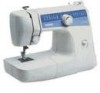
Users Manual - English
Page 2
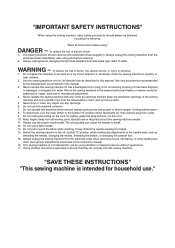
...followed, including the following: "Read all moving parts. Do not allow this machine to break. 12. Do not pull or push the fabric while stitching. Always unplug the sewing machine from the electrical outlet immediately after using and before cleaning. 2. Use only...from the accumulation of the sewing machine and foot controller free from all instructions before changing the light bulb. Do not use the proper needle plate. Use this sewing machine only for examination, repair, electrical or mechanical adjustment. 4. Return the sewing machine to persons: 1. Keep the...
...followed, including the following: "Read all moving parts. Do not allow this machine to break. 12. Do not pull or push the fabric while stitching. Always unplug the sewing machine from the electrical outlet immediately after using and before cleaning. 2. Use only...from the accumulation of the sewing machine and foot controller free from all instructions before changing the light bulb. Do not use the proper needle plate. Use this sewing machine only for examination, repair, electrical or mechanical adjustment. 4. Return the sewing machine to persons: 1. Keep the...
Users Manual - English
Page 39
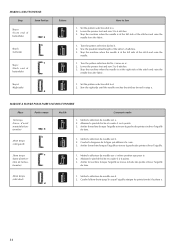
...) 2ème position que pour a). d 1. d 31 Lower the presser foot and sew 5 to a. 2. Stop the machine when the needle is at the left side of the stitches and raise the needle from the fabric. 1. Stop the machine when the needle is at the right side of the stitch and raise the needle. 1. Arrêter la...
...) 2ème position que pour a). d 1. d 31 Lower the presser foot and sew 5 to a. 2. Stop the machine when the needle is at the left side of the stitches and raise the needle from the fabric. 1. Stop the machine when the needle is at the right side of the stitch and raise the needle. 1. Arrêter la...
Users Manual - English
Page 55
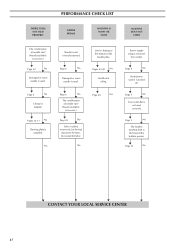
...M Damaged or worn needle is slid toward the bobbin presser. M Page 6 No M Damaged or worn needle is not used . M Page 5 No M Foot controller is used correctly. M Pages 12-17 No M Darning plate is clinging to the bottom of the needle plate. No Lint is installed. M Page 4 ... M Page 12 No M M M M CONTACT YOUR LOCAL SERVICE CENTER 47 PERFORMANCE CHECK LIST FABRIC DOES NOT FEED PROPERLY NEEDLE BREAKS MACHINE IS NOISY OR SLOW MACHINE DOES NOT START The combination of needle size/ thread size/fabric is removed from outlet. M Page 6 No M Thread is tangled.
...M Damaged or worn needle is slid toward the bobbin presser. M Page 6 No M Damaged or worn needle is not used . M Page 5 No M Foot controller is used correctly. M Pages 12-17 No M Darning plate is clinging to the bottom of the needle plate. No Lint is installed. M Page 4 ... M Page 12 No M M M M CONTACT YOUR LOCAL SERVICE CENTER 47 PERFORMANCE CHECK LIST FABRIC DOES NOT FEED PROPERLY NEEDLE BREAKS MACHINE IS NOISY OR SLOW MACHINE DOES NOT START The combination of needle size/ thread size/fabric is removed from outlet. M Page 6 No M Thread is tangled.
Users Manual - English
Page 63
... Bobbin winding 12 Buttonhole 30-31, 33 Buttonhole Fine Adjustment 34 Button Sewing 35 C Cleaning 43-45 Connecting Plugs 4 D Darning 38 Drawing Up Lower Thread 17 E Elastic Stitching 27 Embroidering 40-41 F Feed Dog Cleaning 45 Foot Controller 5 Free-Arm Style 8 G Gathering 37 L Lower Threading 14 M Main Power Switch 5 Monogramming 40-41 N Needle...
... Bobbin winding 12 Buttonhole 30-31, 33 Buttonhole Fine Adjustment 34 Button Sewing 35 C Cleaning 43-45 Connecting Plugs 4 D Darning 38 Drawing Up Lower Thread 17 E Elastic Stitching 27 Embroidering 40-41 F Feed Dog Cleaning 45 Foot Controller 5 Free-Arm Style 8 G Gathering 37 L Lower Threading 14 M Main Power Switch 5 Monogramming 40-41 N Needle...
Quick Setup Guide - English
Page 1
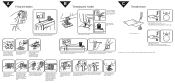
... on the surface of the channel to thread the take-up the left . 6 7 8 ∗If these actions do not correct the problem, please rethread the machine using step A and B. Hold the bobbin case as shown, insert the bobbin with the top opening around the bobbin winder thread guide. 2 3 4 4 Raise ...the dial a higher number. When the bobbin is full, it is too loose. (Locks appear on the reverse side of the thread, depress the foot controller. Guide the thread up lever. While holding the end of the fabric.) Increase the tension by the latch align the finger with the thread...
... on the surface of the channel to thread the take-up the left . 6 7 8 ∗If these actions do not correct the problem, please rethread the machine using step A and B. Hold the bobbin case as shown, insert the bobbin with the top opening around the bobbin winder thread guide. 2 3 4 4 Raise ...the dial a higher number. When the bobbin is full, it is too loose. (Locks appear on the reverse side of the thread, depress the foot controller. Guide the thread up lever. While holding the end of the fabric.) Increase the tension by the latch align the finger with the thread...


