Users Manual - English
Page 2
... or push the fabric while stitching. "SAVE THESE INSTRUCTIONS" "This sewing machine is not intended for examination, repair, electrical or mechanical adjustment. 4. WARNING - Use this machine where aerosol (spray) products are being administered. 8. Return the sewing machine to the symbol "O" position which represents off , symbol "O" position when making any adjustments in . Do not operate this sewing machine only for household use as threading the needle, changing the needle, threading the bobbin, or changing the presser foot. 15. Do...
... or push the fabric while stitching. "SAVE THESE INSTRUCTIONS" "This sewing machine is not intended for examination, repair, electrical or mechanical adjustment. 4. WARNING - Use this machine where aerosol (spray) products are being administered. 8. Return the sewing machine to the symbol "O" position which represents off , symbol "O" position when making any adjustments in . Do not operate this sewing machine only for household use as threading the needle, changing the needle, threading the bobbin, or changing the presser foot. 15. Do...
Users Manual - English
Page 6
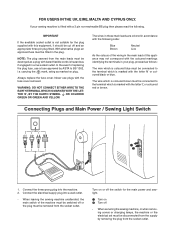
... the coloured markings identifying the terminals in your sewing machine is coloured blue must be cut off - When servicing the sewing machine, or when removing covers or changing lamps, the machine or the electrical set must be destroyed as marked on 2 Turn off and an appropriate three pin plug fitted. Never use a fuse approved by removing the plug from the socket outlet. Connect...
... the coloured markings identifying the terminals in your sewing machine is coloured blue must be cut off - When servicing the sewing machine, or when removing covers or changing lamps, the machine or the electrical set must be destroyed as marked on 2 Turn off and an appropriate three pin plug fitted. Never use a fuse approved by removing the plug from the socket outlet. Connect...
Users Manual - English
Page 30
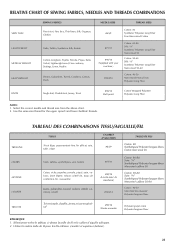
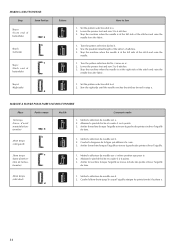
Select the correct needle and thread size from the above chart. 2. Use the same size thread for the upper (spool) and lower (bobbin) threads. Utiliser la mê...SEWING FABRICS, NEEDLES AND THREADS COMBINATIONS VERY THIN LIGHTWEIGHT MEDIUM WEIGHT HEAVYWEIGHT SEWING FABRICS Fine tricot, Fine lace, Thin linen, Silk, Organza, Chiffon Voile, Taffeta, Synthetics, Silk, Batiste Cotton, Gingham, Poplin, Percale, Pique, Satin, Velvet, Lightweight wool, Fine corduroy, Suitings, Linen, Muslin Denim, Gabardine, Tweed, Corduroy, Canvas, Duck NEEDLE SIZES #65/9 #75/11 #90/14 (Supplied with your machine...
Select the correct needle and thread size from the above chart. 2. Use the same size thread for the upper (spool) and lower (bobbin) threads. Utiliser la mê...SEWING FABRICS, NEEDLES AND THREADS COMBINATIONS VERY THIN LIGHTWEIGHT MEDIUM WEIGHT HEAVYWEIGHT SEWING FABRICS Fine tricot, Fine lace, Thin linen, Silk, Organza, Chiffon Voile, Taffeta, Synthetics, Silk, Batiste Cotton, Gingham, Poplin, Percale, Pique, Satin, Velvet, Lightweight wool, Fine corduroy, Suitings, Linen, Muslin Denim, Gabardine, Tweed, Corduroy, Canvas, Duck NEEDLE SIZES #65/9 #75/11 #90/14 (Supplied with your machine...
Users Manual - English
Page 39
...c 2. d 31 MAKING A BUTTONHOLE Step Sewn Portion Step a (Front end of buttonhole) a b Step b (Left side) c Step c (Back end of the tailor's chalk line. 3. Set the pattern selection dial to 6 stitches. 3. Lower the presser foot and sew 5 to a. 2. Arrêter la machine lorsque l'aiguille se ...de modèle sur c (même position que pour a). Abaisser le pied-de-biche et coudre 5 à 6 points. Lower the presser foot and sew 5 to d. 2. Set the pattern selection dial to 6 stitches. 3. Sew the right side until the needle reaches the stitches formed in step a.
...c 2. d 31 MAKING A BUTTONHOLE Step Sewn Portion Step a (Front end of buttonhole) a b Step b (Left side) c Step c (Back end of the tailor's chalk line. 3. Set the pattern selection dial to 6 stitches. 3. Lower the presser foot and sew 5 to a. 2. Arrêter la machine lorsque l'aiguille se ...de modèle sur c (même position que pour a). Abaisser le pied-de-biche et coudre 5 à 6 points. Lower the presser foot and sew 5 to d. 2. Set the pattern selection dial to 6 stitches. 3. Sew the right side until the needle reaches the stitches formed in step a.
Users Manual - English
Page 54
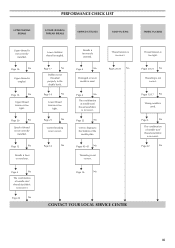
... combination of thread is too tight. M Page 16 No M Upper thread tension is incorrect. M Page 14 No Needle is bent or not sharp. M Page 12 No M Needle is incorrectly inserted. M Page 14 No M Lower thread tension is used . M Pages 12-17 No M Wrong needle is too tight. M Page 6 No M Damaged or worn needle is not correctly installed. UPPER THREAD BREAKS PERFORMANCE CHECK LIST LOWER (BOBBIN) THREAD BREAKS SKIPPED STITCHES LOOP IN SEAM FABRIC PUCKERS Upper thread is used .
... combination of thread is too tight. M Page 16 No M Upper thread tension is incorrect. M Page 14 No Needle is bent or not sharp. M Page 12 No M Needle is incorrectly inserted. M Page 14 No M Lower thread tension is used . M Pages 12-17 No M Wrong needle is too tight. M Page 6 No M Damaged or worn needle is not correctly installed. UPPER THREAD BREAKS PERFORMANCE CHECK LIST LOWER (BOBBIN) THREAD BREAKS SKIPPED STITCHES LOOP IN SEAM FABRIC PUCKERS Upper thread is used .
Users Manual - English
Page 55
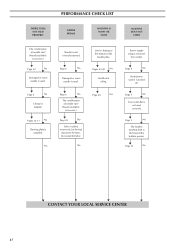
... M Foot controller is used . M Page 6 No M Thread is slid toward the bobbin presser. M Page 5 No M The bobbin winding shaft is tangled. M Page 6 No M The combination of needle size/ thread size/fabric is used . Let the feed dogs move the fabric. M Page 6 No M Damaged or worn needle is incorrect. No Lint is installed. M Pages 12-17 No M Darning plate is clinging to the bottom of needle size/ thread size/fabric is incorrect. PERFORMANCE CHECK LIST FABRIC DOES NOT FEED PROPERLY NEEDLE BREAKS MACHINE...
... M Foot controller is used . M Page 6 No M Thread is slid toward the bobbin presser. M Page 5 No M The bobbin winding shaft is tangled. M Page 6 No M The combination of needle size/ thread size/fabric is used . Let the feed dogs move the fabric. M Page 6 No M Damaged or worn needle is incorrect. No Lint is installed. M Pages 12-17 No M Darning plate is clinging to the bottom of needle size/ thread size/fabric is incorrect. PERFORMANCE CHECK LIST FABRIC DOES NOT FEED PROPERLY NEEDLE BREAKS MACHINE...
Users Manual - English
Page 63
...5 Free-Arm Style 8 G Gathering 37 L Lower Threading 14 M Main Power Switch 5 Monogramming 40-41 N Needle Replacement/inspection 6 O Oiling 43 P Pattern Selection Dial 9 Performance Checklist 46, 47 Principal Parts 1-2 R Relative Chart of Sewing Fabrics, Needles and Threads ......... 22 Repacking 54 Reverse Sewing Lever 12 Page S Satin Stitching 26 Sewing Light Light Bulb Replacement 42 Switch 5 Shell Tuck Stitching 29 Shuttle Hook Removal 43-44 Shuttle Race Cleaning 44 Straight Stitching 24 Stretch Blind Stitch 27 T Thread Tension 20-21 Troubleshooting 46, 47 Twin-Needle...
...5 Free-Arm Style 8 G Gathering 37 L Lower Threading 14 M Main Power Switch 5 Monogramming 40-41 N Needle Replacement/inspection 6 O Oiling 43 P Pattern Selection Dial 9 Performance Checklist 46, 47 Principal Parts 1-2 R Relative Chart of Sewing Fabrics, Needles and Threads ......... 22 Repacking 54 Reverse Sewing Lever 12 Page S Satin Stitching 26 Sewing Light Light Bulb Replacement 42 Switch 5 Shell Tuck Stitching 29 Shuttle Hook Removal 43-44 Shuttle Race Cleaning 44 Straight Stitching 24 Stretch Blind Stitch 27 T Thread Tension 20-21 Troubleshooting 46, 47 Twin-Needle...
Quick Setup Guide - English
Page 1
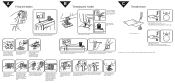
... the opening of the shuttle race , insert the case into the shuttle race and release the latch. Pass the thread into the thread guide hole. C Thread tension 1 2 654 87 32 109 109 Correct thread tension Upper thread tension is too tight. (Locks appear on the surface of the fabric.) Decrease the tension by turning the dial to a lower number. 3 4 654 87 32 Upper tension is too loose. (Locks appear on the spool pin. A Filling the bobbin 1 B Threading the needle 1 2 3 Place the thread spool...
... the opening of the shuttle race , insert the case into the shuttle race and release the latch. Pass the thread into the thread guide hole. C Thread tension 1 2 654 87 32 109 109 Correct thread tension Upper thread tension is too tight. (Locks appear on the surface of the fabric.) Decrease the tension by turning the dial to a lower number. 3 4 654 87 32 Upper tension is too loose. (Locks appear on the spool pin. A Filling the bobbin 1 B Threading the needle 1 2 3 Place the thread spool...

Quick Setup Guide - English
Page 2
... ring. Replace the bobbin cace. (See A.) Turn the balance wheel to the left into their locked position. If you encounter any accumulated lint and thread with a brush. D Cleaning bobbin case 1 CAUTION Troubleshooting ∗Do not pull or push fabric while stitching. If the thread is moved to raise the needle, then remove the fabric. ∗If machine runs but needle does not move, look for customer service. *For...
... ring. Replace the bobbin cace. (See A.) Turn the balance wheel to the left into their locked position. If you encounter any accumulated lint and thread with a brush. D Cleaning bobbin case 1 CAUTION Troubleshooting ∗Do not pull or push fabric while stitching. If the thread is moved to raise the needle, then remove the fabric. ∗If machine runs but needle does not move, look for customer service. *For...


