Users Manual - English
Page 2
...intended use a bent needle. 13. Do not pull or push the fabric while stitching. Always unplug the sewing machine from the electrical outlet immediately after using and before cleaning. 2. Always unplug this sewing machine from the electrical outlet when removing covers, lubricating, or when making any object into ... Use this manual. Keep the ventilation openings of burns, fire, electric shock, or injury to break. 14. Replace bulb with this sewing machine if it has a damaged cord or plug, if it has been dropped or damaged, or dropped into any of electric shock: 1. Never...
...intended use a bent needle. 13. Do not pull or push the fabric while stitching. Always unplug the sewing machine from the electrical outlet immediately after using and before cleaning. 2. Always unplug this sewing machine from the electrical outlet when removing covers, lubricating, or when making any object into ... Use this manual. Keep the ventilation openings of burns, fire, electric shock, or injury to break. 14. Replace bulb with this sewing machine if it has a damaged cord or plug, if it has been dropped or damaged, or dropped into any of electric shock: 1. Never...
Users Manual - English
Page 6
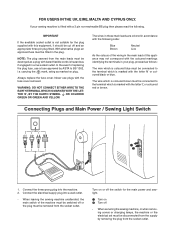
... THE EARTH TERMINAL WHICH IS MARKED WITH THE LETTER 'E', BY THE EARTH SYMBOL OR COLORED GREEN OR GREEN AND YELLOW. When leaving the sewing machine unattended, the main switch of this equipment, it should be removed from the socket outlet. carrying the ASA mark, rating as follows:... fitted with the letter 'N' or coloured black or blue. Always replace the fuse cover. When servicing the sewing machine, or when removing covers or changing lamps, the machine or the electrical set must be fitted in a live socket outlet. IMPORTANT If the available socket outlet is marked with a 3...
... THE EARTH TERMINAL WHICH IS MARKED WITH THE LETTER 'E', BY THE EARTH SYMBOL OR COLORED GREEN OR GREEN AND YELLOW. When leaving the sewing machine unattended, the main switch of this equipment, it should be removed from the socket outlet. carrying the ASA mark, rating as follows:... fitted with the letter 'N' or coloured black or blue. Always replace the fuse cover. When servicing the sewing machine, or when removing covers or changing lamps, the machine or the electrical set must be fitted in a live socket outlet. IMPORTANT If the available socket outlet is marked with a 3...
Users Manual - English
Page 30
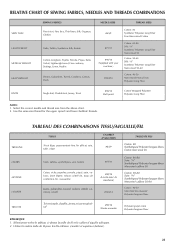
...confection, lin, mousseline Jeans, gabardine, tweed, velours côtelé, canevas, coutil #75/11 #90/14 (Livrés avec la machine) #100/16 Coton: 60-80 Soie: "A" Synthétiques/ Polyester longues fibres Mercerisé calibre 50 Coton: 50-60 Soie: ...SEWING FABRICS Fine tricot, Fine lace, Thin linen, Silk, Organza, Chiffon Voile, Taffeta, Synthetics, Silk, Batiste Cotton, Gingham, Poplin, Percale, Pique, Satin, Velvet, Lightweight wool, Fine corduroy, Suitings, Linen, Muslin Denim, Gabardine, Tweed, Corduroy, Canvas, Duck NEEDLE SIZES #65/9 #75/11 #90/14 (Supplied with your machine...
...confection, lin, mousseline Jeans, gabardine, tweed, velours côtelé, canevas, coutil #75/11 #90/14 (Livrés avec la machine) #100/16 Coton: 60-80 Soie: "A" Synthétiques/ Polyester longues fibres Mercerisé calibre 50 Coton: 50-60 Soie: ...SEWING FABRICS Fine tricot, Fine lace, Thin linen, Silk, Organza, Chiffon Voile, Taffeta, Synthetics, Silk, Batiste Cotton, Gingham, Poplin, Percale, Pique, Satin, Velvet, Lightweight wool, Fine corduroy, Suitings, Linen, Muslin Denim, Gabardine, Tweed, Corduroy, Canvas, Duck NEEDLE SIZES #65/9 #75/11 #90/14 (Supplied with your machine...
Users Manual - English
Page 39
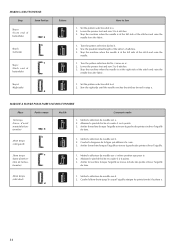
... de modèle sur a. 2. Abaisser le pied-de-biche et coudre 5 à 6 points. a 3. Stop the machine when the needle is at the left side of the stitch and raise the needle from the fabric. 1. Abaisser le pied-de-biche et coudre 5 ou 6 points. 3. Mettre le sé...;le sur b. 2. c 2. Lower the presser foot and sew 5 to a. 2. Set the pattern selection dial to 6 stitches. 3. Turn the pattern selection dial to 6 stitches. 3. Lower the presser foot and sew 5 to b. 2. Sew the right side until the needle reaches the stitches formed in step a. Turn the pattern selection dial to d. ...
... de modèle sur a. 2. Abaisser le pied-de-biche et coudre 5 à 6 points. a 3. Stop the machine when the needle is at the left side of the stitch and raise the needle from the fabric. 1. Abaisser le pied-de-biche et coudre 5 ou 6 points. 3. Mettre le sé...;le sur b. 2. c 2. Lower the presser foot and sew 5 to a. 2. Set the pattern selection dial to 6 stitches. 3. Turn the pattern selection dial to 6 stitches. 3. Lower the presser foot and sew 5 to b. 2. Sew the right side until the needle reaches the stitches formed in step a. Turn the pattern selection dial to d. ...

Quick Setup Guide - English
Page 2
... to the left into their locked position. If the thread is moved to raise the needle, then remove the fabric. ∗If machine runs but needle does not move, look for customer service. *For the address of the hook, match the hook position opposite the ... ring. D Cleaning bobbin case 1 CAUTION Troubleshooting ∗Do not pull or push fabric while stitching. TO REPACK: FOLLOW DIAGRAM BELOW =REPACKING= 1 2 3 4 5 6 XA8545-021 PRINTED IN CHINA Push the latch levers into the sewing position. ***READ ME FIRST*** Should you still need assistance, call 1-800-284-4357. *KEEP...
... to the left into their locked position. If the thread is moved to raise the needle, then remove the fabric. ∗If machine runs but needle does not move, look for customer service. *For the address of the hook, match the hook position opposite the ... ring. D Cleaning bobbin case 1 CAUTION Troubleshooting ∗Do not pull or push fabric while stitching. TO REPACK: FOLLOW DIAGRAM BELOW =REPACKING= 1 2 3 4 5 6 XA8545-021 PRINTED IN CHINA Push the latch levers into the sewing position. ***READ ME FIRST*** Should you still need assistance, call 1-800-284-4357. *KEEP...


