
Basic Users Guide - English
Page 13
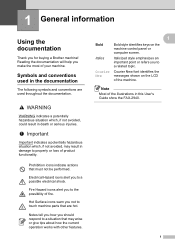
... if not avoided, could result in this User's Guide show the FAX-2940. 1 Notes tell you how you not to touch machine parts that are used in damage to a possible electrical shock. Courier New font identifies the messages shown on the machine control panel or computer ...screen. Reading the documentation will help you for buying a Brother machine! Italics Courier New Italicized style emphasizes an important point or refers you to property or loss of your machine. WARNING WARNING indicates ...
... if not avoided, could result in this User's Guide show the FAX-2940. 1 Notes tell you how you not to touch machine parts that are used in damage to a possible electrical shock. Courier New font identifies the messages shown on the machine control panel or computer ...screen. Reading the documentation will help you for buying a Brother machine! Italics Courier New Italicized style emphasizes an important point or refers you to property or loss of your machine. WARNING WARNING indicates ...
Basic Users Guide - English
Page 33
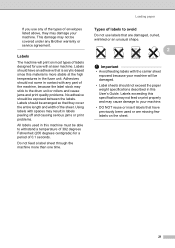
...adhesive that are missing few labels on most types of 0.1 seconds. Types of the sheet. Labels should not come in contact with any Brother warranty or service agreement. Labels exceeding this User's Guide. Do not feed a label sheet through the machine more stable at the high ... be able to avoid 2 Do not use with the carrier sheet exposed because your machine. Labels 2 The machine will be covered under any part of envelopes listed above, they cover the entire length and width of labels to withstand a temperature of 392 degrees Fahrenheit (200 degrees centigrade)...
...adhesive that are missing few labels on most types of 0.1 seconds. Types of the sheet. Labels should not come in contact with any Brother warranty or service agreement. Labels exceeding this User's Guide. Do not feed a label sheet through the machine more stable at the high ... be able to avoid 2 Do not use with the carrier sheet exposed because your machine. Labels 2 The machine will be covered under any part of envelopes listed above, they cover the entire length and width of labels to withstand a temperature of 392 degrees Fahrenheit (200 degrees centigrade)...
Basic Users Guide - English
Page 66
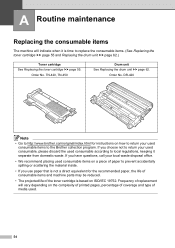
... replacement will indicate when it separate from domestic waste. DR-420 Note • Go to http://www.brother.com/original/index.html for the recommended paper, the life of consumable items and machine parts may be reduced. • The projected life of the toner cartridge is based on ISO/IEC 19752. If... you have questions, call your local waste disposal office. • We recommend placing used consumable items on a piece of media used consumable items to the Brother collection program. TN-420, TN-450 Drum unit See Replacing the drum unit uu page 62.
... replacement will indicate when it separate from domestic waste. DR-420 Note • Go to http://www.brother.com/original/index.html for the recommended paper, the life of consumable items and machine parts may be reduced. • The projected life of the toner cartridge is based on ISO/IEC 19752. If... you have questions, call your local waste disposal office. • We recommend placing used consumable items on a piece of media used consumable items to the Brother collection program. TN-420, TN-450 Drum unit See Replacing the drum unit uu page 62.
Basic Users Guide - English
Page 68
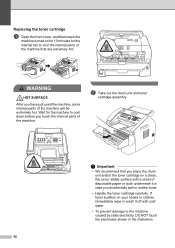
... scatters on a clean, flat, level, stable surface with cold water. • To prevent damage to cool down before you touch the internal parts of disposable paper or cloth underneath it in the illustration. 56 WARNING HOT SURFACE After you accidentally spill or scatter toner. • Handle ...the toner cartridge carefully. Wait for the internal fan to cool the internal parts of the machine will be extremely hot. b Take out the drum unit and toner cartridge assembly. Important • We recommend...
... scatters on a clean, flat, level, stable surface with cold water. • To prevent damage to cool down before you touch the internal parts of disposable paper or cloth underneath it in the illustration. 56 WARNING HOT SURFACE After you accidentally spill or scatter toner. • Handle ...the toner cartridge carefully. Wait for the internal fan to cool the internal parts of the machine will be extremely hot. b Take out the drum unit and toner cartridge assembly. Important • We recommend...
Basic Users Guide - English
Page 70
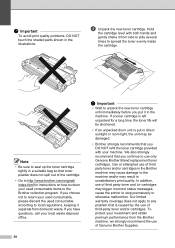
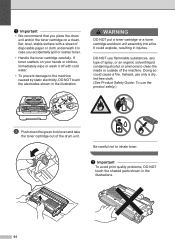
Important To avoid print quality problems, DO NOT touch the shaded parts shown in a suitable bag so that toner powder does not spill...items to use of third party toner and/or cartridges in the machine. Use or attempted use of Genuine Brother Supplies. To protect your investment and obtain premium performance from domestic waste. Note • Be sure to the...up the toner cartridge tightly in the illustrations. We also strongly recommend that is put it in the Brother machine may trigger incorrect status messages, cause the printer to local regulations, keeping it from side to ...
Important To avoid print quality problems, DO NOT touch the shaded parts shown in a suitable bag so that toner powder does not spill...items to use of third party toner and/or cartridges in the machine. Use or attempted use of Genuine Brother Supplies. To protect your investment and obtain premium performance from domestic waste. Note • Be sure to the...up the toner cartridge tightly in the illustrations. We also strongly recommend that is put it in the Brother machine may trigger incorrect status messages, cause the printer to local regulations, keeping it from side to ...
Basic Users Guide - English
Page 71
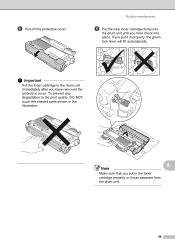
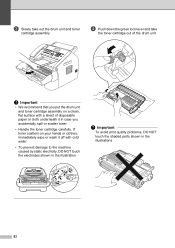
If you put it in the toner cartridge properly or it lock into the drum unit until you have removed the protective cover. To prevent any degradation to the print quality, DO NOT touch the shaded parts shown in the drum unit immediately after you hear it may separate from the drum unit. 59 A Note Make sure that you put in properly, the green lock lever will lift automatically. Important Put the toner cartridge in the illustration. Routine maintenance f Put the new toner cartridge firmly into place. e Pull off the protective cover.
If you put it in the toner cartridge properly or it lock into the drum unit until you have removed the protective cover. To prevent any degradation to the print quality, DO NOT touch the shaded parts shown in the drum unit immediately after you hear it may separate from the drum unit. 59 A Note Make sure that you put in properly, the green lock lever will lift automatically. Important Put the toner cartridge in the illustration. Routine maintenance f Put the new toner cartridge firmly into place. e Pull off the protective cover.
Basic Users Guide - English
Page 72
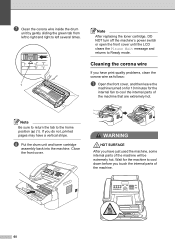
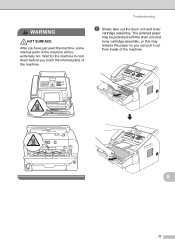
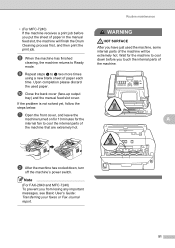
... unit and toner cartridge assembly back into the machine. WARNING HOT SURFACE After you do not, printed pages may have just used the machine, some internal parts of the machine will be extremely hot. Wait for the machine to cool down before you have print quality problems, clean the corona wire as... follows: a Open the front cover, and then leave the machine turned on for 10 minutes for the internal fan to cool the internal parts of the machine. 60 Close the front cover. g Clean the corona wire inside the drum unit by gently sliding the green tab from...
... unit and toner cartridge assembly back into the machine. WARNING HOT SURFACE After you do not, printed pages may have just used the machine, some internal parts of the machine will be extremely hot. Wait for the machine to cool down before you have print quality problems, clean the corona wire as... follows: a Open the front cover, and then leave the machine turned on for 10 minutes for the internal fan to cool the internal parts of the machine. 60 Close the front cover. g Clean the corona wire inside the drum unit by gently sliding the green tab from...
Basic Users Guide - English
Page 75
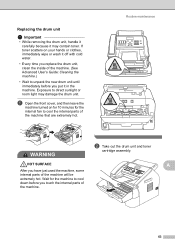
...sunlight or room light may contain toner. Exposure to cool down before you put it in the machine. HOT SURFACE A After you touch the internal parts of the machine that are extremely hot. Routine maintenance WARNING b Take out the drum unit and toner cartridge assembly. a Open the front cover,...hands or clothes, immediately wipe or wash it may damage the drum unit. Wait for the internal fan to unpack the new drum unit until immediately before you have just used the machine, some internal parts of the machine. (See Advanced User's Guide: Cleaning the machine.) • Wait to ...
...sunlight or room light may contain toner. Exposure to cool down before you put it in the machine. HOT SURFACE A After you touch the internal parts of the machine that are extremely hot. Routine maintenance WARNING b Take out the drum unit and toner cartridge assembly. a Open the front cover,...hands or clothes, immediately wipe or wash it may damage the drum unit. Wait for the internal fan to unpack the new drum unit until immediately before you have just used the machine, some internal parts of the machine. (See Advanced User's Guide: Cleaning the machine.) • Wait to ...
Basic Users Guide - English
Page 76
... the machine caused by static electricity, DO NOT touch the electrodes shown in injuries. Important To avoid print quality problems, DO NOT touch the shaded parts shown in case you place the drum unit and/or the toner cartridge on a clean, flat, level, stable surface with cold water. • To prevent...
... the machine caused by static electricity, DO NOT touch the electrodes shown in injuries. Important To avoid print quality problems, DO NOT touch the shaded parts shown in case you place the drum unit and/or the toner cartridge on a clean, flat, level, stable surface with cold water. • To prevent...
Basic Users Guide - English
Page 79
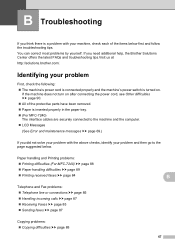
... LCD Messages (See Error and maintenance messages uu page 69.) If you need additional help, the Brother Solutions Center offers the latest FAQs and troubleshooting tips.Visit us at http://solutions.brother.com/. If the machine does not turn on . You can correct most problems by yourself. Identifying your ...the machine's power switch is turned on after connecting the power cord, see Other difficulties uu page 90. All of the protective parts have been removed. Paper is a problem with the above checks, identify your machine, check each of the items below .
... LCD Messages (See Error and maintenance messages uu page 69.) If you need additional help, the Brother Solutions Center offers the latest FAQs and troubleshooting tips.Visit us at http://solutions.brother.com/. If the machine does not turn on . You can correct most problems by yourself. Identifying your ...the machine's power switch is turned on after connecting the power cord, see Other difficulties uu page 90. All of the protective parts have been removed. Paper is a problem with the above checks, identify your machine, check each of the items below .

Basic Users Guide - English
Page 88
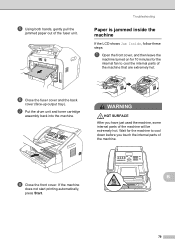
... jam occurred behind the back cover. Follow these steps: a Open the front cover, and then leave the machine turned on for 10 minutes for the internal fan to remove the paper more easily. b Use both hands to fit the paper size. Make sure that are firmly in the slots. (See Loading.... d Put the paper tray firmly back in the standard paper tray uu page 9.) 1 Note Pulling out the jammed paper downwards allows you to cool the internal parts of the paper tray. While pressing the green paper-guide release lever, slide the paper guides to slowly pull out the jammed paper. Paper is...
... jam occurred behind the back cover. Follow these steps: a Open the front cover, and then leave the machine turned on for 10 minutes for the internal fan to remove the paper more easily. b Use both hands to fit the paper size. Make sure that are firmly in the slots. (See Loading.... d Put the paper tray firmly back in the standard paper tray uu page 9.) 1 Note Pulling out the jammed paper downwards allows you to cool the internal parts of the paper tray. While pressing the green paper-guide release lever, slide the paper guides to slowly pull out the jammed paper. Paper is...
Basic Users Guide - English
Page 89
WARNING HOT SURFACE After you have just used the machine, some internal parts of the machine. B 77 The jammed paper may be pulled out with the drum unit and toner cartridge assembly, or this may release the paper so you touch the internal parts of the machine. Wait for the machine to cool down before you can pull it out from inside of the machine will be extremely hot. Troubleshooting b Slowly take out the drum unit and toner cartridge assembly.
WARNING HOT SURFACE After you have just used the machine, some internal parts of the machine. B 77 The jammed paper may be pulled out with the drum unit and toner cartridge assembly, or this may release the paper so you touch the internal parts of the machine. Wait for the machine to cool down before you can pull it out from inside of the machine will be extremely hot. Troubleshooting b Slowly take out the drum unit and toner cartridge assembly.
Basic Users Guide - English
Page 91
... to cool down before you have just used the machine, some internal parts of the fuser unit. WARNING HOT SURFACE After you touch the internal parts of the machine that are extremely hot. B h Close the front cover. e Using both hands, gently pull the jammed paper out of the machine ... Inside, follow these steps: a Open the front cover, and then leave the machine turned on for 10 minutes for the machine to cool the internal parts of the machine. If the machine does not start printing automatically, press Start. 79 g Put the drum unit and toner cartridge assembly back into ...
... to cool down before you have just used the machine, some internal parts of the fuser unit. WARNING HOT SURFACE After you touch the internal parts of the machine that are extremely hot. B h Close the front cover. e Using both hands, gently pull the jammed paper out of the machine ... Inside, follow these steps: a Open the front cover, and then leave the machine turned on for 10 minutes for the machine to cool the internal parts of the machine. If the machine does not start printing automatically, press Start. 79 g Put the drum unit and toner cartridge assembly back into ...

Basic Users Guide - English
Page 93
Clear the jammed paper if there is any inside the drum unit. B 81 • To prevent damage to the machine from static electricity, DO NOT touch the electrodes shown in the illustrations. Troubleshooting Important To avoid print quality problems, DO NOT touch the shaded parts shown in the illustration. c Push down the green lock lever and take the toner cartridge out of the drum unit.
Clear the jammed paper if there is any inside the drum unit. B 81 • To prevent damage to the machine from static electricity, DO NOT touch the electrodes shown in the illustrations. Troubleshooting Important To avoid print quality problems, DO NOT touch the shaded parts shown in the illustration. c Push down the green lock lever and take the toner cartridge out of the drum unit.
Advanced Users Guide - English
Page 6
... the drum unit 49 Cleaning the paper pick-up rollers 54 Checking the machine 56 Checking the Page Counters 56 Checking the remaining life of parts 56 Packing and shipping the machine 56 B Glossary 59 C Index 63 v
... the drum unit 49 Cleaning the paper pick-up rollers 54 Checking the machine 56 Checking the Page Counters 56 Checking the remaining life of parts 56 Packing and shipping the machine 56 B Glossary 59 C Index 63 v

Advanced Users Guide - English
Page 54
Cleaning the corona wire A If you have just used the machine, some internal parts of the machine. Important • We recommend that are extremely hot. Wait for the internal fan to cool down before you accidentally spill or scatter toner. • Handle the toner cartridge carefully. If toner ...scatters on for 10 minutes for the machine to cool the internal parts of disposable paper or cloth underneath it off with a sheet of the machine that you place the drum unit and toner cartridge assembly ...
Cleaning the corona wire A If you have just used the machine, some internal parts of the machine. Important • We recommend that are extremely hot. Wait for the internal fan to cool down before you accidentally spill or scatter toner. • Handle the toner cartridge carefully. If toner ...scatters on for 10 minutes for the machine to cool the internal parts of disposable paper or cloth underneath it off with a sheet of the machine that you place the drum unit and toner cartridge assembly ...
Advanced Users Guide - English
Page 57
i Repeat steps e to cool down , turn off the machine's power switch. Routine maintenance WARNING HOT SURFACE After you touch the internal parts of the machine. If the problem is not solved yet, follow the steps below: a Open the front cover, and leave the machine turned on for ...'s Guide: Transferring your faxes or Fax Journal report. 51 Note (For FAX-2840 and MFC-7240) To prevent you put the sheet of paper each time. h When the machine has finished cleaning, the machine returns to cool the internal parts of the machine will finish the Drum Cleaning process first, and then print...
i Repeat steps e to cool down , turn off the machine's power switch. Routine maintenance WARNING HOT SURFACE After you touch the internal parts of the machine. If the problem is not solved yet, follow the steps below: a Open the front cover, and leave the machine turned on for ...'s Guide: Transferring your faxes or Fax Journal report. 51 Note (For FAX-2840 and MFC-7240) To prevent you put the sheet of paper each time. h When the machine has finished cleaning, the machine returns to cool the internal parts of the machine will finish the Drum Cleaning process first, and then print...
Advanced Users Guide - English
Page 58
Important To avoid print quality problems, DO NOT touch the shaded parts shown in the illustration. c Slowly take the toner cartridge out of disposable paper or cloth underneath it off with a sheet of the drum unit. If ...
Important To avoid print quality problems, DO NOT touch the shaded parts shown in the illustration. c Slowly take the toner cartridge out of disposable paper or cloth underneath it off with a sheet of the drum unit. If ...
Advanced Users Guide - English
Page 62
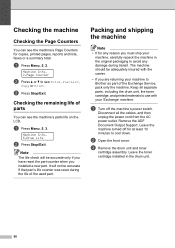
... Output Support. Machine Info. 2.Page Counter b Press a or b to see the machine's parts life on the LCD. Note The life check will not be adequately insured with your machine to Brother as part of parts A You can see the machine's Page Counters for at least 10 minutes to cool down.... Leave the machine turned off the machine's power switch. c Press Stop/Exit. The machine should be accurate if that part's life counter was reset during ...
... Output Support. Machine Info. 2.Page Counter b Press a or b to see the machine's parts life on the LCD. Note The life check will not be adequately insured with your machine to Brother as part of parts A You can see the machine's Page Counters for at least 10 minutes to cool down.... Leave the machine turned off the machine's power switch. c Press Stop/Exit. The machine should be accurate if that part's life counter was reset during ...
Advanced Users Guide - English
Page 70
...38 Printing See Software User's Guide. Reports 37, 38 Fax Journal 37, 38 Maintenance, routine 46 checking the remaining life of parts 56 page counts 56 Macintosh See Software User's Guide. Polling polled transmit 20 polling receive 29 Power failure 1 Presto! PageManager ...31 J Jacks convert to RJ11 jack triplex adapter 32, 33 L LCD (liquid crystal display) contrast 6 M Machine information checking remaining life of parts ......56 Manual transmission 15 Memory storage 1 Memory Security 10 N N in 1 (page layout 44 Nuance™ PaperPort™ 12SE See Software User...
...38 Printing See Software User's Guide. Reports 37, 38 Fax Journal 37, 38 Maintenance, routine 46 checking the remaining life of parts 56 page counts 56 Macintosh See Software User's Guide. Polling polled transmit 20 polling receive 29 Power failure 1 Presto! PageManager ...31 J Jacks convert to RJ11 jack triplex adapter 32, 33 L LCD (liquid crystal display) contrast 6 M Machine information checking remaining life of parts ......56 Manual transmission 15 Memory storage 1 Memory Security 10 N N in 1 (page layout 44 Nuance™ PaperPort™ 12SE See Software User...

