Users Manual - English
Page 2
... Tension of the Bobbin Thread ...13 TROUBLESHOOTING...14 1 For specific details on operating the machine, refer to the Operation Manual provided with your machine. The images and patterns used in this manual are for illustration purposes and may differ from the actual items. This is a kit used for sewing bobbin work. CONTENTS...
... Tension of the Bobbin Thread ...13 TROUBLESHOOTING...14 1 For specific details on operating the machine, refer to the Operation Manual provided with your machine. The images and patterns used in this manual are for illustration purposes and may differ from the actual items. This is a kit used for sewing bobbin work. CONTENTS...

Users Manual - English
Page 3
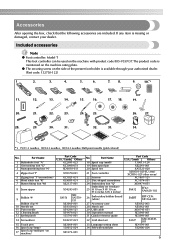
... or region where this kit. Bobbin case (gray) (XE8298-001) Bobbin cover with tabs (*See Note.) Screwdriver (small) (X55468-051) CD-ROM (Contains the Operation Manual and the Templates for freemotion sewing.) (USA/CANADA: XE9382-001, Other areas: XE9501-001) Note • Two bobbin covers may be installed on the machine...
... or region where this kit. Bobbin case (gray) (XE8298-001) Bobbin cover with tabs (*See Note.) Screwdriver (small) (X55468-051) CD-ROM (Contains the Operation Manual and the Templates for freemotion sewing.) (USA/CANADA: XE9382-001, Other areas: XE9501-001) Note • Two bobbin covers may be installed on the machine...
Users Manual - English
Page 8
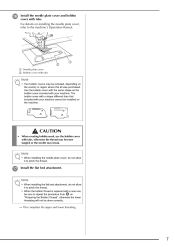
... may break. a Needle plate cover b Bobbin cover with tabs. Note • When installing the flat bed attachment, do not allow it to the machine's Operation Manual. For details on the machine. Note • When installing the needle plate cover, do not allow it to repeat the procedure from a on "Preparing the...
... may break. a Needle plate cover b Bobbin cover with tabs. Note • When installing the flat bed attachment, do not allow it to the machine's Operation Manual. For details on the machine. Note • When installing the needle plate cover, do not allow it to repeat the procedure from a on "Preparing the...

Users Manual - English
Page 10
...become tangled or the needle may result. Select a stitch. We recommend selecting a simple stitch and sewing trial stitches to the machine's Operation Manual. Note • Do not sew reinforcement/reverse stitches at the rear of the machine. i j Turn on the fabric, bunched stitches ...may break. For details on adjusting the stitch length and stitch width, refer to the machine's Operation Manual. • Depending on the machine. o If your machine is started with the automatic thread cutting function and automatic reinforcement/reverse stitching ...
...become tangled or the needle may result. Select a stitch. We recommend selecting a simple stitch and sewing trial stitches to the machine's Operation Manual. Note • Do not sew reinforcement/reverse stitches at the rear of the machine. i j Turn on the fabric, bunched stitches ...may break. For details on adjusting the stitch length and stitch width, refer to the machine's Operation Manual. • Depending on the machine. o If your machine is started with the automatic thread cutting function and automatic reinforcement/reverse stitching ...
Users Manual - English
Page 12
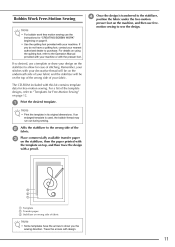
... using the quilting foot, refer to the wrong side of the fabric. The CD-ROM included with design. 11 b c Affix the stabilizer to the Operation Manual provided with your machine or with a pencil. a Template b Transfer paper c Stabilizer on page 12. Trace the arrows with this kit contains template data for ease...
... using the quilting foot, refer to the wrong side of the fabric. The CD-ROM included with design. 11 b c Affix the stabilizer to the Operation Manual provided with your machine or with a pencil. a Template b Transfer paper c Stabilizer on page 12. Trace the arrows with this kit contains template data for ease...
Users Manual - English
Page 14
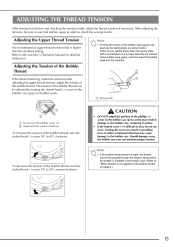
... slotted-head (-) screw on the bobbin case (gray) as shown below. Turning the screw too much or providing force in order to the machine's Operation Manual for bobbin work. ADJUSTING THE THREAD TENSION After sewing trial stitches and checking the sewing results, adjust the thread tensions if necessary. a Spring plate CAUTION...
... slotted-head (-) screw on the bobbin case (gray) as shown below. Turning the screw too much or providing force in order to the machine's Operation Manual for bobbin work. ADJUSTING THE THREAD TENSION After sewing trial stitches and checking the sewing results, adjust the thread tensions if necessary. a Spring plate CAUTION...
Operation Manual
Page 1
Computerized Embroidery and Sewing Machine Operation Manual Product Code 885-V35/V37 GETTING READY SEWING BASICS UTILITY STITCHES EMBROIDERY APPENDIX Please visit us at http://solutions.brother.com where you can get product support and answers to frequently asked questions (FAQs).
Computerized Embroidery and Sewing Machine Operation Manual Product Code 885-V35/V37 GETTING READY SEWING BASICS UTILITY STITCHES EMBROIDERY APPENDIX Please visit us at http://solutions.brother.com where you can get product support and answers to frequently asked questions (FAQs).
Operation Manual
Page 3
...blocked. Important Safety Instructions Please read the "Important Safety Instructions", and then study this manual for examination, repair, electrical or mechanical adjustment. • While the machine is cut. 3 Never operate this manual, or if you notice anything unusual, such as an odor, heat, discoloration or ...when removing covers, lubricating, or when making any sudden or careless movements, otherwise you may damage the machine or result in the instruction manual. • To unplug the machine, switch the machine to the symbol "O" position to turn it off, then grasp the plug ...
...blocked. Important Safety Instructions Please read the "Important Safety Instructions", and then study this manual for examination, repair, electrical or mechanical adjustment. • While the machine is cut. 3 Never operate this manual, or if you notice anything unusual, such as an odor, heat, discoloration or ...when removing covers, lubricating, or when making any sudden or careless movements, otherwise you may damage the machine or result in the instruction manual. • To unplug the machine, switch the machine to the symbol "O" position to turn it off, then grasp the plug ...
Operation Manual
Page 4
...an unstable surface, such as an unsteady or slanted table, otherwise the sewing machine may fall, resulting in this manual. If the problem persists, please consult your local authorized Brother dealer. Do not use outdoors. 7 For a longer service life: • When storing this machine only ...In the event a malfunction occurs or adjustment is required, first follow the troubleshooting table in the manual. For additional product information and updates, visit our web site at www.brother.com 2 Never allow children to play with this sewing machine was supplied in should never be ...
...an unstable surface, such as an unsteady or slanted table, otherwise the sewing machine may fall, resulting in this manual. If the problem persists, please consult your local authorized Brother dealer. Do not use outdoors. 7 For a longer service life: • When storing this machine only ...In the event a malfunction occurs or adjustment is required, first follow the troubleshooting table in the manual. For additional product information and updates, visit our web site at www.brother.com 2 Never allow children to play with this sewing machine was supplied in should never be ...
Operation Manual
Page 11
... SA432 EF62: XA6628-102 26 Embroidery bobbin thread (white) SAEBT EBT-CEN: X81164-001 27 Accessory case 28 Hard case 29 USB cable 30 Operation manual 31 Quick reference guide 32 Grid sheet set 11 Twin needle 12 Cleaning brush 13 Eyelet punch 14 Screwdriver 15 Touch pen 16 Spool cap...
... SA432 EF62: XA6628-102 26 Embroidery bobbin thread (white) SAEBT EBT-CEN: X81164-001 27 Accessory case 28 Hard case 29 USB cable 30 Operation manual 31 Quick reference guide 32 Grid sheet set 11 Twin needle 12 Cleaning brush 13 Eyelet punch 14 Screwdriver 15 Touch pen 16 Spool cap...

Operation Manual
Page 23
... appears. X The initial stitch screen appears again. Memo z For details on the sewing machine. c a b cd After you return to the corresponding page in this Operation Manual. Turn on each topic, refer to the previous page. Checking machine operating Press (Next page key) to switch to the item 1 selection screen. Simple explanations...
... appears. X The initial stitch screen appears again. Memo z For details on the sewing machine. c a b cd After you return to the corresponding page in this Operation Manual. Turn on each topic, refer to the previous page. Checking machine operating Press (Next page key) to switch to the item 1 selection screen. Simple explanations...

Operation Manual
Page 33
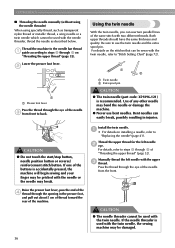
... may become tangled around the spool pin or the needle may break. ● Three spool cap sizes are available, allowing you to "Threading the needle manually (without using special thread such as transparent nylon thread or metallic thread, the needle threader cannot be used . If the upper threading is described below.
... may become tangled around the spool pin or the needle may break. ● Three spool cap sizes are available, allowing you to "Threading the needle manually (without using special thread such as transparent nylon thread or metallic thread, the needle threader cannot be used . If the upper threading is described below.
Operation Manual
Page 38
...-121) is accidentally pressed, the machine will begin sewing and your finger may be damaged. 36 GETTING READY ■ Threading the needle manually (without using the needle threader) When using specialty thread, such as described below. Using the twin needle With the twin needle, you ...; For details on "Threading the upper thread" (page 32). Raise the presser foot lever, pass the end of the needle c from the front. Manually thread the left needle b eye. CAUTION ● The needle threader cannot be pricked with the upper c thread. Be sure to "Replacing the needle...
...-121) is accidentally pressed, the machine will begin sewing and your finger may be damaged. 36 GETTING READY ■ Threading the needle manually (without using the needle threader) When using specialty thread, such as described below. Using the twin needle With the twin needle, you ...; For details on "Threading the upper thread" (page 32). Raise the presser foot lever, pass the end of the needle c from the front. Manually thread the left needle b eye. CAUTION ● The needle threader cannot be pricked with the upper c thread. Be sure to "Replacing the needle...

Operation Manual
Page 39
...; For details, refer to "Replacing the Presser Foot" (page 43). Turn on changing the presser foot, refer to steps g through the needle f bar thread guide, manually thread the right needle. Without passing the thread through j of the needle from the front of the spool. CAUTION ● When using the twin needle...
...; For details, refer to "Replacing the Presser Foot" (page 43). Turn on changing the presser foot, refer to steps g through the needle f bar thread guide, manually thread the right needle. Without passing the thread through j of the needle from the front of the spool. CAUTION ● When using the twin needle...

Operation Manual
Page 74
Utility stitches Twin Needle Walking Foot Presser Foot Stitch Name Pattern Application Stitch Width [mm (inch)] Auto Manual 1 J Basic stitching, sewing gathers or pintucks, etc. 0.0 (0) 0.0-7.0 (0-1/4) Stitch Length [mm (inch)] Auto Manual Reverse/ Reinforcement Stitching 2.5 0.2-5.0 Yes (3/32) (1/64-3/16) (J) Reverse No Left Straight stitch 2 J Basic stitching and sewing gathers or pintucks 0.0 (0) 0.0-7.0 (0-1/4) 2.5 0.2-5.0 Yes (3/32) (1/64...
Utility stitches Twin Needle Walking Foot Presser Foot Stitch Name Pattern Application Stitch Width [mm (inch)] Auto Manual 1 J Basic stitching, sewing gathers or pintucks, etc. 0.0 (0) 0.0-7.0 (0-1/4) Stitch Length [mm (inch)] Auto Manual Reverse/ Reinforcement Stitching 2.5 0.2-5.0 Yes (3/32) (1/64-3/16) (J) Reverse No Left Straight stitch 2 J Basic stitching and sewing gathers or pintucks 0.0 (0) 0.0-7.0 (0-1/4) 2.5 0.2-5.0 Yes (3/32) (1/64...

Operation Manual
Page 75
... Blind hem stitch 18 R Blind hem stitching on mediumweight fabrics R Blind hem stitching on stretch fabrics Stitch Width [mm (inch)] Stitch Length [mm (inch)] Auto Manual Auto Manual Reverse/ Reinforcement Stitching 00 3← - →3 2.0 (1/16) 1.0-3.5 (1/16-1/8) No Reinforcement No 00 3← - →3 2.0 (1/16) 1.0-3.5 (1/16-1/8) No Reinforcement No 19 Appliqué stitch J Appliqu...
... Blind hem stitch 18 R Blind hem stitching on mediumweight fabrics R Blind hem stitching on stretch fabrics Stitch Width [mm (inch)] Stitch Length [mm (inch)] Auto Manual Auto Manual Reverse/ Reinforcement Stitching 00 3← - →3 2.0 (1/16) 1.0-3.5 (1/16-1/8) No Reinforcement No 00 3← - →3 2.0 (1/16) 1.0-3.5 (1/16-1/8) No Reinforcement No 19 Appliqué stitch J Appliqu...

Operation Manual
Page 76
UTILITY STITCHES Presser Foot Twin Needle Walking Foot Stitch Name Pattern Application 35 J Decorative stitching Stitch Width [mm (inch)] Auto 4.0 (3/16) Manual 0.0-7.0 (0-1/4) Stitch Length [mm (inch)] Auto Manual Reverse/ Reinforcement Stitching 3.0 (1/8) 2.0-4.0 (1/16-3/16) No Reinforcement No 36 J Decorative stitching 4.0 (3/16) 0.0-7.0 (0-1/4) 2.5 1.0-4.0 Yes (3/32) (1/16-3/16) (J) Reinforcement No 37 J Decorative stitching 5.5 (7/32) 0.0-7.0 (0-1/4) 1.6 1.0-4.0 Yes (1/16) (1/16...
UTILITY STITCHES Presser Foot Twin Needle Walking Foot Stitch Name Pattern Application 35 J Decorative stitching Stitch Width [mm (inch)] Auto 4.0 (3/16) Manual 0.0-7.0 (0-1/4) Stitch Length [mm (inch)] Auto Manual Reverse/ Reinforcement Stitching 3.0 (1/8) 2.0-4.0 (1/16-3/16) No Reinforcement No 36 J Decorative stitching 4.0 (3/16) 0.0-7.0 (0-1/4) 2.5 1.0-4.0 Yes (3/32) (1/16-3/16) (J) Reinforcement No 37 J Decorative stitching 5.5 (7/32) 0.0-7.0 (0-1/4) 1.6 1.0-4.0 Yes (1/16) (1/16...

Operation Manual
Page 77
... Twin Needle Walking Foot Stitch Name Pattern Application 48 A Horizontal buttonholes on thin and mediumweight fabrics Stitch Width [mm (inch)] Stitch Length [mm (inch)] Auto Manual Auto Manual Reverse/ Reinforcement Stitching 5.0 (3/16) 3.0-5.0 (1/8-3/16) 0.5 (1/32) 0.2-1.0 (1/64-1/16) No Automatic reinforcement No 49 A Horizontal buttonholes on areas that are subject to strain 5.0 (3/16) 3.0-5.0 (1/8-3/16...
... Twin Needle Walking Foot Stitch Name Pattern Application 48 A Horizontal buttonholes on thin and mediumweight fabrics Stitch Width [mm (inch)] Stitch Length [mm (inch)] Auto Manual Auto Manual Reverse/ Reinforcement Stitching 5.0 (3/16) 3.0-5.0 (1/8-3/16) 0.5 (1/32) 0.2-1.0 (1/64-1/16) No Automatic reinforcement No 49 A Horizontal buttonholes on areas that are subject to strain 5.0 (3/16) 3.0-5.0 (1/8-3/16...

Operation Manual
Page 80
... "G". Otherwise, injuries may occur if (Start/stop button) is explained according to the presser foot that fray easily Stitch Width [mm (inch)] Auto Manual Stitch Length [mm (inch)] Auto Manual Presser Foot 3.5 2.0 (1/8) (1/16) 2.5-5.0 (3/32-3/16) 1.0-4.0 (1/16-3/16) G 5.0 2.5 (3/16) (3/32) 3.5-5.0 (1/8-3/16) CAUTION ● Be sure to turn off the main power before replacing...
... "G". Otherwise, injuries may occur if (Start/stop button) is explained according to the presser foot that fray easily Stitch Width [mm (inch)] Auto Manual Stitch Length [mm (inch)] Auto Manual Presser Foot 3.5 2.0 (1/8) (1/16) 2.5-5.0 (3/32-3/16) 1.0-4.0 (1/16-3/16) G 5.0 2.5 (3/16) (3/32) 3.5-5.0 (1/8-3/16) CAUTION ● Be sure to turn off the main power before replacing...

Operation Manual
Page 81
... "J". a • For details on replacing the presser foot, refer to "Selecting stitching" a (page 51). Stitch Name Pattern Application Stitch Width [mm (inch)] Auto Manual Stitch Length [mm (inch)] Auto Manual Presser Foot Zigzag stitch (center 7 needle position) Zigzag stitch 8 (right needle position) Preventing fraying (center baseline/reverse stitching) 3.5 (1/8) Preventing fraying (right baseline...
... "J". a • For details on replacing the presser foot, refer to "Selecting stitching" a (page 51). Stitch Name Pattern Application Stitch Width [mm (inch)] Auto Manual Stitch Length [mm (inch)] Auto Manual Presser Foot Zigzag stitch (center 7 needle position) Zigzag stitch 8 (right needle position) Preventing fraying (center baseline/reverse stitching) 3.5 (1/8) Preventing fraying (right baseline...


