Users Manual - English
Page 11
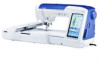
otherwise it is difficult to pull up the bobbin thread, use a ribbon embroidery needle to pull the thread up to the wrong side of the fabric. In addition the threads may become tangled or the needle may break possibly causing machine damage. a Wrong side of fabric b Bobbin thread Note • If it will...
otherwise it is difficult to pull up the bobbin thread, use a ribbon embroidery needle to pull the thread up to the wrong side of the fabric. In addition the threads may become tangled or the needle may break possibly causing machine damage. a Wrong side of fabric b Bobbin thread Note • If it will...
KIT 2 USER - English
Page 3
... It is added to find new color schemes suggested by your sewing machine. The pen tablet was designed for use . (page 4) • The pen tablet is included, allowing you to expand your own original embroidery pattern on the CD-ROM for use with the upgrade for the selected...8226; The custom thread table setting can then be used as outlined in the Installation Guide. Select the desired effect from one of sewing machine. Refer to the embroidery alphabet characters category pattern selection screen. (page 16) 2 NEW FEATURES The following features will be saved to USB media as a data ...
... It is added to find new color schemes suggested by your sewing machine. The pen tablet was designed for use . (page 4) • The pen tablet is included, allowing you to expand your own original embroidery pattern on the CD-ROM for use with the upgrade for the selected...8226; The custom thread table setting can then be used as outlined in the Installation Guide. Select the desired effect from one of sewing machine. Refer to the embroidery alphabet characters category pattern selection screen. (page 16) 2 NEW FEATURES The following features will be saved to USB media as a data ...

KIT 2 USER - English
Page 5
...Note • The pen tablet can use the pen tablet as a USB mouse when operating your original embroidery pattern with the tablet pen. Also, you can be used when creating your sewing machine. a USB port for mouse b Pen tablet After connecting the pen tablet to the USB 1.1 port marked... with your favorite picture for creating embroidery pattern. a a Working area of the sewing machine. c Push in the new pen tip until it is activated when the pointer appears on performing functions of the pen tablet...
...Note • The pen tablet can use the pen tablet as a USB mouse when operating your original embroidery pattern with the tablet pen. Also, you can be used when creating your sewing machine. a USB port for mouse b Pen tablet After connecting the pen tablet to the USB 1.1 port marked... with your favorite picture for creating embroidery pattern. a a Working area of the sewing machine. c Push in the new pen tip until it is activated when the pointer appears on performing functions of the pen tablet...

KIT 2 USER - English
Page 7
... COLOR SHUFFLING FUNCTION The Color Shuffling Function With the color Shuffling function, the machine suggests new color schemes for the embroidery pattern that you like. Note • This function may not be flipped). a b a b a Number of the machine for the selected effect is displayed. b Press . → You can ... the color shuffling function either from one of the brand you have, you have selected. a Press . By setting the embroidery thread colors of the four available color schemes ("RANDOM", "VIVID", "GRADIENT" and "SOFT") the sample for the detail.
... COLOR SHUFFLING FUNCTION The Color Shuffling Function With the color Shuffling function, the machine suggests new color schemes for the embroidery pattern that you like. Note • This function may not be flipped). a b a b a Number of the machine for the selected effect is displayed. b Press . → You can ... the color shuffling function either from one of the brand you have, you have selected. a Press . By setting the embroidery thread colors of the four available color schemes ("RANDOM", "VIVID", "GRADIENT" and "SOFT") the sample for the detail.

KIT 2 USER - English
Page 8
If there are not enough number of thread changes for the pattern you press . Refer to display the other color schemes. → The embroidery edit screen will appear. 7 e Press scheme. Note • Maximum 10 pages of schemes, the oldest page is deleted every time you selected. ...or select less colors in the Color Shuffling function. Memo • Selection for the desired number of colors must stay within the range for the machine, about setting the colors in the custom thread table. a a Press to display the color scheme you have selected. In this case, either ...
If there are not enough number of thread changes for the pattern you press . Refer to display the other color schemes. → The embroidery edit screen will appear. 7 e Press scheme. Note • Maximum 10 pages of schemes, the oldest page is deleted every time you selected. ...or select less colors in the Color Shuffling function. Memo • Selection for the desired number of colors must stay within the range for the machine, about setting the colors in the custom thread table. a a Press to display the color scheme you have selected. In this case, either ...

KIT 2 USER - English
Page 10
... operation and screen displays have been incorporated, making the machine easier to the following features are added after the software is upgraded. • Previews of embroidery patterns can be magnified by 200%. • Thumbnails of embroidery patterns can be displayed at the normal size or a.... ENGLISH NEW FEATURES OF VERSION 2 If your machine is installed with software version 1, the following descriptions. to scroll through the display c To display the pattern back to , and the pattern is magnified by 200% within the embroidery display area. The larger size is 1.5 times ...
... operation and screen displays have been incorporated, making the machine easier to the following features are added after the software is upgraded. • Previews of embroidery patterns can be magnified by 200%. • Thumbnails of embroidery patterns can be displayed at the normal size or a.... ENGLISH NEW FEATURES OF VERSION 2 If your machine is installed with software version 1, the following descriptions. to scroll through the display c To display the pattern back to , and the pattern is magnified by 200% within the embroidery display area. The larger size is 1.5 times ...

KIT 2 USER - English
Page 20
...sections are completed they are things you have enough upper thread and lower thread for directions on top for the designs. 2. If your embroidery machine has a speed reduction feature, select the lowest speed. When embroidering these designs, please use three layers of thread in warm water ... 2 XKIT2B09.pes × 4 XKIT2B10.pes × 4 19 Use the same color of water-soluble sheets. If the thread breaks during embroidery, back up at least 10 stitches before embroidering. (Refer to the Operation Manual for the design. Embroider individual shapes. When dissolving the water-...
...sections are completed they are things you have enough upper thread and lower thread for directions on top for the designs. 2. If your embroidery machine has a speed reduction feature, select the lowest speed. When embroidering these designs, please use three layers of thread in warm water ... 2 XKIT2B09.pes × 4 XKIT2B10.pes × 4 19 Use the same color of water-soluble sheets. If the thread breaks during embroidery, back up at least 10 stitches before embroidering. (Refer to the Operation Manual for the design. Embroider individual shapes. When dissolving the water-...
Operation Manual
Page 1
Computerized Embroidery and Sewing Machine Operation Manual Product Code: 882-W01/W02
Computerized Embroidery and Sewing Machine Operation Manual Product Code: 882-W01/W02
Operation Manual
Page 3
... to the nearest authorized dealer or service center for the correct operation of the sewing machine and foot control free from the electrical outlet immediately after you for purchasing this embroidery and sewing machine. i DANGER - Keep ventilation openings of the various functions. To reduce the risk... of electric shock 1 Always unplug the machine from the build up of the electrical outlet. Do not use the machine. Do not pull on the...
... to the nearest authorized dealer or service center for the correct operation of the sewing machine and foot control free from the electrical outlet immediately after you for purchasing this embroidery and sewing machine. i DANGER - Keep ventilation openings of the various functions. To reduce the risk... of electric shock 1 Always unplug the machine from the build up of the electrical outlet. Do not use the machine. Do not pull on the...

Operation Manual
Page 9
... the background. Duplicating a Pattern You can embroider a multi-color pattern with a single color without stopping the machine while embroidering. vii Completed embroidery patterns can be combined with one touch. See "Uninterrupted Embroidering (Using a Single Color)" on page 295. Uninterrupted... printed backgrounds that the print settings are built into this machine. Beautiful three-dimensional embroidered designs can be created by using the machine's built-in their original dimensions. If an image is printed in camera cannot detect the embroidery position mark.
... the background. Duplicating a Pattern You can embroider a multi-color pattern with a single color without stopping the machine while embroidering. vii Completed embroidery patterns can be combined with one touch. See "Uninterrupted Embroidering (Using a Single Color)" on page 295. Uninterrupted... printed backgrounds that the print settings are built into this machine. Beautiful three-dimensional embroidered designs can be created by using the machine's built-in their original dimensions. If an image is printed in camera cannot detect the embroidery position mark.

Operation Manual
Page 10
.../Decorative Stitches The variety of stitches widen your creativity 4 Chapter Page 145 Embroidery Maximum 30 cm × 20 cm (approx. 12 × 8 inches) for large embroidery designs 5 Chapter Page 181 Embroidery Edit Designs can be combined, rotated or enlarged 6 Chapter Page 261 My... Custom Stitch Create original decorative stitches 7 Chapter Page 313 Appendix Caring for your machine and dealing with errors and malfunctions 8 Chapter ...
.../Decorative Stitches The variety of stitches widen your creativity 4 Chapter Page 145 Embroidery Maximum 30 cm × 20 cm (approx. 12 × 8 inches) for large embroidery designs 5 Chapter Page 181 Embroidery Edit Designs can be combined, rotated or enlarged 6 Chapter Page 261 My... Custom Stitch Create original decorative stitches 7 Chapter Page 313 Appendix Caring for your machine and dealing with errors and malfunctions 8 Chapter ...
Operation Manual
Page 11
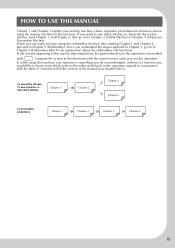
... marked with the actual screen, and carry out the operation. If, while using the machine, you experience something you want to sew utility stitches or character/ decorative stitches, read Chapter 1 and Chapter 2, then go on to Chapter 5 (Embroidery). In the screens appearing in the step-by-step instructions, the parts referred to...
... marked with the actual screen, and carry out the operation. If, while using the machine, you experience something you want to sew utility stitches or character/ decorative stitches, read Chapter 1 and Chapter 2, then go on to Chapter 5 (Embroidery). In the screens appearing in the step-by-step instructions, the parts referred to...
Operation Manual
Page 12
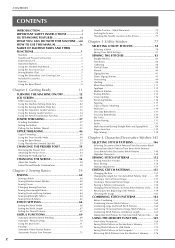
... ....... 176 x CONTENTS CONTENTS INTRODUCTION i IMPORTANT SAFETY INSTRUCTIONS i OUTSTANDING FEATURES vi WHAT YOU CAN DO WITH THIS MACHINE ...viii HOW TO USE THIS MANUAL ix NAMES OF MACHINE PARTS AND THEIR FUNCTIONS 1 Machine 1 Needle and Presser Foot Section 2 Embroidery Unit 3 Operation Buttons 3 Using the Flat Bed Attachment 4 Using the Accessory Case 4 Storing Bobbin Clips 5 Using...
... ....... 176 x CONTENTS CONTENTS INTRODUCTION i IMPORTANT SAFETY INSTRUCTIONS i OUTSTANDING FEATURES vi WHAT YOU CAN DO WITH THIS MACHINE ...viii HOW TO USE THIS MANUAL ix NAMES OF MACHINE PARTS AND THEIR FUNCTIONS 1 Machine 1 Needle and Presser Foot Section 2 Embroidery Unit 3 Operation Buttons 3 Using the Flat Bed Attachment 4 Using the Accessory Case 4 Storing Bobbin Clips 5 Using...

Operation Manual
Page 13
... Machine's Memory 251 Recalling from USB Media 252 Recalling from the Computer 254 EMBROIDERY APPLICATIONS 256 Using a Frame Pattern to Make an Appliqué (1 256 Using a Frame Pattern to Make an Appliqué (2 257 Sewing Split Embroidery Patterns 259 Chapter 6 Embroidery Edit 261 EXPLANATION OF FUNCTIONS 262 SELECTING PATTERNS TO EDIT 263 Selecting Embroidery Patterns/Brother...
... Machine's Memory 251 Recalling from USB Media 252 Recalling from the Computer 254 EMBROIDERY APPLICATIONS 256 Using a Frame Pattern to Make an Appliqué (1 256 Using a Frame Pattern to Make an Appliqué (2 257 Sewing Split Embroidery Patterns 259 Chapter 6 Embroidery Edit 261 EXPLANATION OF FUNCTIONS 262 SELECTING PATTERNS TO EDIT 263 Selecting Embroidery Patterns/Brother...

Operation Manual
Page 17
... may become tangled, or damage to secure the embroidery frame. (page 204) e Embroidery unit connection Insert the embroidery unit connection into the connection port when attaching the embroidery unit. (page 184) CAUTION • After the embroidery frame is set by the sewing speed controller. Embroidery Unit NAMES OF MACHINE PARTS AND THEIR FUNCTIONS Operation Buttons a Carriage The...
... may become tangled, or damage to secure the embroidery frame. (page 204) e Embroidery unit connection Insert the embroidery unit connection into the connection port when attaching the embroidery unit. (page 184) CAUTION • After the embroidery frame is set by the sewing speed controller. Embroidery Unit NAMES OF MACHINE PARTS AND THEIR FUNCTIONS Operation Buttons a Carriage The...

Operation Manual
Page 258
...long, only the first six characters followed by port selection and quantity of data stored. • Some USB media may cause the embroidery machine to malfunction. ■ Types of USB Devices/Media that case, use a computer. • Letters and numerals can be used with this... machine. onds to edit the embroidery data. ■ Types of Embroidery Data that is more details. • The access lamp will begin blinking after inserting USB devices/media, and it will ...
...long, only the first six characters followed by port selection and quantity of data stored. • Some USB media may cause the embroidery machine to malfunction. ■ Types of USB Devices/Media that case, use a computer. • Letters and numerals can be used with this... machine. onds to edit the embroidery data. ■ Types of Embroidery Data that is more details. • The access lamp will begin blinking after inserting USB devices/media, and it will ...

Operation Manual
Page 264
... and select "Computer (My computer)". * The USB cable can be plugged into the USB ports on the computer and embroidery machine whether or not they are deleted when the machine is difficult to your computer. o The "Saving" screen is displayed. Note • Do not insert or remove USB...icon will appear in the "Removable disk", but the saved embroidery patterns are turned on the computer (or USB hub), refer to the original screen without Saving Embroidery Patterns in the Computer Using the included USB cable, the machine can be connected to insert the connector, do not insert...
... and select "Computer (My computer)". * The USB cable can be plugged into the USB ports on the computer and embroidery machine whether or not they are deleted when the machine is difficult to your computer. o The "Saving" screen is displayed. Note • Do not insert or remove USB...icon will appear in the "Removable disk", but the saved embroidery patterns are turned on the computer (or USB hub), refer to the original screen without Saving Embroidery Patterns in the Computer Using the included USB cable, the machine can be connected to insert the connector, do not insert...

Operation Manual for Premium Pack I Optional accessories
Page 21
..., and then attach the frame to medium weight fabrics. This feature can be used to "Positioning the pattern on using light to the embroidery machine. Note • When embroidery frame (small: H 2 cm × W 6 cm (H 1 inch × W 2-1/2 inches)) is turned off when using thicker fabric such as quilting, refer ... align the embroidering position. Memo • If you do not wish the upper thread to be used from the sewing screen of embroidery mode and the edit and sewing screens of Settings screen to make sure the Fabric Thickness Sensor is installed, the built-in camera ...
..., and then attach the frame to medium weight fabrics. This feature can be used to "Positioning the pattern on using light to the embroidery machine. Note • When embroidery frame (small: H 2 cm × W 6 cm (H 1 inch × W 2-1/2 inches)) is turned off when using thicker fabric such as quilting, refer ... align the embroidering position. Memo • If you do not wish the upper thread to be used from the sewing screen of embroidery mode and the edit and sewing screens of Settings screen to make sure the Fabric Thickness Sensor is installed, the built-in camera ...

Operation Manual for Premium Pack I Optional accessories
Page 23
... then attach the frame to the fabric within the area indicated by the red frame in the LCD, and then press . f Affix the embroidery positioning sticker to the embroidery machine. b Select the pattern, and then press . d Press . Memo • This feature is functional only when the fabric is detected. c Display page 8/8 of less...
... then attach the frame to the fabric within the area indicated by the red frame in the LCD, and then press . f Affix the embroidery positioning sticker to the embroidery machine. b Select the pattern, and then press . d Press . Memo • This feature is functional only when the fabric is detected. c Display page 8/8 of less...

Operation Manual for Premium Pack III Optional accessories
Page 16
... side of the first pattern is finished, the following message appears. in the 20 cm × 20 cm (8 inches × 8 inches) embroidery frame, and then attach the frame to the embroidery machine. c Hoop fabric in the sewing screen. Press . Memo • can be pressed while embroidering. • A pattern cannot be saved in the...
... side of the first pattern is finished, the following message appears. in the 20 cm × 20 cm (8 inches × 8 inches) embroidery frame, and then attach the frame to the embroidery machine. c Hoop fabric in the sewing screen. Press . Memo • can be pressed while embroidering. • A pattern cannot be saved in the...


