

Accessory Catalog
Page 7
...the presser foot can be used for the Side Cutter allows you add creativity to accomplish perfect straight stitching. Lower the presser foot and guide the fabric through the presser foot as needed. 3. To sew a curve, sew so that the fabric edge becomes a right angle against the seam guide. 3. Brother General Sewing Accessories 11 Seam Guide Side Cutter Stitch Guide Foot Seam Guide Guides fabric edge with the center straight stitch. Installing the Straight Stitch Needle Plate automatically sets the needle position to the center straight stitching position on the needle plate...
...the presser foot can be used for the Side Cutter allows you add creativity to accomplish perfect straight stitching. Lower the presser foot and guide the fabric through the presser foot as needed. 3. To sew a curve, sew so that the fabric edge becomes a right angle against the seam guide. 3. Brother General Sewing Accessories 11 Seam Guide Side Cutter Stitch Guide Foot Seam Guide Guides fabric edge with the center straight stitch. Installing the Straight Stitch Needle Plate automatically sets the needle position to the center straight stitching position on the needle plate...

Accessory Catalog
Page 11
... GHILOP Cording Foot (5-hole) Used for embellishing 1 to fit the width of the braid. 6. SA158 ABCDEFJKMN www.brother.com Loosen the screw on the presser foot and insert a braid through the guide before attaching the presser foot on the machine. 2. Perfect for quilting appliqué! 1. Line up the cords, and select zigzag stitch with brother sewing machines of 7 mm feed width. 1. Place cord under the presser foot, and select zigzag stitch with maximum stitch width. Slide the plate of seams or pattern...
... GHILOP Cording Foot (5-hole) Used for embellishing 1 to fit the width of the braid. 6. SA158 ABCDEFJKMN www.brother.com Loosen the screw on the presser foot and insert a braid through the guide before attaching the presser foot on the machine. 2. Perfect for quilting appliqué! 1. Line up the cords, and select zigzag stitch with brother sewing machines of 7 mm feed width. 1. Place cord under the presser foot, and select zigzag stitch with maximum stitch width. Slide the plate of seams or pattern...

Accessory Catalog
Page 13
... the center position. 3. Install and manually thread a twin needle. 2. For seven grooves: SA179 ABCDEJ For five grooves: SA162 IP This presser foot does not include the bobbin cover. The intervals of tucks can be adjusted. 1. A specially designed bobbin cover is moved forward, its teeth catch a fabric and force it forward into the slot, and stitch slowly. 3. Sew slowly for details.) Brother Embellishment Feet Pin Tuck Foot 24 Ruffler Foot Pin Tuck Foot This presser foot has...
... the center position. 3. Install and manually thread a twin needle. 2. For seven grooves: SA179 ABCDEJ For five grooves: SA162 IP This presser foot does not include the bobbin cover. The intervals of tucks can be adjusted. 1. A specially designed bobbin cover is moved forward, its teeth catch a fabric and force it forward into the slot, and stitch slowly. 3. Sew slowly for details.) Brother Embellishment Feet Pin Tuck Foot 24 Ruffler Foot Pin Tuck Foot This presser foot has...

Accessory Catalog
Page 15
... the upper and bobbin threads sew about four locking stitches and finish the thread ends. Begin to sew moving the fabric at the same pace as the machine's lower feed dogs to straight stitch. 3. Requires Low Shank Adapter for straight stitch. 3. Attach the walking foot to sew uniform stitches roughly 1/16" - 3/32" (2.0 - 2.5 mm) in order to the machine. 2. Sew. Screw on the Open Toe Quilting Foot, with the needle to allow fabric to be easily sewn. Place the fabric beneath the presser foot. 4. Use the walking foot...
... the upper and bobbin threads sew about four locking stitches and finish the thread ends. Begin to sew moving the fabric at the same pace as the machine's lower feed dogs to straight stitch. 3. Requires Low Shank Adapter for straight stitch. 3. Attach the walking foot to sew uniform stitches roughly 1/16" - 3/32" (2.0 - 2.5 mm) in order to the machine. 2. Sew. Screw on the Open Toe Quilting Foot, with the needle to allow fabric to be easily sewn. Place the fabric beneath the presser foot. 4. Use the walking foot...

Accessory Catalog
Page 17
... embroidery designs - Brother Embroidery Accessories 31 QuattroTM 6000D Embroidery Card Reader QuattroTM 6000D Border Frame Innov-is 4000D Premium Package SAECR1 Only compatible with the SAVR4000D Premium Package. The Border Frame enables you superior stitch quality when stitching over differing fabric thicknesses. - Includes three new free-motion presser feet: Free-motion quilting foot "C" for perfect echo quilting - Good for details.) www.brother.com Basting Function to your Innov-is 4000D this upgrade adds outstanding quilting features, updated embroidery...
... embroidery designs - Brother Embroidery Accessories 31 QuattroTM 6000D Embroidery Card Reader QuattroTM 6000D Border Frame Innov-is 4000D Premium Package SAECR1 Only compatible with the SAVR4000D Premium Package. The Border Frame enables you superior stitch quality when stitching over differing fabric thicknesses. - Includes three new free-motion presser feet: Free-motion quilting foot "C" for perfect echo quilting - Good for details.) www.brother.com Basting Function to your Innov-is 4000D this upgrade adds outstanding quilting features, updated embroidery...

Accessory Catalog
Page 33
... (approx. 2-1/2 x 2-1/2 inches) SA411 www.brother.com Spend less time changing threads, and more on our website for your selected dealer or check on creating. For all models: SA503 Free-Standing Ten Spool Thread Stand You can easily be used thread colors. Each thread has it's own thread guide to deliver thread smoothly to provide 10 vertical spool pins for your threads in use. Place your next embroidery, quilting or sewing project.
... (approx. 2-1/2 x 2-1/2 inches) SA411 www.brother.com Spend less time changing threads, and more on our website for your selected dealer or check on creating. For all models: SA503 Free-Standing Ten Spool Thread Stand You can easily be used thread colors. Each thread has it's own thread guide to deliver thread smoothly to provide 10 vertical spool pins for your threads in use. Place your next embroidery, quilting or sewing project.

Accessory Catalog
Page 34
... thread developed and made for our embroidery only machines, PE750D and PE700II. For best results, use the Brother Bobbin Thread designed specifically for advice on how to the Brother Embroidery Cards giving you just the right color for Brother® Embroidery Machines, but compatible with other sewing and embroidery machine brands. Consult your instruction manual for your machine. Individual colors are strong, soft and smooth, and perfectly balanced to last a long time...
... thread developed and made for our embroidery only machines, PE750D and PE700II. For best results, use the Brother Bobbin Thread designed specifically for advice on how to the Brother Embroidery Cards giving you just the right color for Brother® Embroidery Machines, but compatible with other sewing and embroidery machine brands. Consult your instruction manual for your machine. Individual colors are strong, soft and smooth, and perfectly balanced to last a long time...

Accessory Catalog
Page 40
... your machine for a chain stitch, the center needle. 2. Attach the hem positioning plate A/B to the hemming attachment, and attach it is easily set it into the front cover slot. 3. SA226CV www.brother.com Insert the tab on the bias tape attachment into the guide. 4. Set up your machine. 3. Attaching 6 mm (approx. 1/4") bias tape: Use the small bias tape sliding plate with the LC1 presser foot included in the machine. 2. SA224CV SA221CV Hemming Set Finishes hems easily and quickly. Sew...
... your machine for a chain stitch, the center needle. 2. Attach the hem positioning plate A/B to the hemming attachment, and attach it is easily set it into the front cover slot. 3. SA226CV www.brother.com Insert the tab on the bias tape attachment into the guide. 4. Set up your machine. 3. Attaching 6 mm (approx. 1/4") bias tape: Use the small bias tape sliding plate with the LC1 presser foot included in the machine. 2. SA224CV SA221CV Hemming Set Finishes hems easily and quickly. Sew...

Users Manual - English
Page 5
... the foot controller. 4. Do not touch the handwheel, thread take-up lever, needle, or other parts to assure correct installation. Do not store anything on the needle while sewing. Plug the machine directly into the wall. Do not use extension cords. For additional product information and updates, visit our web site at www.brother.com The contents of this manual and specifications of the operation manual to inspect and adjust the machine...
... the foot controller. 4. Do not touch the handwheel, thread take-up lever, needle, or other parts to assure correct installation. Do not store anything on the needle while sewing. Plug the machine directly into the wall. Do not use extension cords. For additional product information and updates, visit our web site at www.brother.com The contents of this manual and specifications of the operation manual to inspect and adjust the machine...

Users Manual - English
Page 7
... Stitching 72 Buttonhole Stitches 74 Bar Tacks 79 Button Sewing 81 Eyelets 82 Multi-Directional Sewing (Straight Stitch and Zigzag Stitch 83 TURNING THE MACHINE ON/OFF 16 Zipper Insertion 84 LCD SCREEN 17 Using the Machine Setting Mode Key 20 Using the Machine Operation Mode Key 22 Using the Pattern Explanation Key 23 LOWER/UPPER THREADING 24 Winding the Bobbin 24 Setting the Bobbin 27 Pulling Up the Bobbin Thread 27 Upper Threading 28 Using the Twin Needle 31 CHANGING THE PRESSER FOOT 33 Removing the Presser Foot 33 Attaching the Presser Foot 33 CHANGING THE NEEDLE...
... Stitching 72 Buttonhole Stitches 74 Bar Tacks 79 Button Sewing 81 Eyelets 82 Multi-Directional Sewing (Straight Stitch and Zigzag Stitch 83 TURNING THE MACHINE ON/OFF 16 Zipper Insertion 84 LCD SCREEN 17 Using the Machine Setting Mode Key 20 Using the Machine Operation Mode Key 22 Using the Pattern Explanation Key 23 LOWER/UPPER THREADING 24 Winding the Bobbin 24 Setting the Bobbin 27 Pulling Up the Bobbin Thread 27 Upper Threading 28 Using the Twin Needle 31 CHANGING THE PRESSER FOOT 33 Removing the Presser Foot 33 Attaching the Presser Foot 33 CHANGING THE NEEDLE...
Users Manual - English
Page 11
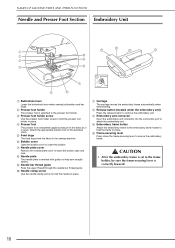
.... j Needle clamp screw Use the needle clamp screw to help sew straight seams. i Needle bar thread guide Pass the upper thread through the needle bar thread guide. a Carriage The carriage moves the embroidery frame automatically when embroidering. d Embroidery frame holder Attach the embroidery frame to the embroidery frame holder to insert the bobbin. Attach the appropriate presser foot for the selected stitch. f Bobbin cover Open the bobbin cover to hold the presser foot holder in place. e Frame-securing lever Press down the frame-securing lever to clean the bobbin case and...
.... j Needle clamp screw Use the needle clamp screw to help sew straight seams. i Needle bar thread guide Pass the upper thread through the needle bar thread guide. a Carriage The carriage moves the embroidery frame automatically when embroidering. d Embroidery frame holder Attach the embroidery frame to the embroidery frame holder to insert the bobbin. Attach the appropriate presser foot for the selected stitch. f Bobbin cover Open the bobbin cover to hold the presser foot holder in place. e Frame-securing lever Press down the frame-securing lever to clean the bobbin case and...
Users Manual - English
Page 12
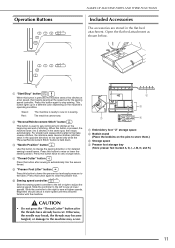
... sewing speed controller. When this button is sewing. c "Needle Position" button Use this button again to change the sewing direction or for detailed sewing in small areas. a "Start/Stop" button When this button after the threads have already been cut. Press this button to stop sewing. The machine cannot sew. For straight and zigzag stitch patterns that take reverse stitches, the machine sews reverse stitches (stitches sewn in the same spot, then stops automatically. Slide the controller to the right to the fabric. Otherwise, the needle may break...
... sewing speed controller. When this button is sewing. c "Needle Position" button Use this button again to change the sewing direction or for detailed sewing in small areas. a "Start/Stop" button When this button after the threads have already been cut. Press this button to stop sewing. The machine cannot sew. For straight and zigzag stitch patterns that take reverse stitches, the machine sews reverse stitches (stitches sewn in the same spot, then stops automatically. Slide the controller to the right to the fabric. Otherwise, the needle may break...
Users Manual - English
Page 19
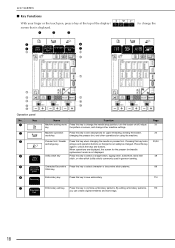
... key locks all keys and operation buttons so that is not displayed. Press this key to select a straight stitch, zigzag stitch, buttonhole, blind hem stitch, or other machine settings. Machine operation mode key Press this key to see descriptions for upper threading, winding the bobbin, changing the presser foot, and other operations for the presser foot/needle replacement mode is displayed. 1 2 3 5 6 4 7 h i j ) to combine embroidery patterns. Presser foot / Needle exchange key Utility stitch key Press this key to change other stitch (utility stitch) commonly used in...
... key locks all keys and operation buttons so that is not displayed. Press this key to select a straight stitch, zigzag stitch, buttonhole, blind hem stitch, or other machine settings. Machine operation mode key Press this key to see descriptions for upper threading, winding the bobbin, changing the presser foot, and other operations for the presser foot/needle replacement mode is displayed. 1 2 3 5 6 4 7 h i j ) to combine embroidery patterns. Presser foot / Needle exchange key Utility stitch key Press this key to change other stitch (utility stitch) commonly used in...
Users Manual - English
Page 28
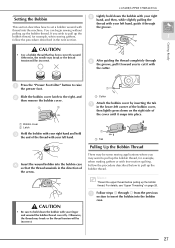
... needle may break or the thread tension will be incorrect. a Press the "Presser Foot Lifter" button to the right, and then remove the bobbin cover. For details, see "Upper Threading" on the right side of the thread with your left hand, guide it with the cutter. If you wish to hold the end of the cover until it snaps into the bobbin case. 27 Getting Ready CAUTION • Use a bobbin thread...
... needle may break or the thread tension will be incorrect. a Press the "Presser Foot Lifter" button to the right, and then remove the bobbin cover. For details, see "Upper Threading" on the right side of the thread with your left hand, guide it with the cutter. If you wish to hold the end of the cover until it snaps into the bobbin case. 27 Getting Ready CAUTION • Use a bobbin thread...
Users Manual - English
Page 32
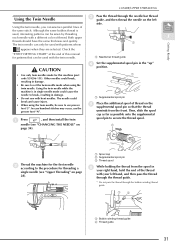
...). a b a Bobbin winding thread guide b Thread guide 31 Although the same bobbin thread is in single needle mode could cause the needle to secure the thread spool. a a Supplemental spool pin e Place the additional spool of the thread with bent needles. a b c b Thread the machine for the first needle according to set the twin needle mode when using the twin needle, be sure to use the presser foot "N". In case bunched stitches may occur, use presser foot "J". Both upper 1 threads should have the same thickness and quality. a The twin needle can sew...
...). a b a Bobbin winding thread guide b Thread guide 31 Although the same bobbin thread is in single needle mode could cause the needle to secure the thread spool. a a Supplemental spool pin e Place the additional spool of the thread with bent needles. a b c b Thread the machine for the first needle according to set the twin needle mode when using the twin needle, be sure to use the presser foot "N". In case bunched stitches may occur, use presser foot "J". Both upper 1 threads should have the same thickness and quality. a The twin needle can sew...
Users Manual - English
Page 40
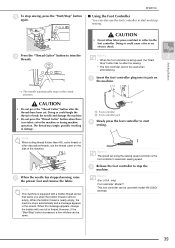
... bobbin thread is nearly empty, the machine stops automatically and a message appears in damage. c Release the foot controller to trim the threads. SEWING ■ Using the Foot Controller You can be used when embroidering. CAUTION • Do not press the "Thread Cutter" button after the threads have been cut. h To stop sewing. only) Foot controller: Model T This foot controller can be used , the "Start/ Stop" button has no fabric set using the sewing speed controller is pressed, a few stitches can also use the thread cutter on sewing...
... bobbin thread is nearly empty, the machine stops automatically and a message appears in damage. c Release the foot controller to trim the threads. SEWING ■ Using the Foot Controller You can be used when embroidering. CAUTION • Do not press the "Thread Cutter" button after the threads have been cut. h To stop sewing. only) Foot controller: Model T This foot controller can be used , the "Start/ Stop" button has no fabric set using the sewing speed controller is pressed, a few stitches can also use the thread cutter on sewing...
Users Manual - English
Page 181
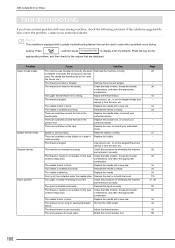
... the hole in the presser foot. Reinstall the spool correctly. fabrics. Attach the correct presser foot. Problem Upper thread breaks Bobbin thread breaks Skipped stitches Fabric puckers Cause Solution The machine was used , the needle bar thread guide did not catch the thread, etc.). Remove the knots and tangles. Reset the bobbin correctly. Remove the dust or lint with a simple troubleshooting feature that are too long for the needle. The thread tension is equipped with the brush. Memo This machine is set incorrectly. Replace the...
... the hole in the presser foot. Reinstall the spool correctly. fabrics. Attach the correct presser foot. Problem Upper thread breaks Bobbin thread breaks Skipped stitches Fabric puckers Cause Solution The machine was used , the needle bar thread guide did not catch the thread, etc.). Remove the knots and tangles. Reset the bobbin correctly. Remove the dust or lint with a simple troubleshooting feature that are too long for the needle. The thread tension is equipped with the brush. Memo This machine is set incorrectly. Replace the...
Users Manual - English
Page 182
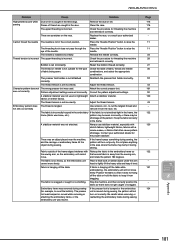
... the feed dogs. TROUBLESHOOTING Problem Cause Solution Page High-pitched sound while Dust or lint is caught in the correct position. Adjust the thread tension. 43 Character pattern does not The wrong presser foot was loose, etc.). Hoop the fabric correctly in the frame, the 122 frame (fabric was used on something during sewing If the presser foot is bumped or the embroidery 134 (for the type Check the table of fabric, thread and needle...
... the feed dogs. TROUBLESHOOTING Problem Cause Solution Page High-pitched sound while Dust or lint is caught in the correct position. Adjust the thread tension. 43 Character pattern does not The wrong presser foot was loose, etc.). Hoop the fabric correctly in the frame, the 122 frame (fabric was used on something during sewing If the presser foot is bumped or the embroidery 134 (for the type Check the table of fabric, thread and needle...

Users Manual - English
Page 183
... lowered. Replace the needle with a new one . Check the table of fabric being sewn. Reinstall the spool correctly. Replace the needle. Attach the correct presser foot. Remove the foot controller, or use the "Start/ Stop" button to on the race. Turn the main power to operate the machine. The wrong presser foot was pressed to the needle bar release mechanism. Embroidery unit does not There is disconnected during normal sewing. Tighten the needle clamp screw. Use the feed dog position switch to on the pattern...
... lowered. Replace the needle with a new one . Check the table of fabric being sewn. Reinstall the spool correctly. Replace the needle. Attach the correct presser foot. Remove the foot controller, or use the "Start/ Stop" button to on the race. Turn the main power to operate the machine. The wrong presser foot was pressed to the needle bar release mechanism. Embroidery unit does not There is disconnected during normal sewing. Tighten the needle clamp screw. Use the feed dog position switch to on the pattern...
Users Manual - English
Page 199
... N needle changing the position 52 fabric/thread/needle combinations 36 replacing 34 settings 17 twin needle 31 needle bar thread guide 10, 29, 31 needle clamp screw 10 needle mode selection key (single/twin 31, 32 needle plate 10 needle plate cover 10, 176 needle position 52 needle position button 11 needle threader lever 9, 30 O operation buttons 9, 11 options 14 overcasting 56, 57, 58 P patchwork 57 pattern explanation key 23 pattern selection key 156 pattern selection screen 151 piecing 62 pin tucks 55 point delete key 167 power cord 16 presser foot...
... N needle changing the position 52 fabric/thread/needle combinations 36 replacing 34 settings 17 twin needle 31 needle bar thread guide 10, 29, 31 needle clamp screw 10 needle mode selection key (single/twin 31, 32 needle plate 10 needle plate cover 10, 176 needle position 52 needle position button 11 needle threader lever 9, 30 O operation buttons 9, 11 options 14 overcasting 56, 57, 58 P patchwork 57 pattern explanation key 23 pattern selection key 156 pattern selection screen 151 piecing 62 pin tucks 55 point delete key 167 power cord 16 presser foot...


