
Command Reference Guide for Software Developers
Page 531
... from 180 mm to 250 mm, and the value to 20 seconds. APPENDIX C HBP MODE COMMANDS - 9 When set to change the temperature control for the fuser unit when printing. n=0: Regular (Default) n=1: Thick paper n=2: Thicker paper n=3: Transparency @J+CHR$ (1) +CHR$ (n): Sets the toner stirring time The value of engine related commands...
... from 180 mm to 250 mm, and the value to 20 seconds. APPENDIX C HBP MODE COMMANDS - 9 When set to change the temperature control for the fuser unit when printing. n=0: Regular (Default) n=1: Thick paper n=2: Thicker paper n=3: Transparency @J+CHR$ (1) +CHR$ (n): Sets the toner stirring time The value of engine related commands...
Users Guide
Page 13
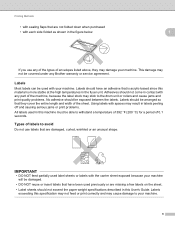
...User's Guide. IMPORTANT • DO NOT feed partially used label sheets or labels with spaces may stick to avoid 1 Do not use any Brother warranty or service agreement. Using labels with the carrier sheet exposed because your machine. 6 Adhesives should not come in contact with any part ... temperature of 392 F (200 C) for a period of the sheet. Labels should not exceed the paper weight specifications described in the fuser unit. Labels exceeding this machine must be able to your machine will be covered under any of the types of envelopes listed above, they cover...
...User's Guide. IMPORTANT • DO NOT feed partially used label sheets or labels with spaces may stick to avoid 1 Do not use any Brother warranty or service agreement. Using labels with the carrier sheet exposed because your machine. 6 Adhesives should not come in contact with any part ... temperature of 392 F (200 C) for a period of the sheet. Labels should not exceed the paper weight specifications described in the fuser unit. Labels exceeding this machine must be able to your machine will be covered under any of the types of envelopes listed above, they cover...

Users Guide
Page 97
...following: Drum Life - Displays the pages left to print with the PF kit MP. Displays the pages left to print with the fuser unit. - General Information Machine Info. (continued) Submenu 1 Parts Life Submenu 2 Toner Life Menu Selections Options Descriptions Black(BK)... - BK oonnnnnnnn - Displays the pages left to print with the PF kit 2. - Fuser Life - Displays the pages left to print with an asterisk. 90 Resets the drum unit life. Cyan(C) - Magenta(M) - For example,...
...following: Drum Life - Displays the pages left to print with the PF kit MP. Displays the pages left to print with the fuser unit. - General Information Machine Info. (continued) Submenu 1 Parts Life Submenu 2 Toner Life Menu Selections Options Descriptions Black(BK)... - BK oonnnnnnnn - Displays the pages left to print with the PF kit 2. - Fuser Life - Displays the pages left to print with an asterisk. 90 Resets the drum unit life. Cyan(C) - Magenta(M) - For example,...

Users Guide
Page 127
... 1 3 See page 129 See page 129 See page 135 DR-331CL DR-331CL BU-320CL Replace WT Box Replace Fuser Waste toner box Fuser unit 50,000 pages 1 3 100,000 pages 1 3 Replace PF KitMP Paper feeding kit 50,000 pages 1 3... See page 141 WT-320CL Call Brother Customer Service for a replacement PF kit MP. 120 Yellow (Y). Black (BK). TN-331BK ...pages 1 2 4 4,000 pages 1 2 5 How to replace See page 123 Order No. Call Brother Customer Service for a replacement fuser unit.
... 1 3 See page 129 See page 129 See page 135 DR-331CL DR-331CL BU-320CL Replace WT Box Replace Fuser Waste toner box Fuser unit 50,000 pages 1 3 100,000 pages 1 3 Replace PF KitMP Paper feeding kit 50,000 pages 1 3... See page 141 WT-320CL Call Brother Customer Service for a replacement PF kit MP. 120 Yellow (Y). Black (BK). TN-331BK ...pages 1 2 4 4,000 pages 1 2 5 How to replace See page 123 Order No. Call Brother Customer Service for a replacement fuser unit.

Users Guide
Page 172
... the laser unit. 5 Replace PF Kit1 2 Replace the paper feeding kit for PF Kit 1, PF Kit 2, Fuser and Laser. Please call Brother Customer Service or a Brother Authorized Service Center when the following messages appear on HL-L8250CDN or HL-L8350CDW. 165 Replace PF KitMP 2 Replace the paper feeding kit for the lower tray (option). Routine Maintenance... of part is approximate and may vary by type of use. 3 If the optional lower tray is installed on the LCD: LCD message Description Replace Fuser 2 Replace the fuser unit.
... the laser unit. 5 Replace PF Kit1 2 Replace the paper feeding kit for PF Kit 1, PF Kit 2, Fuser and Laser. Please call Brother Customer Service or a Brother Authorized Service Center when the following messages appear on HL-L8250CDN or HL-L8350CDW. 165 Replace PF KitMP 2 Replace the paper feeding kit for the lower tray (option). Routine Maintenance... of part is approximate and may vary by type of use. 3 If the optional lower tray is installed on the LCD: LCD message Description Replace Fuser 2 Replace the fuser unit.
Users Guide
Page 179
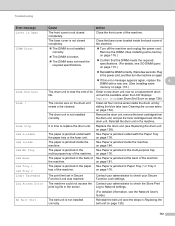
... page 154). DIMM Error The DIMM is not installed correctly. The DIMM is jammed underneath the Paper Tray the paper tray or the fuser unit. Replace the drum unit (see the Network User's Guide.) No Belt Unit The belt unit is jammed in the multi-purpose tray multi-purpose... (see the steps in the See Paper is jammed at the back of its Order a new drum unit now so a replacement drum life. Close the fuser cover located inside the drum unit by sliding the blue tabs (see SO-DIMM types on page 176. Wait a few seconds. Remove the drum unit...
... page 154). DIMM Error The DIMM is not installed correctly. The DIMM is jammed underneath the Paper Tray the paper tray or the fuser unit. Replace the drum unit (see the Network User's Guide.) No Belt Unit The belt unit is jammed in the multi-purpose tray multi-purpose... (see the steps in the See Paper is jammed at the back of its Order a new drum unit now so a replacement drum life. Close the fuser cover located inside the drum unit by sliding the blue tabs (see SO-DIMM types on page 176. Wait a few seconds. Remove the drum unit...
Users Guide
Page 181
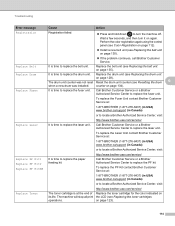
...). 174 The drum unit counter was installed. Call Brother Customer Service or a Brother Authorized Service Center to replace the PF kit. Call Brother Customer Service or a Brother Authorized Service Center to replace the fuser unit. Replace Fuser It is time to locate a Brother Authorized Service Center, visit: http://www.brother-usa.com/service/ Replace Toner The toner cartridge...
...). 174 The drum unit counter was installed. Call Brother Customer Service or a Brother Authorized Service Center to replace the PF kit. Call Brother Customer Service or a Brother Authorized Service Center to replace the fuser unit. Replace Fuser It is time to locate a Brother Authorized Service Center, visit: http://www.brother-usa.com/service/ Replace Toner The toner cartridge...
Users Guide
Page 182
...within the specified time. Toner Low: X (X indicates the toner cartridge or drum unit color that the toner cartridge is not Do one of the fuser unit Turn the machine off, wait a few seconds, and then does not rise to the USB Interface. Unusable Device An incompatible or defective device... tray. Size Error The paper size specified in the Choose a paper size that you that is supported for automatic 2-sided printing. The fuser unit is not available for each tray. Self-Diagnostic The temperature of the following: the correct size. on again. direct interface.
...within the specified time. Toner Low: X (X indicates the toner cartridge or drum unit color that the toner cartridge is not Do one of the fuser unit Turn the machine off, wait a few seconds, and then does not rise to the USB Interface. Unusable Device An incompatible or defective device... tray. Size Error The paper size specified in the Choose a paper size that you that is supported for automatic 2-sided printing. The fuser unit is not available for each tray. Self-Diagnostic The temperature of the following: the correct size. on again. direct interface.

Users Guide
Page 189
Troubleshooting c Pull the blue tabs at the left and right sides toward you to release the fuser cover (1). 2 2 3 3 1 6 NOTE If the envelope levers (3) inside the back cover are pulled down to the envelope position, lift these levers to gently pull the jammed paper out of the fuser unit. 182 d Use both hands to the original position before pulling the blue tabs (2) down.
Troubleshooting c Pull the blue tabs at the left and right sides toward you to release the fuser cover (1). 2 2 3 3 1 6 NOTE If the envelope levers (3) inside the back cover are pulled down to the envelope position, lift these levers to gently pull the jammed paper out of the fuser unit. 182 d Use both hands to the original position before pulling the blue tabs (2) down.

Users Guide
Page 190
Troubleshooting e Close the fuser cover (1). 2 2 1 6 NOTE If you print on envelopes, pull down the envelope levers (2) to the envelope position again before closing the back cover. f Close the back cover. 183
Troubleshooting e Close the fuser cover (1). 2 2 1 6 NOTE If you print on envelopes, pull down the envelope levers (2) to the envelope position again before closing the back cover. f Close the back cover. 183

Product Safety Guide
Page 8
...; DO NOT put a toner cartridge, a toner cartridge and drum unit assembly, or a waste toner box into a fire. Please carefully clean the toner dust with the fuser unit could cause a fire or electrical shock.
...; DO NOT put a toner cartridge, a toner cartridge and drum unit assembly, or a waste toner box into a fire. Please carefully clean the toner dust with the fuser unit could cause a fire or electrical shock.


