Network User's Guide - English
Page 14
...BRAdmin Professional 3. The BRPrint Auditor can E-mail the usage and status information directly to collect usage and status information from a Brother machine connected via the parallel or USB interface. Changing your machine's network settings BRPrint Auditor (Windows®) 2 The BRPrint... Auditor software brings the monitoring power of Brother network management tools to check items such as page counts, toner and drum status and the firmware version. This allows the 2 administrator to locally connected machines. This ...
...BRAdmin Professional 3. The BRPrint Auditor can E-mail the usage and status information directly to collect usage and status information from a Brother machine connected via the parallel or USB interface. Changing your machine's network settings BRPrint Auditor (Windows®) 2 The BRPrint... Auditor software brings the monitoring power of Brother network management tools to check items such as page counts, toner and drum status and the firmware version. This allows the 2 administrator to locally connected machines. This ...
Network User's Guide - English
Page 41
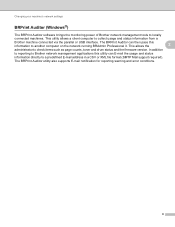
...(T) have six LEDs (Back Cover, Toner, Drum, Paper, Error and Ready) and two keys (Cancel and Go) on the control panel. HL-5470DW(T) and HL-6180DW(T) one back lit Liquid Crystal Display (LCD), seven keys and two Light Emitting Diodes (LEDs) on the control panel....panel you can do the following: Change the print server settings using the control panel (For HL-5470DW(T) and HL-6180DW(T)) 4 See Network menu (For HL-5470DW(T) and HL-6180DW(T)) uu page 36. Printing the WLAN report (For HL-5470DW(T) and HL-6180DW(T)) 4 See Printing the WLAN report (For HL-5470DW(T) and HL-6180DW(T)) uu page 42. 35
...(T) have six LEDs (Back Cover, Toner, Drum, Paper, Error and Ready) and two keys (Cancel and Go) on the control panel. HL-5470DW(T) and HL-6180DW(T) one back lit Liquid Crystal Display (LCD), seven keys and two Light Emitting Diodes (LEDs) on the control panel....panel you can do the following: Change the print server settings using the control panel (For HL-5470DW(T) and HL-6180DW(T)) 4 See Network menu (For HL-5470DW(T) and HL-6180DW(T)) uu page 36. Printing the WLAN report (For HL-5470DW(T) and HL-6180DW(T)) 4 See Printing the WLAN report (For HL-5470DW(T) and HL-6180DW(T)) uu page 42. 35
Network User's Guide - English
Page 84
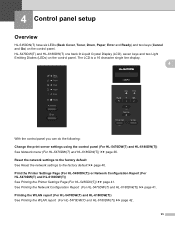
...from the machine. The toner cartridges and drum unit are fully closed. 7 Troubleshooting 7 Overview 7 This chapter explains how to resolve typical network problems you are unable to resolve your problem, please visit the Brother Solutions Center at http://solutions.brother.com/ and click Manuals on your model... when using security software. (See page 82.) I cannot complete the wireless network setup configuration. (See page 79.) The Brother machine is not found on . Paper is inserted properly in the paper tray. (For wired networks) A network cable is not found on the...
...from the machine. The toner cartridges and drum unit are fully closed. 7 Troubleshooting 7 Overview 7 This chapter explains how to resolve typical network problems you are unable to resolve your problem, please visit the Brother Solutions Center at http://solutions.brother.com/ and click Manuals on your model... when using security software. (See page 82.) I cannot complete the wireless network setup configuration. (See page 79.) The Brother machine is not found on . Paper is inserted properly in the paper tray. (For wired networks) A network cable is not found on the...
Quick Setup Guide - English
Page 1
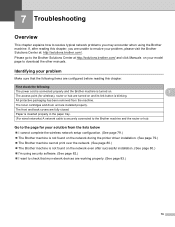
... page to download the other languages, please visit http://solutions.brother.com/. (HL-6180DW(T)) In USA: Please go to deliver reliable performance, day-in all countries. 1 Unpack the machine and check the components Drum Unit and Toner Cartridge Assembly (pre-installed) Quick Setup Guide...for choosing Brother, your support is engineered and manufactured to the highest standards to the Brother Solutions Center at http://solutions.brother.com/ and click Manuals on your business. To view the Quick Setup Guide in other manuals. Quick Setup Guide Start Here HL-5470DW(T) HL-6180DW(T) ...
... page to download the other languages, please visit http://solutions.brother.com/. (HL-6180DW(T)) In USA: Please go to deliver reliable performance, day-in all countries. 1 Unpack the machine and check the components Drum Unit and Toner Cartridge Assembly (pre-installed) Quick Setup Guide...for choosing Brother, your support is engineered and manufactured to the highest standards to the Brother Solutions Center at http://solutions.brother.com/ and click Manuals on your business. To view the Quick Setup Guide in other manuals. Quick Setup Guide Start Here HL-5470DW(T) HL-6180DW(T) ...
Quick Setup Guide - English
Page 3
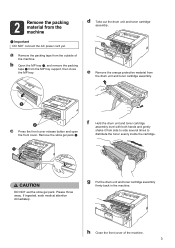
... cover release button and open the front cover. g Put the drum unit and toner cartridge assembly firmly back in the machine. f Hold the drum unit and toner cartridge assembly level with both hands and gently shake it from the drum unit and toner cartridge assembly. Remove the silica gel pack a. ...If ingested, seek medical attention immediately. d Take out the drum unit and toner cartridge assembly. e Remove the orange protective material from side to side several times to distribute the toner evenly inside the ...
... cover release button and open the front cover. g Put the drum unit and toner cartridge assembly firmly back in the machine. f Hold the drum unit and toner cartridge assembly level with both hands and gently shake it from the drum unit and toner cartridge assembly. Remove the silica gel pack a. ...If ingested, seek medical attention immediately. d Take out the drum unit and toner cartridge assembly. e Remove the orange protective material from side to side several times to distribute the toner evenly inside the ...
Quick Setup Guide - English
Page 33
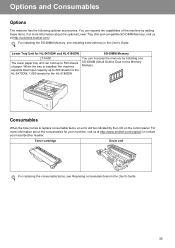
... Memory, see Replacing consumable items in the User's Guide. Consumables When the time comes to 800 sheets for the HL-5470DW, 1,050 sheets for the HL-6180DW. Toner cartridge Drum unit For replacing the consumable items, see Installing extra memory in the User's Guide. 33 SO-DIMM Memory You... Dual In-line Memory Module). For more information about the consumables for HL-5470DW and HL-6180DW LT-5400 The lower paper tray unit can expand the capabilities of paper. Lower Tray Unit for your local Brother reseller. You can hold up to replace consumable items, an error will...
... Memory, see Replacing consumable items in the User's Guide. Consumables When the time comes to 800 sheets for the HL-5470DW, 1,050 sheets for the HL-6180DW. Toner cartridge Drum unit For replacing the consumable items, see Installing extra memory in the User's Guide. 33 SO-DIMM Memory You... Dual In-line Memory Module). For more information about the consumables for HL-5470DW and HL-6180DW LT-5400 The lower paper tray unit can expand the capabilities of paper. Lower Tray Unit for your local Brother reseller. You can hold up to replace consumable items, an error will...
User's Guide - English
Page 5
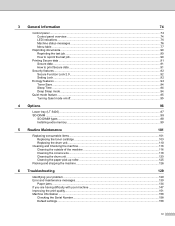
...98 SO-DIMM types ...98 Installing extra memory ...99 5 Routine Maintenance 101 Replacing consumable items...101 Replacing the toner cartridge ...103 Replacing the drum unit...110 Cleaning and Checking the machine ...116 Cleaning the outside of the machine 116 Cleaning the corona wire...118 Cleaning the... drum unit ...120 Cleaning the paper pick-up roller...125 Packing and shipping the machine ...126 6 Troubleshooting 129 Identifying your problem ...129 Error ...
...98 SO-DIMM types ...98 Installing extra memory ...99 5 Routine Maintenance 101 Replacing consumable items...101 Replacing the toner cartridge ...103 Replacing the drum unit...110 Cleaning and Checking the machine ...116 Cleaning the outside of the machine 116 Cleaning the corona wire...118 Cleaning the... drum unit ...120 Cleaning the paper pick-up roller...125 Packing and shipping the machine ...126 6 Troubleshooting 129 Identifying your problem ...129 Error ...
User's Guide - English
Page 12
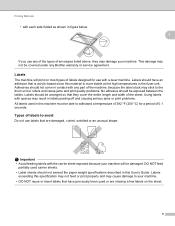
... labels peeling off and causing serious jams or print problems. All labels used in this User's Guide. Types of the sheet. Using labels with any Brother warranty or service agreement. DO NOT feed partially used or are damaged, curled, wrinkled or an unusual shape. Labels should have previously been used carrier... NOT reuse or insert labels that have an adhesive that is more stable at the high temperatures in this machine must be able to the drum unit or rollers and cause jams and print quality problems. No adhesive should be damaged.
... labels peeling off and causing serious jams or print problems. All labels used in this User's Guide. Types of the sheet. Using labels with any Brother warranty or service agreement. DO NOT feed partially used or are damaged, curled, wrinkled or an unusual shape. Labels should have previously been used carrier... NOT reuse or insert labels that have an adhesive that is more stable at the high temperatures in this machine must be able to the drum unit or rollers and cause jams and print quality problems. No adhesive should be damaged.
User's Guide - English
Page 84
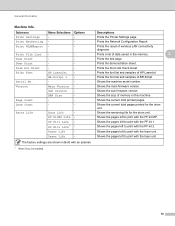
...Prints the result of data saved in the memory. 3 Prints the test page. Shows the machine serial number. Shows the remaining life for the drum unit. Shows the pages left to print with an asterisk. 1 When Tray 2 is installed. 3 Descriptions Prints the Printer Settings page. General ... Menu Selections - The factory settings are shown in this machine. Prints the demonstration sheet. Shows the current total pages printed for the drum unit. Shows the pages left to print with the PF kit 1. Shows the current total printed pages. Fuser Life - Prints the Network...
...Prints the result of data saved in the memory. 3 Prints the test page. Shows the machine serial number. Shows the remaining life for the drum unit. Shows the pages left to print with an asterisk. 1 When Tray 2 is installed. 3 Descriptions Prints the Printer Settings page. General ... Menu Selections - The factory settings are shown in this machine. Prints the demonstration sheet. Shows the current total pages printed for the drum unit. Shows the pages left to print with the PF kit 1. Shows the current total printed pages. Fuser Life - Prints the Network...
User's Guide - English
Page 107
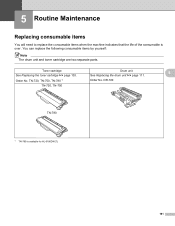
See Replacing the drum unit uu page 111. Order No. TN-720, TN-750, TN-780 1 Order No. 5 Routine Maintenance 5 Replacing consumable items 5 You will need to replace the consumable items when the machine indicates that the life of the consumable is available for HL-6180DW(T). 101 DR-720 TN-720, TN-750 TN-780 1 TN-780 is over. Toner cartridge Drum unit 5 See Replacing the toner cartridge uu page 103. You can replace the following consumable items by yourself: Note The drum unit and toner cartridge are two separate parts.
See Replacing the drum unit uu page 111. Order No. TN-720, TN-750, TN-780 1 Order No. 5 Routine Maintenance 5 Replacing consumable items 5 You will need to replace the consumable items when the machine indicates that the life of the consumable is available for HL-6180DW(T). 101 DR-720 TN-720, TN-750 TN-780 1 TN-780 is over. Toner cartridge Drum unit 5 See Replacing the toner cartridge uu page 103. You can replace the following consumable items by yourself: Note The drum unit and toner cartridge are two separate parts.
User's Guide - English
Page 108
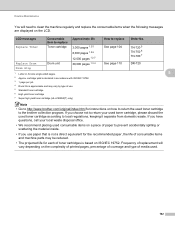
...3 4 See page 110 DR-720 Drum Stop 1 Letter or A4 size single-sided pages. 5 2 Approx. If you use . 5 Standard toner cartridge 6 High yield toner cartridge 7 Super high yield toner cartridge (HL-6180DW(T) only) Note • Go to http://www.brother.com/original/index.html for instructions on... the LCD. cartridge yield is declared in accordance with ISO/IEC 19752. 3 1 page per job 4 Drum life is based on the complexity of printed...
...3 4 See page 110 DR-720 Drum Stop 1 Letter or A4 size single-sided pages. 5 2 Approx. If you use . 5 Standard toner cartridge 6 High yield toner cartridge 7 Super high yield toner cartridge (HL-6180DW(T) only) Note • Go to http://www.brother.com/original/index.html for instructions on... the LCD. cartridge yield is declared in accordance with ISO/IEC 19752. 3 1 page per job 4 Drum life is based on the complexity of printed...
User's Guide - English
Page 110
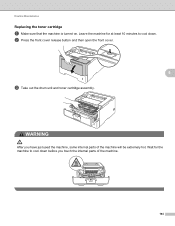
WARNING After you touch the internal parts of the machine will be extremely hot. Leave the machine for the machine to cool down before you have just used the machine, some internal parts of the machine. 104 b Press the front cover release button and then open the front cover. 5 c Take out the drum unit and toner cartridge assembly. Wait for at least 10 minutes to cool down . Routine Maintenance Replacing the toner cartridge 5 a Make sure that the machine is turned on.
WARNING After you touch the internal parts of the machine will be extremely hot. Leave the machine for the machine to cool down before you have just used the machine, some internal parts of the machine. 104 b Press the front cover release button and then open the front cover. 5 c Take out the drum unit and toner cartridge assembly. Wait for at least 10 minutes to cool down . Routine Maintenance Replacing the toner cartridge 5 a Make sure that the machine is turned on.
User's Guide - English
Page 111
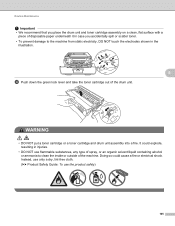
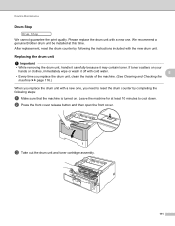
... the green lock lever and take the toner cartridge out of the drum unit. WARNING • DO NOT put a toner cartridge or a toner cartridge and drum unit assembly into a fire. Routine Maintenance Important • We recommend that you place the drum unit and toner cartridge assembly on a clean, flat surface with a piece of...
... the green lock lever and take the toner cartridge out of the drum unit. WARNING • DO NOT put a toner cartridge or a toner cartridge and drum unit assembly into a fire. Routine Maintenance Important • We recommend that you place the drum unit and toner cartridge assembly on a clean, flat surface with a piece of...
User's Guide - English
Page 112
... parts shown in case you place the toner cartridge on how to return your used consumable, please discard the used consumable items to http://www.brother.com/original/index.html for instructions on a clean, flat, level, stable surface with a sheet of the cartridge. • Go to the... Brother collection program. If you have questions, call your hands or clothes, immediately wipe or wash it off with both hands and gently shake it from ...
... parts shown in case you place the toner cartridge on how to return your used consumable, please discard the used consumable items to http://www.brother.com/original/index.html for instructions on a clean, flat, level, stable surface with a sheet of the cartridge. • Go to the... Brother collection program. If you have questions, call your hands or clothes, immediately wipe or wash it off with both hands and gently shake it from ...
User's Guide - English
Page 113
...Our limited warranty coverage does not apply to any degradation to the print quality, DO NOT touch the shaded parts shown in the Brother machine may cause damage to the machine and/or may trigger incorrect status messages, cause the printer to stop prematurely or otherwise ...in unsatisfactory print quality. We also strongly recommend that is put it in the drum unit immediately after you have removed the protective cover. To prevent any problem that you continue to use of Genuine Brother Supplies. 5 f Pull off the protective cover. To protect your machine. Use...
...Our limited warranty coverage does not apply to any degradation to the print quality, DO NOT touch the shaded parts shown in the Brother machine may cause damage to the machine and/or may trigger incorrect status messages, cause the printer to stop prematurely or otherwise ...in unsatisfactory print quality. We also strongly recommend that is put it in the drum unit immediately after you have removed the protective cover. To prevent any problem that you continue to use of Genuine Brother Supplies. 5 f Pull off the protective cover. To protect your machine. Use...
User's Guide - English
Page 114
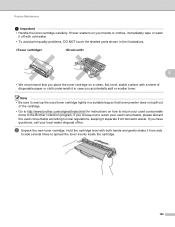
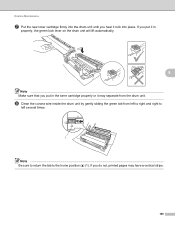
If you put it in the toner cartridge properly or it lock into the drum unit until you hear it may have a vertical stripe. 108 h Clean the corona wire inside the drum unit by gently sliding the green tab from the drum unit. If you put in properly, the green lock lever on the drum unit will lift automatically. 5 Note Make sure that you do not, printed pages may separate from left to right and right to left several times. 1 Note Be sure to return the tab to the home position (a) (1). Routine Maintenance g Put the new toner cartridge firmly into place.
If you put it in the toner cartridge properly or it lock into the drum unit until you hear it may have a vertical stripe. 108 h Clean the corona wire inside the drum unit by gently sliding the green tab from the drum unit. If you put in properly, the green lock lever on the drum unit will lift automatically. 5 Note Make sure that you do not, printed pages may separate from left to right and right to left several times. 1 Note Be sure to return the tab to the home position (a) (1). Routine Maintenance g Put the new toner cartridge firmly into place.
User's Guide - English
Page 115
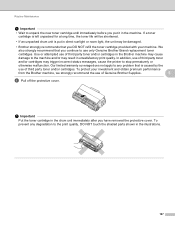
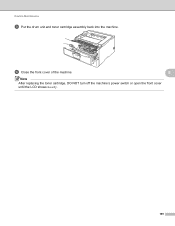
j Close the front cover of the machine. 5 Note After replacing the toner cartridge, DO NOT turn off the machine's power switch or open the front cover until the LCD shows Ready. 109 Routine Maintenance i Put the drum unit and toner cartridge assembly back into the machine.
j Close the front cover of the machine. 5 Note After replacing the toner cartridge, DO NOT turn off the machine's power switch or open the front cover until the LCD shows Ready. 109 Routine Maintenance i Put the drum unit and toner cartridge assembly back into the machine.
User's Guide - English
Page 116
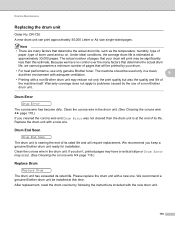
... with a new one . Replace the drum unit with a non-Brother drum unit may occur. (See Cleaning the corona wire uu page 118.) Replace Drum 5 Replace Drum The drum unit has exceeded its life. If you keep a genuine Brother drum unit ready for installation. After replacement, reset the drum counter by the use only genuine Brother toner. The machine should be...
... with a new one . Replace the drum unit with a non-Brother drum unit may occur. (See Cleaning the corona wire uu page 118.) Replace Drum 5 Replace Drum The drum unit has exceeded its life. If you keep a genuine Brother drum unit ready for installation. After replacement, reset the drum counter by the use only genuine Brother toner. The machine should be...
User's Guide - English
Page 117
... • Every time you replace the drum unit, clean the inside of the machine. (See Cleaning and Checking the machine uu page 116.) When you replace the drum unit with a new one . Leave the machine for at this time. We recommend a genuine Brother drum unit be installed at least 10 minutes ...to reset the drum counter by following steps: a Make sure that the machine is turned...
... • Every time you replace the drum unit, clean the inside of the machine. (See Cleaning and Checking the machine uu page 116.) When you replace the drum unit with a new one . Leave the machine for at this time. We recommend a genuine Brother drum unit be installed at least 10 minutes ...to reset the drum counter by following steps: a Make sure that the machine is turned...
User's Guide - English
Page 118
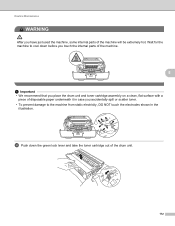
d Push down before you touch the internal parts of the machine. 5 Important • We recommend that you place the drum unit and toner cartridge assembly on a clean, flat surface with a piece of disposable paper underneath it in the illustration. Routine Maintenance WARNING After you accidentally .... Wait for the machine to the machine from static electricity, DO NOT touch the electrodes shown in case you have just used the machine, some internal parts of the drum unit. 112
d Push down before you touch the internal parts of the machine. 5 Important • We recommend that you place the drum unit and toner cartridge assembly on a clean, flat surface with a piece of disposable paper underneath it in the illustration. Routine Maintenance WARNING After you accidentally .... Wait for the machine to the machine from static electricity, DO NOT touch the electrodes shown in case you have just used the machine, some internal parts of the drum unit. 112


