Users Manual - English
Page 8
......3 Back view ...4 Positioning the printer ...5 Power supply ...5 Environment ...5 2 Printing Methods 6 About paper ...6 Type and size of paper ...6 Recommended paper ...8 Unprintable area ...10 Printing methods...11 Printing on plain paper, bond paper and transparencies 11 Printing on thick paper, labels and envelopes 20 Duplex ...Script3 printer driver 64 Uninstalling the printer driver ...70 Printer driver for Windows® and Windows Vista® and Windows Server® 2003/2008 70 Printer driver for Macintosh ...70 Software ...72 Software for networks (For HL-5350DN and HL-5370DW ...
......3 Back view ...4 Positioning the printer ...5 Power supply ...5 Environment ...5 2 Printing Methods 6 About paper ...6 Type and size of paper ...6 Recommended paper ...8 Unprintable area ...10 Printing methods...11 Printing on plain paper, bond paper and transparencies 11 Printing on thick paper, labels and envelopes 20 Duplex ...Script3 printer driver 64 Uninstalling the printer driver ...70 Printer driver for Windows® and Windows Vista® and Windows Server® 2003/2008 70 Printer driver for Macintosh ...70 Software ...72 Software for networks (For HL-5350DN and HL-5370DW ...
Users Manual - English
Page 9
......93 Consumables...93 Toner cartridge ...94 Drum unit ...101 Cleaning ...106 Cleaning the outside of the printer 106 Cleaning the inside of the printer...108 Cleaning the paper pick-up roller...111 Cleaning the corona wires ...113 Cleaning the corona wire...113 7 Troubleshooting 115 Identifying...Error message printout ...118 Paper handling ...119 Paper jams and how to clear them ...120 Jam MP tray / Tray1 / Tray2 / Tray3 / Inside 120 Jam Rear / Duplex...125 Improving the print quality...129 Solving print problems ...136 Network problems (For HL-5350DN and HL-5370DW 137 Other problems ......
......93 Consumables...93 Toner cartridge ...94 Drum unit ...101 Cleaning ...106 Cleaning the outside of the printer 106 Cleaning the inside of the printer...108 Cleaning the paper pick-up roller...111 Cleaning the corona wires ...113 Cleaning the corona wire...113 7 Troubleshooting 115 Identifying...Error message printout ...118 Paper handling ...119 Paper jams and how to clear them ...120 Jam MP tray / Tray1 / Tray2 / Tray3 / Inside 120 Jam Rear / Duplex...125 Improving the print quality...129 Solving print problems ...136 Network problems (For HL-5350DN and HL-5370DW 137 Other problems ......

Users Manual - English
Page 10
A Appendix 139 Printer specifications...139 Engine ...139 Controller ...140 Software ...141 Control panel ...141 Paper handling ...141 Media specifications ...142 Supplies ...142 Dimensions / weights...143 Other...143 Computer requirements...144 Important information for choosing your paper 145 Symbol and character sets ...148 How to use the Web Based Management ...for bar code control commands 150 Print bar codes or expanded characters 150 B Appendix (for Europe and Other Countries) 158 Brother numbers ...158 C Appendix (for USA and Canada) 159 Brother numbers ...159 D Index 161 ix
A Appendix 139 Printer specifications...139 Engine ...139 Controller ...140 Software ...141 Control panel ...141 Paper handling ...141 Media specifications ...142 Supplies ...142 Dimensions / weights...143 Other...143 Computer requirements...144 Important information for choosing your paper 145 Symbol and character sets ...148 How to use the Web Based Management ...for bar code control commands 150 Print bar codes or expanded characters 150 B Appendix (for Europe and Other Countries) 158 Brother numbers ...158 C Appendix (for USA and Canada) 159 Brother numbers ...159 D Index 161 ix
Users Manual - English
Page 13
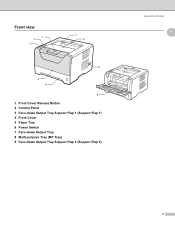
Front view 1 2 3 7 9 6 4 5 8 1 Front Cover Release Button 2 Control Panel 3 Face-down Output Tray Support Flap 1 (Support Flap 1) 4 Front Cover 5 Paper Tray 6 Power Switch 7 Face-down Output Tray 8 Multi-purpose Tray (MP Tray) 9 Face-down Output Tray Support Flap 2 (Support Flap 2) About this Printer 1 1 3
Front view 1 2 3 7 9 6 4 5 8 1 Front Cover Release Button 2 Control Panel 3 Face-down Output Tray Support Flap 1 (Support Flap 1) 4 Front Cover 5 Paper Tray 6 Power Switch 7 Face-down Output Tray 8 Multi-purpose Tray (MP Tray) 9 Face-down Output Tray Support Flap 2 (Support Flap 2) About this Printer 1 1 3
Users Manual - English
Page 16
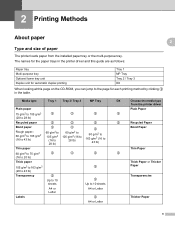
...m2 (16 to 43 lb) p p p Up to the page for each printing method by clicking p in the printer driver and this guide are as follows: 2 2 2 Paper tray Multi-purpose tray Optional lower tray unit Duplex unit for automatic duplex printing Tray 1 MP Tray Tray 2 / Tray ... Letter DX Choose the media type from the installed paper tray or the multi-purpose tray. Printing Methods2 2 Printing Methods 2 About paper Type and size of paper The printer loads paper from the printer driver Plain Paper p p Recycled Paper Bond Paper Thin Paper p Thick Paper or Thicker Paper Transparencies Thicker...
...m2 (16 to 43 lb) p p p Up to the page for each printing method by clicking p in the printer driver and this guide are as follows: 2 2 2 Paper tray Multi-purpose tray Optional lower tray unit Duplex unit for automatic duplex printing Tray 1 MP Tray Tray 2 / Tray ... Letter DX Choose the media type from the installed paper tray or the multi-purpose tray. Printing Methods2 2 Printing Methods 2 About paper Type and size of paper The printer loads paper from the printer driver Plain Paper p p Recycled Paper Bond Paper Thin Paper p Thick Paper or Thicker Paper Transparencies Thicker...

Users Manual - English
Page 17
Thin 2 Env. DX Letter, Legal 1, Folio 1 7 Thick Paper size Number of sheets (80 g/m2 / 20 lb) Tray 1 A4, Letter, Legal 1, B5 (ISO), Executive, A5, A6, B6 (ISO), Folio 1, A5(Long Edge) 250 sheets ... MP Tray Width: 69.8 to 216 mm (2.75 to 8.5 in.) Length: 116 to 406.4 mm (4.57 to 3 sheets DX Choose the media type from the printer driver Envelopes Env. Printing Methods Media type Envelopes Tray 1 Tray 2/ Tray 3 MP Tray p Up to 16 in.) 50 sheets 1 Legal or Folio size...
Thin 2 Env. DX Letter, Legal 1, Folio 1 7 Thick Paper size Number of sheets (80 g/m2 / 20 lb) Tray 1 A4, Letter, Legal 1, B5 (ISO), Executive, A5, A6, B6 (ISO), Folio 1, A5(Long Edge) 250 sheets ... MP Tray Width: 69.8 to 216 mm (2.75 to 8.5 in.) Length: 116 to 406.4 mm (4.57 to 3 sheets DX Choose the media type from the printer driver Envelopes Env. Printing Methods Media type Envelopes Tray 1 Tray 2/ Tray 3 MP Tray p Up to 16 in.) 50 sheets 1 Legal or Folio size...
Users Manual - English
Page 18
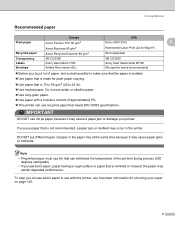
... Avery laser label L7163 Avery laser labels white #5160 Envelope Antalis River series (DL) (No specific brand recommended) „ Before you use bond paper, paper having a rough surface or paper that is wrinkled or creased, the paper may exhibit degraded performance. Do not use acidic or alkaline paper. „ Use long-grain paper. „ Use paper with this printer, see...
... Avery laser label L7163 Avery laser labels white #5160 Envelope Antalis River series (DL) (No specific brand recommended) „ Before you use bond paper, paper having a rough surface or paper that is wrinkled or creased, the paper may exhibit degraded performance. Do not use acidic or alkaline paper. „ Use long-grain paper. „ Use paper with this printer, see...
Users Manual - English
Page 19
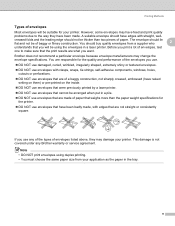
... some envelopes may change the envelope specifications. Brother does not recommend a particular envelope because envelope manufacturers may have raised writing on them) or pre-printed on the inside. „ DO NOT use envelopes that were previously printed by a laser printer. „ DO NOT use envelopes with...creased folds and the leading edge should have been badly made . A suitable envelope should not be thicker than the paper weight specifications for your printer. You should lie flat and not be of baggy or flimsy construction. Before you print a lot of envelopes, ...
... some envelopes may change the envelope specifications. Brother does not recommend a particular envelope because envelope manufacturers may have raised writing on them) or pre-printed on the inside. „ DO NOT use envelopes that were previously printed by a laser printer. „ DO NOT use envelopes with...creased folds and the leading edge should have been badly made . A suitable envelope should not be thicker than the paper weight specifications for your printer. You should lie flat and not be of baggy or flimsy construction. Before you print a lot of envelopes, ...

Users Manual - English
Page 20
... in.) B6 (ISO) 4.23 mm (0.16 in.) 5.0 mm (0.19 in.) 4.23 mm (0.16 in.) 5.0 mm (0.19 in ). Printing Methods Unprintable area 2 The area of the paper that cannot be printed on is shown in the table below: Note 2 When using BR-Script emulation, the edges of the...
... in.) B6 (ISO) 4.23 mm (0.16 in.) 5.0 mm (0.19 in.) 4.23 mm (0.16 in.) 5.0 mm (0.19 in ). Printing Methods Unprintable area 2 The area of the paper that cannot be printed on is shown in the table below: Note 2 When using BR-Script emulation, the edges of the...
Users Manual - English
Page 21
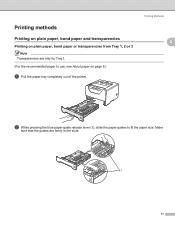
Make sure that the guides are only for Tray1. (For the recommended paper to fit the paper size. Printing methods Printing on plain paper, bond paper and transparencies Printing on page 6.) a Pull the paper tray completely out of the printer. Printing Methods 2 2 2 2 b While pressing the blue paper-guide release lever (1), slide the paper guides to use, see About paper on plain paper, bond paper or transparencies from Tray 1, 2 or 3 Note Transparencies are firmly in the slots. 1 11
Make sure that the guides are only for Tray1. (For the recommended paper to fit the paper size. Printing methods Printing on plain paper, bond paper and transparencies Printing on page 6.) a Pull the paper tray completely out of the printer. Printing Methods 2 2 2 2 b While pressing the blue paper-guide release lever (1), slide the paper guides to use, see About paper on plain paper, bond paper or transparencies from Tray 1, 2 or 3 Note Transparencies are firmly in the slots. 1 11
Users Manual - English
Page 22
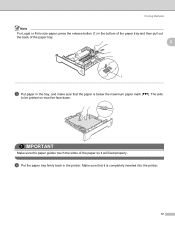
The side to be printed on must be face down. d Put the paper tray firmly back in the tray, and make sure that it will feed properly. Printing Methods Note For Legal or Folio size paper, press the release button (1) in the bottom of the paper tray and then pull out the back of the paper so it is below the maximum paper mark (bbb). IMPORTANT Make sure the paper guides touch the sides of the paper tray. 2 1 c Put paper in the printer. Make sure that the paper is completely inserted into the printer. 12
The side to be printed on must be face down. d Put the paper tray firmly back in the tray, and make sure that it will feed properly. Printing Methods Note For Legal or Folio size paper, press the release button (1) in the bottom of the paper tray and then pull out the back of the paper so it is below the maximum paper mark (bbb). IMPORTANT Make sure the paper guides touch the sides of the paper tray. 2 1 c Put paper in the printer. Make sure that the paper is completely inserted into the printer. 12
Users Manual - English
Page 23
Printing Methods e Lift up the support flap to prevent paper from sliding off the face-down output tray, or remove each page as soon as it comes out of the printer. 2 1 13
Printing Methods e Lift up the support flap to prevent paper from sliding off the face-down output tray, or remove each page as soon as it comes out of the printer. 2 1 13

Users Manual - English
Page 24
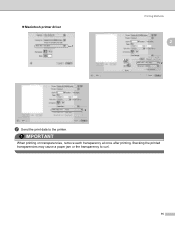
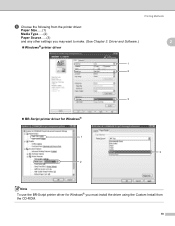
Printing Methods f Choose the following from the printer driver: Paper Size......(1) Media Type......(2) Paper Source......(3) and any other settings you may want to make. (See Chapter 3: Driver and Software.) 2 „ Windows® printer driver 1 2 „ BR-Script printer driver for Windows® 1 2 3 3 Note To use the BR-Script printer driver for Windows® you must install the driver using the Custom Install from the CD-ROM. 14
Printing Methods f Choose the following from the printer driver: Paper Size......(1) Media Type......(2) Paper Source......(3) and any other settings you may want to make. (See Chapter 3: Driver and Software.) 2 „ Windows® printer driver 1 2 „ BR-Script printer driver for Windows® 1 2 3 3 Note To use the BR-Script printer driver for Windows® you must install the driver using the Custom Install from the CD-ROM. 14
Users Manual - English
Page 25
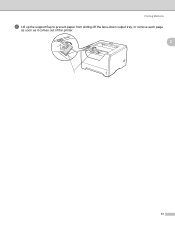
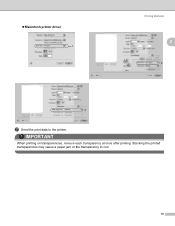
Stacking the printed transparencies may cause a paper jam or the transparency to the printer. „ Macintosh printer driver 1 Printing Methods 2 3 g Send the print data to curl. 15 IMPORTANT When printing on transparencies, remove each transparency at once after printing.
Stacking the printed transparencies may cause a paper jam or the transparency to the printer. „ Macintosh printer driver 1 Printing Methods 2 3 g Send the print data to curl. 15 IMPORTANT When printing on transparencies, remove each transparency at once after printing.
Users Manual - English
Page 26
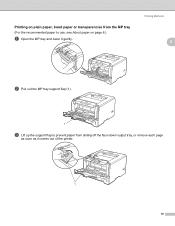
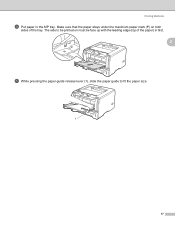
Printing on page 6.) a Open the MP tray and lower it comes out of the printer. 1 16 Printing Methods 2 2 b Pull out the MP tray support flap (1). 1 c Lift up the support flap to prevent paper from the MP tray (For the recommended paper to use, see About paper on plain paper, bond paper or transparencies from sliding off the face-down output tray, or remove each page as soon as it gently.
Printing on page 6.) a Open the MP tray and lower it comes out of the printer. 1 16 Printing Methods 2 2 b Pull out the MP tray support flap (1). 1 c Lift up the support flap to prevent paper from the MP tray (For the recommended paper to use, see About paper on plain paper, bond paper or transparencies from sliding off the face-down output tray, or remove each page as soon as it gently.
Users Manual - English
Page 27
Printing Methods d Put paper in first. 2 e While pressing the paper-guide release lever (1), slide the paper guide to be face up with the leading edge (top of the tray. Make sure that the paper stays under the maximum paper mark (b) on must be printed on both sides of the paper) in the MP tray. The side to fit the paper size. 1 17
Printing Methods d Put paper in first. 2 e While pressing the paper-guide release lever (1), slide the paper guide to be face up with the leading edge (top of the tray. Make sure that the paper stays under the maximum paper mark (b) on must be printed on both sides of the paper) in the MP tray. The side to fit the paper size. 1 17
Users Manual - English
Page 28
Printing Methods f Choose the following from the printer driver: Paper Size......(1) Media Type......(2) Paper Source......(3) and any other settings you may want to make. (See Chapter 3: Driver and Software.) 2 „ Windows® printer driver 1 2 „ BR-Script printer driver for Windows® 1 2 3 3 Note To use the BR-Script printer driver for Windows® you must install the driver using the Custom Install from the CD-ROM. 18
Printing Methods f Choose the following from the printer driver: Paper Size......(1) Media Type......(2) Paper Source......(3) and any other settings you may want to make. (See Chapter 3: Driver and Software.) 2 „ Windows® printer driver 1 2 „ BR-Script printer driver for Windows® 1 2 3 3 Note To use the BR-Script printer driver for Windows® you must install the driver using the Custom Install from the CD-ROM. 18
Users Manual - English
Page 29
Stacking the printed transparencies may cause a paper jam or the transparency to the printer. „ Macintosh printer driver 1 Printing Methods 2 3 g Send the print data to curl. 19 IMPORTANT When printing on transparencies, remove each transparency at once after printing.
Stacking the printed transparencies may cause a paper jam or the transparency to the printer. „ Macintosh printer driver 1 Printing Methods 2 3 g Send the print data to curl. 19 IMPORTANT When printing on transparencies, remove each transparency at once after printing.
Users Manual - English
Page 30
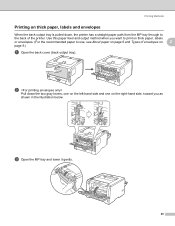
..., one on the left-hand side and one on thick paper, labels and envelopes 2 When the back output tray is pulled down, the printer has a straight paper path from the MP tray through to use, see About paper on page 6 and Types of the printer. c Open the MP tray and lower it gently. 20 Printing... Methods Printing on the right-hand side, toward you want to print on thick paper, labels or envelopes. (For the recommended paper to the back of envelopes on 2 page...
..., one on the left-hand side and one on thick paper, labels and envelopes 2 When the back output tray is pulled down, the printer has a straight paper path from the MP tray through to use, see About paper on page 6 and Types of the printer. c Open the MP tray and lower it gently. 20 Printing... Methods Printing on the right-hand side, toward you want to print on thick paper, labels or envelopes. (For the recommended paper to the back of envelopes on 2 page...
Users Manual - English
Page 31
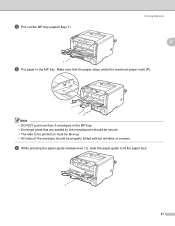
Make sure that are sealed by the manufacturer should be properly folded without wrinkles or creases. f While pressing the paper-guide release lever (1), slide the paper guide to be printed on must be face up. • All sides of the envelope should be secure. • The side to fit the paper size. 1 21 Printing Methods 2 1 e Put paper in the MP tray. • Envelope joints that the paper stays under the maximum paper mark (b). d Pull out the MP tray support flap (1). Note • DO NOT put more than 3 envelopes in the MP tray.
Make sure that are sealed by the manufacturer should be properly folded without wrinkles or creases. f While pressing the paper-guide release lever (1), slide the paper guide to be printed on must be face up. • All sides of the envelope should be secure. • The side to fit the paper size. 1 21 Printing Methods 2 1 e Put paper in the MP tray. • Envelope joints that the paper stays under the maximum paper mark (b). d Pull out the MP tray support flap (1). Note • DO NOT put more than 3 envelopes in the MP tray.


