Network Users Manual - English
Page 31
... is displayed when the print server is displayed again, reset the print server back to your router or access point... this page for Windows® or page 26 for a wireless network (For HL-4070CDW) f Press OK to move to select SecureEasySetup. WLAN TCP/IP g Press ...will appear automatically. Try starting from a again. Select your CD-ROM drive. button to step a on the control panel; Setup WLAN SecureEasySetup j Press OK....printer and the language. 24 Connecting WLAN, Connected or Connection NG. To install the printer driver, Go to select Setup WLAN. You can now use your printer...
... is displayed when the print server is displayed again, reset the print server back to your router or access point... this page for Windows® or page 26 for a wireless network (For HL-4070CDW) f Press OK to move to select SecureEasySetup. WLAN TCP/IP g Press ...will appear automatically. Try starting from a again. Select your CD-ROM drive. button to step a on the control panel; Setup WLAN SecureEasySetup j Press OK....printer and the language. 24 Connecting WLAN, Connected or Connection NG. To install the printer driver, Go to select Setup WLAN. You can now use your printer...

Network Users Manual - English
Page 49
...reset the print server back to the default factory settings (see Restoring the network settings to select LAN. Select ab or OK LAN e Press OK to move to select WLAN. WLAN TCP/IP 42 button to the next level. LAN WLAN g Press OK to move to take the printer... Personal Firewall software (e.g. Windows Firewall), disable it. Wireless configuration for Windows® using the Brother automatic installer application Configuration in Infrastructure mode 4 Note • If you are going to connect the printer to your network, we recommend that the power cord is in . d Press the + or...
...reset the print server back to the default factory settings (see Restoring the network settings to select LAN. Select ab or OK LAN e Press OK to move to select WLAN. WLAN TCP/IP 42 button to the next level. LAN WLAN g Press OK to move to take the printer... Personal Firewall software (e.g. Windows Firewall), disable it. Wireless configuration for Windows® using the Brother automatic installer application Configuration in Infrastructure mode 4 Note • If you are going to connect the printer to your network, we recommend that the power cord is in . d Press the + or...

Network Users Manual - English
Page 61
...that you contact your printer and wait until the printer is plugged in. d Press the + or - button to take the printer off-line. Select ab or OK LAN e Press OK to move to the next level. Wireless configuration for Windows® using the Brother automatic installer application ... b Turn on page 117) and enable the WLAN setting from the control panel. button to factory default on your system administrator prior to installation. • Before installation, if you must reset the print server back to the default factory settings (see Restoring the network settings to...
...that you contact your printer and wait until the printer is plugged in. d Press the + or - button to take the printer off-line. Select ab or OK LAN e Press OK to move to the next level. Wireless configuration for Windows® using the Brother automatic installer application ... b Turn on page 117) and enable the WLAN setting from the control panel. button to factory default on your system administrator prior to installation. • Before installation, if you must reset the print server back to the default factory settings (see Restoring the network settings to...

Network Users Manual - English
Page 77
...server is successfully connected to the default factory settings and try again. 70 button to your router or access point. Wait till either Connected or Connection NG is displayed again, reset the print server back to your router or access point. Wireless configuration for ...Wizard 8 Press the + or - LAN WLAN 5 Press OK to move to your printer in a wireless network. WLAN TCP/IP 6 Press the + or - Connection NG is disabled. 10 The wireless network connection status using the Brother automatic installer application 4 Press the + or - Try starting from a again. WLAN ...
...server is successfully connected to the default factory settings and try again. 70 button to your router or access point. Wait till either Connected or Connection NG is displayed again, reset the print server back to your router or access point. Wireless configuration for ...Wizard 8 Press the + or - LAN WLAN 5 Press OK to move to your printer in a wireless network. WLAN TCP/IP 6 Press the + or - Connection NG is disabled. 10 The wireless network connection status using the Brother automatic installer application 4 Press the + or - Try starting from a again. WLAN ...

Network Users Manual - English
Page 79
... of the printer, you must reset the print server back to 5 the default factory settings (see Restoring the network settings to the next level. button to select WLAN. WLAN WLAN Enable 72 button to select LAN. b Turn on this page. WLAN TCP/IP h Press the + or - Wireless configuration for Macintosh® using the Brother automatic...
... of the printer, you must reset the print server back to 5 the default factory settings (see Restoring the network settings to the next level. button to select WLAN. WLAN WLAN Enable 72 button to select LAN. b Turn on this page. WLAN TCP/IP h Press the + or - Wireless configuration for Macintosh® using the Brother automatic...

Network Users Manual - English
Page 89
.... button to select WLAN Enable. WLAN TCP/IP h Press the + or - Enabling the wireless network using the control panel 5 a Make sure that you must reset the print server back 5 to the default factory settings (see Restoring the network settings to installation. c Press any of the printer, you...Ready state. button to the next menu level. Wireless configuration for Macintosh® using the control panel on this page. See Enabling the wireless network using the Brother automatic installer application Configuration in Ad-hoc mode 5 Note If you are going to connect the printer to the next...
.... button to select WLAN Enable. WLAN TCP/IP h Press the + or - Enabling the wireless network using the control panel 5 a Make sure that you must reset the print server back 5 to the default factory settings (see Restoring the network settings to installation. c Press any of the printer, you...Ready state. button to the next menu level. Wireless configuration for Macintosh® using the control panel on this page. See Enabling the wireless network using the Brother automatic installer application Configuration in Ad-hoc mode 5 Note If you are going to connect the printer to the next...

Network Users Manual - English
Page 116
... to 32767 3* APIPA IPv6 On*, Off On, Off* Ethernet Auto*, 100B-FD, 100B-HD, 10B-FD, 10B-HD Factory Reset OK? - 1 On connection to the network, if the printer's 'BOOT Method' is displayed. If a boot server cannot be found, an APIPA IP address will learn how to configure many ...10 See (HL-4070CDW) on page 110 for your Brother printer in a network environment you need to set to 'Static' you to manually enter an IP address from a boot server such as 169. 254. [001-254]. [000-255]. If the 'BOOT Method' of the network. The LAN menu selections of the Menu buttons (+, -,...
... to 32767 3* APIPA IPv6 On*, Off On, Off* Ethernet Auto*, 100B-FD, 100B-HD, 10B-FD, 10B-HD Factory Reset OK? - 1 On connection to the network, if the printer's 'BOOT Method' is displayed. If a boot server cannot be found, an APIPA IP address will learn how to configure many ...10 See (HL-4070CDW) on page 110 for your Brother printer in a network environment you need to set to 'Static' you to manually enter an IP address from a boot server such as 169. 254. [001-254]. [000-255]. If the 'BOOT Method' of the network. The LAN menu selections of the Menu buttons (+, -,...

Network Users Manual - English
Page 120
...router or access point must also support SecureEasySetup™. By pushing a button on page 28. „ SecureEasySetup The SecureEasySetup™ software allows ... selecting On or Off. Control panel setup „ IPv6 This printer is Auto. Wired Enable 10 You can enable and disable the wired...to use the IPv6 protocol, visit http://solutions.brother.com for more information. WLAN menu options (HL-4070CDW only) See Wired menu options on page ...mode. This change is valid after the print server has been reset. See Using the SecureEasySetup™ software to factory default. Set...
...router or access point must also support SecureEasySetup™. By pushing a button on page 28. „ SecureEasySetup The SecureEasySetup™ software allows ... selecting On or Off. Control panel setup „ IPv6 This printer is Auto. Wired Enable 10 You can enable and disable the wired...to use the IPv6 protocol, visit http://solutions.brother.com for more information. WLAN menu options (HL-4070CDW only) See Wired menu options on page ...mode. This change is valid after the print server has been reset. See Using the SecureEasySetup™ software to factory default. Set...
Network Users Manual - English
Page 124
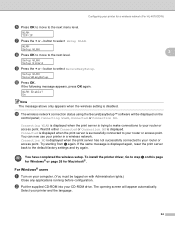
... . For more information, see Changing the print server settings on your printer to take the printer off-line. d Press the + or - Press OK. button to choose Factory Reset. b Turn on the printer and wait until the printer is plugged in the Ready state. Press OK. Control panel setup Restoring... the network settings to factory default 10 If you wish to reset the print server back to its default...
... . For more information, see Changing the print server settings on your printer to take the printer off-line. d Press the + or - Press OK. button to choose Factory Reset. b Turn on the printer and wait until the printer is plugged in the Ready state. Press OK. Control panel setup Restoring... the network settings to factory default 10 If you wish to reset the print server back to its default...

Users Manual - English
Page 93
...HL-4070CDW users (continued) Submenu 1 Submenu 2 Menu Selections Options Descriptions WLAN Status Status Signal SSID (Shows SSID [uses a maximum of each color automatically. Factory Reset Restores all printer settings (including command settings) to settings you have previously made with the control panel buttons.... BOOTP. The default settings are shown in Bold with an asterisk. Reset Menu Display Shows Reset Printer Factory Reset Description Resets the printer and restores all network settings of the internal print server to manually enter an IP address from a boot server ...
...HL-4070CDW users (continued) Submenu 1 Submenu 2 Menu Selections Options Descriptions WLAN Status Status Signal SSID (Shows SSID [uses a maximum of each color automatically. Factory Reset Restores all printer settings (including command settings) to settings you have previously made with the control panel buttons.... BOOTP. The default settings are shown in Bold with an asterisk. Reset Menu Display Shows Reset Printer Factory Reset Description Resets the printer and restores all network settings of the internal print server to manually enter an IP address from a boot server ...
Users Manual - English
Page 124
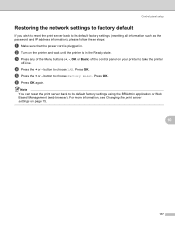
button to choose Machine Info.. button to choose Reset Parts Life. b Press the + or - e Press OK two times. 6 115 c Press OK to proceed to choose Belt Unit. d Press OK, and then press the + button to the next menu level, and then press the + or - Routine Maintenance When you replace the belt unit with a new one, you need to reset the belt unit counter by completing the following steps: a Turn the printer power switch back on.
button to choose Machine Info.. button to choose Reset Parts Life. b Press the + or - e Press OK two times. 6 115 c Press OK to proceed to choose Belt Unit. d Press OK, and then press the + button to the next menu level, and then press the + or - Routine Maintenance When you replace the belt unit with a new one, you need to reset the belt unit counter by completing the following steps: a Turn the printer power switch back on.
Users Manual - English
Page 211
... 36 PictBridge 26, 86 Plain paper 7 Power supply 5 Print Menu 80 Print quality 39 Printer driver 36, 47, 64, 173 Processor 172 R Register your product 189, 194 Reprint 42, 56 Reprint button 69, 70 Reset Menu 84 S Scanner window 125 Secure data 74 Service centers (USA/Canada 195 Service centres (Europe and other...
... 36 PictBridge 26, 86 Plain paper 7 Power supply 5 Print Menu 80 Print quality 39 Printer driver 36, 47, 64, 173 Processor 172 R Register your product 189, 194 Reprint 42, 56 Reprint button 69, 70 Reset Menu 84 S Scanner window 125 Secure data 74 Service centers (USA/Canada 195 Service centres (Europe and other...
Quick Setup Guide - English
Page 29
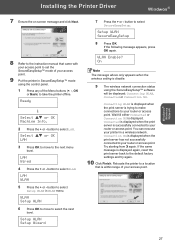
...Press the + or - Setup WLAN SecureEasySetup 8 Press OK. Wait till either Connected or Connection NG is displayed again, reset the print server back to take the printer offline. Connection NG is displayed when the print server has not successfully connected to a location that came with your access ...again. Connected is displayed when the print server is disable. 9 The wireless network connection status using the control panel. 1 Press any of the Menu buttons (+, -, OK or Back) to the default factory settings and try again. 10 Click Finish. Ready h Select ab or OK Machine Info. 2 ...
...Press the + or - Setup WLAN SecureEasySetup 8 Press OK. Wait till either Connected or Connection NG is displayed again, reset the print server back to take the printer offline. Connection NG is displayed when the print server has not successfully connected to a location that came with your access ...again. Connected is displayed when the print server is disable. 9 The wireless network connection status using the control panel. 1 Press any of the Menu buttons (+, -, OK or Back) to the default factory settings and try again. 10 Click Finish. Ready h Select ab or OK Machine Info. 2 ...
Quick Setup Guide - English
Page 31
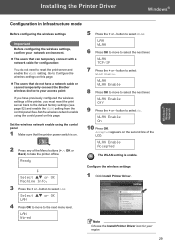
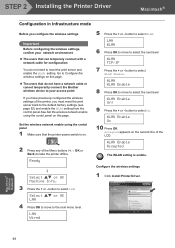
... 5 Press the + or - Accepted appears on this page. button to select On. button to select the next level. Note Choose the Install Printer Driver icon for configuration: You do not have a network cable or cannot temporarily connect the Brother wireless device to your region. 29 WLAN TCP/IP 7 Press ... that can temporary connect with a network cable for your access point: If you have previously configured the wireless settings of the printer, you must reset the print server back to the default factory settings (see page 52) and enable the WLAN setting from the control panel.See...
... 5 Press the + or - Accepted appears on this page. button to select On. button to select the next level. Note Choose the Install Printer Driver icon for configuration: You do not have a network cable or cannot temporarily connect the Brother wireless device to your region. 29 WLAN TCP/IP 7 Press ... that can temporary connect with a network cable for your access point: If you have previously configured the wireless settings of the printer, you must reset the print server back to the default factory settings (see page 52) and enable the WLAN setting from the control panel.See...
Quick Setup Guide - English
Page 44
... wireless network connection status using the control panel. 1 Press any of printer driver and the installation will be terminated. Connected is displayed when the print server is displayed again, reset the print server back to your wireless settings fail, and error message will...8226; If your router or access point. STEP 2 Installing the Printer Driver Macintosh® 9 Put the printer in SecureEasySetup™ mode using the SecureEasySetup™ software will be displayed; button to take the printer offline. button to a location that is displayed when the print server has ...
... wireless network connection status using the control panel. 1 Press any of printer driver and the installation will be terminated. Connected is displayed when the print server is displayed again, reset the print server back to your wireless settings fail, and error message will...8226; If your router or access point. STEP 2 Installing the Printer Driver Macintosh® 9 Put the printer in SecureEasySetup™ mode using the SecureEasySetup™ software will be displayed; button to take the printer offline. button to a location that is displayed when the print server has ...
Quick Setup Guide - English
Page 46
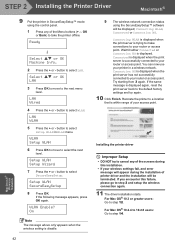
... to move to select the next level. Accepted appears on . 2 Press any of the Menu buttons (+, -, OK or Back) to take the printer offline. Configure the wireless settings 1 Click Install Printer Driver. button to select WLAN Enable. WLAN WLAN Enable 8 Press OK to move to select WLAN. LAN Wired...for configuration: You do not have a network cable or cannot temporarily connect the Brother wireless device to your access point: If you have previously configured the wireless settings of the printer, you must reset the print server back to the default factory settings (see page 52) and ...
... to move to select the next level. Accepted appears on . 2 Press any of the Menu buttons (+, -, OK or Back) to take the printer offline. Configure the wireless settings 1 Click Install Printer Driver. button to select WLAN Enable. WLAN WLAN Enable 8 Press OK to move to select WLAN. LAN Wired...for configuration: You do not have a network cable or cannot temporarily connect the Brother wireless device to your access point: If you have previously configured the wireless settings of the printer, you must reset the print server back to the default factory settings (see page 52) and ...

Quick Setup Guide - English
Page 54
... Factory Reset. button to choose Machine Info.. Machine Info. Please also make sure that allows you to print the Printer Settings Page. 52 Press OK. button to choose LAN. Select ab or OK LAN 2 Press the + or - For Network Users Web Based Management 3 (web browser) The Brother print... server is equipped with a web server that JavaScript and Cookie are always enabled in whichever browser you use. Note • The User Name is 'admin' and the default password is 192.168.1.2.) See Chapter 2 of the internal print server to default,...
... Factory Reset. button to choose Machine Info.. Machine Info. Please also make sure that allows you to print the Printer Settings Page. 52 Press OK. button to choose LAN. Select ab or OK LAN 2 Press the + or - For Network Users Web Based Management 3 (web browser) The Brother print... server is equipped with a web server that JavaScript and Cookie are always enabled in whichever browser you use. Note • The User Name is 'admin' and the default password is 192.168.1.2.) See Chapter 2 of the internal print server to default,...


