Users Manual - English
Page 7
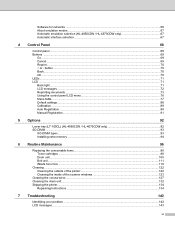
Software for networks ...66 About emulation modes...67 Automatic emulation selection (HL-4050CDN / HL-4070CDW only 67 Automatic interface selection...67 4 Control Panel 68 Control panel ...68 Buttons ...69 Go ...69 Cancel ...69 Reprint ...70 + or - button ......tray (LT-100CL) (HL-4050CDN / HL-4070CDW only 92 SO-DI M M ...93 SO-DIMM types ...93 Installing extra memory ...94 6 Routine Maintenance 96 Replacing the consumable items...96 Toner cartridges ...98 Drum unit ...105 Belt unit...111 Waste toner box ...116 Cleaning ...122 Cleaning the outside of the printer 122 Cleaning the inside...
Software for networks ...66 About emulation modes...67 Automatic emulation selection (HL-4050CDN / HL-4070CDW only 67 Automatic interface selection...67 4 Control Panel 68 Control panel ...68 Buttons ...69 Go ...69 Cancel ...69 Reprint ...70 + or - button ......tray (LT-100CL) (HL-4050CDN / HL-4070CDW only 92 SO-DI M M ...93 SO-DIMM types ...93 Installing extra memory ...94 6 Routine Maintenance 96 Replacing the consumable items...96 Toner cartridges ...98 Drum unit ...105 Belt unit...111 Waste toner box ...116 Cleaning ...122 Cleaning the outside of the printer 122 Cleaning the inside...
Users Manual - English
Page 10
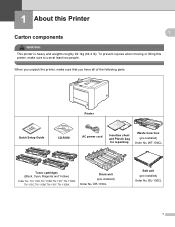
... TN-115C,TN-115M,TN-115Y,TN-115BK Drum unit (pre-installed) Order No. Printer Quick Setup Guide CD-ROM AC power cord Insertion sheet and Plastic bag for repacking Waste toner box (pre-installed) Order No. When you unpack the printer, make sure to use at least two people...100CL Toner cartridges (Black, Cyan, Magenta and Yellow) Order No. 1 About this printer, make sure that you have all of the following parts. To prevent injuries when moving or lifting this Printer 1 1 Carton components 1 WA RNING This printer is heavy and weights roughly 29.1kg (64.2 lb). DR-110CL Belt unit ...
... TN-115C,TN-115M,TN-115Y,TN-115BK Drum unit (pre-installed) Order No. Printer Quick Setup Guide CD-ROM AC power cord Insertion sheet and Plastic bag for repacking Waste toner box (pre-installed) Order No. When you unpack the printer, make sure to use at least two people...100CL Toner cartridges (Black, Cyan, Magenta and Yellow) Order No. 1 About this printer, make sure that you have all of the following parts. To prevent injuries when moving or lifting this Printer 1 1 Carton components 1 WA RNING This printer is heavy and weights roughly 29.1kg (64.2 lb). DR-110CL Belt unit ...
Users Manual - English
Page 86
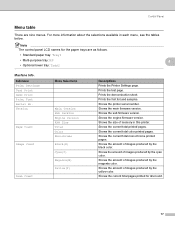
.... Note The control panel LCD names for drum unit. 77 Version Page Count Image Count Drum Count Menu Selections Main Version Sub Version Engine Version RAM Size Total Color Monochrome Black(K) Cyan(C) Magenta(M) Yellow(Y) Descriptions Prints the Printer Settings page. Shows the printer serial number. Shows the current total color printed pages. Shows the amount of...
.... Note The control panel LCD names for drum unit. 77 Version Page Count Image Count Drum Count Menu Selections Main Version Sub Version Engine Version RAM Size Total Color Monochrome Black(K) Cyan(C) Magenta(M) Yellow(Y) Descriptions Prints the Printer Settings page. Shows the printer serial number. Shows the current total color printed pages. Shows the amount of...
Users Manual - English
Page 106
...color toner cartridge. Change PF KitMP Paper feeding kit MP. (Paper pick-up roller Separator pad) 100,000 pages 1 Call your dealer or Brother..., call your dealer or Brother Customer Service for a replacement laser unit. Laser Unit End Laser unit 100,000 pages 1 Call your dealer or Brother Customer Service for a replacement..., percentage of coverage and type of media used. 97 Drum End Soon Drum Unit 17,000 pages 1 See page 105 DR-110CL ...the LCD when the printer is not a direct equivalent for the recommended paper, the life of consumable items and printer parts may be reduced...
...color toner cartridge. Change PF KitMP Paper feeding kit MP. (Paper pick-up roller Separator pad) 100,000 pages 1 Call your dealer or Brother..., call your dealer or Brother Customer Service for a replacement laser unit. Laser Unit End Laser unit 100,000 pages 1 Call your dealer or Brother Customer Service for a replacement..., percentage of coverage and type of media used. 97 Drum End Soon Drum Unit 17,000 pages 1 See page 105 DR-110CL ...the LCD when the printer is not a direct equivalent for the recommended paper, the life of consumable items and printer parts may be reduced...
Users Manual - English
Page 108
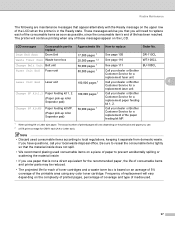
... recommend the use of cartridges other manufacturer's products with this machine. To protect your printer. If damage is caused to the drum unit or other part of using other than genuine Brother branded cartridges with this machine, any repairs required as a result of this optimum performance...also strongly recommend that is put it in the printer. CA UTI ON For UK and other specifications are used with your investment and obtain premium performance from the Brother machine, we strongly recommend the use of genuine Brother supplies. Our warranty coverage does not apply to...
... recommend the use of cartridges other manufacturer's products with this machine. To protect your printer. If damage is caused to the drum unit or other part of using other than genuine Brother branded cartridges with this machine, any repairs required as a result of this optimum performance...also strongly recommend that is put it in the printer. CA UTI ON For UK and other specifications are used with your investment and obtain premium performance from the Brother machine, we strongly recommend the use of genuine Brother supplies. Our warranty coverage does not apply to...
Users Manual - English
Page 109
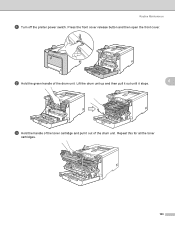
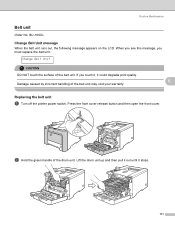
Press the front cover release button and then open the front cover. b Hold the green handle of the drum unit. Routine Maintenance a Turn off the printer power switch. Lift the drum unit up and then pull it out until it stops. 6 c Hold the handle of the toner cartridge and pull it out of the drum unit. Repeat this for all the toner cartridges. 100
Press the front cover release button and then open the front cover. b Hold the green handle of the drum unit. Routine Maintenance a Turn off the printer power switch. Lift the drum unit up and then pull it out until it stops. 6 c Hold the handle of the toner cartridge and pull it out of the drum unit. Repeat this for all the toner cartridges. 100

Users Manual - English
Page 113
Magenta 3.Y - Yellow 4.K - i Close the front cover of the toner cartridge and slide the toner cartridge into the drum unit. Repeat this for all the toner cartridges. (1) (1) 1 2 3 4 1.C - Black 6 h Put the drum unit back in place. Routine Maintenance g Hold the handle of the printer. 104 Make sure that you match the toner cartridge color to the same color label on the drum unit, and make sure that you fold down the toner cartridge handle (1) once the toner cartridge is in the printer. Cyan 2.M -
Magenta 3.Y - Yellow 4.K - i Close the front cover of the toner cartridge and slide the toner cartridge into the drum unit. Repeat this for all the toner cartridges. (1) (1) 1 2 3 4 1.C - Black 6 h Put the drum unit back in place. Routine Maintenance g Hold the handle of the printer. 104 Make sure that you match the toner cartridge color to the same color label on the drum unit, and make sure that you fold down the toner cartridge handle (1) once the toner cartridge is in the printer. Cyan 2.M -
Users Manual - English
Page 114
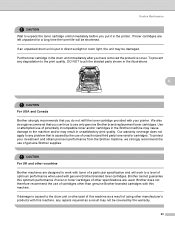
...it may be printed by the use only genuine Brother toner. The printer should be used only in the print quality. Warranty coverage does not apply to problems caused by your drum will be significantly less than this estimate. DR-110CL A new drum unit can print approximately 17,000 A4 or Letter...quality and life of toner used and so on page 122.) a Turn off the printer power switch. Under ideal conditions, the average drum life is estimated at approximately 17,000 pages. The actual number of the printer. (See Cleaning on . Press the front cover release button and then open the ...
...it may be printed by the use only genuine Brother toner. The printer should be used only in the print quality. Warranty coverage does not apply to problems caused by your drum will be significantly less than this estimate. DR-110CL A new drum unit can print approximately 17,000 A4 or Letter...quality and life of toner used and so on page 122.) a Turn off the printer power switch. Under ideal conditions, the average drum life is estimated at approximately 17,000 pages. The actual number of the printer. (See Cleaning on . Press the front cover release button and then open the ...
Users Manual - English
Page 115
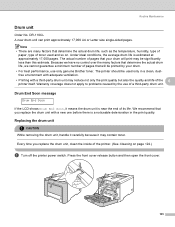
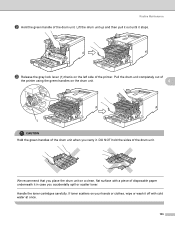
... then pull it out until it in case you accidentally spill or scatter toner. DO NOT hold the sides of the drum unit. Pull the drum unit completely out of the printer using the green handles on your hands or clothes, wipe or wash it . Routine Maintenance b Hold the green handle of... the drum unit. Handle the toner cartridges carefully. If toner scatters on the drum unit. 6 1 CA UTI ON Hold the green handles of the drum unit when you ...
... then pull it out until it in case you accidentally spill or scatter toner. DO NOT hold the sides of the drum unit. Pull the drum unit completely out of the printer using the green handles on your hands or clothes, wipe or wash it . Routine Maintenance b Hold the green handle of... the drum unit. Handle the toner cartridges carefully. If toner scatters on the drum unit. 6 1 CA UTI ON Hold the green handles of the drum unit when you ...

Users Manual - English
Page 116
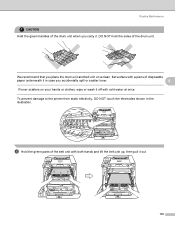
Repeat this for all the toner cartridges. 6 CA UTI ON To prevent damage to the printer from static electricity, DO NOT touch the electrodes shown in the illustrations. 107 To avoid print quality problems, DO NOT touch the shaded parts shown in the illustration. Routine Maintenance d Hold the handle of the toner cartridge and pull it out of the drum unit.
Repeat this for all the toner cartridges. 6 CA UTI ON To prevent damage to the printer from static electricity, DO NOT touch the electrodes shown in the illustrations. 107 To avoid print quality problems, DO NOT touch the shaded parts shown in the illustration. Routine Maintenance d Hold the handle of the toner cartridge and pull it out of the drum unit.

Users Manual - English
Page 117
... 1 CA UTI ON Wait to unpack a drum unit until immediately before you fold down the toner cartridge handle (1) once the toner cartridge is in the printer. Make sure that you match the toner cartridge color to direct sunlight or room light may damage the drum unit. 6 f Hold the handle of the... toner cartridge and slide the toner cartridge into the drum unit. Exposure to the same color label on the drum unit, and make ...
... 1 CA UTI ON Wait to unpack a drum unit until immediately before you fold down the toner cartridge handle (1) once the toner cartridge is in the printer. Make sure that you match the toner cartridge color to direct sunlight or room light may damage the drum unit. 6 f Hold the handle of the... toner cartridge and slide the toner cartridge into the drum unit. Exposure to the same color label on the drum unit, and make ...
Users Manual - English
Page 118
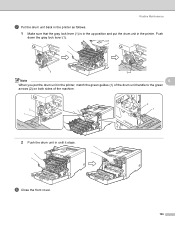
Push down the gray lock lever (1). 1 1 Note 6 When you put the drum unit in until it stops. h Close the front cover. 109 Routine Maintenance g Put the drum unit back in the printer as follows. 1 Make sure that the gray lock lever (1) is in the up position and put the drum unit in the printer, match the green guides (1) of the drum unit handle to the green arrows (2) on both sides of the machine. 2 1 2 1 2 Push the drum unit in the printer.
Push down the gray lock lever (1). 1 1 Note 6 When you put the drum unit in until it stops. h Close the front cover. 109 Routine Maintenance g Put the drum unit back in the printer as follows. 1 Make sure that the gray lock lever (1) is in the up position and put the drum unit in the printer, match the green guides (1) of the drum unit handle to the green arrows (2) on both sides of the machine. 2 1 2 1 2 Push the drum unit in the printer.

Users Manual - English
Page 119
b Press the + or - c Press OK to proceed to reset the drum counter by completing the following steps: a Turn the printer power switch back on. e Press OK two times. 6 110 Routine Maintenance When you replace the drum unit with a new one, you need to the next menu level, and then press the + or - key to choose Reset Parts Life. key to choose Machine Info.. d Press OK, and then press the + key to choose Drum Unit.
b Press the + or - c Press OK to proceed to reset the drum counter by completing the following steps: a Turn the printer power switch back on. e Press OK two times. 6 110 Routine Maintenance When you replace the drum unit with a new one, you need to the next menu level, and then press the + or - key to choose Reset Parts Life. key to choose Machine Info.. d Press OK, and then press the + key to choose Drum Unit.
Users Manual - English
Page 120
Replacing the belt unit 6 a Turn off the printer power switch. Press the front cover release button and then open the front cover. Lift the drum unit up and then pull it out until it could degrade print quality. 6 Damage caused by incorrect handling of the belt unit may void your ... Maintenance Belt unit 6 Order No. If you must replace the belt unit: Change Belt Unit CA UTI ON DO NOT touch the surface of the drum unit. When you see this message, you touch it, it stops. 111 BU-100CL Change Belt Unit message 6 When the belt unit runs out, the...
Replacing the belt unit 6 a Turn off the printer power switch. Press the front cover release button and then open the front cover. Lift the drum unit up and then pull it out until it could degrade print quality. 6 Damage caused by incorrect handling of the belt unit may void your ... Maintenance Belt unit 6 Order No. If you must replace the belt unit: Change Belt Unit CA UTI ON DO NOT touch the surface of the drum unit. When you see this message, you touch it, it stops. 111 BU-100CL Change Belt Unit message 6 When the belt unit runs out, the...

Users Manual - English
Page 121
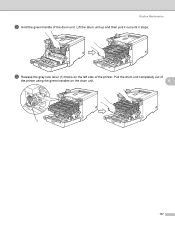
... out of the printer using the green handles on the drum unit. 1 6 CA UTI ON Hold the green handles of disposable paper underneath it . We recommend that is on the left side of the drum unit. Routine Maintenance c Release the gray lock lever (1) that you place the drum unit and belt ...unit on a clean, flat surface with a piece of the drum unit when you accidentally spill or scatter toner. To prevent damage to the printer from static electricity, DO NOT touch the electrodes shown in case you ...
... out of the printer using the green handles on the drum unit. 1 6 CA UTI ON Hold the green handles of disposable paper underneath it . We recommend that is on the left side of the drum unit. Routine Maintenance c Release the gray lock lever (1) that you place the drum unit and belt ...unit on a clean, flat surface with a piece of the drum unit when you accidentally spill or scatter toner. To prevent damage to the printer from static electricity, DO NOT touch the electrodes shown in case you ...

Users Manual - English
Page 123
Push down the gray lock lever (1). 1 1 Note 6 When you put the drum unit in until it stops. h Close the front cover. 114 Routine Maintenance g Put the drum unit back in the printer as follows. 1 Make sure that the gray lock lever (1) is in the up position and put the drum unit in the printer, match the green guides (1) of the drum unit handle to the green arrows (2) on both sides of the machine. 2 1 2 1 2 Push the drum unit in the printer.
Push down the gray lock lever (1). 1 1 Note 6 When you put the drum unit in until it stops. h Close the front cover. 114 Routine Maintenance g Put the drum unit back in the printer as follows. 1 Make sure that the gray lock lever (1) is in the up position and put the drum unit in the printer, match the green guides (1) of the drum unit handle to the green arrows (2) on both sides of the machine. 2 1 2 1 2 Push the drum unit in the printer.
Users Manual - English
Page 126
c Release the gray lock lever (1) that is on the drum unit. 6 1 117 Lift the drum unit up and then pull it out until it stops. Pull the drum unit completely out of the printer using the green handles on the left side of the drum unit. Routine Maintenance b Hold the green handle of the printer.
c Release the gray lock lever (1) that is on the drum unit. 6 1 117 Lift the drum unit up and then pull it out until it stops. Pull the drum unit completely out of the printer using the green handles on the left side of the drum unit. Routine Maintenance b Hold the green handle of the printer.
Users Manual - English
Page 127
... that you carry it out. 118 DO NOT hold the sides of the belt unit with cold water at once. To prevent damage to the printer from static electricity, DO NOT touch the electrodes shown in case you accidentally spill or scatter toner. 6 If toner scatters on a clean, flat surface with... a piece of the drum unit when you place the drum unit and belt unit on your hands or clothes, wipe or wash it off with both hands and lift the belt unit up...
... that you carry it out. 118 DO NOT hold the sides of the belt unit with cold water at once. To prevent damage to the printer from static electricity, DO NOT touch the electrodes shown in case you accidentally spill or scatter toner. 6 If toner scatters on a clean, flat surface with... a piece of the drum unit when you place the drum unit and belt unit on your hands or clothes, wipe or wash it off with both hands and lift the belt unit up...

Users Manual - English
Page 129
Push 6 down on the green area of the belt unit to lock it in the printer, match the green guides (1) of the drum unit handle to the g mark on both sides of the machine. 2 1 2 1 120 h Put the drum unit back in the printer as follows. 1 Make sure that the gray lock lever (1) is in the up position and put the drum unit in place. Push down the gray lock lever (1). 1 1 Note When you put the drum unit in the printer. Match the h mark on the belt unit to the green arrows (2) on the printer. Routine Maintenance g Put the belt unit back in the printer.
Push 6 down on the green area of the belt unit to lock it in the printer, match the green guides (1) of the drum unit handle to the g mark on both sides of the machine. 2 1 2 1 120 h Put the drum unit back in the printer as follows. 1 Make sure that the gray lock lever (1) is in the up position and put the drum unit in place. Push down the gray lock lever (1). 1 1 Note When you put the drum unit in the printer. Match the h mark on the belt unit to the green arrows (2) on the printer. Routine Maintenance g Put the belt unit back in the printer.
Users Manual - English
Page 131
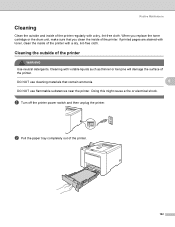
...the outside and inside of the printer. If printed pages are stained with toner, clean the inside of the printer with volatile liquids such as thinner or benzine will damage the surface of the printer. When you replace the toner cartridge or the drum unit, make sure that contain ...ammonia. 6 DO NOT use flammable substances near the printer. Routine Maintenance Cleaning 6 Clean...
...the outside and inside of the printer. If printed pages are stained with toner, clean the inside of the printer with volatile liquids such as thinner or benzine will damage the surface of the printer. When you replace the toner cartridge or the drum unit, make sure that contain ...ammonia. 6 DO NOT use flammable substances near the printer. Routine Maintenance Cleaning 6 Clean...


