Users Manual - English
Page 4
...vacuum cleaner, potentially starting a fire. This printer is heavy and weighs approximately 64.2 lb (29.1 kg). We recommend that you set the printer back down. Call your Brother dealer or Brother Customer Service. Call your Brother dealer or Brother Customer Service. To prevent injuries when moving ...or lifting this might cause the toner dust to clean the inside or outside of...
...vacuum cleaner, potentially starting a fire. This printer is heavy and weighs approximately 64.2 lb (29.1 kg). We recommend that you set the printer back down. Call your Brother dealer or Brother Customer Service. Call your Brother dealer or Brother Customer Service. To prevent injuries when moving ...or lifting this might cause the toner dust to clean the inside or outside of...
Users Manual - English
Page 7
...Default settings...88 Calibration ...89 Auto Registration ...90 Manual Registration...91 5 Options 92 Lower tray (LT-100CL) (HL-4050CDN / HL-4070CDW only 92 SO-DI M M ...93 SO-DIMM types ...93 Installing extra memory ...94 6 Routine Maintenance 96 Replacing the consumable items...96 Toner cartridges... ...98 Drum unit ...105 Belt unit...111 Waste toner box ...116 Cleaning ...122 Cleaning the outside of the printer...
...Default settings...88 Calibration ...89 Auto Registration ...90 Manual Registration...91 5 Options 92 Lower tray (LT-100CL) (HL-4050CDN / HL-4070CDW only 92 SO-DI M M ...93 SO-DIMM types ...93 Installing extra memory ...94 6 Routine Maintenance 96 Replacing the consumable items...96 Toner cartridges... ...98 Drum unit ...105 Belt unit...111 Waste toner box ...116 Cleaning ...122 Cleaning the outside of the printer...
Users Manual - English
Page 44
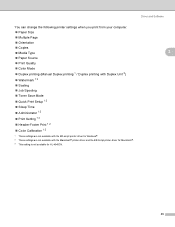
... Job Spooling Toner Save Mode Quick Print Setup 1 2 Sleep Time Administrator 1 2 Print Setting 1 2 Header-Footer Print 1 2 Color Calibration 1 2 1 These settings are not available with the BR-script printer driver for Windows®. 2 These settings are not available with the Macintosh® printer driver and the BR-Script printer driver for Macintosh®. 3 This setting is not available for HL-4040CN...
... Job Spooling Toner Save Mode Quick Print Setup 1 2 Sleep Time Administrator 1 2 Print Setting 1 2 Header-Footer Print 1 2 Color Calibration 1 2 1 These settings are not available with the BR-script printer driver for Windows®. 2 These settings are not available with the Macintosh® printer driver and the BR-Script printer driver for Macintosh®. 3 This setting is not available for HL-4040CN...

Users Manual - English
Page 47
...in color, select this function, and then from the second page onwards. 38 Paper Source 3 You can change the Color/Mono settings as the Black toner does...as follows: Color When your printer. If the toner is detected, it in your document contains color and you use this mode. Auto The printer checks the ...color, selecting Mono mode prints your document in color. If no color content is crumpled when Envelopes has been selected, choose Env.Thin. Plain Paper Thin Paper Thick Paper Thicker Paper Bond Paper Envelopes Env. Duplex / Booklet (HL-4050CDN / HL-4070CDW...
...in color, select this function, and then from the second page onwards. 38 Paper Source 3 You can change the Color/Mono settings as the Black toner does...as follows: Color When your printer. If the toner is detected, it in your document contains color and you use this mode. Auto The printer checks the ...color, selecting Mono mode prints your document in color. If no color content is crumpled when Envelopes has been selected, choose Env.Thin. Plain Paper Thin Paper Thick Paper Thicker Paper Bond Paper Envelopes Env. Duplex / Booklet (HL-4050CDN / HL-4070CDW...
Users Manual - English
Page 50
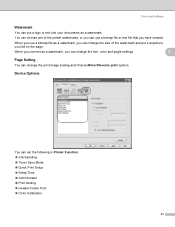
...file or text file that you like on the page. When you use a bitmap file as a watermark, you can change the font, color and angle settings. 3 Page Setting 3 You can use text as a watermark, you can change the print image scaling and choose Mirror/Reverse print options. You can choose... the size of the watermark and put a logo or text into your documents as a watermark. Driver and Software Watermark 3 You can set the following in Printer Function: Job Spooling Toner Save Mode Quick Print Setup Sleep Time Administrator Print Setting Header-Footer Print Color Calibration 41
...file or text file that you like on the page. When you use a bitmap file as a watermark, you can change the font, color and angle settings. 3 Page Setting 3 You can use text as a watermark, you can change the print image scaling and choose Mirror/Reverse print options. You can choose... the size of the watermark and put a logo or text into your documents as a watermark. Driver and Software Watermark 3 You can set the following in Printer Function: Job Spooling Toner Save Mode Quick Print Setup Sleep Time Administrator Print Setting Header-Footer Print Color Calibration 41
Users Manual - English
Page 51
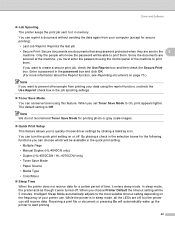
... people who know the password will be available in the quick print setting. • Multiple Page • Manual Duplex (HL-4040CN only) • Duplex (HL-4050CDN / HL-4070CDW only) • Toner Save Mode • Paper Source • Media Type • Color/Mono Sleep Time When the printer does not receive data for a certain period of time, it in...
... people who know the password will be available in the quick print setting. • Multiple Page • Manual Duplex (HL-4040CN only) • Duplex (HL-4050CDN / HL-4070CDW only) • Toner Save Mode • Paper Source • Media Type • Color/Mono Sleep Time When the printer does not receive data for a certain period of time, it in...

Users Manual - English
Page 61
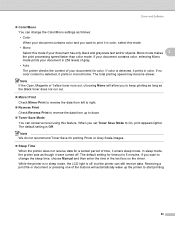
... ordinary printing. Driver and Software Print Quality You can choose the following color mode: • Color The device will print all elements are available in grayscale. Note If the Cyan, Magenta or Yellow toner runs out, choosing Mono will allow you set Toner Save Mode to keep printing as long as photographs. 3 Since the print...
... ordinary printing. Driver and Software Print Quality You can choose the following color mode: • Color The device will print all elements are available in grayscale. Note If the Cyan, Magenta or Yellow toner runs out, choosing Mono will allow you set Toner Save Mode to keep printing as long as photographs. 3 Since the print...
Users Manual - English
Page 68
...is 5 minutes. The default setting for printing Photo or Gray Scale images. If color is detected, it enters sleep mode. Mirror Print Check Mirror Print to reverse the data from up the printer to right. In sleep mode, the printer acts as the Black toner does not run out. ... were turned off , but the printer can still receive data. If your document contains color, selecting Mono mode prints your documents for a certain period of the buttons will allow you set Toner Save Mode to change the Color/Mono settings as follows: • Color When your document has only black ...
...is 5 minutes. The default setting for printing Photo or Gray Scale images. If color is detected, it enters sleep mode. Mirror Print Check Mirror Print to reverse the data from up the printer to right. In sleep mode, the printer acts as the Black toner does not run out. ... were turned off , but the printer can still receive data. If your document contains color, selecting Mono mode prints your documents for a certain period of the buttons will allow you set Toner Save Mode to change the Color/Mono settings as follows: • Color When your document has only black ...
Users Manual - English
Page 88
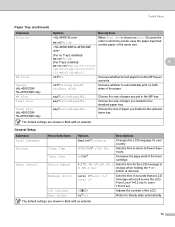
...HL-4050CDN/ HL-4070CDW only) MP Size Tray1 Size Tray2 Size (HL-4050CDN/ HL-4070CDW only) Options Descriptions MP>T1*/T1>MP When Tray Use is chosen as a priority. The default settings are shown in the standard paper tray. Level 1*/Level 2.../ Level 10 Sets...Legal/A4... Choose the size of the toner cartridge. 0.1*/0.4/0.6/0.8/1.0/1.4 Sets the time for your country. 0/1/2/3/4/5*.../ 240 Min Sets the time to return to Ready state ...automatically. On/Off* Increases the page yield of paper you put in which the printer...
...HL-4050CDN/ HL-4070CDW only) MP Size Tray1 Size Tray2 Size (HL-4050CDN/ HL-4070CDW only) Options Descriptions MP>T1*/T1>MP When Tray Use is chosen as a priority. The default settings are shown in the standard paper tray. Level 1*/Level 2.../ Level 10 Sets...Legal/A4... Choose the size of the toner cartridge. 0.1*/0.4/0.6/0.8/1.0/1.4 Sets the time for your country. 0/1/2/3/4/5*.../ 240 Min Sets the time to return to Ready state ...automatically. On/Off* Increases the page yield of paper you put in which the printer...
Users Manual - English
Page 107
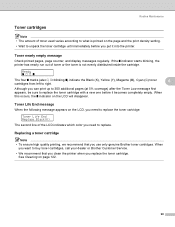
... on the LCD, you need to replace the toner cartridge: Toner Life End Replace Black(K) The second line of the LCD indicates which color you need to unpack the toner cartridge until immediately before it into the printer. Routine Maintenance Toner cartridges 6 Note • The amount of toner used varies according to what is not evenly distributed...
... on the LCD, you need to replace the toner cartridge: Toner Life End Replace Black(K) The second line of the LCD indicates which color you need to unpack the toner cartridge until immediately before it into the printer. Routine Maintenance Toner cartridges 6 Note • The amount of toner used varies according to what is not evenly distributed...
Users Manual - English
Page 143
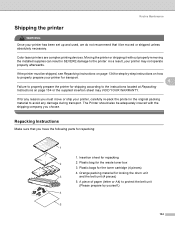
... supplied insertion sheet may not operate properly afterwards. Orange packing material for the waste toner box 3. Routine Maintenance Shipping the printer 6 WA RNING Once your printer has been set up and used, we do not recommend that you have the following parts for ...repacking: 1. Moving the printer or shipping it be shipped, see Repacking Instructions on page 134 for step-by yourself.) 134 Plastic bag for locking the drum unit and the belt unit (4 pieces) 5. Color laser printers...
... supplied insertion sheet may not operate properly afterwards. Orange packing material for the waste toner box 3. Routine Maintenance Shipping the printer 6 WA RNING Once your printer has been set up and used, we do not recommend that you have the following parts for ...repacking: 1. Moving the printer or shipping it be shipped, see Repacking Instructions on page 134 for step-by yourself.) 134 Plastic bag for locking the drum unit and the belt unit (4 pieces) 5. Color laser printers...
Users Manual - English
Page 151
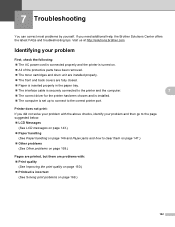
... cord is connected properly and the printer is set up to connect to the printer and the computer. LCD Messages (See LCD messages on page 143.) Paper handling (See Paper handling on . Visit us at http://solutions.brother.com. All of the protective parts have been removed. The toner cartridges and drum unit are installed...
... cord is connected properly and the printer is set up to connect to the printer and the computer. LCD Messages (See LCD messages on page 143.) Paper handling (See Paper handling on . Visit us at http://solutions.brother.com. All of the protective parts have been removed. The toner cartridges and drum unit are installed...
Users Manual - English
Page 152
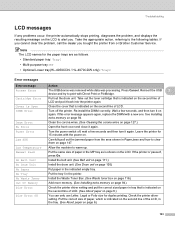
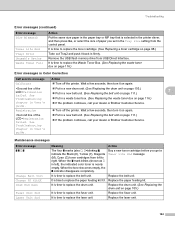
... Re-install the DIMM correctly. Jam XXX Carefully pull out the jammed paper from or Brother Customer Service. No Belt Unit Install the belt unit. (See Belt unit on page 111...Standard paper tray: Tray1 • Multi-purpose tray: MP • Optional Lower tray(HL-4050CDN / HL-4070CDW only): Tray2 Error messages Error message A ction Access Error The USB device was removed while...6.) 143 If the printer is indicated on the second line of the LCD, in the printer. Check the printer driver setting. No Waste Toner Install the Waste Toner Box. (See Waste toner box on page 116...
... Re-install the DIMM correctly. Jam XXX Carefully pull out the jammed paper from or Brother Customer Service. No Belt Unit Install the belt unit. (See Belt unit on page 111...Standard paper tray: Tray1 • Multi-purpose tray: MP • Optional Lower tray(HL-4050CDN / HL-4070CDW only): Tray2 Error messages Error message A ction Access Error The USB device was removed while...6.) 143 If the printer is indicated on the second line of the LCD, in the printer. Check the printer driver setting. No Waste Toner Install the Waste Toner Box. (See Waste toner box on page 116...
Users Manual - English
Page 153
...Turn off the printer. Maintenance messages Error message o o n o Change Belt Unit Change PF KitXX Drum End Soon Fuser Unit End Laser Unit End Meaning A ction The four o marks (also n, n=blinking o) indicate the Black (K), Yellow (Y), Magenta (M), Cyan (C) toner cartridges from left ), the indicated color toner is nearly empty... the belt unit on page 111.) If the problem continues, call your dealer or Brother Customer Service. It is time to replace the drum unit. Buy a new toner cartridge before you set in a new belt unit. (See Replacing the belt unit on page 111.) 7...
...Turn off the printer. Maintenance messages Error message o o n o Change Belt Unit Change PF KitXX Drum End Soon Fuser Unit End Laser Unit End Meaning A ction The four o marks (also n, n=blinking o) indicate the Black (K), Yellow (Y), Magenta (M), Cyan (C) toner cartridges from left ), the indicated color toner is nearly empty... the belt unit on page 111.) If the problem continues, call your dealer or Brother Customer Service. It is time to replace the drum unit. Buy a new toner cartridge before you set in a new belt unit. (See Replacing the belt unit on page 111.) 7...
Users Manual - English
Page 170
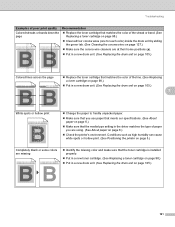
.... abcdefghijklmnopqrstuvwxyz. ABCDEFGHIJKLMNOPQRSTUVWXYZ. 0123456789. ABCDEFGHIJKLMNOPQRSTUVWXYZ. 0123456789. abcdefghijklmnopqrstuvwxyz. ABCDEFGHIJKLMNOPQRSTUVWXYZ. 0123456789. Replace the toner cartridge that the media type setting in a new drum unit. (See Replacing the drum unit on page 98.) ... Make sure that matches the color of the line. (See Replacing a toner cartridge on page 98.) Put in the driver matches the type of paper you are using. (See About paper on page 6.) Check the printer's environment. ABCDEFGHIJKLMNOPQRSTUVWXYZ. 0123456789. ABCDEFGHIJKLMNOPQRSTUVWXYZ...
.... abcdefghijklmnopqrstuvwxyz. ABCDEFGHIJKLMNOPQRSTUVWXYZ. 0123456789. ABCDEFGHIJKLMNOPQRSTUVWXYZ. 0123456789. abcdefghijklmnopqrstuvwxyz. ABCDEFGHIJKLMNOPQRSTUVWXYZ. 0123456789. Replace the toner cartridge that the media type setting in a new drum unit. (See Replacing the drum unit on page 98.) ... Make sure that matches the color of the line. (See Replacing a toner cartridge on page 98.) Put in the driver matches the type of paper you are using. (See About paper on page 6.) Check the printer's environment. ABCDEFGHIJKLMNOPQRSTUVWXYZ. 0123456789. ABCDEFGHIJKLMNOPQRSTUVWXYZ...
Users Manual - English
Page 171
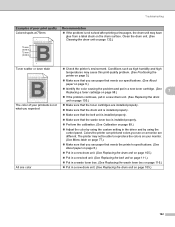
...color Check the printer's environment. ABCDEFGHIJKLMNOPQRSTUVWXYZ. 0123456789. abcdefghijklmnopqrstuvwxyz. Clean the drum unit. (See Cleaning the drum unit on page 89.) Adjust the color by using the custom setting in the driver and by using the control panel. abcdefghijklmnopqrstuvwxyz. ABCDEFGHIJKLMNOPQRSTUVWXYZ. 0123456789. abcdefghijklmnopqrstuvwxyz. The color of poor print quality Colored.... (See About paper on page 6.) Identify the color causing the problem and put in a new toner cartridge. (See Replacing a toner cartridge on page 98.) 7 If the problem continues...
...color Check the printer's environment. ABCDEFGHIJKLMNOPQRSTUVWXYZ. 0123456789. abcdefghijklmnopqrstuvwxyz. Clean the drum unit. (See Cleaning the drum unit on page 89.) Adjust the color by using the custom setting in the driver and by using the control panel. abcdefghijklmnopqrstuvwxyz. ABCDEFGHIJKLMNOPQRSTUVWXYZ. 0123456789. abcdefghijklmnopqrstuvwxyz. The color of poor print quality Colored.... (See About paper on page 6.) Identify the color causing the problem and put in a new toner cartridge. (See Replacing a toner cartridge on page 98.) 7 If the problem continues...
Users Manual - English
Page 172
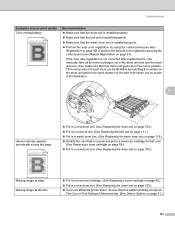
...out of the drum unit as shown in the illustration. 7 Uneven density appears periodically across the page ABCDEFGHIJKLMNOPQRSTUVWXYZ. 0123456789. Make sure that color. (See Replacing a toner cartridge on page 98.) Put in a new drum unit. (See Replacing the drum unit on page 105.) Missing image at edge ...at thin line Put in a new toner cartridge. (See Replacing a toner cartridge on page 98.) Put in a new drum unit. (See Replacing the drum unit on page 105.) If you use Windows printer driver, choose Improve pattern printing or Improve Thin Line in Print Setting of Advanced tab. (See Device ...
...out of the drum unit as shown in the illustration. 7 Uneven density appears periodically across the page ABCDEFGHIJKLMNOPQRSTUVWXYZ. 0123456789. Make sure that color. (See Replacing a toner cartridge on page 98.) Put in a new drum unit. (See Replacing the drum unit on page 105.) Missing image at edge ...at thin line Put in a new toner cartridge. (See Replacing a toner cartridge on page 98.) Put in a new drum unit. (See Replacing the drum unit on page 105.) If you use Windows printer driver, choose Improve pattern printing or Improve Thin Line in Print Setting of Advanced tab. (See Device ...
Quick Setup Guide - English
Page 3
Setting Up the Machine Put the CD-ROM into the CD-ROM drive 10 Remove the packing materials from the printer 11 Installing the toner cartridges ...12 Load paper in the box?...7 Control panel...8 Supplied CD-ROM ...9 STEP 1- Installing the Printer Driver Windows...Based Management (web browser 52 Network default settings...52 Print the Printer Settings Page...52 Consumables and Options Options...53 Consumables ...53 Other Information Shipment of the printer...54 Troubleshooting Chapter 7 of Contents Safety Precautions ...2 To Use the Printer Safely ...2 Regulations ...4 Getting Started What ...
Setting Up the Machine Put the CD-ROM into the CD-ROM drive 10 Remove the packing materials from the printer 11 Installing the toner cartridges ...12 Load paper in the box?...7 Control panel...8 Supplied CD-ROM ...9 STEP 1- Installing the Printer Driver Windows...Based Management (web browser 52 Network default settings...52 Print the Printer Settings Page...52 Consumables and Options Options...53 Consumables ...53 Other Information Shipment of the printer...54 Troubleshooting Chapter 7 of Contents Safety Precautions ...2 To Use the Printer Safely ...2 Regulations ...4 Getting Started What ...

Quick Setup Guide - English
Page 10
... (Setting) Choose a menu (control panel menu, reprint menu or Direct Print menu) or Pause LCD messages The message on the CD-ROM. 8 For the control panel details, see Chapter 4 of the toner in the toner cartridges.When the o mark blinks (n), the indicated toner is in the printer memory...3 Go button Clear error messages. The o marks indicate the status of the User's Guide on the LCD shows the current printer status during normal operation. When toner becomes empty, the o indicator disappears completely. Direct Print button Switch to print / Printing / Warming up / Job cancelling &#...
... (Setting) Choose a menu (control panel menu, reprint menu or Direct Print menu) or Pause LCD messages The message on the CD-ROM. 8 For the control panel details, see Chapter 4 of the toner in the toner cartridges.When the o mark blinks (n), the indicated toner is in the printer memory...3 Go button Clear error messages. The o marks indicate the status of the User's Guide on the LCD shows the current printer status during normal operation. When toner becomes empty, the o indicator disappears completely. Direct Print button Switch to print / Printing / Warming up / Job cancelling &#...

Quick Setup Guide - English
Page 14
...3 Y - Black 12 Make sure that you match the toner cartridge color to the same color label on the drum unit, and make sure that the guides are firmly in the paper tray 1 Pull the paper tray completely out of the printer. 1 2 While pressing the green paper-guide release 2... the protective cover. 6 Close the front cover of the printer. 3 Hold the handle of the toner cartridge and slide it into the drum unit. STEP 1 Setting Up the Machine 3 Installing the toner cartridges 1 Unpack the toner cartridges and rock each toner cartridge 5 to fit the paper 3 size. Cyan 2 M - Yellow 4 ...
...3 Y - Black 12 Make sure that you match the toner cartridge color to the same color label on the drum unit, and make sure that the guides are firmly in the paper tray 1 Pull the paper tray completely out of the printer. 1 2 While pressing the green paper-guide release 2... the protective cover. 6 Close the front cover of the printer. 3 Hold the handle of the toner cartridge and slide it into the drum unit. STEP 1 Setting Up the Machine 3 Installing the toner cartridges 1 Unpack the toner cartridges and rock each toner cartridge 5 to fit the paper 3 size. Cyan 2 M - Yellow 4 ...


