Users Manual - English
Page 3
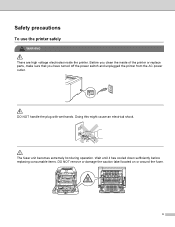
Safety precautions To use the printer safely WA RNING There are high voltage electrodes inside of the printer or replace parts, make sure that you clean the inside the printer. The fuser unit becomes extremely hot during operation. Wait until it has cooled down sufficiently before replacing consumable items. DO NOT remove or damage the caution label located on or around the fuser. DO NOT handle the plug with wet hands. Before you have turned off the power switch and unplugged the printer from the AC power outlet. ii Doing this might cause an electrical shock.
Safety precautions To use the printer safely WA RNING There are high voltage electrodes inside of the printer or replace parts, make sure that you clean the inside the printer. The fuser unit becomes extremely hot during operation. Wait until it has cooled down sufficiently before replacing consumable items. DO NOT remove or damage the caution label located on or around the fuser. DO NOT handle the plug with wet hands. Before you have turned off the power switch and unplugged the printer from the AC power outlet. ii Doing this might cause an electrical shock.
Users Manual - English
Page 8
... underneath the standard paper tray (tray 1) or in the fuser unit) (HL-4050CDN / HL-4070CDW only 150 Jam Rear (paper jam behind the back cover 153 Jam Inside (paper jam inside the printer 156 Improving the print quality...160 Solving print problems ...169 ... and Other Countries) 189 Brother numbers ...189 Important information: regulations ...190 Radio interference (220 to 240 volt model only 190 International ENERGY STAR® Compliance Statement (For HL-4050CDN / HL-4070CDW only) ..190 IEC 60825-1 specification (220 to 240 volt model only 190 Internal laser radiation ...191 IMPORTANT -...
... underneath the standard paper tray (tray 1) or in the fuser unit) (HL-4050CDN / HL-4070CDW only 150 Jam Rear (paper jam behind the back cover 153 Jam Inside (paper jam inside the printer 156 Improving the print quality...160 Solving print problems ...169 ... and Other Countries) 189 Brother numbers ...189 Important information: regulations ...190 Radio interference (220 to 240 volt model only 190 International ENERGY STAR® Compliance Statement (For HL-4050CDN / HL-4070CDW only) ..190 IEC 60825-1 specification (220 to 240 volt model only 190 Internal laser radiation ...191 IMPORTANT -...
Users Manual - English
Page 87
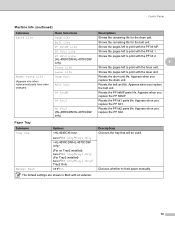
...been changed) Menu Selections Drum Life Belt Life PF KitMP Life PF Kit1 Life PF Kit2 Life (HL-4050CDN/HL-4070CDW only) Fuser Life Laser Life Drum Unit Belt Unit PF KitMP PF Kit1 PF Kit2 (HL-4050CDN/HL-4070CDW only) Descriptions Shows the remaining life for the belt unit. Shows the pages left to feed paper... Only/Tray1 Only (For Tray2 installed) Auto*/MP Only/Tray1 Only/ Tray2 Only Off*/On The default settings are shown in Bold with the fuser unit. Shows the remaining life for the drum unit. Resets the drum unit life. Appears when you replace the PF KitMP. Resets the belt...
...been changed) Menu Selections Drum Life Belt Life PF KitMP Life PF Kit1 Life PF Kit2 Life (HL-4050CDN/HL-4070CDW only) Fuser Life Laser Life Drum Unit Belt Unit PF KitMP PF Kit1 PF Kit2 (HL-4050CDN/HL-4070CDW only) Descriptions Shows the remaining life for the belt unit. Shows the pages left to feed paper... Only/Tray1 Only (For Tray2 installed) Auto*/MP Only/Tray1 Only/ Tray2 Only Off*/On The default settings are shown in Bold with the fuser unit. Shows the remaining life for the drum unit. Resets the drum unit life. Appears when you replace the PF KitMP. Resets the belt...
Users Manual - English
Page 106
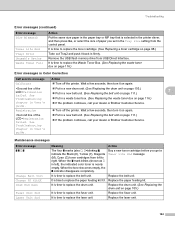
...100CL Fuser Unit End Fuser unit 80,000 pages 1 Call your dealer or Brother Customer Service for a replacement laser unit. Laser Unit End Laser unit 100,000 pages 1 Call your dealer or Brother Customer ...up roller Separator pad) 50,000 pages 1 Call your local waste disposal office. The printer will vary depending on a piece of paper to prevent accidentally spilling or scattering the ...color toner cartridge. Change PF KitMP Paper feeding kit MP. (Paper pick-up roller Separator pad) 100,000 pages 1 Call your dealer or Brother 6 Customer Service for a replacement fuser...
...100CL Fuser Unit End Fuser unit 80,000 pages 1 Call your dealer or Brother Customer Service for a replacement laser unit. Laser Unit End Laser unit 100,000 pages 1 Call your dealer or Brother Customer ...up roller Separator pad) 50,000 pages 1 Call your local waste disposal office. The printer will vary depending on a piece of paper to prevent accidentally spilling or scattering the ...color toner cartridge. Change PF KitMP Paper feeding kit MP. (Paper pick-up roller Separator pad) 100,000 pages 1 Call your dealer or Brother 6 Customer Service for a replacement fuser...
Users Manual - English
Page 152
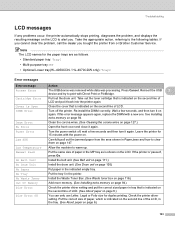
... Error Turn off , wait a few seconds, and then turn it on again. Fuser Error Turn the power switch off the printer. Jam XXX Carefully pull out the jammed paper from or Brother Customer Service. Put the correct size of paper, which is indicated on the second line... of the LCD, in the MP tray as follows. • Standard paper tray: Tray1 • Multi-purpose tray: MP • Optional Lower tray(HL-4050CDN / HL-4070CDW...
... Error Turn off , wait a few seconds, and then turn it on again. Fuser Error Turn the power switch off the printer. Jam XXX Carefully pull out the jammed paper from or Brother Customer Service. Put the correct size of paper, which is indicated on the second line... of the LCD, in the MP tray as follows. • Standard paper tray: Tray1 • Multi-purpose tray: MP • Optional Lower tray(HL-4050CDN / HL-4070CDW...
Users Manual - English
Page 153
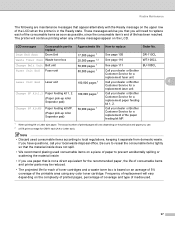
...See Replacing the belt unit on page 111.) If the problem continues, call your dealer or Brother Customer Service. Maintenance messages Error message o o n o Change Belt Unit Change PF KitXX Drum End Soon Fuser Unit End Laser Unit End Meaning A ction The four o marks (also n, n=blinking o) indicate the Black...Error messages in Color Correction Call service message Action Calibrate Turn off the printer. It is time to replace the toner cartridge. (See Replacing a toner cartridge on page 98.) Take out Tray2 and push it on again. Registration Turn off the printer. When the ...
...See Replacing the belt unit on page 111.) If the problem continues, call your dealer or Brother Customer Service. Maintenance messages Error message o o n o Change Belt Unit Change PF KitXX Drum End Soon Fuser Unit End Laser Unit End Meaning A ction The four o marks (also n, n=blinking o) indicate the Black...Error messages in Color Correction Call service message Action Calibrate Turn off the printer. It is time to replace the toner cartridge. (See Replacing a toner cartridge on page 98.) Take out Tray2 and push it on again. Registration Turn off the printer. When the ...
Users Manual - English
Page 156
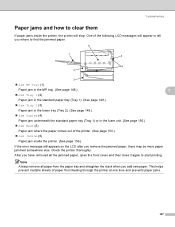
...prevent multiple sheets of the following LCD messages will stop. Troubleshooting Paper jams and how to clear them 7 If paper jams inside the printer, the printer will appear to tell you where to start printing. One of paper from the paper tray and straighten the stack when you have removed... (4) Paper jam underneath the standard paper tray (Tray 1) or in the fuser unit. (See page 150.) Jam Rear (5) Paper jam where the paper comes out of the printer. (See page 153.) Jam Inside (6) Paper jam inside the printer. (See page 156.) If the error message still appears on the LCD after...
...prevent multiple sheets of the following LCD messages will stop. Troubleshooting Paper jams and how to clear them 7 If paper jams inside the printer, the printer will appear to tell you where to start printing. One of paper from the paper tray and straighten the stack when you have removed... (4) Paper jam underneath the standard paper tray (Tray 1) or in the fuser unit. (See page 150.) Jam Rear (5) Paper jam where the paper comes out of the printer. (See page 153.) Jam Inside (6) Paper jam inside the printer. (See page 156.) If the error message still appears on the LCD after...
Users Manual - English
Page 159
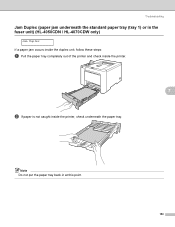
Note Do not put the paper tray back in the fuser unit) (HL-4050CDN / HL-4070CDW only) 7 Jam Duplex If a paper jam occurs inside the duplex unit, follow these steps: a Pull the paper tray completely out of the printer and check inside the printer. 7 b If paper is not caught inside the printer, check underneath the paper tray. Troubleshooting Jam Duplex (paper jam underneath the standard paper tray (tray 1) or in at this point. 150
Note Do not put the paper tray back in the fuser unit) (HL-4050CDN / HL-4070CDW only) 7 Jam Duplex If a paper jam occurs inside the duplex unit, follow these steps: a Pull the paper tray completely out of the printer and check inside the printer. 7 b If paper is not caught inside the printer, check underneath the paper tray. Troubleshooting Jam Duplex (paper jam underneath the standard paper tray (tray 1) or in at this point. 150
Users Manual - English
Page 163
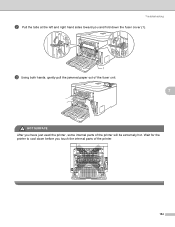
Wait for the printer to cool down the fuser cover (1). 1 c Using both hands, gently pull the jammed paper out of the fuser unit. 7 HOT SURFACE After you touch the internal parts of the printer will be extremely hot. Troubleshooting b Pull the tabs at the left and right hand sides toward you and fold down before you have just used the printer, some internal parts of the printer. 154
Wait for the printer to cool down the fuser cover (1). 1 c Using both hands, gently pull the jammed paper out of the fuser unit. 7 HOT SURFACE After you touch the internal parts of the printer will be extremely hot. Troubleshooting b Pull the tabs at the left and right hand sides toward you and fold down before you have just used the printer, some internal parts of the printer. 154

Users Manual - English
Page 164
Troubleshooting 1 e Fully close the back covers. 7 155 d Close the fuser cover (1) and lift the tabs at the left and right hand sides.
Troubleshooting 1 e Fully close the back covers. 7 155 d Close the fuser cover (1) and lift the tabs at the left and right hand sides.

Users Manual - English
Page 173
... thick paper mode from the control panel or the printer driver. 164 Replace the fuser unit. Call Brother Customer Service. ABCDEFGHIJKLMNOPQRSTUVWXYZ. 0123456789. ABCDEFGHIJKLMNOPQRSTUVWXYZ. 0123456789. ABCDEFGHIJKLMNOPQRSTUVWXYZ. 0123456789. Replace the fuser unit. Make sure that the back cover is installed properly. abcdefghijklmnopqrstuvwxyz. ABCDEFGHIJKLMNOPQRSTUVWXYZ. 0123456789. abcdefghijklmnopqrstuvwxyz. abcdefghijklmnopqrstuvwxyz. Check the printer's environment. Poor fixing when printed on page 6.) Make...
... thick paper mode from the control panel or the printer driver. 164 Replace the fuser unit. Call Brother Customer Service. ABCDEFGHIJKLMNOPQRSTUVWXYZ. 0123456789. ABCDEFGHIJKLMNOPQRSTUVWXYZ. 0123456789. ABCDEFGHIJKLMNOPQRSTUVWXYZ. 0123456789. Replace the fuser unit. Make sure that the back cover is installed properly. abcdefghijklmnopqrstuvwxyz. ABCDEFGHIJKLMNOPQRSTUVWXYZ. 0123456789. abcdefghijklmnopqrstuvwxyz. abcdefghijklmnopqrstuvwxyz. Check the printer's environment. Poor fixing when printed on page 6.) Make...

Quick Setup Guide - English
Page 4
Wait until it has cooled down sufficiently before replacing consumable items. DO NOT remove or damage the caution labels located on or around the fuser. 2 The fuser unit becomes extremely hot during operation. Before you have turned off the power switch and unplugged the printer from the AC power outlet. DO NOT handle the plug with wet hands. Doing this might cause an electrical shock. Safety Precautions To Use the Printer Safely Warning There are high voltage electrodes inside of the printer, make sure that you clean the inside the printer.
Wait until it has cooled down sufficiently before replacing consumable items. DO NOT remove or damage the caution labels located on or around the fuser. 2 The fuser unit becomes extremely hot during operation. Before you have turned off the power switch and unplugged the printer from the AC power outlet. DO NOT handle the plug with wet hands. Doing this might cause an electrical shock. Safety Precautions To Use the Printer Safely Warning There are high voltage electrodes inside of the printer, make sure that you clean the inside the printer.


