
Users Manual - English
Page 6
... devices that contain magnets or produce magnetic fields. DO NOT put objects on or around the printer as large appliances or other equipment that might disrupt the power supply. Note Keep a minimum gap around the fuser. DO NOT connect your machine to an AC power outlet controlled by wall switches or automatic... power outlet on the same circuit as shown in the illustration. 100mm (4 in.) 510mm(20.1 in.) 100mm (4 in.) 120mm (4.72 in.) v DO NOT put the printer near heaters, air conditioners, chemicals or refrigerators. DO NOT put the...
... devices that contain magnets or produce magnetic fields. DO NOT put objects on or around the printer as large appliances or other equipment that might disrupt the power supply. Note Keep a minimum gap around the fuser. DO NOT connect your machine to an AC power outlet controlled by wall switches or automatic... power outlet on the same circuit as shown in the illustration. 100mm (4 in.) 510mm(20.1 in.) 100mm (4 in.) 120mm (4.72 in.) v DO NOT put the printer near heaters, air conditioners, chemicals or refrigerators. DO NOT put the...
Users Manual - English
Page 113
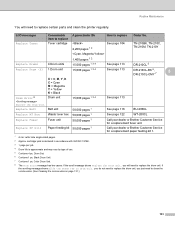
...Fuser Fuser unit 50,000 pages 1 Call your dealer or Brother Customer Service for a replacement fuser unit. Replace PF kit1 Paper feeding kit 50,000 pages 1 Call your dealer or Brother... Customer Service for a replacement paper feeding kit 1. 1 A4 or Letter size single-sided pages. 2 Approx. you just need to replace the drum unit. cartridge yield is declared in accordance with ISO/IEC 19798. 3 1 page per job. 4 Drum life is approximate and may vary by type of use. 5 Contains 4 pc. Color... to replace certain parts and clean the printer regularly. Black Drum Unit. 7 Contains ...
...Fuser Fuser unit 50,000 pages 1 Call your dealer or Brother Customer Service for a replacement fuser unit. Replace PF kit1 Paper feeding kit 50,000 pages 1 Call your dealer or Brother... Customer Service for a replacement paper feeding kit 1. 1 A4 or Letter size single-sided pages. 2 Approx. you just need to replace the drum unit. cartridge yield is declared in accordance with ISO/IEC 19798. 3 1 page per job. 4 Drum life is approximate and may vary by type of use. 5 Contains 4 pc. Color... to replace certain parts and clean the printer regularly. Black Drum Unit. 7 Contains ...

Users Manual - English
Page 153
Visit us at http://solutions.brother.com/. Drum Error Replace the Drum Unit. Fuser Error Jam XXX Low Temperature Manual Feed A ction The...Standard paper tray: Tray 1 6 • Manual feed slot: Manual Feed Error messages Error message Access Error (HL-3070CW only) Cartridge Error Cover is indicated on the LCD. Put the same size of paper in the drum. ... happens, your dealer or Brother Customer Service. Leave the printer for the toner color that is cleared from the area shown in Paper jams and how to alert you bought the printer from or Brother Customer Service. The most ...
Visit us at http://solutions.brother.com/. Drum Error Replace the Drum Unit. Fuser Error Jam XXX Low Temperature Manual Feed A ction The...Standard paper tray: Tray 1 6 • Manual feed slot: Manual Feed Error messages Error message Access Error (HL-3070CW only) Cartridge Error Cover is indicated on the LCD. Put the same size of paper in the drum. ... happens, your dealer or Brother Customer Service. Leave the printer for the toner color that is cleared from the area shown in Paper jams and how to alert you bought the printer from or Brother Customer Service. The most ...
Users Manual - English
Page 155
...Print Unable 1A) error, call your dealer or kit 1. Call your dealer or Brother Customer Service. 1 (X) shows the toner cartridge or drum unit color that is indicated on page 118.) Replace WT box It is time to replace the fuser unit. LCD before you get a Replace Belt message. Buy a new waste toner... service message A ction Print Unable ## Turn off the printer. Buy a new toner cartridge for the color indicated on Buy a new drum unit for the color that is near the end of its life. Drum End Soon(X) 1 The drum unit for the color indicated on the the LCD is near the end of...
...Print Unable 1A) error, call your dealer or kit 1. Call your dealer or Brother Customer Service. 1 (X) shows the toner cartridge or drum unit color that is indicated on page 118.) Replace WT box It is time to replace the fuser unit. LCD before you get a Replace Belt message. Buy a new waste toner... service message A ction Print Unable ## Turn off the printer. Buy a new toner cartridge for the color indicated on Buy a new drum unit for the color that is near the end of its life. Drum End Soon(X) 1 The drum unit for the color indicated on the the LCD is near the end of...
Users Manual - English
Page 159
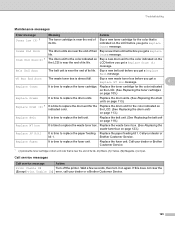
...down before continuing to resume printing. c Pull the green tabs at least 10 minutes for the printer to cool down the fuser cover (1). 1 149 b Open the back cover. d Put the paper tray firmly back in the printer. Jam Rear (Paper jam behind the back cover) Jam Rear If a paper jam occurs ...behind the face-up output tray, follow these steps: a Turn off the printer's power switch and unplug the AC power cord. Wait at the left and right hand sides toward you have just used the printer, some internal parts will be extremely hot. e Press Go to the next step.
...down before continuing to resume printing. c Pull the green tabs at least 10 minutes for the printer to cool down the fuser cover (1). 1 149 b Open the back cover. d Put the paper tray firmly back in the printer. Jam Rear (Paper jam behind the back cover) Jam Rear If a paper jam occurs ...behind the face-up output tray, follow these steps: a Turn off the printer's power switch and unplug the AC power cord. Wait at the left and right hand sides toward you have just used the printer, some internal parts will be extremely hot. e Press Go to the next step.
Users Manual - English
Page 160
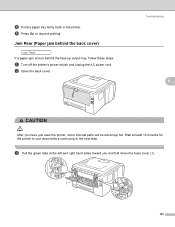
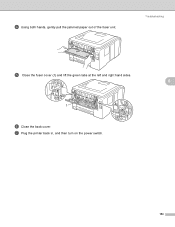
g Plug the printer back in, and then turn on the power switch. 150 Troubleshooting e Close the fuser cover (1) and lift the green tabs at the left and right hand sides. 6 1 f Close the back cover. d Using both hands, gently pull the jammed paper out of the fuser unit.
g Plug the printer back in, and then turn on the power switch. 150 Troubleshooting e Close the fuser cover (1) and lift the green tabs at the left and right hand sides. 6 1 f Close the back cover. d Using both hands, gently pull the jammed paper out of the fuser unit.
Quick Setup Guide - English
Page 24
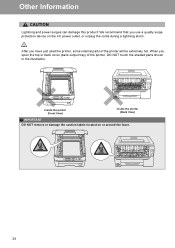
... cover (back output tray) of the printer will be extremely hot. Other Information CAUTION Lightning and power surges can damage this product! When you use a quality surge protection device on or around the fuser. 24 After you have just used the printer, some internal parts of the printer, DO NOT touch the shaded parts shown...
... cover (back output tray) of the printer will be extremely hot. Other Information CAUTION Lightning and power surges can damage this product! When you use a quality surge protection device on or around the fuser. 24 After you have just used the printer, some internal parts of the printer, DO NOT touch the shaded parts shown...


