Users Manual - English
Page 17
... To delete the job ...3-31 To cancel the reprint job 3-31 4 Options ...4-1 Optional accessories and supplies 4-1 Lower tray unit (LT-27CL 4-1 Legal tray (LT-27LG) ...4-1 Duplex unit (DX-2700) ...4-1 CompactFlash® card ...4-1 SO-DIMM memory ...4-1 Optional fonts package ...4-1 Lower tray unit (LT-27CL) ...4-2 Putting paper in the lower tray unit 4-2 How... the fusing unit 5-14 120K kit ...5-16 Replacing the transfer belt cleaner 5-16 Replacing the transfer roller 5-18 Cleaning ...5-21 Cleaning the outside of the printer 5-22 Cleaning the inside of the...
... To delete the job ...3-31 To cancel the reprint job 3-31 4 Options ...4-1 Optional accessories and supplies 4-1 Lower tray unit (LT-27CL 4-1 Legal tray (LT-27LG) ...4-1 Duplex unit (DX-2700) ...4-1 CompactFlash® card ...4-1 SO-DIMM memory ...4-1 Optional fonts package ...4-1 Lower tray unit (LT-27CL) ...4-2 Putting paper in the lower tray unit 4-2 How... the fusing unit 5-14 120K kit ...5-16 Replacing the transfer belt cleaner 5-16 Replacing the transfer roller 5-18 Cleaning ...5-21 Cleaning the outside of the printer 5-22 Cleaning the inside of the...
Users Manual - English
Page 18
... roller 6-9 JAM C (paper jam where the paper comes out of the printer 6-11 JAM D (paper jam in the lower part of the duplex unit 6-13 JAM E (paper jam in the upper part of the duplex unit 6-14 Improving the print quality ...6-16 Q & A ...6-20 Setting... up the printer hardware 6-20 Setting up the printer ...6-21 Paper handling ...6-22 Printing ...6-23 A Appendix ...A-1 Printer specifications ...A-1 Printing ...A-1 Features ...A-2 ...
... roller 6-9 JAM C (paper jam where the paper comes out of the printer 6-11 JAM D (paper jam in the lower part of the duplex unit 6-13 JAM E (paper jam in the upper part of the duplex unit 6-14 Improving the print quality ...6-16 Q & A ...6-20 Setting... up the printer hardware 6-20 Setting up the printer ...6-21 Paper handling ...6-22 Printing ...6-23 A Appendix ...A-1 Printer specifications ...A-1 Printing ...A-1 Features ...A-2 ...
Users Manual - English
Page 22
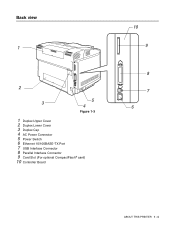
Back view 1 2 3 5 4 Figure 1-3 1 Duplex Upper Cover 2 Duplex Lower Cover 3 Duplex Cap 4 AC Power Connector 5 Power Switch 6 Ethernet 10/100BASE-TX Port 7 USB Interface Connector 8 Parallel Interface Connector 9 Card Slot (For optional CompactFlash® card) 10 Controller Board 10 9 8 7 6 ABOUT THIS PRINTER 1 - 4
Back view 1 2 3 5 4 Figure 1-3 1 Duplex Upper Cover 2 Duplex Lower Cover 3 Duplex Cap 4 AC Power Connector 5 Power Switch 6 Ethernet 10/100BASE-TX Port 7 USB Interface Connector 8 Parallel Interface Connector 9 Card Slot (For optional CompactFlash® card) 10 Controller Board 10 9 8 7 6 ABOUT THIS PRINTER 1 - 4
Users Manual - English
Page 27
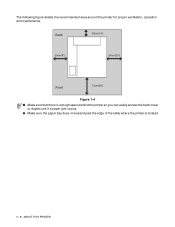
Back 35cm(14") 20cm(8") 50cm(20") Front 70cm(28") Figure 1-4 ■ Make sure that there is enough space behind the printer so you can easily access the back cover or duplex unit if a paper jam occurs. ■ Make sure the paper tray does not extend past the edge of the table where the printer is located. 1 - 9 ABOUT THIS PRINTER The following figure details the recommended area around the printer for proper ventilation, operation and maintenance.
Back 35cm(14") 20cm(8") 50cm(20") Front 70cm(28") Figure 1-4 ■ Make sure that there is enough space behind the printer so you can easily access the back cover or duplex unit if a paper jam occurs. ■ Make sure the paper tray does not extend past the edge of the table where the printer is located. 1 - 9 ABOUT THIS PRINTER The following figure details the recommended area around the printer for proper ventilation, operation and maintenance.
Users Manual - English
Page 28
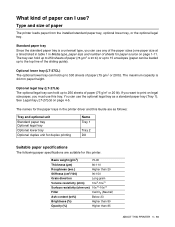
...Tray and optional unit Standard paper tray Optional legal tray Optional lower tray Optional duplex unit for duplex printing Name Tray 1 Tray 2 DX Suitable paper specifications The following paper specifications are suitable for this printer. Optional legal tray (LT-27LG) The optional legal tray can hold up ...cm) 10e10-10e12 Filler Ash content (wt%) CaCO3 (Neutral) Below 23 Brightness (%) Higher than 80 Opacity (%) Higher than 85 ABOUT THIS PRINTER 1 - 10 Standard paper tray Since the standard paper tray is 44 mm paper height. Type and size of sheets for the paper trays...
...Tray and optional unit Standard paper tray Optional legal tray Optional lower tray Optional duplex unit for duplex printing Name Tray 1 Tray 2 DX Suitable paper specifications The following paper specifications are suitable for this printer. Optional legal tray (LT-27LG) The optional legal tray can hold up ...cm) 10e10-10e12 Filler Ash content (wt%) CaCO3 (Neutral) Below 23 Brightness (%) Higher than 80 Opacity (%) Higher than 85 ABOUT THIS PRINTER 1 - 10 Standard paper tray Since the standard paper tray is 44 mm paper height. Type and size of sheets for the paper trays...

Users Manual - English
Page 35
... All labels and transparencies used in contact with spaces may cause damage to avoid Do not use the recommended type for laser printers. Types of 0.1 seconds. Brother will be damaged. ■ When feeding transparencies, use labels or transparencies that are responsible for a period of labels and...fusing unit. Figure 1-11 Before using the duplex unit. Labels should not come in this User's Guide. Using labels with any part of labels and transparencies designed for use with the carrier sheet exposed because your printer will not recommend particular labels or transparencies ...
... All labels and transparencies used in contact with spaces may cause damage to avoid Do not use the recommended type for laser printers. Types of 0.1 seconds. Brother will be damaged. ■ When feeding transparencies, use labels or transparencies that are responsible for a period of labels and...fusing unit. Figure 1-11 Before using the duplex unit. Labels should not come in this User's Guide. Using labels with any part of labels and transparencies designed for use with the carrier sheet exposed because your printer will not recommend particular labels or transparencies ...

Users Manual - English
Page 37
... more information on . ■ During manual duplex printing, if you wish to use and the print image. ■ You may experience poor paper feeding during duplex printing. ■ You cannot perform continuous duplex printing when MANUAL FEED is selected, the printer waits until you put the paper in the... tray and the size of the paper you leave the printer for more than 5 minutes after the first...
... more information on . ■ During manual duplex printing, if you wish to use and the print image. ■ You may experience poor paper feeding during duplex printing. ■ You cannot perform continuous duplex printing when MANUAL FEED is selected, the printer waits until you put the paper in the... tray and the size of the paper you leave the printer for more than 5 minutes after the first...

Users Manual - English
Page 40
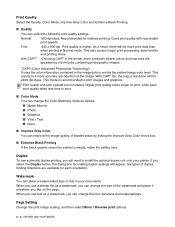
in the General tab of the Brother HL-2700CN series Properties screen. 12 34 5 Change the tab settings by clicking Printing Preferences... Advanced tab If you are using Windows NT® 4.0, Windows® 2000 or XP, you can access the Advanced tab by clicking the following icons: 1 Print Quality 2 Duplex 3 Watermark 4 Page Setting 5 Device Options DRIVER AND SOFTWARE 2 - 3
in the General tab of the Brother HL-2700CN series Properties screen. 12 34 5 Change the tab settings by clicking Printing Preferences... Advanced tab If you are using Windows NT® 4.0, Windows® 2000 or XP, you can access the Advanced tab by clicking the following icons: 1 Print Quality 2 Duplex 3 Watermark 4 Page Setting 5 Device Options DRIVER AND SOFTWARE 2 - 3
Users Manual - English
Page 41
... of print jobs containing photographic images. *CAPT (Color Advanced Photoscale Technology) It uses the color information contained in Normal mode. Recommended for making duplex settings will be printed correctly, make the setting here. Good print quality with CAPT* Choosing CAPT in the printer driver produces clearer colors and improves the appearance of the image. with...
... of print jobs containing photographic images. *CAPT (Color Advanced Photoscale Technology) It uses the color information contained in Normal mode. Recommended for making duplex settings will be printed correctly, make the setting here. Good print quality with CAPT* Choosing CAPT in the printer driver produces clearer colors and improves the appearance of the image. with...
Users Manual - English
Page 43
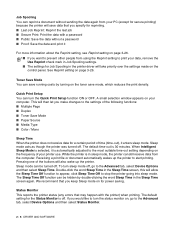
... with a password ■ Public: Save the data without sending the data again from your PC (except for secure printing) because the printer will save data that you specify for reprinting. ■ Last Job Reprint: Reprint the last job ■ Secure Print: Print the data with... to the settings of the following functions: ■ Multiple Page ■ Duplex ■ Toner Save Mode ■ Paper Source ■ Media Type ■ Color / Mono Sleep Time When the printer does not receive data for a certain period of your printer use. Receiving a print file or document automatically wakes up the...
... with a password ■ Public: Save the data without sending the data again from your PC (except for secure printing) because the printer will save data that you specify for reprinting. ■ Last Job Reprint: Reprint the last job ■ Secure Print: Print the data with... to the settings of the following functions: ■ Multiple Page ■ Duplex ■ Toner Save Mode ■ Paper Source ■ Media Type ■ Color / Mono Sleep Time When the printer does not receive data for a certain period of your printer use. Receiving a print file or document automatically wakes up the...
Users Manual - English
Page 49
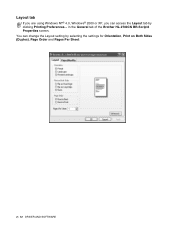
in the General tab of the Brother HL-2700CN BR-Script3 Properties screen. Layout tab If you are using Windows NT® 4.0, Windows® 2000 or XP, you can change the Layout setting by clicking Printing Preferences... You can access the Layout tab by selecting the settings for Orientation, Print on Both Sides (Duplex), Page Order and Pages Per Sheet: 2 - 12 DRIVER AND SOFTWARE
in the General tab of the Brother HL-2700CN BR-Script3 Properties screen. Layout tab If you are using Windows NT® 4.0, Windows® 2000 or XP, you can change the Layout setting by clicking Printing Preferences... You can access the Layout tab by selecting the settings for Orientation, Print on Both Sides (Duplex), Page Order and Pages Per Sheet: 2 - 12 DRIVER AND SOFTWARE
Users Manual - English
Page 66
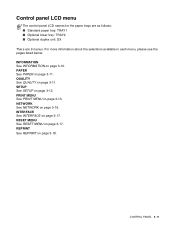
... menu The control panel LCD names for the paper trays are as follows: ■ Standard paper tray: TRAY1 ■ Optional lower tray: TRAY2 ■ Optional duplex unit: DX There are 9 menus.
... menu The control panel LCD names for the paper trays are as follows: ■ Standard paper tray: TRAY1 ■ Optional lower tray: TRAY2 ■ Optional duplex unit: DX There are 9 menus.
Users Manual - English
Page 68
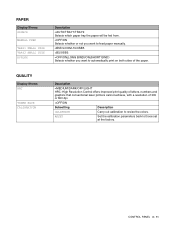
... on both sides of 300 or 600 dpi. =OFF/ON Subsetting Description CALIBRATE Carry out calibration to revise the colors. PAPER Display Shows SOURCE MANUAL FEED TRAY1 SMALL SIZE TRAY2 SMALL SIZE DUPLEX Description =AUTO/TRAY1/TRAY2 Selects which paper tray the paper will be fed from. =OFF/ON Selects whether or... Shows HRC TONER SAVE CALIBRATION Description =MEDIUM/DARK/OFF/LIGHT HRC: High Resolution Control offers improved print quality of letters, numbers and graphics that conventional laser printers cannot achieve, with a resolution of the paper.
... on both sides of 300 or 600 dpi. =OFF/ON Subsetting Description CALIBRATE Carry out calibration to revise the colors. PAPER Display Shows SOURCE MANUAL FEED TRAY1 SMALL SIZE TRAY2 SMALL SIZE DUPLEX Description =AUTO/TRAY1/TRAY2 Selects which paper tray the paper will be fed from. =OFF/ON Selects whether or... Shows HRC TONER SAVE CALIBRATION Description =MEDIUM/DARK/OFF/LIGHT HRC: High Resolution Control offers improved print quality of letters, numbers and graphics that conventional laser printers cannot achieve, with a resolution of the paper.
Users Manual - English
Page 89
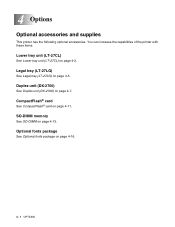
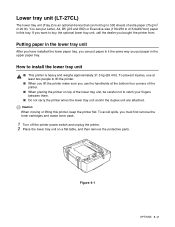
CompactFlash® card See CompactFlash® card on page 4-16. 4 - 1 OPTIONS Optional fonts package See Optional fonts package on page 4-11. Duplex unit (DX-2700) See Duplex unit (DX-2700) on page 4-2. You can increase the capabilities of the printer with these items. Lower tray unit (LT-27CL) See Lower tray unit (LT-27CL) on page 4-7. Legal tray (LT-27LG) See Legal tray (LT-27LG) on page 4-13. SO-DIMM memory See SO-DIMM on page 4-5. 4 Options Optional accessories and supplies This printer has the following optional accessories.
CompactFlash® card See CompactFlash® card on page 4-16. 4 - 1 OPTIONS Optional fonts package See Optional fonts package on page 4-11. Duplex unit (DX-2700) See Duplex unit (DX-2700) on page 4-2. You can increase the capabilities of the printer with these items. Lower tray unit (LT-27CL) See Lower tray unit (LT-27CL) on page 4-7. Legal tray (LT-27LG) See Legal tray (LT-27LG) on page 4-13. SO-DIMM memory See SO-DIMM on page 4-5. 4 Options Optional accessories and supplies This printer has the following optional accessories.
Users Manual - English
Page 90
... 4-1 OPTIONS 4 - 2 To prevent injuries, use at least two people to lift the printer. ■ When you lift the printer make sure you must first remove the toner cartridges and waste toner pack. 1 Turn off the printer power switch and unplug the printer. 2 Place the lower tray unit on top of the lower tray unit..., be careful not to catch your fingers between them. ■ Do not carry the printer when the lower tray unit and/or the duplex unit are attached. To avoid spills, you use the handholds at the bottom four corners of extra paper (75 g/m2 or...
... 4-1 OPTIONS 4 - 2 To prevent injuries, use at least two people to lift the printer. ■ When you lift the printer make sure you must first remove the toner cartridges and waste toner pack. 1 Turn off the printer power switch and unplug the printer. 2 Place the lower tray unit on top of the lower tray unit..., be careful not to catch your fingers between them. ■ Do not carry the printer when the lower tray unit and/or the duplex unit are attached. To avoid spills, you use the handholds at the bottom four corners of extra paper (75 g/m2 or...
Users Manual - English
Page 95
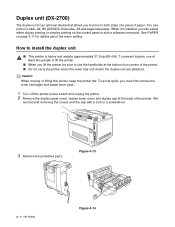
...the toner cartridges and waste toner pack. 1 Turn off the printer power switch and unplug the printer. 2 Remove the duplex upper cover, duplex lower cover and duplex cap at the bottom four corners of the printer. Duplex unit (DX-2700) The duplex unit is an optional device that allows you to print on ...page 3-11 for details about the menu setting. How to install the duplex unit ■ This printer is installed, you can print on the control panel or with a coin or a screwdriver. 3 Remove the protective parts. Figure 4-13 4 - 7...
...the toner cartridges and waste toner pack. 1 Turn off the printer power switch and unplug the printer. 2 Remove the duplex upper cover, duplex lower cover and duplex cap at the bottom four corners of the printer. Duplex unit (DX-2700) The duplex unit is an optional device that allows you to print on ...page 3-11 for details about the menu setting. How to install the duplex unit ■ This printer is installed, you can print on the control panel or with a coin or a screwdriver. 3 Remove the protective parts. Figure 4-13 4 - 7...

Users Manual - English
Page 96
Figure 4-16 6 Open the duplex back cover and duplex inside unit. 4 Use the handholds of the duplex unit to the holes of the duplex unit to lift it up. Figure 4-15 5 Insert the bottom of the duplex unit into the grooves in the printer, and then insert both the hooks of the printer. Figure 4-17 OPTIONS 4 - 8
Figure 4-16 6 Open the duplex back cover and duplex inside unit. 4 Use the handholds of the duplex unit to the holes of the duplex unit to lift it up. Figure 4-15 5 Insert the bottom of the duplex unit into the grooves in the printer, and then insert both the hooks of the printer. Figure 4-17 OPTIONS 4 - 8

Users Manual - English
Page 97
Figure 4-20 10 Plug the printer into the hole of the duplex unit into the AC power outlet/socket and turn on the printer power switch. 4 - 9 OPTIONS 7 Pull out the 2 green sleeves covering the screws as far as they will come. Turn the green sleeves to tighten the screws of the duplex unit to the printer. Secure the screw of the duplex unit to the printer. Figure 4-18 8 Put the hook on the left hand side of the printer. Once the screws are fully tight, push the green sleeves back in. Figure 4-19 9 Connect the connector cable to the printer.
Figure 4-20 10 Plug the printer into the hole of the duplex unit into the AC power outlet/socket and turn on the printer power switch. 4 - 9 OPTIONS 7 Pull out the 2 green sleeves covering the screws as far as they will come. Turn the green sleeves to tighten the screws of the duplex unit to the printer. Secure the screw of the duplex unit to the printer. Figure 4-18 8 Put the hook on the left hand side of the printer. Once the screws are fully tight, push the green sleeves back in. Figure 4-19 9 Connect the connector cable to the printer.
Users Manual - English
Page 98
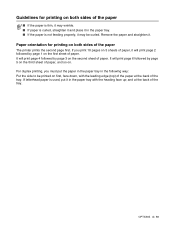
... the back of the paper ■ If the paper is thin, it may be printed on the second sheet of the tray. OPTIONS 4 - 10 For duplex printing, you print 10 pages on the third sheet of paper. Remove the paper and straighten it will print page 4 followed by page 5 on 5 sheets... of paper, it . It will print page 2 followed by page 1 on the first sheet of paper, and so on both sides of the paper The printer prints the second page first. Paper orientation for printing on .
... the back of the paper ■ If the paper is thin, it may be printed on the second sheet of the tray. OPTIONS 4 - 10 For duplex printing, you print 10 pages on the third sheet of paper. Remove the paper and straighten it will print page 4 followed by page 5 on 5 sheets... of paper, it . It will print page 2 followed by page 1 on the first sheet of paper, and so on both sides of the paper The printer prints the second page first. Paper orientation for printing on .
Users Manual - English
Page 123
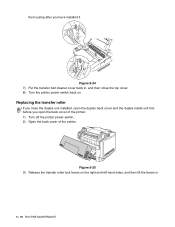
Figure 5-24 7) Put the transfer belt cleaner cover back in, and then close the top cover. 8) Turn the printer power switch back on the right and left-hand sides, and then lift the levers to 5 - 18 ROUTINE MAINTENANCE Replacing the transfer roller If you open the back cover of the printer. 1) Turn off the printer power switch. 2) Open the back cover of the printer. Figure 5-25 3) Release the transfer roller lock levers on . the housing after you have the duplex unit installed, open the duplex back cover and the duplex inside unit first before you have installed it.
Figure 5-24 7) Put the transfer belt cleaner cover back in, and then close the top cover. 8) Turn the printer power switch back on the right and left-hand sides, and then lift the levers to 5 - 18 ROUTINE MAINTENANCE Replacing the transfer roller If you open the back cover of the printer. 1) Turn off the printer power switch. 2) Open the back cover of the printer. Figure 5-25 3) Release the transfer roller lock levers on . the housing after you have the duplex unit installed, open the duplex back cover and the duplex inside unit first before you have installed it.


