Users Manual - English
Page 1
Please read this User's Guide thoroughly before you can use it quickly if you can use the printer. Note: Not all models are available in the box. Brother Laser Printer USER'S GUIDE HL-2140 HL-2150N HL-2170W For visually-impaired users You can read this manual with Screen Reader 'text-to-speech' software. Version A EN-US Please...
Please read this User's Guide thoroughly before you can use it quickly if you can use the printer. Note: Not all models are available in the box. Brother Laser Printer USER'S GUIDE HL-2140 HL-2150N HL-2170W For visually-impaired users You can read this manual with Screen Reader 'text-to-speech' software. Version A EN-US Please...

Users Manual - English
Page 2
Notes tell you how you must follow or avoid to prevent possible damage to the printer or other features. Improper Setup icons alert you not to touch machine parts that are not compatible with other objects. Hot Surface icons warn you ...to devices and operations that may arise or give tips about how the operation works with the printer. Cautions specify procedures you should respond to a situation that are hot. Using this guide Symbols used in this guide We use the following icons throughout...
Notes tell you how you must follow or avoid to prevent possible damage to the printer or other features. Improper Setup icons alert you not to touch machine parts that are not compatible with other objects. Hot Surface icons warn you ...to devices and operations that may arise or give tips about how the operation works with the printer. Cautions specify procedures you should respond to a situation that are hot. Using this guide Symbols used in this guide We use the following icons throughout...

Users Manual - English
Page 3
...power switch and unplugged the printer from the AC power outlet. DO NOT handle the plug with wet hands. Always make sure that you have just used the printer, some internal parts of the printer will be extremely hot. Safety precautions To use the printer safely WARNING There are high... voltage electrodes inside of the printer, make sure the plug is fully inserted. Inside the...
...power switch and unplugged the printer from the AC power outlet. DO NOT handle the plug with wet hands. Always make sure that you have just used the printer, some internal parts of the printer will be extremely hot. Safety precautions To use the printer safely WARNING There are high... voltage electrodes inside of the printer, make sure the plug is fully inserted. Inside the...

Users Manual - English
Page 4
DO NOT use cleaning materials that you have unplugged the printer from the AC power outlet. • Use neutral detergents. Cleaning with a dry, lint-free cloth and dispose of the machine. DO NOT use a vacuum cleaner .... Carefully clean the toner dust with volatile liquids such as thinner or benzine will damage the outside surface of the printer. • DO NOT use flammable substances or any type of the printer: • Make sure that contain ammonia. DO NOT remove or damage the caution labels located on or around the...
DO NOT use cleaning materials that you have unplugged the printer from the AC power outlet. • Use neutral detergents. Cleaning with a dry, lint-free cloth and dispose of the machine. DO NOT use a vacuum cleaner .... Carefully clean the toner dust with volatile liquids such as thinner or benzine will damage the outside surface of the printer. • DO NOT use flammable substances or any type of the printer: • Make sure that contain ammonia. DO NOT remove or damage the caution labels located on or around the...
Users Manual - English
Page 5
...the U.S. The contents of this manual and the specifications of this manual has a Software License Agreement specific to make changes without notice. Brother reserves the right to its proprietary programs. All other countries. Microsoft, MS-DOS, Windows are subject to change without notice in this... Inc. Java and all Java-based trademarks and logos are registered trademarks of the Printer If for any reason you save and use the original packaging. Shipment of Apple Inc. The printer should also be responsible for any damages (including consequential) caused by reliance on the...
...the U.S. The contents of this manual and the specifications of this manual has a Software License Agreement specific to make changes without notice. Brother reserves the right to its proprietary programs. All other countries. Microsoft, MS-DOS, Windows are subject to change without notice in this... Inc. Java and all Java-based trademarks and logos are registered trademarks of the Printer If for any reason you save and use the original packaging. Shipment of Apple Inc. The printer should also be responsible for any damages (including consequential) caused by reliance on the...
Users Manual - English
Page 6
...Server® 2003 45 Printer driver for Macintosh® ...45 Software ...46 Software for network models (HL-2150N / HL-2170W only 46 Automatic interface selection (HL-2150N / HL-2170W only 47 Remote Printer Console ...47 4 ...Control Panel 48 LEDs (Light Emitting Diodes)...48 Service call indications ...53 Go button ...55 Print a test page ...56 Print a Printer Settings page...57 Print Fonts (HL-2150N / HL-2170W only 58 Network default settings (HL-2150N / HL-2170W...
...Server® 2003 45 Printer driver for Macintosh® ...45 Software ...46 Software for network models (HL-2150N / HL-2170W only 46 Automatic interface selection (HL-2150N / HL-2170W only 47 Remote Printer Console ...47 4 ...Control Panel 48 LEDs (Light Emitting Diodes)...48 Service call indications ...53 Go button ...55 Print a test page ...56 Print a Printer Settings page...57 Print Fonts (HL-2150N / HL-2170W only 58 Network default settings (HL-2150N / HL-2170W...
Users Manual - English
Page 7
...them ...85 Improving the print quality...91 Solving print problems ...97 Network problems (HL-2150N / HL-2170W only 98 Other problems ...98 For Macintosh® with USB...98 A Appendix 99 Printer specifications...99 Engine ...99 Controller ...100 Software ...101 Control panel ...101 Paper ... code control commands (HL-2150N / HL-2170W only) ...110 Print bar codes or expanded characters 110 B Appendix (for Europe and Other Countries) 117 Brother numbers ...117 Important information: regulations ...118 Radio interference (220 to 240 volt model only 118 International ENERGY STAR® ...
...them ...85 Improving the print quality...91 Solving print problems ...97 Network problems (HL-2150N / HL-2170W only 98 Other problems ...98 For Macintosh® with USB...98 A Appendix 99 Printer specifications...99 Engine ...99 Controller ...100 Software ...101 Control panel ...101 Paper ... code control commands (HL-2150N / HL-2170W only) ...110 Print bar codes or expanded characters 110 B Appendix (for Europe and Other Countries) 117 Brother numbers ...117 Important information: regulations ...118 Radio interference (220 to 240 volt model only 118 International ENERGY STAR® ...
Users Manual - English
Page 9
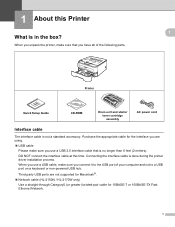
... all of your computer and not to a USB port on a keyboard or non-powered USB hub. 1 About this time. When you unpack the printer, make sure that is not a standard accessory. When you use a USB cable, make sure you use a USB 2.0 interface cable that you connect.... 1 1 Printer Quick Setup Guide CD-ROM Drum unit and starter toner cartridge assembly AC power cord Interface cable 1 The interface cable is no longer than 6 feet (2 meters). Purchase the appropriate cable for the interface you are not supported for Macintosh®. „ Network cable (HL-2150N / HL-2170W only) Use ...
... all of your computer and not to a USB port on a keyboard or non-powered USB hub. 1 About this time. When you unpack the printer, make sure that is not a standard accessory. When you use a USB cable, make sure you use a USB 2.0 interface cable that you connect.... 1 1 Printer Quick Setup Guide CD-ROM Drum unit and starter toner cartridge assembly AC power cord Interface cable 1 The interface cable is no longer than 6 feet (2 meters). Purchase the appropriate cable for the interface you are not supported for Macintosh®. „ Network cable (HL-2150N / HL-2170W only) Use ...

Users Manual - English
Page 10
About this Printer 1 1 11 10 9 8 7 2 Front view 1 2 3 4 5 6 1 Face-down output tray support flap 2 (support flap 2) 1 2 Face-down output tray support flap 1 (support flap 1) 3 Control panel 2 4 Manual feed paper guide 5 Manual feed slot 6 Manual feed slot cover 7 Paper tray 8 Front cover 9 Power switch 10 Ventilation hole 11 Face-down output tray 1 For details about the support flap 2, see page 96. 2 For details about the control panel, see Chapter 4.
About this Printer 1 1 11 10 9 8 7 2 Front view 1 2 3 4 5 6 1 Face-down output tray support flap 2 (support flap 2) 1 2 Face-down output tray support flap 1 (support flap 1) 3 Control panel 2 4 Manual feed paper guide 5 Manual feed slot 6 Manual feed slot cover 7 Paper tray 8 Front cover 9 Power switch 10 Ventilation hole 11 Face-down output tray 1 For details about the support flap 2, see page 96. 2 For details about the control panel, see Chapter 4.
Users Manual - English
Page 11
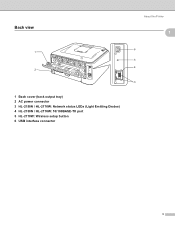
Back view About this Printer 1 1 6 1 5 4 2 3 1 Back cover (back output tray) 2 AC power connector 3 HL-2150N / HL-2170W: Network status LEDs (Light Emitting Diodes) 4 HL-2150N / HL-2170W: 10/100BASE-TX port 5 HL-2170W: Wireless setup button 6 USB interface connector 3
Back view About this Printer 1 1 6 1 5 4 2 3 1 Back cover (back output tray) 2 AC power connector 3 HL-2150N / HL-2170W: Network status LEDs (Light Emitting Diodes) 4 HL-2150N / HL-2170W: 10/100BASE-TX port 5 HL-2170W: Wireless setup button 6 USB interface connector 3

Users Manual - English
Page 12
...circuit with these appliances, we recommend that you use a voltage transformer or a high-frequency noise filter. Keep a gap of the printer is not stable. About this Printer Positioning the printer 1 1 Read the following ranges of temperature and humidity: Temperature: 10 °C to 32.5 °C (50 °F ...to 90.5 °F) Humidity: 20% to 80% (without condensation) „ Use the printer in a well-ventilated room. „ DO NOT put the printer where the ventilation hole of roughly 100 mm (4 in.) between the ventilation hole and the wall. „ DO NOT expose...
...circuit with these appliances, we recommend that you use a voltage transformer or a high-frequency noise filter. Keep a gap of the printer is not stable. About this Printer Positioning the printer 1 1 Read the following ranges of temperature and humidity: Temperature: 10 °C to 32.5 °C (50 °F ...to 90.5 °F) Humidity: 20% to 80% (without condensation) „ Use the printer in a well-ventilated room. „ DO NOT put the printer where the ventilation hole of roughly 100 mm (4 in.) between the ventilation hole and the wall. „ DO NOT expose...
Users Manual - English
Page 13
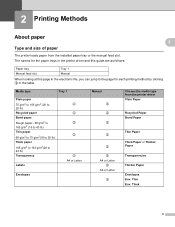
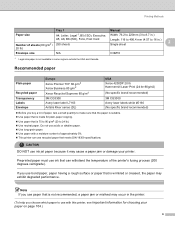
... g/m2 to 75 g/m2(16 to 20 lb) Thick paper 105 g/m2 to 163 g/m2(28 to the page for the paper trays in the printer driver and this guide are as follows: 2 2 2 Paper tray Manual feed slot Tray 1 Manual When looking at this page in the table. 2 Printing Methods 2 ...About paper Type and size of paper The printer loads paper from the printer driver Plain Paper Recycled Paper Bond Paper Thin Paper Thick Paper or Thicker Paper Transparencies Thicker Paper Envelopes Env. Thin Env. The names...
... g/m2 to 75 g/m2(16 to 20 lb) Thick paper 105 g/m2 to 163 g/m2(28 to the page for the paper trays in the printer driver and this guide are as follows: 2 2 2 Paper tray Manual feed slot Tray 1 Manual When looking at this page in the table. 2 Printing Methods 2 ...About paper Type and size of paper The printer loads paper from the printer driver Plain Paper Recycled Paper Bond Paper Thin Paper Thick Paper or Thicker Paper Transparencies Thicker Paper Envelopes Env. Thin Env. The names...
Users Manual - English
Page 14
... or creased, the paper may exhibit degraded performance. Do not use acidic or alkaline paper. „ Use long-grain paper. „ Use paper with this printer, see Important information for plain-paper copying. „ Use paper that meets DIN 19309 specifications. If you buy a lot of paper, test a small quantity ...to make sure that the paper is suitable. „ Use paper that is made for choosing your printer. Preprinted paper must use ink that can use recycled paper that is 75 to 90 g/m2 (20 to 24 lb). „ Use neutral paper. CAUTION...
... or creased, the paper may exhibit degraded performance. Do not use acidic or alkaline paper. „ Use long-grain paper. „ Use paper with this printer, see Important information for plain-paper copying. „ Use paper that meets DIN 19309 specifications. If you buy a lot of paper, test a small quantity ...to make sure that the paper is suitable. „ Use paper that is made for choosing your printer. Preprinted paper must use ink that can use recycled paper that is 75 to 90 g/m2 (20 to 24 lb). „ Use neutral paper. CAUTION...
Users Manual - English
Page 15
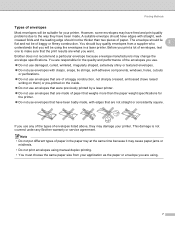
...test one to the way they have been badly made . This damage is not covered under any of the types of paper in a laser printer. Note • Do not put different types of envelopes listed above, they may have edges with edges that the print results are what you ...print a lot of baggy or flimsy construction. A suitable envelope should lie flat and not be suitable for the printer. „ Do not use any Brother warranty or service agreement. You should not be using . 7 If you use envelopes that you are not straight or consistently square....
...test one to the way they have been badly made . This damage is not covered under any of the types of paper in a laser printer. Note • Do not put different types of envelopes listed above, they may have edges with edges that the print results are what you ...print a lot of baggy or flimsy construction. A suitable envelope should lie flat and not be suitable for the printer. „ Do not use any Brother warranty or service agreement. You should not be using . 7 If you use envelopes that you are not straight or consistently square....

Users Manual - English
Page 17
Make sure that the guides are firmly in the slots. 9 Printing Methods Printing methods Printing on plain paper, bond paper and transparencies Printing on plain paper, bond paper and transparencies from the paper tray (For the recommended paper to use, see About paper on page 5.) a Pull the paper tray completely out of the printer. 2 2 2 2 b While pressing the green paper-guide release lever, slide the paper guides to fit the paper size.
Make sure that the guides are firmly in the slots. 9 Printing Methods Printing methods Printing on plain paper, bond paper and transparencies Printing on plain paper, bond paper and transparencies from the paper tray (For the recommended paper to use, see About paper on page 5.) a Pull the paper tray completely out of the printer. 2 2 2 2 b While pressing the green paper-guide release lever, slide the paper guides to fit the paper size.

Users Manual - English
Page 18
Printing Methods Note For Legal size paper, press in the inside latches and pull out the back of the paper tray. (Legal size paper is not available in some regions.) 2 c Put paper in the printer. e Lift up the support flap 1 (1) to be printed on must be face down output tray. 1 10 The side to prevent paper from sliding off the face-down . 1 d Put the paper tray firmly back in the tray, and make sure that it is below the maximum paper mark (1). Make sure that the paper is completely inserted into the printer.
Printing Methods Note For Legal size paper, press in the inside latches and pull out the back of the paper tray. (Legal size paper is not available in some regions.) 2 c Put paper in the printer. e Lift up the support flap 1 (1) to be printed on must be face down output tray. 1 10 The side to prevent paper from sliding off the face-down . 1 d Put the paper tray firmly back in the tray, and make sure that it is below the maximum paper mark (1). Make sure that the paper is completely inserted into the printer.

Users Manual - English
Page 19
f Choose the following from the printer driver: Paper Size 1) Media Type 2) Paper Source 3) and any other settings. „ Windows® printer driver 1 2 3 „ Macintosh® printer driver 1 2 Printing Methods 2 3 11
f Choose the following from the printer driver: Paper Size 1) Media Type 2) Paper Source 3) and any other settings. „ Windows® printer driver 1 2 3 „ Macintosh® printer driver 1 2 Printing Methods 2 3 11

Users Manual - English
Page 20
Stacking the printed transparencies may cause a paper jam or the transparency to indicate No paper if the power switch is turned on before you put paper or transparencies in the tray. You can clear this error indication by pressing Go. 2 • When printing on the control panel will light up to curl. 12 Note • The Error LED on transparencies, remove each transparency as soon as it has been printed. Printing Methods g Send the print data to the printer.
Stacking the printed transparencies may cause a paper jam or the transparency to indicate No paper if the power switch is turned on before you put paper or transparencies in the tray. You can clear this error indication by pressing Go. 2 • When printing on the control panel will light up to curl. 12 Note • The Error LED on transparencies, remove each transparency as soon as it has been printed. Printing Methods g Send the print data to the printer.
Users Manual - English
Page 21
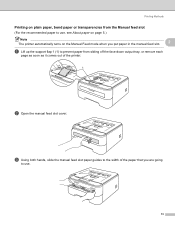
Printing Methods Printing on plain paper, bond paper or transparencies from sliding off the face-down output tray, or remove each page as soon as it comes out of the printer. 1 b Open the manual feed slot cover. c Using both hands, slide the manual feed slot paper guides to the width of the paper that you are going to prevent paper from the Manual feed slot 2 (For the recommended paper to use, see About paper on page 5.) Note The printer automatically turns on the Manual Feed mode when you put paper in the manual feed slot. 2 a Lift up the support flap 1 (1) to use. 13
Printing Methods Printing on plain paper, bond paper or transparencies from sliding off the face-down output tray, or remove each page as soon as it comes out of the printer. 1 b Open the manual feed slot cover. c Using both hands, slide the manual feed slot paper guides to the width of the paper that you are going to prevent paper from the Manual feed slot 2 (For the recommended paper to use, see About paper on page 5.) Note The printer automatically turns on the Manual Feed mode when you put paper in the manual feed slot. 2 a Lift up the support flap 1 (1) to use. 13
Users Manual - English
Page 22
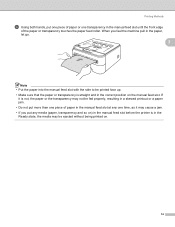
... the front edge of paper in the manual feed slot at any media (paper, transparency and so on) in the manual feed slot before the printer is in the Ready state, the media may be fed properly, resulting in a skewed printout or a paper jam. • Do not put any one piece...
... the front edge of paper in the manual feed slot at any media (paper, transparency and so on) in the manual feed slot before the printer is in the Ready state, the media may be fed properly, resulting in a skewed printout or a paper jam. • Do not put any one piece...


