Users Manual - English
Page 9
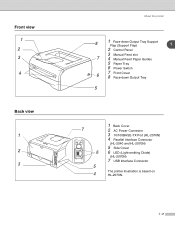
Front view 1 2 3 4 Back view 1 2 3 About this printer 8 1 Face-down Output Tray Support Flap (Support Flap) 1 2 Control Panel 3 Manual Feed slot 7 4 Manual Feed Paper Guides 5 Paper Tray 6 Power Switch 6 7 Front Cover 8 Face-down Output Tray 5 1 Back Cover 7 2 AC Power Connector 3 10/100BASE-TX Port (HL-2070N) 4 Parallel Interface Connector (HL-2040 and HL-2070N) 5 Side Cover 6 6 LED (Light-emitting Diode) (HL-2070N) 7 USB Interface Connector 5 4 The printer illustration is based on HL-2070N. 1 - 2
Front view 1 2 3 4 Back view 1 2 3 About this printer 8 1 Face-down Output Tray Support Flap (Support Flap) 1 2 Control Panel 3 Manual Feed slot 7 4 Manual Feed Paper Guides 5 Paper Tray 6 Power Switch 6 7 Front Cover 8 Face-down Output Tray 5 1 Back Cover 7 2 AC Power Connector 3 10/100BASE-TX Port (HL-2070N) 4 Parallel Interface Connector (HL-2040 and HL-2070N) 5 Side Cover 6 6 LED (Light-emitting Diode) (HL-2070N) 7 USB Interface Connector 5 4 The printer illustration is based on HL-2070N. 1 - 2
Users Manual - English
Page 33
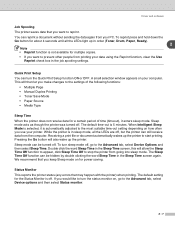
...A small selection window appears on how often you use your data using the Reprint function, clear the Use Reprint check box in order (Toner, Drum, Paper, Ready). 2 Note • Reprint function is automatically adjusted to the settings of time (timeout), it enters sleep mode. This will then let you ... into sleep mode. Quick Print Setup You can be hidden by double clicking the word Sleep Time in sleep mode, all the LEDs light up the printer. The Sleep Time Off function can reprint a document without sending the data again from the computer. To reprint press and hold down ...
...A small selection window appears on how often you use your data using the Reprint function, clear the Use Reprint check box in order (Toner, Drum, Paper, Ready). 2 Note • Reprint function is automatically adjusted to the settings of time (timeout), it enters sleep mode. This will then let you ... into sleep mode. Quick Print Setup You can be hidden by double clicking the word Sleep Time in sleep mode, all the LEDs light up the printer. The Sleep Time Off function can reprint a document without sending the data again from the computer. To reprint press and hold down ...

Users Manual - English
Page 44
or or or or LED is off LED is on the control panel. 3 The LED indications shown in the table below are used in the illustrations in Sleep mode, all the LEDs are off or the printer is off . 3 - 1 3 Control panel This section refers to the four Light Emitting Diodes (LEDs) (Toner, Drum, Paper, Ready) and a control panel button (Go) on LED is blinking Note When the power switch is in this chapter.
or or or or LED is off LED is on the control panel. 3 The LED indications shown in the table below are used in the illustrations in Sleep mode, all the LEDs are off or the printer is off . 3 - 1 3 Control panel This section refers to the four Light Emitting Diodes (LEDs) (Toner, Drum, Paper, Ready) and a control panel button (Go) on LED is blinking Note When the power switch is in this chapter.

Users Manual - English
Page 50
... in Sleep mode, press the Go button to wake the printer up and go to use the printer. The Ready and Paper LEDs will recover automatically from some errors. Form feed If the green Ready LED blinks for about 4 seconds until all the LEDs light up. 3 - 7 If an error is being cancelled. Cancel ...the Go button. Reprint To reprint the last document, press the Go button for about 4 seconds until all the LEDs light up. Error recovery If there is an error, the printer will flash as the job is not automatically cleared, press the Go button to clear the error, and then continue to...
... in Sleep mode, press the Go button to wake the printer up and go to use the printer. The Ready and Paper LEDs will recover automatically from some errors. Form feed If the green Ready LED blinks for about 4 seconds until all the LEDs light up. 3 - 7 If an error is being cancelled. Cancel ...the Go button. Reprint To reprint the last document, press the Go button for about 4 seconds until all the LEDs light up. Error recovery If there is an error, the printer will flash as the job is not automatically cleared, press the Go button to clear the error, and then continue to...
Users Manual - English
Page 51
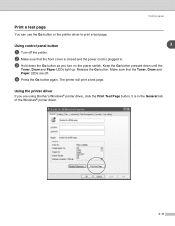
... . 3 Hold down until the Toner, Drum and Paper LEDs light up. The printer will print a test page. Using the printer driver If you turn on the power switch. Using control panel button 3 1 Turn off the printer. 2 Make sure that the Toner, Drum and Paper LEDs are using Brother's Windows® printer driver, click the Print Test Page button...
... . 3 Hold down until the Toner, Drum and Paper LEDs light up. The printer will print a test page. Using the printer driver If you turn on the power switch. Using control panel button 3 1 Turn off the printer. 2 Make sure that the Toner, Drum and Paper LEDs are using Brother's Windows® printer driver, click the Print Test Page button...
Users Manual - English
Page 53
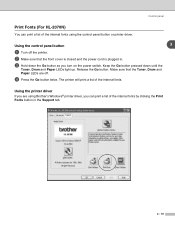
...sure that the Toner, Drum and Paper LEDs are using the control panel button or printer driver. Control panel Print Fonts (For HL-2070N) You can print a list of the internal fonts by clicking the Print Fonts button in . 3 Hold down until the Toner, Drum and Paper LEDs light up. Make sure that the front... 3 1 Turn off . 4 Press the Go button twice. Keep the Go button pressed down the Go button as you can print a list of the internal fonts. The printer will print a list of the internal fonts using Brother's Windows® printer driver, you turn on the power switch.
...sure that the Toner, Drum and Paper LEDs are using the control panel button or printer driver. Control panel Print Fonts (For HL-2070N) You can print a list of the internal fonts by clicking the Print Fonts button in . 3 Hold down until the Toner, Drum and Paper LEDs light up. Make sure that the front... 3 1 Turn off . 4 Press the Go button twice. Keep the Go button pressed down the Go button as you can print a list of the internal fonts. The printer will print a list of the internal fonts using Brother's Windows® printer driver, you turn on the power switch.
Users Manual - English
Page 54
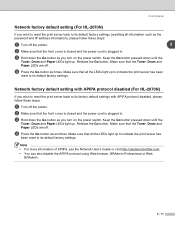
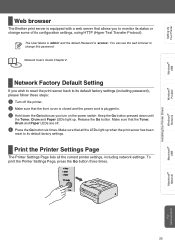
...down until the Toner, Drum and Paper LEDs light up . Network factory default setting with APIPA protocol disabled (For HL-2070N) If you wish to reset the print server back to its factory default settings with APIPA protocol disabled, please follow these steps: 1 Turn off the printer. 2 Make sure that the ..., see the Network User's Guide or visit http://solutions.brother.com • You can also disable the APIPA protocol using Web browser, BRAdmin Professional or Web BRAdmin. 3 - 11 Release the Go button. Make sure that all the LEDs light up to indicate the print server has been reset to...
...down until the Toner, Drum and Paper LEDs light up . Network factory default setting with APIPA protocol disabled (For HL-2070N) If you wish to reset the print server back to its factory default settings with APIPA protocol disabled, please follow these steps: 1 Turn off the printer. 2 Make sure that the ..., see the Network User's Guide or visit http://solutions.brother.com • You can also disable the APIPA protocol using Web browser, BRAdmin Professional or Web BRAdmin. 3 - 11 Release the Go button. Make sure that all the LEDs light up to indicate the print server has been reset to...
Users Manual - English
Page 65
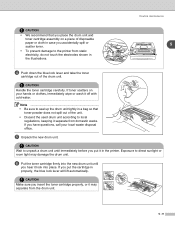
...according to local regulations, keeping it lock into place. CAUTION Wait to the printer from static electricity, do not touch the electrodes shown in the printer. CAUTION Make sure you insert the toner cartridge properly, or it may ... your local waste disposal office. 5 Unpack the new drum unit. If toner scatters on a piece of disposable paper or cloth in case you put the cartridge in a bag so that you hear it separate from the drum ... Note • Be sure to direct sunlight or room light may separate from domestic waste. CAUTION Handle the toner cartridge carefully.
...according to local regulations, keeping it lock into place. CAUTION Wait to the printer from static electricity, do not touch the electrodes shown in the printer. CAUTION Make sure you insert the toner cartridge properly, or it may ... your local waste disposal office. 5 Unpack the new drum unit. If toner scatters on a piece of disposable paper or cloth in case you put the cartridge in a bag so that you hear it separate from the drum ... Note • Be sure to direct sunlight or room light may separate from domestic waste. CAUTION Handle the toner cartridge carefully.
Users Manual - English
Page 84
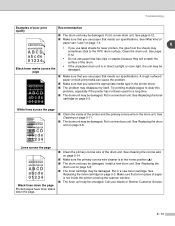
... unpacked drum unit is in direct sunlight or room light, the unit may be damaged. ■ Make sure that you use paper that has clips or staples because they will scratch the surface of paper can cause the problem. See Cleaning on page 5-...scanner window. ■ The fuser unit may sometimes stick to clear this problem, especially if the printer has not been used for laser printers, the glue from the sheets may be damaged. Install a new drum unit. Make sure that ...8226; If you select the appropriate media type in the drum unit. Call your dealer or Brother Customer Service.
... unpacked drum unit is in direct sunlight or room light, the unit may be damaged. ■ Make sure that you use paper that has clips or staples because they will scratch the surface of paper can cause the problem. See Cleaning on page 5-...scanner window. ■ The fuser unit may sometimes stick to clear this problem, especially if the printer has not been used for laser printers, the glue from the sheets may be damaged. Install a new drum unit. Make sure that ...8226; If you select the appropriate media type in the drum unit. Call your dealer or Brother Customer Service.
Quick Setup Guide - English
Page 27
...Password is plugged in. 3 Hold down until the Toner, Drum and Paper LEDs light up when the print server has been reset to its default factory settings. Make sure that the Toner, Drum and Paper LEDs are off the printer. 2 Make sure that the front cover is closed and the power ...cord is 'access'. Setting Up Your Printer Windows® USB Windows® Parallel Installing the Printer Driver Windows® Network Web browser The Brother print server is equipped with a web...
...Password is plugged in. 3 Hold down until the Toner, Drum and Paper LEDs light up when the print server has been reset to its default factory settings. Make sure that the Toner, Drum and Paper LEDs are off the printer. 2 Make sure that the front cover is closed and the power ...cord is 'access'. Setting Up Your Printer Windows® USB Windows® Parallel Installing the Printer Driver Windows® Network Web browser The Brother print server is equipped with a web...


