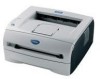
Users Manual - English
Page 6
...-2200w)...4-1 Print server (NC-2100p) (For HL-2040 4-2 5 Routine maintenance 5-1 Replacing the consumable items...5-1 Toner cartridge ...5-2 Toner Low message ...5-2 Toner Life End message ...5-3 Replacing the toner cartridge 5-3 Drum unit ...5-7 Change Drum message...5-7 Replacing the drum unit...5-8 Cleaning ...5-11 Cleaning the outside of the printer 5-11 Cleaning the inside of the printer 5-12 Cleaning the corona wire...5-14...
...-2200w)...4-1 Print server (NC-2100p) (For HL-2040 4-2 5 Routine maintenance 5-1 Replacing the consumable items...5-1 Toner cartridge ...5-2 Toner Low message ...5-2 Toner Life End message ...5-3 Replacing the toner cartridge 5-3 Drum unit ...5-7 Change Drum message...5-7 Replacing the drum unit...5-8 Cleaning ...5-11 Cleaning the outside of the printer 5-11 Cleaning the inside of the printer 5-12 Cleaning the corona wire...5-14...
Users Manual - English
Page 8
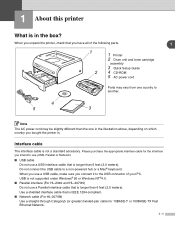
... to a non-powered hub or a Mac® keyboard. Use a shielded interface cable that you have all of the following parts. 1 1 2 1 Printer 2 Drum unit and toner cartridge assembly 3 Quick Setup Guide 4 CD-ROM 5 AC power cord Parts may be slightly different than the one country to the USB...USB is not supported under Windows® 95 or Windows NT®4.0. ■ Parallel interface (For HL-2040 and HL-2070N) Do not use a USB interface cable that is longer than 6 feet (2.0 meters). 1 About this printer What is in . Do not connect the USB cable to use (USB, Parallel or Network). ...
... to a non-powered hub or a Mac® keyboard. Use a shielded interface cable that you have all of the following parts. 1 1 2 1 Printer 2 Drum unit and toner cartridge assembly 3 Quick Setup Guide 4 CD-ROM 5 AC power cord Parts may be slightly different than the one country to the USB...USB is not supported under Windows® 95 or Windows NT®4.0. ■ Parallel interface (For HL-2040 and HL-2070N) Do not use a USB interface cable that is longer than 6 feet (2.0 meters). 1 About this printer What is in . Do not connect the USB cable to use (USB, Parallel or Network). ...
Users Manual - English
Page 33
While the printer is in sleep mode, all the LEDs light up in order (Toner, Drum, Paper, Ready). 2 Note • Reprint function is off . The Sleep ... sleep mode. When Intelligent Sleep Mode is selected, it is 5 minutes. Driver and software Job Spooling The printer saves data that you want to prevent other people from printing your data using the Reprint function, clear the... the word Sleep Time in the Sleep Time screen, this will also wake up the printer to stop the printer from your printer. To turn the Quick Print Setup function ON or OFF. Double click the word Sleep...
While the printer is in sleep mode, all the LEDs light up in order (Toner, Drum, Paper, Ready). 2 Note • Reprint function is off . The Sleep ... sleep mode. When Intelligent Sleep Mode is selected, it is 5 minutes. Driver and software Job Spooling The printer saves data that you want to prevent other people from printing your data using the Reprint function, clear the... the word Sleep Time in the Sleep Time screen, this will also wake up the printer to stop the printer from your printer. To turn the Quick Print Setup function ON or OFF. Double click the word Sleep...

Users Manual - English
Page 44
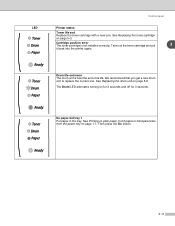
or or or or LED is off . 3 - 1 3 Control panel This section refers to the four Light Emitting Diodes (LEDs) (Toner, Drum, Paper, Ready) and a control panel button (Go) on LED is blinking Note When the power switch is off or the printer is on the control panel. 3 The LED indications shown in the table below are used in the illustrations in Sleep mode, all the LEDs are off LED is in this chapter.
or or or or LED is off . 3 - 1 3 Control panel This section refers to the four Light Emitting Diodes (LEDs) (Toner, Drum, Paper, Ready) and a control panel button (Go) on LED is blinking Note When the power switch is off or the printer is on the control panel. 3 The LED indications shown in the table below are used in the illustrations in Sleep mode, all the LEDs are off LED is in this chapter.
Users Manual - English
Page 46
... out the toner cartridge and put 3 it back into the printer again. See Replacing the drum unit on for 2 seconds and off for 3 seconds. Then press the Go button. 3 - 3 Drum life end soon The drum unit is not installed correctly. The Drum LED alternates turning on page 5-8. No paper fed tray 1 ... from the paper tray on page 5-3. We recommend that you get a new drum unit to replace the current one . Cartridge position error The toner cartridge is near the end of its life. LED Control panel Printer status Toner life end Replace the toner cartridge with a new one . See...
... out the toner cartridge and put 3 it back into the printer again. See Replacing the drum unit on for 2 seconds and off for 3 seconds. Then press the Go button. 3 - 3 Drum life end soon The drum unit is not installed correctly. The Drum LED alternates turning on page 5-8. No paper fed tray 1 ... from the paper tray on page 5-3. We recommend that you get a new drum unit to replace the current one . Cartridge position error The toner cartridge is near the end of its life. LED Control panel Printer status Toner life end Replace the toner cartridge with a new one . See...

Users Manual - English
Page 47
... Put the paper in the manual feed slot. See Solving print problems on page 1-13. Back cover is open Close the front cover of the printer. See Printing on plain paper, bond paper or transparencies from the manual feed slot on page 1-10 or Printing on thick paper, labels and envelopes... from the manual feed slot on page 6-15. See Cleaning the corona wire on page 6-15. Drum Error The corona wire needs to clear them on page 6-5. See Solving print problems on page 5-14. 3 - 4 See Paper jams and how to be cleaned...
... Put the paper in the manual feed slot. See Solving print problems on page 1-13. Back cover is open Close the front cover of the printer. See Printing on plain paper, bond paper or transparencies from the manual feed slot on page 1-10 or Printing on thick paper, labels and envelopes... from the manual feed slot on page 6-15. See Cleaning the corona wire on page 6-15. Drum Error The corona wire needs to clear them on page 6-5. See Solving print problems on page 5-14. 3 - 4 See Paper jams and how to be cleaned...

Users Manual - English
Page 49
If the error occurs again, consult your dealer or a Brother authorized service representative by referring to your dealer or Brother authorized service representative. 3 - 6 Leave the printer for 10 minutes with the power on again. Note Make sure that the front cover is fully closed before you ... seconds, and then turn it on . Control panel Table 1: LED indications while pressing Go button LEDs fuser unit failure*1 Laser unit failure Main motor failure Main PCB failure Toner 3 Drum Paper Ready Make a note of the indication and report the error status to the above table.
If the error occurs again, consult your dealer or a Brother authorized service representative by referring to your dealer or Brother authorized service representative. 3 - 6 Leave the printer for 10 minutes with the power on again. Note Make sure that the front cover is fully closed before you ... seconds, and then turn it on . Control panel Table 1: LED indications while pressing Go button LEDs fuser unit failure*1 Laser unit failure Main motor failure Main PCB failure Toner 3 Drum Paper Ready Make a note of the indication and report the error status to the above table.
Users Manual - English
Page 51
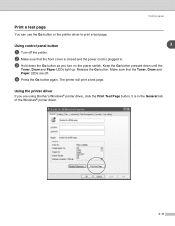
... down the Go button as you are off the printer. 2 Make sure that the Toner, Drum and Paper LEDs are using Brother's Windows® printer driver, click the Print Test Page button. It is plugged in the General tab of the Windows® printer driver. 3 - 8 The printer will print a test page. Make sure that the front...
... down the Go button as you are off the printer. 2 Make sure that the Toner, Drum and Paper LEDs are using Brother's Windows® printer driver, click the Print Test Page button. It is plugged in the General tab of the Windows® printer driver. 3 - 8 The printer will print a test page. Make sure that the front...
Users Manual - English
Page 53
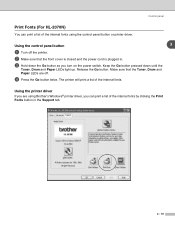
... print a list of the internal fonts using Brother's Windows® printer driver, you are off the printer. 2 Make sure that the Toner, Drum and Paper LEDs are using the control panel button or printer driver. Control panel Print Fonts (For HL-2070N) You can print a list of the internal fonts by clicking the Print Fonts button in . 3 Hold...
... print a list of the internal fonts using Brother's Windows® printer driver, you are off the printer. 2 Make sure that the Toner, Drum and Paper LEDs are using the control panel button or printer driver. Control panel Print Fonts (For HL-2070N) You can print a list of the internal fonts by clicking the Print Fonts button in . 3 Hold...
Users Manual - English
Page 54
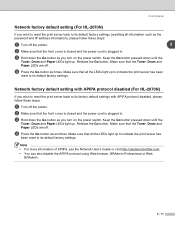
... Release the Go button. Make sure that the Toner, Drum and Paper LEDs are off. 4 Press the Go button ...more information of APIPA, see the Network User's Guide or visit http://solutions.brother.com • You can also disable the APIPA protocol using Web browser, BRAdmin...BRAdmin. 3 - 11 Network factory default setting with APIPA protocol disabled (For HL-2070N) If you wish to reset the print server back to its factory default... password and IP address information), please follow these steps: 1 Turn off the printer. 3 2 Make sure that the front cover is closed and the power cord...
... Release the Go button. Make sure that the Toner, Drum and Paper LEDs are off. 4 Press the Go button ...more information of APIPA, see the Network User's Guide or visit http://solutions.brother.com • You can also disable the APIPA protocol using Web browser, BRAdmin...BRAdmin. 3 - 11 Network factory default setting with APIPA protocol disabled (For HL-2070N) If you wish to reset the print server back to its factory default... password and IP address information), please follow these steps: 1 Turn off the printer. 3 2 Make sure that the front cover is closed and the power cord...

Users Manual - English
Page 57
... See Toner cartridge on page 5-7. 5 - 1 Note These instructions are extremely hot. See Drum unit on page 5-2. When you have just used the printer, some parts inside the printer are also included in the illustrations. Replacing the consumable items You will need to replace the consumable items ...regularly. WARNING 5 When you replace certain parts or clean the printer regularly, pay attention to the following: ■ If your clothes are smeared with toner, wipe off the toner with a dry ...
... See Toner cartridge on page 5-7. 5 - 1 Note These instructions are extremely hot. See Drum unit on page 5-2. When you have just used the printer, some parts inside the printer are also included in the illustrations. Replacing the consumable items You will need to replace the consumable items ...regularly. WARNING 5 When you replace certain parts or clean the printer regularly, pay attention to the following: ■ If your clothes are smeared with toner, wipe off the toner with a dry ...

Users Manual - English
Page 59
... maintenance Toner Life End message If the LED shows the message below, the printer has run out of the printer. 2 Pull out the drum unit and toner cartridge assembly. 5 - 3 When you want to buy toner cartridges, call the dealer you bought the printer from or Brother Customer Service. • We recommend that you clean the...
... maintenance Toner Life End message If the LED shows the message below, the printer has run out of the printer. 2 Pull out the drum unit and toner cartridge assembly. 5 - 3 When you want to buy toner cartridges, call the dealer you bought the printer from or Brother Customer Service. • We recommend that you clean the...
Users Manual - English
Page 60
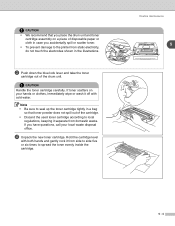
... to seal up the toner cartridge tightly in the illustrations. 3 Push down the blue lock lever and take the toner cartridge out of the drum unit. CAUTION • We recommend that toner powder does not spill out of the cartridge. • Discard the used toner cartridge according to...inside the cartridge. If you accidentally spill or scatter toner. • To prevent damage to the printer from static electricity, do not touch the electrodes shown in a bag so that you place the drum unit and toner cartridge assembly on your local waste disposal office. 4 Unpack the new toner cartridge....
... to seal up the toner cartridge tightly in the illustrations. 3 Push down the blue lock lever and take the toner cartridge out of the drum unit. CAUTION • We recommend that toner powder does not spill out of the cartridge. • Discard the used toner cartridge according to...inside the cartridge. If you accidentally spill or scatter toner. • To prevent damage to the printer from static electricity, do not touch the electrodes shown in a bag so that you place the drum unit and toner cartridge assembly on your local waste disposal office. 4 Unpack the new toner cartridge....

Users Manual - English
Page 61
...not apply to any degradation to the performance and life of a drum unit. Routine maintenance 5 5 - 5 Using or attempting to use potentially incompatible toner and/or toner cartridges in your printer. We also strongly recommend that you put in direct sunlight or room...the toner cartridge in the drum unit immediately after you continue to the printer itself . CAUTION • Wait to replace consumed toner cartridges with only Genuine Brother Branded Supplies. • Printing with your printer may cause damage to use only Genuine Brother Brand replacement toner cartridges....
...not apply to any degradation to the performance and life of a drum unit. Routine maintenance 5 5 - 5 Using or attempting to use potentially incompatible toner and/or toner cartridges in your printer. We also strongly recommend that you put in direct sunlight or room...the toner cartridge in the drum unit immediately after you continue to the printer itself . CAUTION • Wait to replace consumed toner cartridges with only Genuine Brother Branded Supplies. • Printing with your printer may cause damage to use only Genuine Brother Brand replacement toner cartridges....

Users Manual - English
Page 62
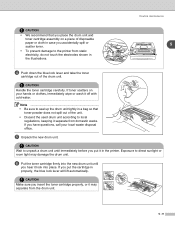
... a vertical stripe. Home position (▲) 5 - 6 CAUTION Make sure you put it lock into place. Close the front cover of the printer. If you hear it in the printer. Routine maintenance 5 8 Put the drum unit and toner cartridge assembly back in properly, the lock lever will lift automatically. 6 Put the new toner cartridge firmly...
... a vertical stripe. Home position (▲) 5 - 6 CAUTION Make sure you put it lock into place. Close the front cover of the printer. If you hear it in the printer. Routine maintenance 5 8 Put the drum unit and toner cartridge assembly back in properly, the lock lever will lift automatically. 6 Put the new toner cartridge firmly...

Users Manual - English
Page 63
... LED shows the message below, it may be used , number of pages per print job and so on the average type 5 of the printer. Under ideal conditions, the average drum life is near the end of pages that you should be significantly less than this estimate. See Cleaning on page 5-11. 5 - 7 Because... we have no control over the many factors that will be printed by the use only genuine Brother toner. The actual number of its life. Routine maintenance Drum unit This printer can print up to 12,000 pages.
... LED shows the message below, it may be used , number of pages per print job and so on the average type 5 of the printer. Under ideal conditions, the average drum life is near the end of pages that you should be significantly less than this estimate. See Cleaning on page 5-11. 5 - 7 Because... we have no control over the many factors that will be printed by the use only genuine Brother toner. The actual number of its life. Routine maintenance Drum unit This printer can print up to 12,000 pages.

Users Manual - English
Page 64
... the LEDs light up. Routine maintenance Replacing the drum unit Note We recommend that the printer is turned on page 5-11. 5 Follow these steps to replace the drum unit. 1 Make sure that you clean the printer when you replace only the toner cartridge. 3 Pull out the drum unit and toner cartridge assembly. 5 - 8 IMPROPER SETUP Do...
... the LEDs light up. Routine maintenance Replacing the drum unit Note We recommend that the printer is turned on page 5-11. 5 Follow these steps to replace the drum unit. 1 Make sure that you clean the printer when you replace only the toner cartridge. 3 Pull out the drum unit and toner cartridge assembly. 5 - 8 IMPROPER SETUP Do...
Users Manual - English
Page 65
...assembly on your hands or clothes, immediately wipe or wash it lock into the new drum unit until immediately before you accidentally spill or scatter toner. 5 • To prevent damage to the printer from static electricity, do not touch the electrodes shown in the illustrations. 4 Push... If toner scatters on a piece of disposable paper or cloth in case you put the cartridge in the printer. Exposure to direct sunlight or room light may separate from the drum unit. 5 - 9 CAUTION Handle the toner cartridge carefully. Routine maintenance CAUTION • We recommend that toner...
...assembly on your hands or clothes, immediately wipe or wash it lock into the new drum unit until immediately before you accidentally spill or scatter toner. 5 • To prevent damage to the printer from static electricity, do not touch the electrodes shown in the illustrations. 4 Push... If toner scatters on a piece of disposable paper or cloth in case you put the cartridge in the printer. Exposure to direct sunlight or room light may separate from the drum unit. 5 - 9 CAUTION Handle the toner cartridge carefully. Routine maintenance CAUTION • We recommend that toner...
Users Manual - English
Page 66
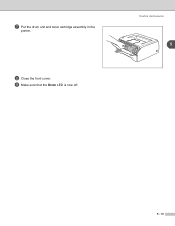
7 Put the drum unit and toner cartridge assembly in the printer. 8 Close the front cover. 9 Make sure that the Drum LED is now off. Routine maintenance 5 5 - 10
7 Put the drum unit and toner cartridge assembly in the printer. 8 Close the front cover. 9 Make sure that the Drum LED is now off. Routine maintenance 5 5 - 10

Users Manual - English
Page 67
... neutral detergents. Routine maintenance Cleaning Clean the outside and inside of the printer regularly with a dry, lint-free cloth. 5 Cleaning the outside of the printer as thinner or benzine will damage the surface of the printer. • Do not use cleaning materials that contain ammonia. If printed... 1 Turn off the printer power switch and unplug the printer from the AC power outlet. 2 Pull the paper tray completely out of the printer with a dry, lint-free cloth. When you replace the toner cartridge or the drum unit, make sure you clean the inside of the printer. 5 - 11
... neutral detergents. Routine maintenance Cleaning Clean the outside and inside of the printer regularly with a dry, lint-free cloth. 5 Cleaning the outside of the printer as thinner or benzine will damage the surface of the printer. • Do not use cleaning materials that contain ammonia. If printed... 1 Turn off the printer power switch and unplug the printer from the AC power outlet. 2 Pull the paper tray completely out of the printer with a dry, lint-free cloth. When you replace the toner cartridge or the drum unit, make sure you clean the inside of the printer. 5 - 11


