
Users Manual - English
Page 9
CHAPTER 6 TROUBLESHOOTING LCD Messages 6-1 Error Messages 6-1 Maintenance Messages 6-3 Service Call Messages 6-4 Troubleshooting Paper Handling 6-5 Paper Jams and How to Clear Them 6-6 JAM TRAY1 6-7 JAM TRAY2 6-9 JAM MP TRAY 6-10 JAM INSIDE 6-11 JAM REAR 6-13 JAM DUPLEX 6-17 PAPER JAM 6-20 Improving the Print Quality 6-23 How to Print Correctly 6-29 Other Problems 6-30 For DOS Users 6-30 BR-Script 3 Language 6-31 viii
CHAPTER 6 TROUBLESHOOTING LCD Messages 6-1 Error Messages 6-1 Maintenance Messages 6-3 Service Call Messages 6-4 Troubleshooting Paper Handling 6-5 Paper Jams and How to Clear Them 6-6 JAM TRAY1 6-7 JAM TRAY2 6-9 JAM MP TRAY 6-10 JAM INSIDE 6-11 JAM REAR 6-13 JAM DUPLEX 6-17 PAPER JAM 6-20 Improving the Print Quality 6-23 How to Print Correctly 6-29 Other Problems 6-30 For DOS Users 6-30 BR-Script 3 Language 6-31 viii

Users Manual - English
Page 29
otherwise, paper may not be fed correctly, resulting in skewed printouts or paper jams. • During printing, the inside of the printer driver. 1-19 Select the MP Tray from paper source. Paper source is correctly seated in the Multi-purpose Tray; ✒ Note CHAPTER 1 ABOUT THIS PRINTER • Make sure that the paper is neatly stacked and is in the Basic tab of the Multi-purpose tray automatically rises to feed paper into the printer. • When you print on transparencies, use the Face Down Output Tray. ☛ 5.
otherwise, paper may not be fed correctly, resulting in skewed printouts or paper jams. • During printing, the inside of the printer driver. 1-19 Select the MP Tray from paper source. Paper source is correctly seated in the Multi-purpose Tray; ✒ Note CHAPTER 1 ABOUT THIS PRINTER • Make sure that the paper is neatly stacked and is in the Basic tab of the Multi-purpose tray automatically rises to feed paper into the printer. • When you print on transparencies, use the Face Down Output Tray. ☛ 5.

Users Manual - English
Page 33
... Fig. 1-18 1-23 For more information, see Chapter 3. ☛ 1. CHAPTER 1 ABOUT THIS PRINTER ✒ Note • Before you print envelopes, you must 'fan' the stack of envelopes well to avoid paper jams and misfeeds. • When you print on double-flap envelopes, place them sideways in the Multi-...purpose Tray. • Do not load different types of paper at the same time in the Multipurpose Tray because paper jams and misfeeds may occur. • Do not print on envelopes using Duplex Printing. • For correct printing,...
... Fig. 1-18 1-23 For more information, see Chapter 3. ☛ 1. CHAPTER 1 ABOUT THIS PRINTER ✒ Note • Before you print envelopes, you must 'fan' the stack of envelopes well to avoid paper jams and misfeeds. • When you print on double-flap envelopes, place them sideways in the Multi-...purpose Tray. • Do not load different types of paper at the same time in the Multipurpose Tray because paper jams and misfeeds may occur. • Do not print on envelopes using Duplex Printing. • For correct printing,...
Users Manual - English
Page 36
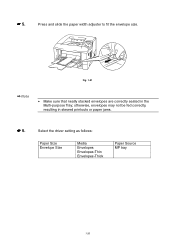
☛ 5. Select the driver setting as follows: Paper Size Envelope Size Media Envelopes Envelopes-Thin Envelopes-Thick Paper Source MP tray 1-26 Fig. 1-21 ✒ Note • Make sure that neatly stacked envelopes are correctly seated in skewed printouts or paper jams. ☛ 6. Press and slide the paper width adjuster to fit the envelope size. otherwise, envelopes may not be fed correctly, resulting in the Multi-purpose Tray;
☛ 5. Select the driver setting as follows: Paper Size Envelope Size Media Envelopes Envelopes-Thin Envelopes-Thick Paper Source MP tray 1-26 Fig. 1-21 ✒ Note • Make sure that neatly stacked envelopes are correctly seated in skewed printouts or paper jams. ☛ 6. Press and slide the paper width adjuster to fit the envelope size. otherwise, envelopes may not be fed correctly, resulting in the Multi-purpose Tray;

Users Manual - English
Page 37
... recommend that you must fan the stack of paper well to the printer. • Do not load different types of paper at the same time in the paper cassette because this may cause paper jams or misfeeds. • For correct printing, you use organizer sheets that are made for laser printers. • Use labels and transparencies that are...
... recommend that you must fan the stack of paper well to the printer. • Do not load different types of paper at the same time in the paper cassette because this may cause paper jams or misfeeds. • For correct printing, you use organizer sheets that are made for laser printers. • Use labels and transparencies that are...

Users Manual - English
Page 40
...both sides of position on the paper. 1-30 Fig. 1-26 ✒ Note If the Paper Adjustment Lever for Duplex Printing is not correctly set the Paper Adjustment Lever for the paper size, paper jams may occur and the print will be out of the paper: • If the paper is thin, it may wrinkle.... • If paper is not feeding correctly, it may be curled. When you use bond paper. • If the paper is curled, ...
...both sides of position on the paper. 1-30 Fig. 1-26 ✒ Note If the Paper Adjustment Lever for Duplex Printing is not correctly set the Paper Adjustment Lever for the paper size, paper jams may occur and the print will be out of the paper: • If the paper is thin, it may wrinkle.... • If paper is not feeding correctly, it may be curled. When you use bond paper. • If the paper is curled, ...

Users Manual - English
Page 44
... Printing is not correctly set the Paper Adjustment Lever for the paper size, paper jams may occur and the print will be curled. Guidelines for Windows® 95 / 98 / Me, Windows NT® 4.0 and Windows® 2000/XP support booklet printing. Booklet Printing (For PCL Driver Only) The supplied printer drivers for Booklet Printing •...
... Printing is not correctly set the Paper Adjustment Lever for the paper size, paper jams may occur and the print will be curled. Guidelines for Windows® 95 / 98 / Me, Windows NT® 4.0 and Windows® 2000/XP support booklet printing. Booklet Printing (For PCL Driver Only) The supplied printer drivers for Booklet Printing •...
Users Manual - English
Page 140
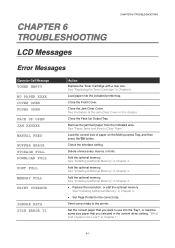
...press theGGoo button. See "Paper Jams and How to the printer. Add the optional memory. CHAPTER 6 6 TROUBLESHOOTING LCD Messages CHAPTER 6 TROUBLESHOOTING Error Messages OOppeerraattoorrCCaalll MMeessssaaggee TONER EMPTY NO PAPER XXXX COVER OPEN FUSER OPEN FACE UP OPEN JAM XXXXXX MANUAL FEED BUFFER ERROR... optional memory. Add the optional memory. "What kind of paper can I use into the indicated printer tray. Remove the jammed paper from the indicated area. See "Installing Additional Memory" in Chapter 4. Close the Jam Clear Cover. Close the Face Up Output Tray. See "...
...press theGGoo button. See "Paper Jams and How to the printer. Add the optional memory. CHAPTER 6 6 TROUBLESHOOTING LCD Messages CHAPTER 6 TROUBLESHOOTING Error Messages OOppeerraattoorrCCaalll MMeessssaaggee TONER EMPTY NO PAPER XXXX COVER OPEN FUSER OPEN FACE UP OPEN JAM XXXXXX MANUAL FEED BUFFER ERROR... optional memory. Add the optional memory. "What kind of paper can I use into the indicated printer tray. Remove the jammed paper from the indicated area. See "Installing Additional Memory" in Chapter 4. Close the Jam Clear Cover. Close the Face Up Output Tray. See "...

Users Manual - English
Page 144
.... 6-5 so the Face Down Output Tray • Change the printer driver setting in the paper cassette, make sure that you are using . The printer does not print on the envelope size you are using paper that the MANUAL FEED = ON (STOP) is a paper jam. • Clear the jammed paper (see your software. Your application software must be set...
.... 6-5 so the Face Down Output Tray • Change the printer driver setting in the paper cassette, make sure that you are using . The printer does not print on the envelope size you are using paper that the MANUAL FEED = ON (STOP) is a paper jam. • Clear the jammed paper (see your software. Your application software must be set...
Users Manual - English
Page 145
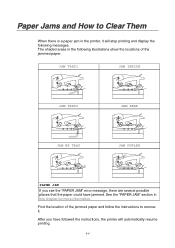
... several possible places that the paper could have followed the instructions, the printer will stop printing and display the following illustrations show the locations of the jammed paper and follow the instructions to Clear Them When there is a paper jam in this chapter for more information. JAM TRAY1 JAM INSIDE JAM TRAY2 JAM REAR JAM MP TRAY JAM DUPLEX PAPER JAM If you have...
... several possible places that the paper could have followed the instructions, the printer will stop printing and display the following illustrations show the locations of the jammed paper and follow the instructions to Clear Them When there is a paper jam in this chapter for more information. JAM TRAY1 JAM INSIDE JAM TRAY2 JAM REAR JAM MP TRAY JAM DUPLEX PAPER JAM If you have...

Users Manual - English
Page 146
Fig. 6-1 Pull the jammed paper out of the printer. ☛ 2. JAM TRAY1 CHAPTER 6 TROUBLESHOOTING JAM TRAY1 Follow the instructions below to clear a paper jam: ☛ 1. Fig. 6-2 6-7 Pull the Paper Cassette completely out of the printer.
Fig. 6-1 Pull the jammed paper out of the printer. ☛ 2. JAM TRAY1 CHAPTER 6 TROUBLESHOOTING JAM TRAY1 Follow the instructions below to clear a paper jam: ☛ 1. Fig. 6-2 6-7 Pull the Paper Cassette completely out of the printer.

Users Manual - English
Page 147
☛ 3. Caution Do not pull out the standard Paper Cassette (Tray 1) while paper is being fed from the Optional Lower Paper Cassette, as this will cause a paper jam. 6-8 Put the paper cassette back into the printer. !
☛ 3. Caution Do not pull out the standard Paper Cassette (Tray 1) while paper is being fed from the Optional Lower Paper Cassette, as this will cause a paper jam. 6-8 Put the paper cassette back into the printer. !

Users Manual - English
Page 148
JAM TRAY2 CHAPTER 6 TROUBLESHOOTING ☛ 1. Fig. 6-4 Put the lower paper cassette back into the printer. 6-9 Fig. 6-3 Using both hands, pull the jammed paper out of the printer. ☛ 2. JAM TRAY2 Follow the instructions below to clear the paper jam: Pull the lower paper cassette completely out of the printer. ☛ 3.
JAM TRAY2 CHAPTER 6 TROUBLESHOOTING ☛ 1. Fig. 6-4 Put the lower paper cassette back into the printer. 6-9 Fig. 6-3 Using both hands, pull the jammed paper out of the printer. ☛ 2. JAM TRAY2 Follow the instructions below to clear the paper jam: Pull the lower paper cassette completely out of the printer. ☛ 3.

Users Manual - English
Page 149
JAM MP TRAY JAM MP TRAY Follow the instructions below to clear a paper jam: ☛ 1. Fig. 6-5 ☛ 2. Fig. 6-6 6-10 Remove the jammed paper from the Multi-purpose Tray. Put all the paper back into the Multi-purpose Tray correctly.
JAM MP TRAY JAM MP TRAY Follow the instructions below to clear a paper jam: ☛ 1. Fig. 6-5 ☛ 2. Fig. 6-6 6-10 Remove the jammed paper from the Multi-purpose Tray. Put all the paper back into the Multi-purpose Tray correctly.

Users Manual - English
Page 150
Pull the Drum Unit Assembly out of the printer. ☛ 3. Pull the Paper Cassette completely out of the printer. Fig. 6-7 ☛ 2. Fig. 6-8 6-11 Pull the jammed paper up and out of the printer. JAM INSIDE CHAPTER 6 TROUBLESHOOTING JAM INSIDE Follow the instructions below to clear the paper jam: ☛ 1. Press the Cover Release Button, and then open the Front Cover.
Pull the Drum Unit Assembly out of the printer. ☛ 3. Pull the Paper Cassette completely out of the printer. Fig. 6-7 ☛ 2. Fig. 6-8 6-11 Pull the jammed paper up and out of the printer. JAM INSIDE CHAPTER 6 TROUBLESHOOTING JAM INSIDE Follow the instructions below to clear the paper jam: ☛ 1. Press the Cover Release Button, and then open the Front Cover.

Users Manual - English
Page 152
Press the Cover Release Button, and then open the Front Cover. ☛ 2. Caution • We recommend that you don't accidentally spill the toner. • To prevent damage to clear a paper jam: ☛ 1. JAM REAR CHAPTER 6 TROUBLESHOOTING JAM REAR Follow the instructions below to the printer caused by static electricity, do not touch the electrodes shown below. 6-13 Pull the Drum Unit Assembly out of disposable paper or cloth so you put the Drum Unit Assembly on a piece of the printer. !
Press the Cover Release Button, and then open the Front Cover. ☛ 2. Caution • We recommend that you don't accidentally spill the toner. • To prevent damage to clear a paper jam: ☛ 1. JAM REAR CHAPTER 6 TROUBLESHOOTING JAM REAR Follow the instructions below to the printer caused by static electricity, do not touch the electrodes shown below. 6-13 Pull the Drum Unit Assembly out of disposable paper or cloth so you put the Drum Unit Assembly on a piece of the printer. !
Users Manual - English
Page 153
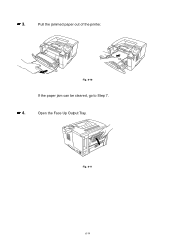
Pull the jammed paper out of the printer. Fig. 6-10 If the paper jam can be cleared, go to Step 7. ☛ 4. ☛ 3. Fig. 6-11 6-14 Open the Face Up Output Tray.
Pull the jammed paper out of the printer. Fig. 6-10 If the paper jam can be cleared, go to Step 7. ☛ 4. ☛ 3. Fig. 6-11 6-14 Open the Face Up Output Tray.

Users Manual - English
Page 156
Pull the jammed paper out of the fuser unit. Fig. 6-15 6-17 Open the Face Up Output Tray. Fig. 6-14 ☛ 2. JAM DUPLEX CHAPTER 6 TROUBLESHOOTING JAM DUPLEX Follow the instructions below to clear a paper jam: ☛ 1.
Pull the jammed paper out of the fuser unit. Fig. 6-15 6-17 Open the Face Up Output Tray. Fig. 6-14 ☛ 2. JAM DUPLEX CHAPTER 6 TROUBLESHOOTING JAM DUPLEX Follow the instructions below to clear a paper jam: ☛ 1.

Users Manual - English
Page 157
Fig. 6-16 ☛ 5. Fig. 6-17 6-18 If the paper jam cannot be cleared, go to the next step. ☛ 4. Pull the jammed paper out of the printer. Pull the Duplex Tray and Paper Cassette out of the printer. Close the Face Up Output Tray. ☛ 3.
Fig. 6-16 ☛ 5. Fig. 6-17 6-18 If the paper jam cannot be cleared, go to the next step. ☛ 4. Pull the jammed paper out of the printer. Pull the Duplex Tray and Paper Cassette out of the printer. Close the Face Up Output Tray. ☛ 3.

Users Manual - English
Page 158
Fig. 6-18 ✒ Note • The JAM DUPLEX message appears if you remove a sheet of paper from the Face Down Output Tray after only one side has printed. • The paper sizes you can use for the Duplex Printing function are A4, Letter and Legal. • If the Paper Adjustment Lever for Duplex Printing is not set correctly for the paper size, paper jams may occur and the printing will be out of position on the page. 6-19 CHAPTER 6 TROUBLESHOOTING Put the Duplex Tray and Paper Cassette back into the printer. ☛ 6.
Fig. 6-18 ✒ Note • The JAM DUPLEX message appears if you remove a sheet of paper from the Face Down Output Tray after only one side has printed. • The paper sizes you can use for the Duplex Printing function are A4, Letter and Legal. • If the Paper Adjustment Lever for Duplex Printing is not set correctly for the paper size, paper jams may occur and the printing will be out of position on the page. 6-19 CHAPTER 6 TROUBLESHOOTING Put the Duplex Tray and Paper Cassette back into the printer. ☛ 6.


