Users Manual - English
Page 63
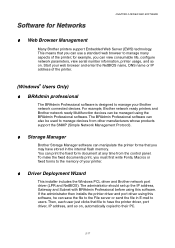
... installer includes the Windows PCL driver and Brother network port driver (LPR and NetBIOS). To make the fixed documents print, you can use a standard web browser to manage many aspects of your Brother network connected devices. Then, each user just clicks that you may have the printer driver, port driver, IP address, and so on . The BRAdmin Professional software can also be managed using the BRAdmin Professional software. Software for example, you can view consumable life, configure network parameters, view serial number information, printer...
... installer includes the Windows PCL driver and Brother network port driver (LPR and NetBIOS). To make the fixed documents print, you can use a standard web browser to manage many aspects of your Brother network connected devices. Then, each user just clicks that you may have the printer driver, port driver, IP address, and so on . The BRAdmin Professional software can also be managed using the BRAdmin Professional software. Software for example, you can view consumable life, configure network parameters, view serial number information, printer...

Users Manual - English
Page 70
Select the displayed menu. Buttons You can control the basic print operations and change the printer settings with the seven buttons on the control panel (Go, Job Cancel, Reprint, +, −, Set, Back). BBuuttttoonn 1 Go 2 Job Cancel 3 Reprint 4 + - 5 Set 6 Back FFuunnccttiioonn Exit from the Control panel menu, Reprint settings and Error messages. Move forward and backward through selectable options. Move forward and backward through menus. Set the Reprint menu. Set the selected menus and settings. Pause / Continue printing. Go back one...
Select the displayed menu. Buttons You can control the basic print operations and change the printer settings with the seven buttons on the control panel (Go, Job Cancel, Reprint, +, −, Set, Back). BBuuttttoonn 1 Go 2 Job Cancel 3 Reprint 4 + - 5 Set 6 Back FFuunnccttiioonn Exit from the Control panel menu, Reprint settings and Error messages. Move forward and backward through selectable options. Move forward and backward through menus. Set the Reprint menu. Set the selected menus and settings. Pause / Continue printing. Go back one...
Users Manual - English
Page 140
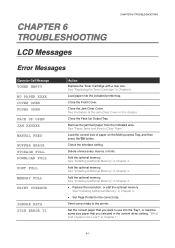
... current driver setting. Close the Face Up Output Tray. Set the correct paper that you selected in this chapter. Remove the jammed paper from the indicated area. See "Installing Additional Memory" in Chapter 4. • Reduce the resolution, or add the optional memory. See "Installing Additional Memory" in Chapter 4. CHAPTER 6 6 TROUBLESHOOTING LCD Messages CHAPTER 6 TROUBLESHOOTING Error Messages OOppeerraattoorrCCaalll MMeessssaaggee TONER EMPTY NO PAPER XXXX COVER OPEN FUSER OPEN FACE UP OPEN JAM XXXXXX MANUAL FEED BUFFER ERROR STORAGE FULL DOWNLOAD FULL FONT FULL MEMORY FULL PRINT...
... current driver setting. Close the Face Up Output Tray. Set the correct paper that you selected in this chapter. Remove the jammed paper from the indicated area. See "Installing Additional Memory" in Chapter 4. • Reduce the resolution, or add the optional memory. See "Installing Additional Memory" in Chapter 4. CHAPTER 6 6 TROUBLESHOOTING LCD Messages CHAPTER 6 TROUBLESHOOTING Error Messages OOppeerraattoorrCCaalll MMeessssaaggee TONER EMPTY NO PAPER XXXX COVER OPEN FUSER OPEN FACE UP OPEN JAM XXXXXX MANUAL FEED BUFFER ERROR STORAGE FULL DOWNLOAD FULL FONT FULL MEMORY FULL PRINT...

Users Manual - English
Page 168
...; Make sure the printer cable is left in Chapter 4. 6-29 Remove all other devices and connect the port to the printer only. • Turn off the status monitor in the Device / Options page on your document or reduce the print resolution. Change the following settings in the supplied Windows® driver, and then try again. • Check that is not too long. A "MEMORY FULL" error message occurs. • Press the Go button to print the data...
...; Make sure the printer cable is left in Chapter 4. 6-29 Remove all other devices and connect the port to the printer only. • Turn off the status monitor in the Device / Options page on your document or reduce the print resolution. Change the following settings in the supplied Windows® driver, and then try again. • Check that is not too long. A "MEMORY FULL" error message occurs. • Press the Go button to print the data...

Users Manual - English
Page 169
... you are using a parallel printer cable, you have print (leaving 62 printable lines). Recommendation • Check that the printer cable is not damaged or broken. • If you would most likely set your DOS software printer port to print from application software. Usually the first two lines and the last two lines of your application software. 6-30 Adjust the top and bottom margins of a page cannot have an interface-switching device, make sure that...
... you are using a parallel printer cable, you have print (leaving 62 printable lines). Recommendation • Check that the printer cable is not damaged or broken. • If you would most likely set your DOS software printer port to print from application software. Usually the first two lines and the last two lines of your application software. 6-30 Adjust the top and bottom margins of a page cannot have an interface-switching device, make sure that...
Quick Setup Guide - English
Page 1
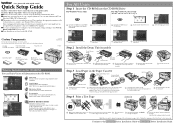
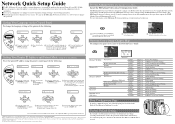
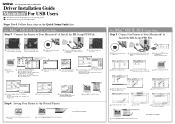
.... Windows® Initial Setup Instruction movie for the interface you intend to use (Parallel, USB or Network). Documentation View the Printer User's Guide and Network User's Guide in the paper cassette. Remove the protective part. 3 Rock it into the printer. paper, press the universal guide release lever as you want. Step 4 Print a Test Page O I OFF ON O I OFF ON Extend the Tray Extension Flap READY Data Back Reprint Set Job cancel Go PRINTING Data Back Reprint Set Job cancel Go 1 2 3 4 Make sure the printer power switch is not a standard...
.... Windows® Initial Setup Instruction movie for the interface you intend to use (Parallel, USB or Network). Documentation View the Printer User's Guide and Network User's Guide in the paper cassette. Remove the protective part. 3 Rock it into the printer. paper, press the universal guide release lever as you want. Step 4 Print a Test Page O I OFF ON O I OFF ON Extend the Tray Extension Flap READY Data Back Reprint Set Job cancel Go PRINTING Data Back Reprint Set Job cancel Go 1 2 3 4 Make sure the printer power switch is not a standard...
Quick Setup Guide - English
Page 2
..., and AppleTalk are trademarks of Adobe Systems Incorporated. Network Quick Setup Guide For HL-1850 users: If you are going to connect the printer to your network, we recommend that you wish to reset the print server back to its default factory settings (resetting all information such as the password and IP address information), use a fine ball point pen to the Network User's Guide. 3 Click "BRAdmin Professional." If you are trademarks or...
..., and AppleTalk are trademarks of Adobe Systems Incorporated. Network Quick Setup Guide For HL-1850 users: If you are going to connect the printer to your network, we recommend that you wish to reset the print server back to its default factory settings (resetting all information such as the password and IP address information), use a fine ball point pen to the Network User's Guide. 3 Click "BRAdmin Professional." If you are trademarks or...
Driver Setup Guide for Mac - English
Page 1
... USB interface cable to your CD-ROM drive. Steps 1 to the printer. 3 Insert the CD-ROM into your Macintosh®, and then connect it to Your Macintosh® & Install the BR-Script PPD File 1 Click "Connect the interface cable & Install the driver/utility." Select Brother HL-1850_1870N series, and then click the Select button. 4 Open your printer name (HL-1850_1870N series), and then click the Save button. Laser Printer HL-1850 and HL-1870N Driver Installation Guide Macintosh® For USB Users...
... USB interface cable to your CD-ROM drive. Steps 1 to the printer. 3 Insert the CD-ROM into your Macintosh®, and then connect it to Your Macintosh® & Install the BR-Script PPD File 1 Click "Connect the interface cable & Install the driver/utility." Select Brother HL-1850_1870N series, and then click the Select button. 4 Open your printer name (HL-1850_1870N series), and then click the Save button. Laser Printer HL-1850 and HL-1870N Driver Installation Guide Macintosh® For USB Users...

Driver Setup Guide for Mac - English
Page 2
... your language folder. 6 Double-click the PPD Installer icon. Open the Utilities folder. 9 Open the Print Center icon. button. A Select AppleTalk. Follow the instructions on the screen. Hub 4 Connect the network interface cable to the printer, and then connect it to a free port on the supplied CD-ROM. C Select Quit Print Center from the control panel menu, Reprint settings or clear error messages. Some illustrations are trademarks or registereted trademarks of Adobe Systems Incorporated. The Setup...
... your language folder. 6 Double-click the PPD Installer icon. Open the Utilities folder. 9 Open the Print Center icon. button. A Select AppleTalk. Follow the instructions on the screen. Hub 4 Connect the network interface cable to the printer, and then connect it to a free port on the supplied CD-ROM. C Select Quit Print Center from the control panel menu, Reprint settings or clear error messages. Some illustrations are trademarks or registereted trademarks of Adobe Systems Incorporated. The Setup...
Driver Setup Guide for Windows - English
Page 1
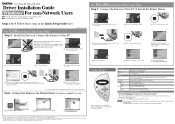
... panel menu, Reprint settings or clear error messages. Connect the USB interface cable to your PC, click the Cancel button. Check that the LANGUAGE message appears, and then press the Set button. 3. Netware is a trademark of Microsoft Corporation in the U.S. All other countries. Laser Printer HL-1850 and HL-1870N Driver Installation Guide Windows® For non-Network Users Follow the instructions in this screen appears, make sure the printer power switch is on. Control Panel Data Back Reprint Set Job cancel Go 1 Click Start, Setting and Printers. 2 Select the Brother HL...
... panel menu, Reprint settings or clear error messages. Connect the USB interface cable to your PC, click the Cancel button. Check that the LANGUAGE message appears, and then press the Set button. 3. Netware is a trademark of Microsoft Corporation in the U.S. All other countries. Laser Printer HL-1850 and HL-1870N Driver Installation Guide Windows® For non-Network Users Follow the instructions in this screen appears, make sure the printer power switch is on. Control Panel Data Back Reprint Set Job cancel Go 1 Click Start, Setting and Printers. 2 Select the Brother HL...
Driver Setup Guide for Windows - English
Page 2
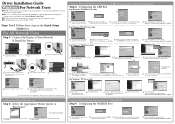
... printer's IP Address and your unique port name, and then click the Next button. 4 Click the Finish button, and then click the OK button. Hub 4 Connect the network interface cable to the printer, and then connect it to a free port on the HL-1870N. button to the Next button. Driver Installation Guide Windows® For Network Users For HL-1850 users: If you continue, please ensure that the administrator has configured the network printer settings correctly referring to the Network Quick Setup Guide...
... printer's IP Address and your unique port name, and then click the Next button. 4 Click the Finish button, and then click the OK button. Hub 4 Connect the network interface cable to the printer, and then connect it to a free port on the HL-1870N. button to the Next button. Driver Installation Guide Windows® For Network Users For HL-1850 users: If you continue, please ensure that the administrator has configured the network printer settings correctly referring to the Network Quick Setup Guide...

Service Manual
Page 3
... high printing quality and performance of rollers, Connection diagrams, PCB circuit diagrams, etc. CHAPTER 4: DISASSEMBLY AND RE-ASSEMBLY Procedures for disassembling and re-assembling the mechanical system. descriptions, Drum life & page counter, Diameter / circumference of the printer. This manual consists of the printer etc. This service manual covers the HL-1850/1870N printers. CHAPTER 2: INSTALLATION AND BASIC OPERATION Installation conditions, Installation procedures, basic operation of the following chapters: CHAPTER 1: GENERAL Features, specifications, etc...
... high printing quality and performance of rollers, Connection diagrams, PCB circuit diagrams, etc. CHAPTER 4: DISASSEMBLY AND RE-ASSEMBLY Procedures for disassembling and re-assembling the mechanical system. descriptions, Drum life & page counter, Diameter / circumference of the printer. This manual consists of the printer etc. This service manual covers the HL-1850/1870N printers. CHAPTER 2: INSTALLATION AND BASIC OPERATION Installation conditions, Installation procedures, basic operation of the following chapters: CHAPTER 1: GENERAL Features, specifications, etc...
Service Manual
Page 16
... own data compression technology in its printer hardware and the supplied printer driver software, which can monitor the status of paper. Versatile Paper Handling The printer loads paper automatically from the control panel. Printer Status Monitor with your Windows® system using bi-directional parallel communications. You can easily install them into the printer's memory. If an error occurs, a dialog box will appear to let you can easily setup these print options through the Printer Setup Menu. High...
... own data compression technology in its printer hardware and the supplied printer driver software, which can monitor the status of paper. Versatile Paper Handling The printer loads paper automatically from the control panel. Printer Status Monitor with your Windows® system using bi-directional parallel communications. You can easily install them into the printer's memory. If an error occurs, a dialog box will appear to let you can easily setup these print options through the Printer Setup Menu. High...

Service Manual
Page 17
... to operate the HL-1850/1870N printers. Use this function when you want to set the printer emulation, you can do it using the Universal Serial Bus (USB) interface to replace only the toner cartridge after printing around 6,500 pages at 5% coverage for A4 paper for the standard cartridge, which has a USB interface. The printer consumes less than 12W when in multi protocol network capability as if the printer was directly connected to use for a certain...
... to operate the HL-1850/1870N printers. Use this function when you want to set the printer emulation, you can do it using the Universal Serial Bus (USB) interface to replace only the toner cartridge after printing around 6,500 pages at 5% coverage for A4 paper for the standard cartridge, which has a USB interface. The printer consumes less than 12W when in multi protocol network capability as if the printer was directly connected to use for a certain...

Service Manual
Page 175
... a new drum unit. Purchase a new toner cartridge in the printer. (2) Reduce the complexity of life. Send correct data to subsection 3.12 `Fixing Unit" REPLACE LASER Replace the laser unit. Refer to subsection 3.3 `Paper Cassette' and 3.13 `Paper Pick-up rol ler ASSY). Replace the fixing unit. Clean the corona wire. HL-1850/1870N SERVICE MANUAL Error Message PRINT OVERRUN IGNORE DATA SIZE ERROR DX SIZE ERROR T1 SIZE ERROR T2 NO DX TRAY DX LEVER ERROR NO TRAY1 CLEAN DRUM UNIT Remedy Reduce the resolution, or add the optional memory. (1) Press the Go switch to print...
... a new drum unit. Purchase a new toner cartridge in the printer. (2) Reduce the complexity of life. Send correct data to subsection 3.12 `Fixing Unit" REPLACE LASER Replace the laser unit. Refer to subsection 3.3 `Paper Cassette' and 3.13 `Paper Pick-up rol ler ASSY). Replace the fixing unit. Clean the corona wire. HL-1850/1870N SERVICE MANUAL Error Message PRINT OVERRUN IGNORE DATA SIZE ERROR DX SIZE ERROR T1 SIZE ERROR T2 NO DX TRAY DX LEVER ERROR NO TRAY1 CLEAN DRUM UNIT Remedy Reduce the resolution, or add the optional memory. (1) Press the Go switch to print...

Service Manual
Page 193
... 9. `INSPECTION MODE' in this Chapter. (7) Try resetting the factory settings. Turn off the printer status monitor in the device options tab in the printer driver. (5) If the print port is not connected to print with the method of this Chapter? Yes This problem may not print the data correctly if there are incorrect software settings. FkAV User Check (1) Check that the printer is set for the printer" error message appears. Remove all other devices and connect the port to 9. `INSPECTION MODE' in this...
... 9. `INSPECTION MODE' in this Chapter. (7) Try resetting the factory settings. Turn off the printer status monitor in the device options tab in the printer driver. (5) If the print port is not connected to print with the method of this Chapter? Yes This problem may not print the data correctly if there are incorrect software settings. FkAV User Check (1) Check that the printer is set for the printer" error message appears. Remove all other devices and connect the port to 9. `INSPECTION MODE' in this...
Service Manual
Page 212
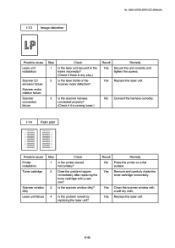
.... Yes Replace the laser unit. Yes Clean the scanner window with a new , one? 3 Is the scanner window dirty? 4 Is the problem solved by replacing the laser unit? Result Remedy No Place the printer on a flat . surface. Yes Replace the laser unit. 6-45 No Connect the harness correctly. 1-14 Faint print Possible cause Printer installation Toner cartridge Scanner window dirty Laser unit failure Step Check 1 Is the printer placed , horizontally? 2 Does the problem happen immediately after replacing the toner cartridge with...
.... Yes Replace the laser unit. Yes Clean the scanner window with a new , one? 3 Is the scanner window dirty? 4 Is the problem solved by replacing the laser unit? Result Remedy No Place the printer on a flat . surface. Yes Replace the laser unit. 6-45 No Connect the harness correctly. 1-14 Faint print Possible cause Printer installation Toner cartridge Scanner window dirty Laser unit failure Step Check 1 Is the printer placed , horizontally? 2 Does the problem happen immediately after replacing the toner cartridge with...

Service Manual
Page 225
... with supervisor privileges) or ADMIN (for Macintosh: Make sure that the printer and the configuration are successful, there is on the back panel of the print server by printing the Network Configuration page. (To print the Configuration page press the Network Test button for more than 5 seconds. If it can see Print Server Status and Control in the menu, then the Brother print server is the print server IP address (note that , turn the printer power off and then on the...
... with supervisor privileges) or ADMIN (for Macintosh: Make sure that the printer and the configuration are successful, there is on the back panel of the print server by printing the Network Configuration page. (To print the Configuration page press the Network Test button for more than 5 seconds. If it can see Print Server Status and Control in the menu, then the Brother print server is the print server IP address (note that , turn the printer power off and then on the...

Service Manual
Page 245
... holding down the Go switch, press the + switch once and then the Set switch until the menu "-- Displays the number of the toner cartridge replacement . Displays the number of the PF kit 2 replacement. COVERAGE counter can be available with this operation. Displays the number of the laser unit replacement. Displays the number of pages when printing JIS B5 size paper 7-10 SERVICE MENU --" appears on . Displays the number of jam occurrence. Displays the number of pages when printing Legal size paper. SERVICE MENU MODE By enabling the Service Menu mode provides, you will be...
... holding down the Go switch, press the + switch once and then the Set switch until the menu "-- Displays the number of the toner cartridge replacement . Displays the number of the PF kit 2 replacement. COVERAGE counter can be available with this operation. Displays the number of the laser unit replacement. Displays the number of pages when printing JIS B5 size paper 7-10 SERVICE MENU --" appears on . Displays the number of jam occurrence. Displays the number of pages when printing Legal size paper. SERVICE MENU MODE By enabling the Service Menu mode provides, you will be...

Service Manual
Page 267
... shown in the lower line on the right below ; (1) Download the Maintenance Information utility from the 17-digit number. (4) Click the OK button. byte data Exit REIM (3) Enter the 8-digit number as the frequency of drum unit change, toner cartridge change and paper jam. To obtain the maintenance information, you need to section 3 'Printer Information' in the menu. 11Printer Information Menu aet the Information Decode the 4- A-5 Print I OK - L1 ** 0000...
... shown in the lower line on the right below ; (1) Download the Maintenance Information utility from the 17-digit number. (4) Click the OK button. byte data Exit REIM (3) Enter the 8-digit number as the frequency of drum unit change, toner cartridge change and paper jam. To obtain the maintenance information, you need to section 3 'Printer Information' in the menu. 11Printer Information Menu aet the Information Decode the 4- A-5 Print I OK - L1 ** 0000...


