

Users Manual - English
Page 2
... described in this manual. Never drop or insert any object into water. WARNING - To reduce the risk of lint, dust, and loose cloth. 5. Return the machine to the nearest authorized dealer or service center for household use. To unplug, grasp the plug, not the cord, and carefully remove from all instructions before using and before cleaning. Keep ventilation openings of the machine free from the...
... described in this manual. Never drop or insert any object into water. WARNING - To reduce the risk of lint, dust, and loose cloth. 5. Return the machine to the nearest authorized dealer or service center for household use. To unplug, grasp the plug, not the cord, and carefully remove from all instructions before using and before cleaning. Keep ventilation openings of the machine free from the...

Users Manual - English
Page 4
... the machine • when leaving the machine unattended 3. For repair or adjustment In the event a malfunction occurs or adjustment is the latest addition to turn off the power switch when inserting and removing the embroidery design cassette. Do not touch the thread cartridge or design frame while embroidering. 2. When storing this instruction manual.) For a longer service life 1. PLEASE READ BEFORE USING THIS MACHINE For safe operation 1. Do not use an...
... the machine • when leaving the machine unattended 3. For repair or adjustment In the event a malfunction occurs or adjustment is the latest addition to turn off the power switch when inserting and removing the embroidery design cassette. Do not touch the thread cartridge or design frame while embroidering. 2. When storing this instruction manual.) For a longer service life 1. PLEASE READ BEFORE USING THIS MACHINE For safe operation 1. Do not use an...
Users Manual - English
Page 5
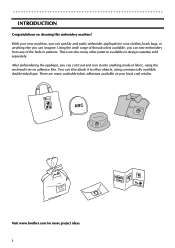
....brother.com for your new machine, you can cut it out and iron it to other patterns available on design cassettes sold separately. Using the wide range of thread colors available, you can quickly and easily embroider appliqués for more project ideas. After embroidering the appliqué, you can also attach it onto anything else you can sew embroidery from any of fabric, using commercially available double...
....brother.com for your new machine, you can cut it out and iron it to other patterns available on design cassettes sold separately. Using the wide range of thread colors available, you can quickly and easily embroider appliqués for more project ideas. After embroidering the appliqué, you can also attach it onto anything else you can sew embroidery from any of fabric, using commercially available double...

Users Manual - English
Page 10
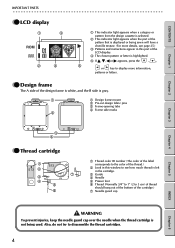
... button ( ) 5 Thread cartridge slot 6 Design frame mounting bracket (inside the machine) 7 Design frame slot 8 Design frame positioning line 9 AC adapter connector 0 Needle position adjustment dial Chapter 1 Chapter 2 Chapter 3 Chapter 4 Chapter 5 7 Back 85 4 Bottom 0 9 GG Operation keys key Press this key to return to start or stop embroidering. key , , & keys Press these keys to find the pattern or letter that you want). Press this key to set...
... button ( ) 5 Thread cartridge slot 6 Design frame mounting bracket (inside the machine) 7 Design frame slot 8 Design frame positioning line 9 AC adapter connector 0 Needle position adjustment dial Chapter 1 Chapter 2 Chapter 3 Chapter 4 Chapter 5 7 Back 85 4 Bottom 0 9 GG Operation keys key Press this key to return to start or stop embroidering. key , , & keys Press these keys to find the pattern or letter that you want). Press this key to set...
Users Manual - English
Page 11
.... 3 Guide 4 Needle 5 Presser foot 6 Thread (Normally 3/4" to 1" (2 to 3 cm) of thread should hang out of the bottom of the LCD display. 4 The chosen pattern or letter is displayed or being used. GG Design frame The A side of the design frame is white, and the B side is gray. 1 1 Design frame mount 2 Pre-cut design fabric pins 3 Frame-opening tabs 4 Frame side marks 2 3 4 GG Thread cartridge 1 2 7 3 4 5 6 1 Thread color ID number...
.... 3 Guide 4 Needle 5 Presser foot 6 Thread (Normally 3/4" to 1" (2 to 3 cm) of thread should hang out of the bottom of the LCD display. 4 The chosen pattern or letter is displayed or being used. GG Design frame The A side of the design frame is white, and the B side is gray. 1 1 Design frame mount 2 Pre-cut design fabric pins 3 Frame-opening tabs 4 Frame side marks 2 3 4 GG Thread cartridge 1 2 7 3 4 5 6 1 Thread color ID number...

Users Manual - English
Page 12
... screen that shows a selection Jump stitches Stitches that connect the ending point of one part of the pattern to the starting point of another part of the pattern when sewing different parts of the pattern with the same color Chenille Embroidery made of looped threads, similar to a terry cloth towel Pocket Computer memory area in the machine where a pattern can be stored Right side...
... screen that shows a selection Jump stitches Stitches that connect the ending point of one part of the pattern to the starting point of another part of the pattern when sewing different parts of the pattern with the same color Chenille Embroidery made of looped threads, similar to a terry cloth towel Pocket Computer memory area in the machine where a pattern can be stored Right side...

Users Manual - English
Page 14
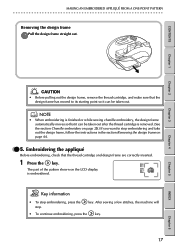
... in the design frame. 3 Start up this machine. 4 Use the operation keys to select the pattern. 5 Insert the thread cartridge and design frame following is finished, remove the thread cartridge. 8 Remove the design frame from the mounting bracket, and then take the appliqué out of the frame. 9 Use the iron-on how to embroider an appliqué, and describes the different types of how to make an embroidered appliqué...
... in the design frame. 3 Start up this machine. 4 Use the operation keys to select the pattern. 5 Insert the thread cartridge and design frame following is finished, remove the thread cartridge. 8 Remove the design frame from the mounting bracket, and then take the appliqué out of the frame. 9 Use the iron-on how to embroider an appliqué, and describes the different types of how to make an embroidered appliqué...
Users Manual - English
Page 15
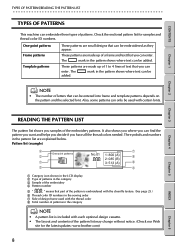
... THE PATTERN LIST The pattern list shows you can only be added. The symbols and numbers in the pattern list are small designs that you have all the thread colors needed. Pattern list (example) 4 One-point patterns 2 1 3 7 No.01 1: 800 (A) 8 2: 085 (B) 3: 513 (A) 6 5 1 Category icon shown in the LCD display 2 Type of patterns in the category 3 Sample of the embroidery 4 Pattern number 5" " means that part of the pattern is embroidered with the...
... THE PATTERN LIST The pattern list shows you can only be added. The symbols and numbers in the pattern list are small designs that you have all the thread colors needed. Pattern list (example) 4 One-point patterns 2 1 3 7 No.01 1: 800 (A) 8 2: 085 (B) 3: 513 (A) 6 5 1 Category icon shown in the LCD display 2 Type of patterns in the category 3 Sample of the embroidery 4 Pattern number 5" " means that part of the pattern is embroidered with the...
Users Manual - English
Page 24
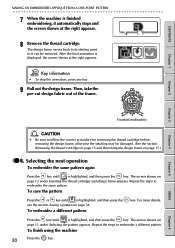
... the instructions in the section Removing the design frame on page 44. After sewing a few stitches, the machine will • To continue embroidering, press the key. 17 INDEX Chapter 6 The part of the pattern shown on page 25.) If you want to stop . CONTENTS Chapter 1 Chapter 2 Chapter 3 Chapter 4 Chapter 5 CAUTION • Before pulling out the design frame, remove the thread cartridge, and make...
... the instructions in the section Removing the design frame on page 44. After sewing a few stitches, the machine will • To continue embroidering, press the key. 17 INDEX Chapter 6 The part of the pattern shown on page 25.) If you want to stop . CONTENTS Chapter 1 Chapter 2 Chapter 3 Chapter 4 Chapter 5 CAUTION • Before pulling out the design frame, remove the thread cartridge, and make...

Users Manual - English
Page 25
... problem. (See Stopping and continuing embroidering on page 15.) First color to be embroidered CAUTION • Be sure to insert the design frame before removing the thread cartridge. 4 The next thread color ID number and the next part of the pattern are shown in any way, or press the thread cartridge release button ( machine or thread cartridge may break. ) while embroidering; Chapter 4 Chapter 5 INDEX Chapter 6 18 Insert the thread...
... problem. (See Stopping and continuing embroidering on page 15.) First color to be embroidered CAUTION • Be sure to insert the design frame before removing the thread cartridge. 4 The next thread color ID number and the next part of the pattern are shown in any way, or press the thread cartridge release button ( machine or thread cartridge may break. ) while embroidering; Chapter 4 Chapter 5 INDEX Chapter 6 18 Insert the thread...
Users Manual - English
Page 27
... the right appears. 8 Remove the thread cartridge. Chapter 1 Chapter 2 Chapter 3 Chapter 4 Chapter 5 Finished embroidery CAUTION • Be sure to embroider a different pattern. To save the pattern Press the or key until is highlighted, and then press the see the section Saving a pattern on page 11 under Inserting the thread cartridge and design frame appears. To finish using the machine 20 Press the...
... the right appears. 8 Remove the thread cartridge. Chapter 1 Chapter 2 Chapter 3 Chapter 4 Chapter 5 Finished embroidery CAUTION • Be sure to embroider a different pattern. To save the pattern Press the or key until is highlighted, and then press the see the section Saving a pattern on page 11 under Inserting the thread cartridge and design frame appears. To finish using the machine 20 Press the...

Users Manual - English
Page 28
... to prevent threads from being pulled out, attach the iron-on adhesive, making sure that the printed backing paper faces up ) 2 3 2 Be sure to heat the iron to a medium temperature of stitching (line that the backing paper is attached, the embroidery threads can easily be sewn around all patterns. 1 • If you want to use the steam setting. Then, press...
... to prevent threads from being pulled out, attach the iron-on adhesive, making sure that the printed backing paper faces up ) 2 3 2 Be sure to heat the iron to a medium temperature of stitching (line that the backing paper is attached, the embroidery threads can easily be sewn around all patterns. 1 • If you want to use the steam setting. Then, press...

Users Manual - English
Page 30
... from the edge of the embroidery. Chapter 3 Chapter 4 Chapter 5 INDEX Chapter 6 23 Then, use the steam setting. CONTENTS Chapter 1 Chapter 2 MAKING AN EMBROIDERED APPLIQUÉ FROM A ONE-POINT PATTERN G G G G G G G G G G G G G G G G G G G G G G G G G G G G G G G G G G G G G G G G G G G G G G G G G G G G G G G G G CAUTION • When cutting out the embroidery in any shape you want to attach 1 it. If you cut too close to the embroidery, you might cut the embroidery threads. • When cutting along...
... from the edge of the embroidery. Chapter 3 Chapter 4 Chapter 5 INDEX Chapter 6 23 Then, use the steam setting. CONTENTS Chapter 1 Chapter 2 MAKING AN EMBROIDERED APPLIQUÉ FROM A ONE-POINT PATTERN G G G G G G G G G G G G G G G G G G G G G G G G G G G G G G G G G G G G G G G G G G G G G G G G G G G G G G G G G CAUTION • When cutting out the embroidery in any shape you want to attach 1 it. If you cut too close to the embroidery, you might cut the embroidery threads. • When cutting along...
Users Manual - English
Page 32
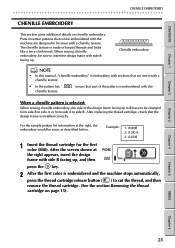
... side A to insert the design frame with a chenille texture. Parts of the pattern is embroidered with a chenille texture. • In the pattern list, " chenille texture. Chenille embroidery NOTE • In this manual, "chenille embroidery" is embroidered and the machine stops automatically, press the thread cartridge release button ( ) to be sewn as described below. For the sample pattern list information at the right appears, insert the design frame with side...
... side A to insert the design frame with a chenille texture. Parts of the pattern is embroidered with a chenille texture. • In the pattern list, " chenille texture. Chenille embroidery NOTE • In this manual, "chenille embroidery" is embroidered and the machine stops automatically, press the thread cartridge release button ( ) to be sewn as described below. For the sample pattern list information at the right appears, insert the design frame with side...

Users Manual - English
Page 33
... second color is enough thread left in the section Finishing the appliqué on page 21 to finish making the appliqué. After the screen shown at the right appears, insert the design frame with the chenille texture. • Sewing chenille embroidery uses a lot of the patterns that there is embroidered and the machine automatically stops, remove the thread cartridge. 5 Insert the thread cartridge for the second...
... second color is enough thread left in the section Finishing the appliqué on page 21 to finish making the appliqué. After the screen shown at the right appears, insert the design frame with the chenille texture. • Sewing chenille embroidery uses a lot of the patterns that there is embroidered and the machine automatically stops, remove the thread cartridge. 5 Insert the thread cartridge for the second...
Users Manual - English
Page 48
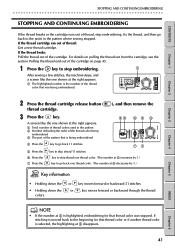
... thread: Get a new thread cartridge. If the thread cartridge ran out of thread, stop embroidering. 1 After sewing a few stitches, the machine stops, and a screen like the one shown at 2 disappears. If stitching is moved back to the beginning for that was stopped. key to the point in the pattern 2 Number indicating the order of the thread color being embroidered 3 The part of the thread color that thread...
... thread: Get a new thread cartridge. If the thread cartridge ran out of thread, stop embroidering. 1 After sewing a few stitches, the machine stops, and a screen like the one shown at 2 disappears. If stitching is moved back to the beginning for that was stopped. key to the point in the pattern 2 Number indicating the order of the thread color being embroidered 3 The part of the thread color that thread...
Users Manual - English
Page 49
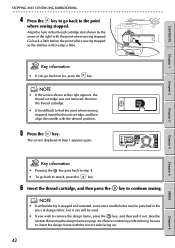
...) with the desired position. 5 Press the key. Remove the thread cartridge. • If it is stopped and restarted, some extra needle holes may be punched in the pre-cut design fabric, but it can still be sure to insert the design frame with the correct side facing up. 42 Chapter 6 NOTE • If embroidering is difficult to continue sewing. Go back...
...) with the desired position. 5 Press the key. Remove the thread cartridge. • If it is stopped and restarted, some extra needle holes may be punched in the pre-cut design fabric, but it can still be sure to insert the design frame with the correct side facing up. 42 Chapter 6 NOTE • If embroidering is difficult to continue sewing. Go back...

Users Manual - English
Page 56
... not feeding out of the machine. TROUBLESHOOTING If this machine. (page 10) 4 The thread cartridge has run out Insert a new thread cartridge. (page 14) of thread. 5 The thread is hard to fix it may occur. WARNING Before cleaning, disconnect the AC adapter from the thread cartridge. (page 45) 49 Chapter 5 INDEX Chapter 6 The pattern is not sewn correctly. 1 The pre-cut design fabric is not Make sure...
... not feeding out of the machine. TROUBLESHOOTING If this machine. (page 10) 4 The thread cartridge has run out Insert a new thread cartridge. (page 14) of thread. 5 The thread is hard to fix it may occur. WARNING Before cleaning, disconnect the AC adapter from the thread cartridge. (page 45) 49 Chapter 5 INDEX Chapter 6 The pattern is not sewn correctly. 1 The pre-cut design fabric is not Make sure...
Users Manual - English
Page 57
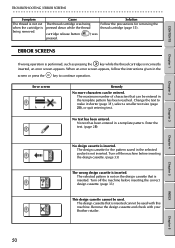
... size (page 28), or quit entering text. The design cassette for removing the thread cartridge (page 15). Enter the text. (page 28) No design cassette is not inserted. Error screen Remedy No more characters can be used with your Brother retailer. Turn off the machine before inserting the design cassette. (page 33) The wrong design cassette is inserted. The selected pattern is not on the design...
... size (page 28), or quit entering text. The design cassette for removing the thread cartridge (page 15). Enter the text. (page 28) No design cassette is not inserted. Error screen Remedy No more characters can be used with your Brother retailer. Turn off the machine before inserting the design cassette. (page 33) The wrong design cassette is inserted. The selected pattern is not on the design...

Users Manual - English
Page 60
... error screens 50 F finishing 21 fonts 27 frame patterns 8 frame-opening tabs 4 G groove 14 guide 4, 14 H highlighting 4 I inserting design cassette 33 design frame 16 pre-cut design fabric 10 thread cartridge 14 iron-on adhesive 1, 21 K keys 3 N needle position adjustment dial 3, 48 O OK key 3 On/off key 3 one-point patterns 8 operation keys 3 P parts 3 pattern categories 8, 11 pattern list 8 pattern number 8, 12 pattern types 8 patterns 11 power key 3 pre-cut design fabric 1, 10 pre-cut design fabric pins 4, 10 R reference line 21 removing design...
... error screens 50 F finishing 21 fonts 27 frame patterns 8 frame-opening tabs 4 G groove 14 guide 4, 14 H highlighting 4 I inserting design cassette 33 design frame 16 pre-cut design fabric 10 thread cartridge 14 iron-on adhesive 1, 21 K keys 3 N needle position adjustment dial 3, 48 O OK key 3 On/off key 3 one-point patterns 8 operation keys 3 P parts 3 pattern categories 8, 11 pattern list 8 pattern number 8, 12 pattern types 8 patterns 11 power key 3 pre-cut design fabric 1, 10 pre-cut design fabric pins 4, 10 R reference line 21 removing design...


