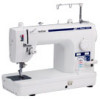
Operation Manual
Page 3
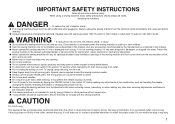
... threading the needle, changing the needle, threading the bobbin or changing the presser foot etc. ●● Always unplug the sewing machine from the electrical outlet when removing covers, lubricating, or when making any adjustments in this sewing machine. Use only accessories recommended by the manufacturer as described in the needle area, such as a toy. Special care is not working properly, if it still does not fit, contact a qualified electrician to break...
... threading the needle, changing the needle, threading the bobbin or changing the presser foot etc. ●● Always unplug the sewing machine from the electrical outlet when removing covers, lubricating, or when making any adjustments in this sewing machine. Use only accessories recommended by the manufacturer as described in the needle area, such as a toy. Special care is not working properly, if it still does not fit, contact a qualified electrician to break...
Operation Manual
Page 5
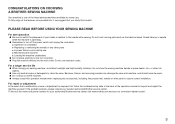
... the foot controller. ●● Plug the machine directly into it, we suggest that a malfunction occurs or adjustment is required, first follow the troubleshooting table in relation to the needle while sewing. CONGRATULATIONS ON CHOOSING A BROTHER SEWING MACHINE Your machine is one of the operation manual to inspect and adjust the machine yourself. Do not store the sewing machine beside a space heater, iron, or other parts to assure correct installation. To...
... the foot controller. ●● Plug the machine directly into it, we suggest that a malfunction occurs or adjustment is required, first follow the troubleshooting table in relation to the needle while sewing. CONGRATULATIONS ON CHOOSING A BROTHER SEWING MACHINE Your machine is one of the operation manual to inspect and adjust the machine yourself. Do not store the sewing machine beside a space heater, iron, or other parts to assure correct installation. To...

Operation Manual
Page 6
...Machine Features 6 Before You Begin (1 7 Power Cord and Foot Controller 7 Power Switch 7 Thread Tension Dial 7 Hand Wheel 7 Stitch Length Regulator 7 Reverse Stitch Lever 7 Presser Foot Lift Lever 8 Knee Lift 8 Presser Foot Pressure Adjustment Dial 8 Fabric Extension Table 8 Before You Begin (2 9 Thread Cutter Button 9 Needle Stop Position Button 9 Light Switch 9 Feed Dog Adjustment Knob 9 Changing Needles and Light Bulb 10 Changing the Needle 10 Changing the Feed Pin 10 Changing Light Bulbs 10 Threading (1 11 Bobbin Winding 11 Bobbin Insertion 13 Threading (2 14 Upper...
...Machine Features 6 Before You Begin (1 7 Power Cord and Foot Controller 7 Power Switch 7 Thread Tension Dial 7 Hand Wheel 7 Stitch Length Regulator 7 Reverse Stitch Lever 7 Presser Foot Lift Lever 8 Knee Lift 8 Presser Foot Pressure Adjustment Dial 8 Fabric Extension Table 8 Before You Begin (2 9 Thread Cutter Button 9 Needle Stop Position Button 9 Light Switch 9 Feed Dog Adjustment Knob 9 Changing Needles and Light Bulb 10 Changing the Needle 10 Changing the Feed Pin 10 Changing Light Bulbs 10 Threading (1 11 Bobbin Winding 11 Bobbin Insertion 13 Threading (2 14 Upper...
Operation Manual
Page 7
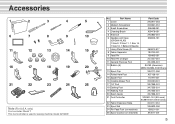
... Hem Foot X57138-101 15 Zipper Foot 112797-001 16 Invisible Zipper Foot XC0093-001 17 1/4" Foot XA7258-001 18 Quilting Foot XA7255-301 19 Walking Foot XA7253-001 20 Seam Guide XA7256-001 21 Foot Controller XD0501-151 (EU area) XC8816-051 (Other areas) 22 Fabric Extension Table XC3117-051 23 Spool Net XA5523-050 24 Pin Feed Foot (on machine) 136021-001 25 Spool Cushion (on machine) XF2071-001 5 only) Foot controller: Model T This foot controller is used for sewing machine model DZ1500F...
... Hem Foot X57138-101 15 Zipper Foot 112797-001 16 Invisible Zipper Foot XC0093-001 17 1/4" Foot XA7258-001 18 Quilting Foot XA7255-301 19 Walking Foot XA7253-001 20 Seam Guide XA7256-001 21 Foot Controller XD0501-151 (EU area) XC8816-051 (Other areas) 22 Fabric Extension Table XC3117-051 23 Spool Net XA5523-050 24 Pin Feed Foot (on machine) 136021-001 25 Spool Cushion (on machine) XF2071-001 5 only) Foot controller: Model T This foot controller is used for sewing machine model DZ1500F...

Operation Manual
Page 8
Machine Features Presser Foot Pressure Three Holed Adjustment Dial (Page 8) Thread Guide (Page 14) Thread Take-up Lever (Page 14) Light Switch (Page 9) Thread Trimmer Sewing Area Light (Page 10) Automatic Needle Threader (Page 15) Quick Bobbin Thread Device (Page 13) Thread Cutter Button (Page 9) Thread Tension Dial (Page 7 and 16) Feed Dogs (Page 9 and 18) Thread Guide Bar (Page 11) Stitch Length Regulator (Page 7) Bobbin Winder (Page 11) Hand Wheel (Page 7) Indicator Lamp Needle Stop Position Button (Page 9) Power Switch (Page 7) Reverse Stitch Lever (Page 7) Power Socket (...
Machine Features Presser Foot Pressure Three Holed Adjustment Dial (Page 8) Thread Guide (Page 14) Thread Take-up Lever (Page 14) Light Switch (Page 9) Thread Trimmer Sewing Area Light (Page 10) Automatic Needle Threader (Page 15) Quick Bobbin Thread Device (Page 13) Thread Cutter Button (Page 9) Thread Tension Dial (Page 7 and 16) Feed Dogs (Page 9 and 18) Thread Guide Bar (Page 11) Stitch Length Regulator (Page 7) Bobbin Winder (Page 11) Hand Wheel (Page 7) Indicator Lamp Needle Stop Position Button (Page 9) Power Switch (Page 7) Reverse Stitch Lever (Page 7) Power Socket (...

Operation Manual
Page 9
..., the machine's speed will increase. When you press the foot controller down lightly, the machine will stop. CAUTION Be sure to its lowest position when reverse sewing is desired. ✽✽ When the feed adjustment dial is set between 5-7 mm, the reverse stitch length is in the lowered position. ✽✽ Make sure to continuously press the lever to keep the area under and around the needle clear. Upper and bobbin threads will meet...
..., the machine's speed will increase. When you press the foot controller down lightly, the machine will stop. CAUTION Be sure to its lowest position when reverse sewing is desired. ✽✽ When the feed adjustment dial is set between 5-7 mm, the reverse stitch length is in the lowered position. ✽✽ Make sure to continuously press the lever to keep the area under and around the needle clear. Upper and bobbin threads will meet...

Operation Manual
Page 10
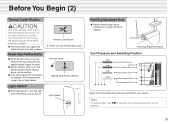
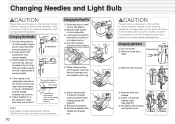
... the pressure adjustment dial raises and lowers the pressure indicator needle as the amount of pressure on page 16. Presser Foot Pressure Adjustment Dial ✽✽ See "Thread Tension" on the presser foot changes. See also: "Feed Dog Adjustment Knob" on to the machine. 2 Hole Guide pin 2 1 Table legs 3 3 Stopper Hook Pressure Indicator Needle Fabric Extension Table ●● Lower the adjustable table feet and slide the fabric extension table on page 9. Presser Foot Lift Lever ●● Lowering the presser foot lift lever lowers the sewing foot down...
... the pressure adjustment dial raises and lowers the pressure indicator needle as the amount of pressure on page 16. Presser Foot Pressure Adjustment Dial ✽✽ See "Thread Tension" on the presser foot changes. See also: "Feed Dog Adjustment Knob" on to the machine. 2 Hole Guide pin 2 1 Table legs 3 3 Stopper Hook Pressure Indicator Needle Fabric Extension Table ●● Lower the adjustable table feet and slide the fabric extension table on page 9. Presser Foot Lift Lever ●● Lowering the presser foot lift lever lowers the sewing foot down...
Operation Manual
Page 11
... turn the light over the sewing area on the foot controller, turn the power off, and moving the needle with the hand wheel, check the situation. ●● The thread cutter trims upper and bobbin threads at the end of four feed dog positions according to your needs. Thread Cutter Button ✽✽ Press with fabric weights. Feed Dog Adjustment Knob Foot Pressure and Feed Dog Position (Feed Dogs Down) Velvet (Pin Feeding) Lightweight Fabrics Middleweight Fabrics Heavyweight Fabrics Select one of seams. Needle Stop Position Button ●...
... turn the light over the sewing area on the foot controller, turn the power off, and moving the needle with the hand wheel, check the situation. ●● The thread cutter trims upper and bobbin threads at the end of four feed dog positions according to your needs. Thread Cutter Button ✽✽ Press with fabric weights. Feed Dog Adjustment Knob Foot Pressure and Feed Dog Position (Feed Dogs Down) Velvet (Pin Feeding) Lightweight Fabrics Middleweight Fabrics Heavyweight Fabrics Select one of seams. Needle Stop Position Button ●...
Operation Manual
Page 12
... and the needle threader will go. Sewing Light: See page 24. 6 Re-attach bulb housing and tighten screw. 230V 120V Light Bulb Light Bulb Note HLX5 needles should lay parallel to cool down before changing bulbs. Changing Needles and Light Bulb CAUTION Please make sure the power to the machine is turned off before carrying out the following operations. Raise needle to highest position using the machine, therefore it up. 6 Attach new feed pin to "velvet" position. (See page 9.) 2 Remove needle, presser foot and needle plate. 3 Lower presser foot and...
... and the needle threader will go. Sewing Light: See page 24. 6 Re-attach bulb housing and tighten screw. 230V 120V Light Bulb Light Bulb Note HLX5 needles should lay parallel to cool down before changing bulbs. Changing Needles and Light Bulb CAUTION Please make sure the power to the machine is turned off before carrying out the following operations. Raise needle to highest position using the machine, therefore it up. 6 Attach new feed pin to "velvet" position. (See page 9.) 2 Remove needle, presser foot and needle plate. 3 Lower presser foot and...

Operation Manual
Page 13
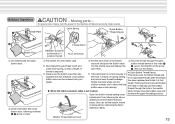
... bobbin with the guide pin (5) inserted into the lower notch. 11 Guide Pin Bobbin Winding Clutch 4 Pass thread through bobbin winding thread guide as shown in drawing. 5 Run thread through the triangular hole. If the bobbin stop does not slide easily between the top and bottom of thread on bobbin winder shaft. 6 Press bobbin winding clutch up against empty bobbin. Threading (1) Bobbin Winding CAUTION Do not move bobbin winding clutch while machine is seated properly with guide pin on the spool pin. ✽1 Use spool...
... bobbin with the guide pin (5) inserted into the lower notch. 11 Guide Pin Bobbin Winding Clutch 4 Pass thread through bobbin winding thread guide as shown in drawing. 5 Run thread through the triangular hole. If the bobbin stop does not slide easily between the top and bottom of thread on bobbin winder shaft. 6 Press bobbin winding clutch up against empty bobbin. Threading (1) Bobbin Winding CAUTION Do not move bobbin winding clutch while machine is seated properly with guide pin on the spool pin. ✽1 Use spool...
Operation Manual
Page 15
... without removing the fabric extension table.) Bobbin Thread Setting Cover 13 thread is not set securely. To reduce risk of the arrow under latch spring, so that the the need to the machine off during sewing to the left. 10 cm (4 inches) 3 2 1 Lift needle plate and open bobbin door. 2 1 5 Lower slide plate and close the bobbin case and Open the bobbin thread setting cover continue the upper threading process. has been replaced and holds it may fly off before servicing. Bobbin Insertion CAUTION...
... without removing the fabric extension table.) Bobbin Thread Setting Cover 13 thread is not set securely. To reduce risk of the arrow under latch spring, so that the the need to the machine off during sewing to the left. 10 cm (4 inches) 3 2 1 Lift needle plate and open bobbin door. 2 1 5 Lower slide plate and close the bobbin case and Open the bobbin thread setting cover continue the upper threading process. has been replaced and holds it may fly off before servicing. Bobbin Insertion CAUTION...

Operation Manual
Page 16
... automatic needle threader. Threading (2) CAUTION Please turn off the power to the machine before using the automatic needle threader. Otherwise, it may not be adjusted adequately unless the thread runs correctly through the holes backwards as shown in highest position and presser foot is in diagram. 14 Upper Threading 1 Long Groove 7 6 8 4 2 3 5 1 7 6 7 2 4 3 5 8 9 0 A Scarf (depression on needle shaft) Thread Needle Hole 9 0 A CAUTION ●● Make sure thread take -up . ✽✽ When using polyester thread or thread that tangles or breaks...
... automatic needle threader. Threading (2) CAUTION Please turn off the power to the machine before using the automatic needle threader. Otherwise, it may not be adjusted adequately unless the thread runs correctly through the holes backwards as shown in highest position and presser foot is in diagram. 14 Upper Threading 1 Long Groove 7 6 8 4 2 3 5 1 7 6 7 2 4 3 5 8 9 0 A Scarf (depression on needle shaft) Thread Needle Hole 9 0 A CAUTION ●● Make sure thread take -up . ✽✽ When using polyester thread or thread that tangles or breaks...

Operation Manual
Page 17
... thread gently, return the needle threader lever to the right. As you until needle is in the highest position, and lower presser foot. 2 Take thread in your left and check that it is in the highest position. 4 Turn the needle threader lever all the way in the direction of 1 and when the hook extends from the needle hole, pull the thread in the direction of 2 to catch it forward. Using the Automatic Needle Threader Automatic Needle Threader...
... thread gently, return the needle threader lever to the right. As you until needle is in the highest position, and lower presser foot. 2 Take thread in your left and check that it is in the highest position. 4 Turn the needle threader lever all the way in the direction of 1 and when the hook extends from the needle hole, pull the thread in the direction of 2 to catch it forward. Using the Automatic Needle Threader Automatic Needle Threader...
Operation Manual
Page 18
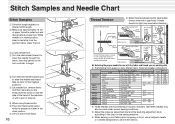
... using thread cutter: 5 Press the thread cutter button while the presser foot lever in raised position, insert a test strip from the garment fabric under normal sewing conditions. ✽✽ Adjust the pressure adjustment dial and the feed dog adjustment knob according to the chart on the sewing machine. ✽✽ When sewing on knit fabrics such as messy stitches, puckered seams Upper Thread and thread breakage. Specialty fabrics Light weight fabrics Middle weight fabrics Heavy weight fabrics Fabric - Stitch Samples 1 Set stitch length regulator to desired stitch length...
... using thread cutter: 5 Press the thread cutter button while the presser foot lever in raised position, insert a test strip from the garment fabric under normal sewing conditions. ✽✽ Adjust the pressure adjustment dial and the feed dog adjustment knob according to the chart on the sewing machine. ✽✽ When sewing on knit fabrics such as messy stitches, puckered seams Upper Thread and thread breakage. Specialty fabrics Light weight fabrics Middle weight fabrics Heavy weight fabrics Fabric - Stitch Samples 1 Set stitch length regulator to desired stitch length...

Operation Manual
Page 19
... seams, lightly guide the fabric with your hand on fabrics which stick or tend to rest against the edge of other presser feet may damage or break the pin feed mechanism. ●● General purpose Foot This foot is used for most sewing. (Can also be used to secure piping in relation to attach the other than concealed fasteners. Changing Presser Feet (Zipper Foot) 1 Raise presser foot, and raise needle to highest position. 2 Loosen and remove screw using...
... seams, lightly guide the fabric with your hand on fabrics which stick or tend to rest against the edge of other presser feet may damage or break the pin feed mechanism. ●● General purpose Foot This foot is used for most sewing. (Can also be used to secure piping in relation to attach the other than concealed fasteners. Changing Presser Feet (Zipper Foot) 1 Raise presser foot, and raise needle to highest position. 2 Loosen and remove screw using...

Operation Manual
Page 20
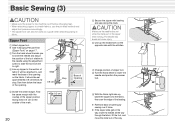
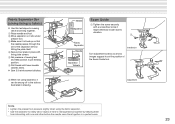
... the feed pin. 18 Backstitches 1 cm Finish sewing. � When changing sewing directions. 1 cm 1 Lift foot, pull about 15 cm of upper and bobbin thread under and behind foot, and position fabric under foot. 2 Lower presser foot lever to lower foot. 3 Turn the hand wheel toward you to lower the needle through the fabric, then step gently on the foot controller to begin. ✽✽ At the beginning and end of a seam, press down the reverse stitch lever and...
... the feed pin. 18 Backstitches 1 cm Finish sewing. � When changing sewing directions. 1 cm 1 Lift foot, pull about 15 cm of upper and bobbin thread under and behind foot, and position fabric under foot. 2 Lower presser foot lever to lower foot. 3 Turn the hand wheel toward you to lower the needle through the fabric, then step gently on the foot controller to begin. ✽✽ At the beginning and end of a seam, press down the reverse stitch lever and...
Operation Manual
Page 22
... the machine is off before changing feet. • When attaching zippers to stretch fabrics, use the pin feed method and adjust foot pressure accordingly. • The zipper foot can also be set Stop Opening foot. It should be used as a guide when attaching piping to fabric. 5 Secure the zipper with the stitches. ✽✽ See "Changing Presser Feet (Zipper Foot)" on page 17. 2 Turn the hand wheel towards you to lower the needle and adjust A the position of the foot relative to the needle using the adjustment screw...
... the machine is off before changing feet. • When attaching zippers to stretch fabrics, use the pin feed method and adjust foot pressure accordingly. • The zipper foot can also be set Stop Opening foot. It should be used as a guide when attaching piping to fabric. 5 Secure the zipper with the stitches. ✽✽ See "Changing Presser Feet (Zipper Foot)" on page 17. 2 Turn the hand wheel towards you to lower the needle and adjust A the position of the foot relative to the needle using the adjustment screw...
Operation Manual
Page 25
... sits under presser foot. 3 Make sure it is lined up so that the needle passes through the slot of the separator without hitting the plate itself. 4 Secure liner plate in place with lining plate screws. 5 Set pressure of sewing feet and feed position to pin feeding position. 6 Pull thread until lower needle catches fabric. ✽✽ Sew 2-3 reinforcement stitches. 7 When not using the fabric separator. • Use the separator to neatly sew 2 layers of the Seam Guide foot. Needle Seam Guide Separator 1 Tighten...
... sits under presser foot. 3 Make sure it is lined up so that the needle passes through the slot of the separator without hitting the plate itself. 4 Secure liner plate in place with lining plate screws. 5 Set pressure of sewing feet and feed position to pin feeding position. 6 Pull thread until lower needle catches fabric. ✽✽ Sew 2-3 reinforcement stitches. 7 When not using the fabric separator. • Use the separator to neatly sew 2 layers of the Seam Guide foot. Needle Seam Guide Separator 1 Tighten...
Operation Manual
Page 26
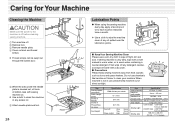
... of Thread TakeUp Lever Foot Height Specification 1,500 stitches per minute 0 - 7 mm 34.1 mm 64.7 mm Foot Lift Knee control One Two Over 6 mm 9 mm 10 mm Item Specification Height of feed dog 0.7 mm, 1.1 mm Height of lower needle 3 mm - 3.5 mm Needles that HLX5#9 - #18 may be swept out through the bobbin door. 5 When the area under the needle plate is cleaned out, oil hook of bobbin case with sewing machine oil. ✽✽ Use...
... of Thread TakeUp Lever Foot Height Specification 1,500 stitches per minute 0 - 7 mm 34.1 mm 64.7 mm Foot Lift Knee control One Two Over 6 mm 9 mm 10 mm Item Specification Height of feed dog 0.7 mm, 1.1 mm Height of lower needle 3 mm - 3.5 mm Needles that HLX5#9 - #18 may be swept out through the bobbin door. 5 When the area under the needle plate is cleaned out, oil hook of bobbin case with sewing machine oil. ✽✽ Use...
Operation Manual
Page 27
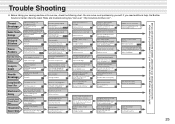
... tangled. Upper threading is dulled. Set needle to make sure the hook isn't bent. Rethread machine. Clean bobbin case and under needle plate needs to use with your fabric and thread. 16 You're pulling the fabric too hard. Change needles. 10 Machine's not plugged in Seam Needle Breakage Sewing Machine Doesn't Run Machine is Noisy Automatic Needle Threader Doesn't Work Thread Cutter Doesn't Work Upper threading is getting tangled. Reduce tension. 16 Needle is bent, or tip is incorrect. Needle may need additional help, the Brother Solutions...
... tangled. Upper threading is dulled. Set needle to make sure the hook isn't bent. Rethread machine. Clean bobbin case and under needle plate needs to use with your fabric and thread. 16 You're pulling the fabric too hard. Change needles. 10 Machine's not plugged in Seam Needle Breakage Sewing Machine Doesn't Run Machine is Noisy Automatic Needle Threader Doesn't Work Thread Cutter Doesn't Work Upper threading is getting tangled. Reduce tension. 16 Needle is bent, or tip is incorrect. Needle may need additional help, the Brother Solutions...


