
BR-Receipts Users Guide Macintosh
Page 4
... 1 Features ...2 System Requirements...2 2 Overview 3 3 Getting Started 6 Menu Bar...6 Command Toolbar ...7 Folder View ...8 Status Bar...9 List View...10 Image View ...11 Edit View ...12 4 Working with BR-Receipts 13 Setting Up BR-Receipts 13 Collecting Receipts ...16 Scanning Receipts 17 Importing Receipts 19 Creating Receipts Manually 20 Using Receipt Templates 20 Select Vendor...21 New Template...22 Manual Input ...23 Modify Template...24...
... 1 Features ...2 System Requirements...2 2 Overview 3 3 Getting Started 6 Menu Bar...6 Command Toolbar ...7 Folder View ...8 Status Bar...9 List View...10 Image View ...11 Edit View ...12 4 Working with BR-Receipts 13 Setting Up BR-Receipts 13 Collecting Receipts ...16 Scanning Receipts 17 Importing Receipts 19 Creating Receipts Manually 20 Using Receipt Templates 20 Select Vendor...21 New Template...22 Manual Input ...23 Modify Template...24...
BR-Receipts Users Guide Macintosh
Page 6
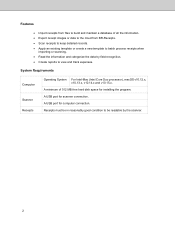
System Requirements Computer Scanner Receipts Operating System For Intel-Mac (Intel Core Duo processor), macOS v10.12.x, v10.13.x, v10.14.x and v10.15.x. A minimum of all the information. • Export receipt images or data to the cloud from files to build and maintain a database of 512 MB free hard disk space for scanner connection. A USB port for installing the program. A USB port for computer...
System Requirements Computer Scanner Receipts Operating System For Intel-Mac (Intel Core Duo processor), macOS v10.12.x, v10.13.x, v10.14.x and v10.15.x. A minimum of all the information. • Export receipt images or data to the cloud from files to build and maintain a database of 512 MB free hard disk space for scanner connection. A USB port for installing the program. A USB port for computer...

BR-Receipts Users Guide Macintosh
Page 7
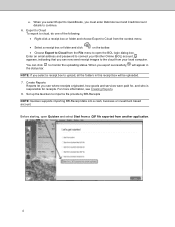
..., drag a rectangle to have the information for them, you get started: 1. For more information, see Using Receipt Templates. 4. You can edit or delete accounts. Export To You can import, scan, manually create, and paste receipts into the receipt box. 2. Under Delimited by - Select Include a header line to highlight a section of your needs. c. Use the file format best suited to finish. d.
..., drag a rectangle to have the information for them, you get started: 1. For more information, see Using Receipt Templates. 4. You can edit or delete accounts. Export To You can import, scan, manually create, and paste receipts into the receipt box. 2. Under Delimited by - Select Include a header line to highlight a section of your needs. c. Use the file format best suited to finish. d.
BR-Receipts Users Guide Macintosh
Page 8
... now send receipt images to connect your local computer. For more information, see where receipts originated, how goods and services were paid for, and who is responsible for receipts. Enter an email address and password to the cloud from another application. 4 NOTE: If you select a receipt box to monitor the uploading status. Before starting, open the BOL login...
... now send receipt images to connect your local computer. For more information, see where receipts originated, how goods and services were paid for, and who is responsible for receipts. Enter an email address and password to the cloud from another application. 4 NOTE: If you select a receipt box to monitor the uploading status. Before starting, open the BOL login...
BR-Receipts Users Guide Macintosh
Page 10
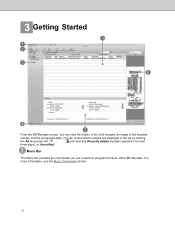
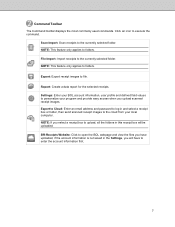
For more information, see the Menu Commands section. 6 You can view file folders, a list of all receipts, an image of the selected receipt, and the recognized data. Menu Bar The Menu bar provides the commands you can control which receipts are displayed in the list by clicking the All drop-down list and selecting Recently Added (receipts updated in the last three days), or Unverified. 3 Getting Started From the BR-Receipts screen, you use to perform program functions within BR-Receipts.
For more information, see the Menu Commands section. 6 You can view file folders, a list of all receipts, an image of the selected receipt, and the recognized data. Menu Bar The Menu bar provides the commands you can control which receipts are displayed in the list by clicking the All drop-down list and selecting Recently Added (receipts updated in the last three days), or Unverified. 3 Getting Started From the BR-Receipts screen, you use to perform program functions within BR-Receipts.
BR-Receipts Users Guide Macintosh
Page 11
..., user profile and defined field values to folders. NOTE: If you upload scanned receipt images. BR-Receipts Website: Click to open the BOL webpage and view the files you will be uploaded. Export to Cloud: Enter an email address and password to log in the Settings, you have uploaded, if the account information is not saved in and select a receipt box...
..., user profile and defined field values to folders. NOTE: If you upload scanned receipt images. BR-Receipts Website: Click to open the BOL webpage and view the files you will be uploaded. Export to Cloud: Enter an email address and password to log in the Settings, you have uploaded, if the account information is not saved in and select a receipt box...

BR-Receipts Users Guide Macintosh
Page 12
... a receipt box, open a file, and create a new folder. Create a receipt box. Change the name of the receipt box. Folder View Folder view includes a Folder section and a Search section. Close the receipt box and all the folders under another name. Right-click the blank area to view these commands: New Receipt Box... Set Location Close Export to the cloud from the menu. Enter an email address and password to log...
... a receipt box, open a file, and create a new folder. Create a receipt box. Change the name of the receipt box. Folder View Folder view includes a Folder section and a Search section. Close the receipt box and all the folders under another name. Right-click the blank area to view these commands: New Receipt Box... Set Location Close Export to the cloud from the menu. Enter an email address and password to log...

BR-Receipts Users Guide Macintosh
Page 17
... to help you send receipt images to save the account information, providing easy access when you organize and track your computer. 13 Setting Up BR-Receipts Click on the toolbar or click the BR-Receipts menu and select Preferences..., and then enter your BOL account information, user profile and defined field values to keep your program. 4 Working with...
... to help you send receipt images to save the account information, providing easy access when you organize and track your computer. 13 Setting Up BR-Receipts Click on the toolbar or click the BR-Receipts menu and select Preferences..., and then enter your BOL account information, user profile and defined field values to keep your program. 4 Working with...
BR-Receipts Users Guide Macintosh
Page 21
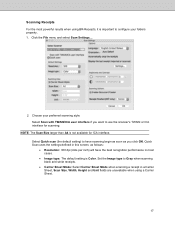
... use the scanner's TWAIN or ICA interface for ICA interface. Set the Image type to configure your preferred scanning style: Select Scan with TWAIN/ICA user interface if you click OK. Select Quick scan (the default setting) to have the best recognition performance in a Carrier Sheet, Scan Size, Width, Height and Unit fields are unavailable when using BR-Receipts, it is not available for scanning. Choose your folders properly. 1. NOTE: The Scan Size...
... use the scanner's TWAIN or ICA interface for ICA interface. Set the Image type to configure your preferred scanning style: Select Scan with TWAIN/ICA user interface if you click OK. Select Quick scan (the default setting) to have the best recognition performance in a Carrier Sheet, Scan Size, Width, Height and Unit fields are unavailable when using BR-Receipts, it is not available for scanning. Choose your folders properly. 1. NOTE: The Scan Size...

BR-Receipts Users Guide Macintosh
Page 22
Click Settings... When you finish configuring your scan settings, you select "Carrier Sheet Mode", the software automatically skips scanning the header of the carrier sheet. Click OK. Do not skew the paper when folding. NOTE: Carrier sheets may differ depending on your scanner model. • Scan Size: Select User Defined from the list. • Enable Document Feeder: Select this option, the selected scanner must have placed the receipt in the scanner's document feeder. • Brightness...
Click Settings... When you finish configuring your scan settings, you select "Carrier Sheet Mode", the software automatically skips scanning the header of the carrier sheet. Click OK. Do not skew the paper when folding. NOTE: Carrier sheets may differ depending on your scanner model. • Scan Size: Select User Defined from the list. • Enable Document Feeder: Select this option, the selected scanner must have placed the receipt in the scanner's document feeder. • Brightness...
BR-Receipts Users Guide Macintosh
Page 23
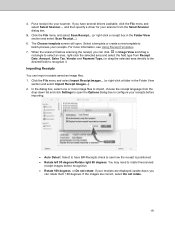
... drag the selected area directly to the desired field) to open . 4. If the images are displayed upside down, you can rotate them 180 degrees. When the scanner finishes scanning the receipt, you have BR-Receipts check to batch-process your scanner. If you can import receipts saved as image files. 1. Select a template or create a new template to see Using Receipt Templates. 7.
... drag the selected area directly to the desired field) to open . 4. If the images are displayed upside down, you can rotate them 180 degrees. When the scanner finishes scanning the receipt, you have BR-Receipts check to batch-process your scanner. If you can import receipts saved as image files. 1. Select a template or create a new template to see Using Receipt Templates. 7.

BR-Receipts Users Guide Macintosh
Page 34
... File... File Menu New New Receipt Box New Folder Create a new receipt box whose properties you can determine yourself. S Save the selected receipt box with customized items of different types in the selected receipt box. Close Close the selected receipt box. Configure the Scan Settings. multiple fields. Open... Import Receipt Image... Export Receipt Image to File Save the receipts as a file in CSV. Select a driver for your scanner, or a different scanner connected to your data...
... File... File Menu New New Receipt Box New Folder Create a new receipt box whose properties you can determine yourself. S Save the selected receipt box with customized items of different types in the selected receipt box. Close Close the selected receipt box. Configure the Scan Settings. multiple fields. Open... Import Receipt Image... Export Receipt Image to File Save the receipts as a file in CSV. Select a driver for your scanner, or a different scanner connected to your data...
Quick Setup Guide
Page 1
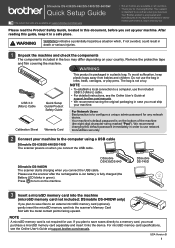
... machine. Remove the protective tape and film covering the machine. Press to an external microSD memory card (optional), gently insert the microSD memory card into the machine (microSD memory card not included; Please use the included USB 3.0 (Micro) cable. • For detailed instructions, see the Online User's Guide at support.brother.com/manuals. DSmobile DS-635/DS-640/DS-740D/DS-940DW Quick Setup Guide The latest manuals are available at support.brother.com/manuals. • Not all models are available...
... machine. Remove the protective tape and film covering the machine. Press to an external microSD memory card (optional), gently insert the microSD memory card into the machine (microSD memory card not included; Please use the included USB 3.0 (Micro) cable. • For detailed instructions, see the Online User's Guide at support.brother.com/manuals. DSmobile DS-635/DS-640/DS-740D/DS-940DW Quick Setup Guide The latest manuals are available at support.brother.com/manuals. • Not all models are available...
Quick Setup Guide
Page 2
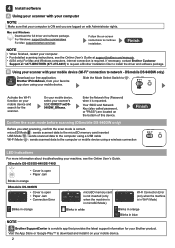
... called password, or "PASS") are logged on your computer. • For detailed scanning instructions, see the Online User's Guide. microSD Mode : sends scanned data to the microSD memory card inserted USB Mode : sends scanned data to the computer using a USB cable Wi-Fi Mode : sends scanned data to network - For Windows: support.brother.com/windows For Mac: support.brother.com/mac Follow the on the bottom of this device. DSmobile DS-940DW only) Download our free application, Brother iPrint&Scan, from your favorite app store using a wireless connection...
... called password, or "PASS") are logged on your computer. • For detailed scanning instructions, see the Online User's Guide. microSD Mode : sends scanned data to the microSD memory card inserted USB Mode : sends scanned data to the computer using a USB cable Wi-Fi Mode : sends scanned data to network - For Windows: support.brother.com/windows For Mac: support.brother.com/mac Follow the on the bottom of this device. DSmobile DS-940DW only) Download our free application, Brother iPrint&Scan, from your favorite app store using a wireless connection...
Quick Setup Guide
Page 3
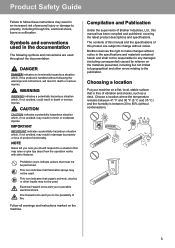
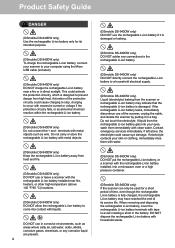
... to property or loss of Brother Industries, Ltd., this product are used . Prohibition icons indicate actions that flammable sprays may arise or give tips about how the operation works with other features. Choosing a location Put your machine on the machine. Product Safety Guide Failure to follow these instructions may result in the documentation The following the warnings and...
... to property or loss of Brother Industries, Ltd., this product are used . Prohibition icons indicate actions that flammable sprays may arise or give tips about how the operation works with other features. Choosing a location Put your machine on the machine. Product Safety Guide Failure to follow these instructions may result in the documentation The following the warnings and...
Quick Setup Guide
Page 4
... battery, connect your scanner to your computer using the Micro USB cable (included). (DSmobile DS-940DW only) DO NOT charge the rechargeable Li-ion battery near fire, heaters, or other high-temperature (above 140 °F/60 °C) locations. (DSmobile DS-940DW only) DO NOT allow the rechargeable Li-ion battery to prevent danger from the rechargeable Li-ion battery gets into...
... battery, connect your scanner to your computer using the Micro USB cable (included). (DSmobile DS-940DW only) DO NOT charge the rechargeable Li-ion battery near fire, heaters, or other high-temperature (above 140 °F/60 °C) locations. (DSmobile DS-940DW only) DO NOT allow the rechargeable Li-ion battery to prevent danger from the rechargeable Li-ion battery gets into...

Quick Setup Guide
Page 6
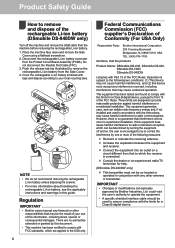
... service. There is illegal to dispose of the scanner. Edges of paper may fall down. Contact the store where this battery. 6 Do not place heavy objects on how to the scanner. IMPORTANT • If the machine does not operate normally when the operating instructions are extreme. Contact your hands. DO NOT use only after drying the device naturally. (DSmobile DS-940DW...
... service. There is illegal to dispose of the scanner. Edges of paper may fall down. Contact the store where this battery. 6 Do not place heavy objects on how to the scanner. IMPORTANT • If the machine does not operate normally when the operating instructions are extreme. Contact your hands. DO NOT use only after drying the device naturally. (DSmobile DS-940DW...

Quick Setup Guide
Page 7
... NOT continue to use . Refer all servicing to a Brother Authorized Service Center. Contact your nearest Brother Authorized Service Center, contact: In USA: 1-877-BROTHER (1-877-276-8437) In Canada: www.brother.ca/support Rechargeable Li-ion battery (DSmobile DS-940DW only) • At the time of your Brother dealer or Brother customer service. Do not use . If the scanner becomes extremely hot, discontinue use the scanner until the...
... NOT continue to use . Refer all servicing to a Brother Authorized Service Center. Contact your nearest Brother Authorized Service Center, contact: In USA: 1-877-BROTHER (1-877-276-8437) In Canada: www.brother.ca/support Rechargeable Li-ion battery (DSmobile DS-940DW only) • At the time of your Brother dealer or Brother customer service. Do not use . If the scanner becomes extremely hot, discontinue use the scanner until the...
Quick Setup Guide
Page 8
... and remove the Side Cover using a flathead screwdriver. 2. IMPORTANT • Changes or modifications not expressly approved by Brother Industries, Ltd. This equipment generates, uses, and can be co-located or operated in this device must not be determined by turning the equipment off the machine and remove the USB cable from the machine before removing the rechargeable Li-ion battery. 1. could void the user's authority to operate...
... and remove the Side Cover using a flathead screwdriver. 2. IMPORTANT • Changes or modifications not expressly approved by Brother Industries, Ltd. This equipment generates, uses, and can be co-located or operated in this device must not be determined by turning the equipment off the machine and remove the USB cable from the machine before removing the rechargeable Li-ion battery. 1. could void the user's authority to operate...
Quick Setup Guide
Page 9
...; specifications for use in this manual has a Software License Agreement specific to see the open -source software. Wi-Fi is mentioned in the USA and Canada only. Each company whose software title is a registered trademark of those respective companies. Please visit support.brother.com to its proprietary programs. Any trade names and product names of companies appearing on Brother products, related documents and...
...; specifications for use in this manual has a Software License Agreement specific to see the open -source software. Wi-Fi is mentioned in the USA and Canada only. Each company whose software title is a registered trademark of those respective companies. Please visit support.brother.com to its proprietary programs. Any trade names and product names of companies appearing on Brother products, related documents and...


