Users Manual - English
Page 6
... This warranty does not cover: 1 Physical damage to this Product; 2 Damage caused by improper installation, improper or abnormal use of non Brother®-brand parts and Consumable and Accessory Items); 4 Consumable and Accessory Items that expired in accordance with a copy of your dated bill ... and Accessory Items. Consumable and Accessory Items include but not limited to Toner Cartridges, Drum Unit, Belt Unit, and Waste Toner Box. „ Except as Paper Feeding Kit, Fuser and Laser Units. This limited warranty is the length of sale showing that this Product was used outside the...
... This warranty does not cover: 1 Physical damage to this Product; 2 Damage caused by improper installation, improper or abnormal use of non Brother®-brand parts and Consumable and Accessory Items); 4 Consumable and Accessory Items that expired in accordance with a copy of your dated bill ... and Accessory Items. Consumable and Accessory Items include but not limited to Toner Cartridges, Drum Unit, Belt Unit, and Waste Toner Box. „ Except as Paper Feeding Kit, Fuser and Laser Units. This limited warranty is the length of sale showing that this Product was used outside the...

Users Manual - English
Page 29
... arranged so that are damaged, curled, wrinkled or an unusual shape. Adhesives should not come in the fuser unit. Labels can be damaged. CAUTION Avoid feeding labels with spaces may cause damage to the belt unit or rollers and cause jams and print quality problems. No adhesive should be exposed between the labels...
... arranged so that are damaged, curled, wrinkled or an unusual shape. Adhesives should not come in the fuser unit. Labels can be damaged. CAUTION Avoid feeding labels with spaces may cause damage to the belt unit or rollers and cause jams and print quality problems. No adhesive should be exposed between the labels...

Users Manual - English
Page 49
...legal To use flammable substances, any maintenance. DO NOT handle the plug with a caution label. After you have just used the machine, some internal parts of the machine, make sure the plug is marked with wet hands. Please DO NOT remove or damage the label. 37 Refer to ...and read them before attempting any type of spray, or an organic solvent/liquid that contains A alcohol or ammonia to clean the machine. The fuser unit is fully inserted. Before you open the front or back cover of the machine. When you clean the inside the machine. WARNING There are...
...legal To use flammable substances, any maintenance. DO NOT handle the plug with a caution label. After you have just used the machine, some internal parts of the machine, make sure the plug is marked with wet hands. Please DO NOT remove or damage the label. 37 Refer to ...and read them before attempting any type of spray, or an organic solvent/liquid that contains A alcohol or ammonia to clean the machine. The fuser unit is fully inserted. Before you open the front or back cover of the machine. When you clean the inside the machine. WARNING There are...

Users Manual - English
Page 67
... ABCDEFGHIJKLMNOPQRSTUVWXYZ. 0123456789. abcdefghijklmnopqrstuvwxyz. Put in a new drum unit. (See Replacing the drum unit on page 106.) „ The fuser unit may be damaged. ABCDEFGHIJKLMNOPQRSTUVWXYZ. 0123456789. Replace the toner ...cartridge that matches the color of the drum unit by sliding the green tab. (See Cleaning the corona wires on page 106.) „ Clean all four corona wires (one for each corona wire's green tab is at 1-877-BROTHER...
... ABCDEFGHIJKLMNOPQRSTUVWXYZ. 0123456789. abcdefghijklmnopqrstuvwxyz. Put in a new drum unit. (See Replacing the drum unit on page 106.) „ The fuser unit may be damaged. ABCDEFGHIJKLMNOPQRSTUVWXYZ. 0123456789. Replace the toner ...cartridge that matches the color of the drum unit by sliding the green tab. (See Cleaning the corona wires on page 106.) „ Clean all four corona wires (one for each corona wire's green tab is at 1-877-BROTHER...
Users Manual - English
Page 71
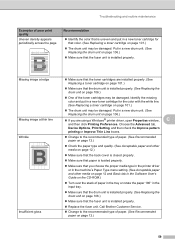
... paper in the tray or rotate the paper 180° in a new drum unit. (See Replacing the drum unit on page 106.) „ Make sure that the drum unit is installed properly. Call Brother Customer Service. „ Change to the recommended type of paper. (See Recommended...and routine maintenance Examples of the toner cartridges may be damaged. abcdefghijklmnopqrstuvwxyz. Put in a new toner cartridge for that the fuser unit is installed properly. (See Replacing the drum unit on page 106.) „ If you are installed properly. (See Replacing a toner cartridge on page 101.) „...
... paper in the tray or rotate the paper 180° in a new drum unit. (See Replacing the drum unit on page 106.) „ Make sure that the drum unit is installed properly. Call Brother Customer Service. „ Change to the recommended type of paper. (See Recommended...and routine maintenance Examples of the toner cartridges may be damaged. abcdefghijklmnopqrstuvwxyz. Put in a new toner cartridge for that the fuser unit is installed properly. (See Replacing the drum unit on page 106.) „ If you are installed properly. (See Replacing a toner cartridge on page 101.) „...

Users Manual - English
Page 72
...in the Software User's Guide on the CD-ROM.) „ Make sure that the release lever of the fuser unit is in the closed position. „ Call Brother Customer Service to the recommended type of poor print quality Offset image ABCDEFGHIJKLMNOPQRSTUVWXYZ. 0123456789. abcdefghijklmnopqrstuvwxyz. ABCDEFGHIJKLMNOPQRSTUVWXYZ. 0123456789. abcdefghijklmnopqrstuvwxyz... media on page 12 and Basic tab in the Software User's Guide on the CD-ROM.) „ Change to replace the fuser unit. „ Choose Thick paper mode in the printer driver or in the machine's Paper Type menu setting. (See Paper type ...
...in the Software User's Guide on the CD-ROM.) „ Make sure that the release lever of the fuser unit is in the closed position. „ Call Brother Customer Service to the recommended type of poor print quality Offset image ABCDEFGHIJKLMNOPQRSTUVWXYZ. 0123456789. abcdefghijklmnopqrstuvwxyz. ABCDEFGHIJKLMNOPQRSTUVWXYZ. 0123456789. abcdefghijklmnopqrstuvwxyz... media on page 12 and Basic tab in the Software User's Guide on the CD-ROM.) „ Change to replace the fuser unit. „ Choose Thick paper mode in the printer driver or in the machine's Paper Type menu setting. (See Paper type ...
Users Manual - English
Page 78
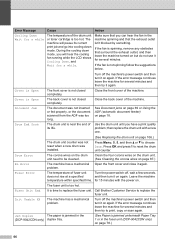
...message continues leave the machine for 15 minutes with a new one. (See Replacing the drum unit on again. Cover is Open The back cover is jammed underneath Paper Tray 1 or in the fuser unit (DCP-9042CDN only) on . for several minutes and then try it again. Close the back ..., and then leave the machine turned on again. Use the drum unit until you can hear the fan in the (DCP-9042CDN only) duplex tray. (See Paper is not closed completely. Call Brother Customer Service to replace the fuser unit. Error Message Cause Action Cooling Down Wait for several minutes.
...message continues leave the machine for 15 minutes with a new one. (See Replacing the drum unit on again. Cover is Open The back cover is jammed underneath Paper Tray 1 or in the fuser unit (DCP-9042CDN only) on . for several minutes and then try it again. Close the back ..., and then leave the machine turned on again. Use the drum unit until you can hear the fan in the (DCP-9042CDN only) duplex tray. (See Paper is not closed completely. Call Brother Customer Service to replace the fuser unit. Error Message Cause Action Cooling Down Wait for several minutes.

Users Manual - English
Page 89
f Close the fuser cover (1) and lift the two green levers at the left -hand-side and one on the righthand-side, as shown in the illustration. 77 When you have just used the machine, some internal parts of the machine, DO NOT touch 1 the shaded parts shown in the illustration below, and then... left and right hand sides. 1 C HOT SURFACE After you open the front or back cover of the machine will be extremely hot. d Pull down the fuser cover (1). Troubleshooting and routine maintenance e Using both hands, gently pull the jammed paper out of the fuser unit.
f Close the fuser cover (1) and lift the two green levers at the left -hand-side and one on the righthand-side, as shown in the illustration. 77 When you have just used the machine, some internal parts of the machine, DO NOT touch 1 the shaded parts shown in the illustration below, and then... left and right hand sides. 1 C HOT SURFACE After you open the front or back cover of the machine will be extremely hot. d Pull down the fuser cover (1). Troubleshooting and routine maintenance e Using both hands, gently pull the jammed paper out of the fuser unit.

Users Manual - English
Page 90
i Close the front cover of the machine and check inside the machine. 78 Paper is jammed underneath Paper Tray 1 or in the machine. g Close the back cover. h Put the drum unit and toner cartridge assembly back in the fuser unit (DCP-9042CDN only) C If the LCD shows Jam Duplex, follow these steps: Jam Duplex a Pull the paper tray completely out of the machine.
i Close the front cover of the machine and check inside the machine. 78 Paper is jammed underneath Paper Tray 1 or in the machine. g Close the back cover. h Put the drum unit and toner cartridge assembly back in the fuser unit (DCP-9042CDN only) C If the LCD shows Jam Duplex, follow these steps: Jam Duplex a Pull the paper tray completely out of the machine.
Users Manual - English
Page 112
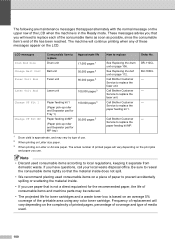
...to replace each of the consumable items as soon as possible, since the consumable item's end of use . Call Brother Customer Service to replace the fuser unit. Service to replace Order No. These messages advise you have questions, call your local waste disposal office. LCD ...messages Drum End Soon Change Belt Unit Fuser Unit End Consumable item to replace Drum unit Approximate life 17,000 pages 1 Belt unit 50,000 pages 2 Fuser unit 80,000 pages 3 Laser Unit End Laser unit 100,000 pages 3 Change PF Kit 1 Change PF Kit MP Paper...
...to replace each of the consumable items as soon as possible, since the consumable item's end of use . Call Brother Customer Service to replace the fuser unit. Service to replace Order No. These messages advise you have questions, call your local waste disposal office. LCD ...messages Drum End Soon Change Belt Unit Fuser Unit End Consumable item to replace Drum unit Approximate life 17,000 pages 1 Belt unit 50,000 pages 2 Fuser unit 80,000 pages 3 Laser Unit End Laser unit 100,000 pages 3 Change PF Kit 1 Change PF Kit MP Paper...

Users Manual - English
Page 143
Machine Info. 4.Parts Life b Press a or b to choose 1.Drum, 2.Belt Unit, 3.PF Kit MP, 4.PF Kit 1, 5.Fuser or 6.Laser. Checking the remaining life of parts C You can view the remaining life of a part will not be accurate only if that part's life counter was installed. Drum Remaining: XX% c Press Stop/Exit. Troubleshooting and routine maintenance C 131 a Press Menu, 5, 4. It will be accurate if that part's life counter was reset when the new part was reset during the life of the used part. Note The life check of these parts on the LCD. Press OK.
Machine Info. 4.Parts Life b Press a or b to choose 1.Drum, 2.Belt Unit, 3.PF Kit MP, 4.PF Kit 1, 5.Fuser or 6.Laser. Checking the remaining life of parts C You can view the remaining life of a part will not be accurate only if that part's life counter was installed. Drum Remaining: XX% c Press Stop/Exit. Troubleshooting and routine maintenance C 131 a Press Menu, 5, 4. It will be accurate if that part's life counter was reset when the new part was reset during the life of the used part. Note The life check of these parts on the LCD. Press OK.
Users Manual - English
Page 151
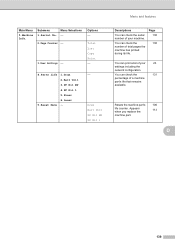
... the 113 machine part. Submenu Menu Selections 1.Serial No. - 2.Page Counter - 3.User Settings - Options - Total List Copy Print - 4.Parts Life 1.Drum 2.Belt Unit 3.PF Kit MP 4.PF Kit 1 5.Fuser 6.Laser 5.Reset Menu - - You can print a list of total pages the machine has printed during its life. You can check the serial number...
... the 113 machine part. Submenu Menu Selections 1.Serial No. - 2.Page Counter - 3.User Settings - Options - Total List Copy Print - 4.Parts Life 1.Drum 2.Belt Unit 3.PF Kit MP 4.PF Kit 1 5.Fuser 6.Laser 5.Reset Menu - - You can print a list of total pages the machine has printed during its life. You can check the serial number...


