Network Users Manual - English
Page 53
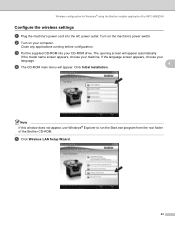
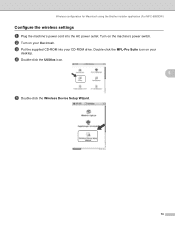
Wireless configuration for Windows® using the Brother installer application (For MFC-8890DW) Configure the wireless settings 4 a Plug the machine's power cord into your machine. Close any applications running before configuration. c Put the ... will appear. Note If this window does not appear, use Windows® Explorer to run the Start.exe program from the root folder of the Brother CD-ROM. If the model name screen appears, choose your CD-ROM drive. b Turn on the machine's power switch.
Wireless configuration for Windows® using the Brother installer application (For MFC-8890DW) Configure the wireless settings 4 a Plug the machine's power cord into your machine. Close any applications running before configuration. c Put the ... will appear. Note If this window does not appear, use Windows® Explorer to run the Start.exe program from the root folder of the Brother CD-ROM. If the model name screen appears, choose your CD-ROM drive. b Turn on the machine's power switch.
Network Users Manual - English
Page 61
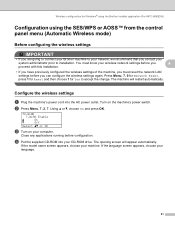
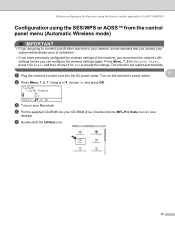
Press Menu, 7, 0 for Network Reset, press 1 for Reset and then choose 1 for Windows® using the Brother installer application (For MFC-8890DW) Configuration using the SES/WPS or AOSS™ from the control panel menu (Automatic Wireless mode) 4 Before ...configuring the wireless settings 4 IMPORTANT • If you are going to connect your Brother machine to your network, we recommend that you contact your CD-ROM drive. Turn on your machine. Close any applications running before you must know your language. 51 The opening screen will...
Press Menu, 7, 0 for Network Reset, press 1 for Reset and then choose 1 for Windows® using the Brother installer application (For MFC-8890DW) Configuration using the SES/WPS or AOSS™ from the control panel menu (Automatic Wireless mode) 4 Before ...configuring the wireless settings 4 IMPORTANT • If you are going to connect your Brother machine to your network, we recommend that you contact your CD-ROM drive. Turn on your machine. Close any applications running before you must know your language. 51 The opening screen will...
Network Users Manual - English
Page 66
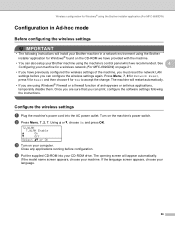
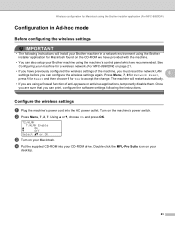
...174; Firewall or a firewall function of the machine, you must reset the network LAN settings before configuration. Turn on your Brother machine using the machine's control panel which we have previously configured the wireless settings of anti-spyware or antivirus applications, temporarily ...running before you can print, configure the software settings following instructions will appear automatically. If the model name screen appears, choose your CD-ROM drive. Press Menu, 7, 0 for Network Reset, press 1 for Reset and then choose 1 for a wireless network (For MFC-8890DW) on ...
...174; Firewall or a firewall function of the machine, you must reset the network LAN settings before configuration. Turn on your Brother machine using the machine's control panel which we have previously configured the wireless settings of anti-spyware or antivirus applications, temporarily ...running before you can print, configure the software settings following instructions will appear automatically. If the model name screen appears, choose your CD-ROM drive. Press Menu, 7, 0 for Network Reset, press 1 for Reset and then choose 1 for a wireless network (For MFC-8890DW) on ...
Network Users Manual - English
Page 80
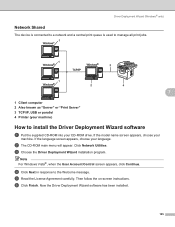
Double-click the MFL-Pro Suite icon on your CD-ROM drive. Wireless configuration for Macintosh using the Brother installer application (For MFC-8890DW) Configure the wireless settings 5 a Plug the machine's power cord into your desktop. c Put the supplied CD-ROM into the AC power outlet. b Turn on the machine's power switch. d Double-click the Utilities icon. 5 e Double-click the Wireless Device Setup Wizard. 70 Turn on your Macintosh.
Double-click the MFL-Pro Suite icon on your CD-ROM drive. Wireless configuration for Macintosh using the Brother installer application (For MFC-8890DW) Configure the wireless settings 5 a Plug the machine's power cord into your desktop. c Put the supplied CD-ROM into the AC power outlet. b Turn on the machine's power switch. d Double-click the Utilities icon. 5 e Double-click the Wireless Device Setup Wizard. 70 Turn on your Macintosh.
Network Users Manual - English
Page 88
...your desktop. d Put the supplied CD-ROM into the AC power outlet. Double-click the MFL-Pro Suite icon on your CD-ROM drive. The machine will restart automatically. Wireless configuration for Yes to accept the change. Using a or b, choose On and press OK. 72...7, 2, 7. e Double-click the Utilities icon. 78 Press Menu, 7, 0 for Network Reset, press 1 for Reset and then choose 1 for Macintosh using the Brother installer application (For MFC-8890DW) Configuration using the SES/WPS or AOSS™ from the control panel menu (Automatic Wireless mode) 5 IMPORTANT • If you...
...your desktop. d Put the supplied CD-ROM into the AC power outlet. Double-click the MFL-Pro Suite icon on your CD-ROM drive. The machine will restart automatically. Wireless configuration for Yes to accept the change. Using a or b, choose On and press OK. 72...7, 2, 7. e Double-click the Utilities icon. 78 Press Menu, 7, 0 for Network Reset, press 1 for Reset and then choose 1 for Macintosh using the Brother installer application (For MFC-8890DW) Configuration using the SES/WPS or AOSS™ from the control panel menu (Automatic Wireless mode) 5 IMPORTANT • If you...
Network Users Manual - English
Page 93
... • The following the instructions. d Put the supplied CD-ROM into the AC power outlet. Wireless configuration for Macintosh using the Brother installer application (For MFC-8890DW) Configuration in a network environment using the machine's control panel which we have previously configured the wireless settings...72.WLAN 7.WLAN Enable a On b Off Select ab or OK c Turn on the machine's power switch. See Configuring your CD-ROM drive. Double-click the MFL-Pro Suite icon on the CD-ROM we recommended. Configure the wireless settings 5 a Plug the machine's power cord...
... • The following the instructions. d Put the supplied CD-ROM into the AC power outlet. Wireless configuration for Macintosh using the Brother installer application (For MFC-8890DW) Configuration in a network environment using the machine's control panel which we have previously configured the wireless settings...72.WLAN 7.WLAN Enable a On b Off Select ab or OK c Turn on the machine's power switch. See Configuring your CD-ROM drive. Double-click the MFL-Pro Suite icon on the CD-ROM we recommended. Configure the wireless settings 5 a Plug the machine's power cord...
Network Users Manual - English
Page 135
... screen appears, choose your language. d Click Next in response to install the Driver Deployment Wizard software 7 a Put the supplied CD-ROM into your CD-ROM drive.
... screen appears, choose your language. d Click Next in response to install the Driver Deployment Wizard software 7 a Put the supplied CD-ROM into your CD-ROM drive.
Network Users Manual - English
Page 137
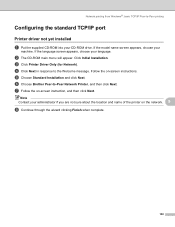
... the box of the driver. „ Creating an executable file The Driver Deployment Wizard software can be used to use is not installed on your drive letter). These selfrunning.EXE files can also be saved to the network, copied to a CD-ROM, USB Flash memory... drive or even E-mailed to another user. Click OK. 1 win2kxpvista folder for 32-bit OS users and winxpx64vista64 folder for 64-bit OS users 7 f Click Next ...
... the box of the driver. „ Creating an executable file The Driver Deployment Wizard software can be used to use is not installed on your drive letter). These selfrunning.EXE files can also be saved to the network, copied to a CD-ROM, USB Flash memory... drive or even E-mailed to another user. Click OK. 1 win2kxpvista folder for 32-bit OS users and winxpx64vista64 folder for 64-bit OS users 7 f Click Next ...
Network Users Manual - English
Page 140
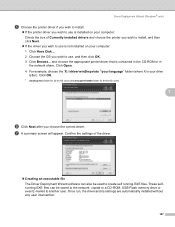
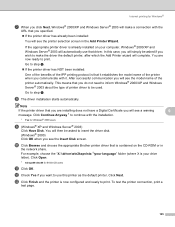
... Installation and click Next. Follow the on -screen instruction, and then click Next. c Click Printer Driver Only (for Network). f Choose Brother Peer-to the Welcome message. Note Contact your CD-ROM drive. Network printing from Windows®: basic TCP/IP Peer-to-Peer printing Configuring the standard TCP/IP port 8 Printer driver...
... Installation and click Next. Follow the on -screen instruction, and then click Next. c Click Printer Driver Only (for Network). f Choose Brother Peer-to the Welcome message. Note Contact your CD-ROM drive. Network printing from Windows®: basic TCP/IP Peer-to-Peer printing Configuring the standard TCP/IP port 8 Printer driver...
Network Users Manual - English
Page 145
j Click Browse and choose the appropriate Brother printer driver that it . Internet printing for Windows® g When you click Next, Windows® 2000/XP and Windows Server® 2003 will make the ... print. m Click Finish and the printer is your language" folder (where X is now configured and ready to print. For example, choose the "X:\\driver\win2kxpvista 1\your drive letter). This means that you specified. „ If the printer driver has already been installed: You will simply be used. Go to continue with the...
j Click Browse and choose the appropriate Brother printer driver that it . Internet printing for Windows® g When you click Next, Windows® 2000/XP and Windows Server® 2003 will make the ... print. m Click Finish and the printer is your language" folder (where X is now configured and ready to print. For example, choose the "X:\\driver\win2kxpvista 1\your drive letter). This means that you specified. „ If the printer driver has already been installed: You will simply be used. Go to continue with the...
Network Users Manual - English
Page 217
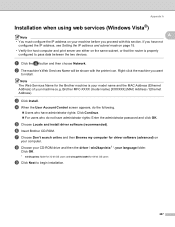
... Web Services Name for driver software (advanced) on your machine (e.g. g Choose Don't search online and then Browse my computer for the Brother machine is properly configured to begin installation. 207 c Click Install. e Choose Locate and install driver software (recommended). Click OK. 1 ... your language folder. a Click the button and then choose Network. h Choose your CD-ROM drive and then the driver \ win2kxpvista 1 \ your machine before you proceed with the printer icon. Brother MFC-XXXX (model name) [XXXXXX] (MAC Address / Ethernet Address). d When the User Account...
... Web Services Name for driver software (advanced) on your machine (e.g. g Choose Don't search online and then Browse my computer for the Brother machine is properly configured to begin installation. 207 c Click Install. e Choose Locate and install driver software (recommended). Click OK. 1 ... your language folder. a Click the button and then choose Network. h Choose your CD-ROM drive and then the driver \ win2kxpvista 1 \ your machine before you proceed with the printer icon. Brother MFC-XXXX (model name) [XXXXXX] (MAC Address / Ethernet Address). d When the User Account...

Software Users Manual - English
Page 13
.... Secure Key 1 Secured data is printed, the data will be cleared. Note If the LCD displays No Data Stored, there is no USB Flash memory drive inserted. • After you need to choose Print, press OK and then enter the number of copies you turn the power switch Off, the secured...
.... Secure Key 1 Secured data is printed, the data will be cleared. Note If the LCD displays No Data Stored, there is no USB Flash memory drive inserted. • After you need to choose Print, press OK and then enter the number of copies you turn the power switch Off, the secured...
Software Users Manual - English
Page 57
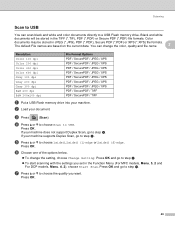
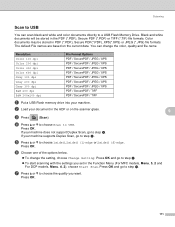
..., go to step j. g Press a or b to choose the quality you set in the Function Menu (For MFC models, Menu, 5, 2 and For DCP models, Menu, 4, 2), choose Start Scan. Press OK. 49 Black and white documents will be stored in the TIFF (*.TIF), PDF (*.PDF) or Secure ...XPS PDF / SecurePDF / JPEG / XPS PDF / SecurePDF / JPEG / XPS PDF / SecurePDF / JPEG / XPS PDF / SecurePDF / TIFF PDF / SecurePDF / TIFF a Put a USB Flash memory drive into your machine. Scanning Scan to USB 2 You can change the setting, choose Change Setting. d Press a or b to choose Scan to choose 1sided, 2sided (L)edge...
..., go to step j. g Press a or b to choose the quality you set in the Function Menu (For MFC models, Menu, 5, 2 and For DCP models, Menu, 4, 2), choose Start Scan. Press OK. 49 Black and white documents will be stored in the TIFF (*.TIF), PDF (*.PDF) or Secure ...XPS PDF / SecurePDF / JPEG / XPS PDF / SecurePDF / JPEG / XPS PDF / SecurePDF / JPEG / XPS PDF / SecurePDF / TIFF PDF / SecurePDF / TIFF a Put a USB Flash memory drive into your machine. Scanning Scan to USB 2 You can change the setting, choose Change Setting. d Press a or b to choose Scan to choose 1sided, 2sided (L)edge...
Software Users Manual - English
Page 58
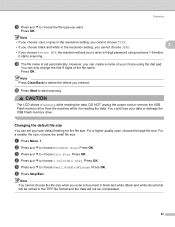
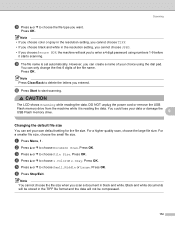
... However, you can only change the first 6 digits of your choice using numbers 1-9 before it is set your data or damage the USB Flash memory drive. You can create a name of the file name. CAUTION The LCD shows Scanning while reading the data. DO NOT unplug the power cord or remove... the USB Flash memory drive from the machine while it starts scanning. Press OK. Press OK. a Press Menu, 1. b Press a or b to enter a 4 digit password using the dial pad. Note ...
... However, you can only change the first 6 digits of your choice using numbers 1-9 before it is set your data or damage the USB Flash memory drive. You can create a name of the file name. CAUTION The LCD shows Scanning while reading the data. DO NOT unplug the power cord or remove... the USB Flash memory drive from the machine while it starts scanning. Press OK. Press OK. a Press Menu, 1. b Press a or b to enter a 4 digit password using the dial pad. Note ...
Software Users Manual - English
Page 59
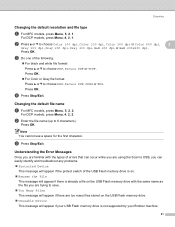
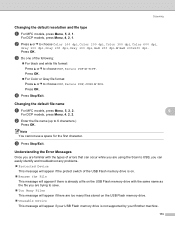
...Files This message will appear if there are too many files stored on the USB Flash memory drive. „ Unusable Device This message will appear if your USB Flash memory drive is not supported by your Brother machine. 51 b Enter the file name (up to choose PDF, Secure PDF, JPEG or... XPS. Note You cannot use a space for the first character. For DCP models, press Menu, 4, 2, 1. d Press Stop/Exit. Changing ...
...Files This message will appear if there are too many files stored on the USB Flash memory drive. „ Unusable Device This message will appear if your USB Flash memory drive is not supported by your Brother machine. 51 b Enter the file name (up to choose PDF, Secure PDF, JPEG or... XPS. Note You cannot use a space for the first character. For DCP models, press Menu, 4, 2, 1. d Press Stop/Exit. Changing ...
Software Users Manual - English
Page 66
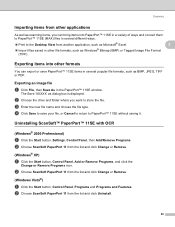
... 11 from the list and click Change or Remove. (Windows Vista®) 2 a Click the Start button, Control Panel, Programs and Programs and Features. b Choose the drive and folder where you can bring items into other formats 2 You can export or save your file, or Cancel to return to the Desktop View...
... 11 from the list and click Change or Remove. (Windows Vista®) 2 a Click the Start button, Control Panel, Programs and Programs and Features. b Choose the drive and folder where you can bring items into other formats 2 You can export or save your file, or Cancel to return to the Desktop View...

Software Users Manual - English
Page 135
... on your four-digit password and press OK. a Press Secure/Direct. The LCD displays the secured jobs list for that is no USB Flash memory drive inserted. • After you need to print the secured data. Press OK. Printer operation keys 8 Job Cancel 8 To cancel the current print job, press Job...
... on your four-digit password and press OK. a Press Secure/Direct. The LCD displays the secured jobs list for that is no USB Flash memory drive inserted. • After you need to print the secured data. Press OK. Printer operation keys 8 Job Cancel 8 To cancel the current print job, press Job...
Software Users Manual - English
Page 179
... / SecurePDF / JPEG / XPS PDF / SecurePDF / JPEG / XPS PDF / SecurePDF / JPEG / XPS PDF / SecurePDF / TIFF PDF / SecurePDF / TIFF a Put a USB Flash memory drive into your machine supports Duplex Scan, go to step f. Press OK. Press OK and go to step g. „ To start scanning with the settings you...(L)edge or 2sided (S)edge. If your machine. Black and white documents will be stored in the Function Menu (For MFC models, Menu, 5, 2 and For DCP models, Menu, 4, 2), choose Start Scan. Press OK. 171 If your document in the PDF (*.PDF), Secure PDF (*.PDF) or TIFF (*.TIF) file ...
... / SecurePDF / JPEG / XPS PDF / SecurePDF / JPEG / XPS PDF / SecurePDF / JPEG / XPS PDF / SecurePDF / TIFF PDF / SecurePDF / TIFF a Put a USB Flash memory drive into your machine supports Duplex Scan, go to step f. Press OK. Press OK and go to step g. „ To start scanning with the settings you...(L)edge or 2sided (S)edge. If your machine. Black and white documents will be stored in the Function Menu (For MFC models, Menu, 5, 2 and For DCP models, Menu, 4, 2), choose Start Scan. Press OK. 171 If your document in the PDF (*.PDF), Secure PDF (*.PDF) or TIFF (*.TIF) file ...
Software Users Manual - English
Page 180
You can set automatically. Press OK. DO NOT unplug the power cord or remove the USB Flash memory drive from the machine while it starts scanning. For a smaller file size, choose the small file size. Note You cannot choose the file size when you ... format and the data will ask you to enter a 4 digit password using numbers 1-9 before it is set your data or damage the USB Flash memory drive. 9 Changing the default file size 9 You can only change the first 6 digits of your choice using the dial pad. i The file name is reading the...
You can set automatically. Press OK. DO NOT unplug the power cord or remove the USB Flash memory drive from the machine while it starts scanning. For a smaller file size, choose the small file size. Note You cannot choose the file size when you ... format and the data will ask you to enter a 4 digit password using numbers 1-9 before it is set your data or damage the USB Flash memory drive. 9 Changing the default file size 9 You can only change the first 6 digits of your choice using the dial pad. i The file name is reading the...
Software Users Manual - English
Page 181
... appear if the protect switch of the following: „ For black and white file format: Press a or b to choose PDF, Secure PDF or TIFF. For DCP models, press Menu, 4, 2, 2. b Enter the file name (up to choose PDF, Secure PDF, JPEG or XPS. Press OK. d Press Stop/Exit. b Press a or b to save... the Error Messages 9 Once you are familiar with the same name as the file you are too many files stored on the USB Flash memory drive. „ Unusable Device This message will appear if your USB Flash memory drive is not supported by your Brother machine. 173 Press OK.
... appear if the protect switch of the following: „ For black and white file format: Press a or b to choose PDF, Secure PDF or TIFF. For DCP models, press Menu, 4, 2, 2. b Enter the file name (up to choose PDF, Secure PDF, JPEG or XPS. Press OK. d Press Stop/Exit. b Press a or b to save... the Error Messages 9 Once you are familiar with the same name as the file you are too many files stored on the USB Flash memory drive. „ Unusable Device This message will appear if your USB Flash memory drive is not supported by your Brother machine. 173 Press OK.


