Advanced Users Manual - English
Page 20
.... If you may need to repeat the cleaning process three or four times. Cleaning the corona wire A If you have just used the machine, some internal parts of the machine will be extremely hot. If you do this, you feel anything on that area. d Plug the machine's power cord back into the... turned on the machine's power switch. When you open the front or back cover (back output tray) of the machine, DO NOT touch the shaded parts shown in the telephone line cord. Note In addition to cleaning the scanner glass and glass strip with a soft lint-free cloth moistened with a sheet...
.... If you may need to repeat the cleaning process three or four times. Cleaning the corona wire A If you have just used the machine, some internal parts of the machine will be extremely hot. If you do this, you feel anything on that area. d Plug the machine's power cord back into the... turned on the machine's power switch. When you open the front or back cover (back output tray) of the machine, DO NOT touch the shaded parts shown in the telephone line cord. Note In addition to cleaning the scanner glass and glass strip with a soft lint-free cloth moistened with a sheet...
Advanced Users Manual - English
Page 23
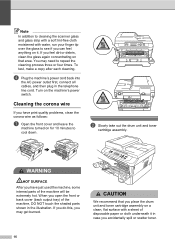
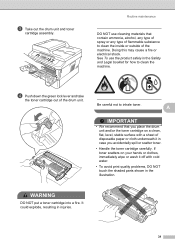
If you do this, you open the front or back cover (back output tray) of the machine, DO NOT touch the shaded parts shown in the illustration. i Repeat steps e to cool down. a Open the front cover and leave the machine turned on a clean, flat surface with a sheet of ... underneath it in case you accidentally spill or scatter toner. 19 When you may get burned. Upon completion please discard the used the machine, some internal parts of the machine will finish the Drum Cleaning process first, and then print the print job. Routine maintenance A b Slowly take out the drum unit and...
If you do this, you open the front or back cover (back output tray) of the machine, DO NOT touch the shaded parts shown in the illustration. i Repeat steps e to cool down. a Open the front cover and leave the machine turned on a clean, flat surface with a sheet of ... underneath it in case you accidentally spill or scatter toner. 19 When you may get burned. Upon completion please discard the used the machine, some internal parts of the machine will finish the Drum Cleaning process first, and then print the print job. Routine maintenance A b Slowly take out the drum unit and...

Advanced Users Manual - English
Page 24
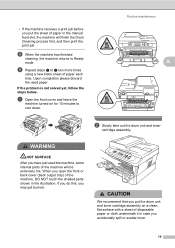
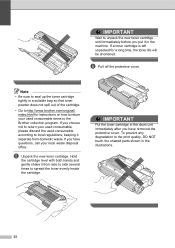
To prevent damage to the machine from static electricity, DO NOT touch the electrodes shown in the illustration. c Push down the green lock lever and take the toner cartridge out of the drum unit. • To prevent damage to the machine caused by static electricity, DO NOT touch the electrodes shown in the illustration. 20 If toner scatters on your hands or clothes, immediately wipe or wash it off with cold water. IMPORTANT • To avoid print quality problems, DO NOT touch the shaded parts shown in the illustrations below. Handle the toner cartridge carefully.
To prevent damage to the machine from static electricity, DO NOT touch the electrodes shown in the illustration. c Push down the green lock lever and take the toner cartridge out of the drum unit. • To prevent damage to the machine caused by static electricity, DO NOT touch the electrodes shown in the illustration. 20 If toner scatters on your hands or clothes, immediately wipe or wash it off with cold water. IMPORTANT • To avoid print quality problems, DO NOT touch the shaded parts shown in the illustrations below. Handle the toner cartridge carefully.

Advanced Users Manual - English
Page 28
...b to choose one of the following : 4.Drum Life (DCP-7060D) 5.Drum Life (DCP-7065DN) 6.Drum Life (HL-2280DW) Press OK. e Press Stop/Exit. a Press Menu. Press OK. It will be accurate if that part's life counter was reset during the life of the drum unit A You.... c Press a or b to choose one of the following : 3.Machine Info. (DCP-7060D) 4.Machine Info. (DCP-7065DN) 5.Machine Info. (HL-2280DW) Press OK. Checking the remaining life of the used part. 24 Note The life check will not be accurate only if you have reset the...
...b to choose one of the following : 4.Drum Life (DCP-7060D) 5.Drum Life (DCP-7065DN) 6.Drum Life (HL-2280DW) Press OK. e Press Stop/Exit. a Press Menu. Press OK. It will be accurate if that part's life counter was reset during the life of the drum unit A You.... c Press a or b to choose one of the following : 3.Machine Info. (DCP-7060D) 4.Machine Info. (DCP-7065DN) 5.Machine Info. (HL-2280DW) Press OK. Checking the remaining life of the used part. 24 Note The life check will not be accurate only if you have reset the...
Advanced Users Manual - English
Page 29
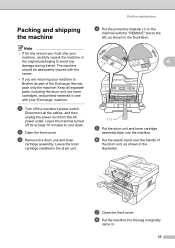
... the machine in the illustration. Routine maintenance d Put the protective material (1) in the machine with the "REMOVE" text to the left, as part of the drum unit, as shown in the illustration. h Put the machine into the machine. The machine should be adequately insured with your machine... to Brother as shown in the original packaging to avoid any reason you are returning your 'Exchange' machine. a Turn off for any damage during transit....
... the machine in the illustration. Routine maintenance d Put the protective material (1) in the machine with the "REMOVE" text to the left, as part of the drum unit, as shown in the illustration. h Put the machine into the machine. The machine should be adequately insured with your machine... to Brother as shown in the original packaging to avoid any reason you are returning your 'Exchange' machine. a Turn off for any damage during transit....
Advanced Users Manual - English
Page 32
... cleaning 16, 17 Duplex copy 12 E Enlarge/Reduce 8 L LCD (liquid crystal display) contrast 3 M Machine information checking remaining life of parts 24 page counts 24 Maintenance, routine 14 checking the remaining life of parts ......24 Memory storage 1 28 N N in 1 (page layout 10 P Packing the machine 25 Page layout (N in 1 10 Power failure 1 Q Quality...
... cleaning 16, 17 Duplex copy 12 E Enlarge/Reduce 8 L LCD (liquid crystal display) contrast 3 M Machine information checking remaining life of parts 24 page counts 24 Maintenance, routine 14 checking the remaining life of parts ......24 Memory storage 1 28 N N in 1 (page layout 10 P Packing the machine 25 Page layout (N in 1 10 Power failure 1 Q Quality...
Users Manual - English
Page 6
... with this Product (including but not limited to damage resulting from use refurbished parts provided such replacement products conform to the manufacturer's specifications for parts or labor. Supply Brother or the Brother Authorized Service Center with a photocopy of your bill of sale. For the name...the right to supply a refurbished or remanufactured replacement Machine and/or accompanying Consumable and Accessory Items and use of non Brother®-brand parts and Consumable and Accessory Items); 4 Consumable and Accessory Items that expired in accordance with a rated life; 5 Problems...
... with this Product (including but not limited to damage resulting from use refurbished parts provided such replacement products conform to the manufacturer's specifications for parts or labor. Supply Brother or the Brother Authorized Service Center with a photocopy of your bill of sale. For the name...the right to supply a refurbished or remanufactured replacement Machine and/or accompanying Consumable and Accessory Items and use of non Brother®-brand parts and Consumable and Accessory Items); 4 Consumable and Accessory Items that expired in accordance with a rated life; 5 Problems...
Users Manual - English
Page 7
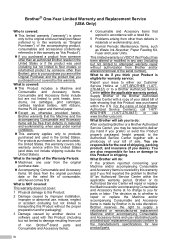
... warranty; (iii) the proper packaging instructions are your sole (i.e., only) and exclusive remedies under this Product. © 2010 Brother International Corporation v The replacement Machine you receive (even if refurbished or remanufactured) will be covered by the balance of the limited warranty...or accompanying Consumable and Accessory Items back to you and charged for any service and/or replacement parts/products at a conveniently located Authorized Service Center. Brother® One-Year Limited Warranty and Replacement Service (USA Only) The repaired or replacement Machine ...
... warranty; (iii) the proper packaging instructions are your sole (i.e., only) and exclusive remedies under this Product. © 2010 Brother International Corporation v The replacement Machine you receive (even if refurbished or remanufactured) will be covered by the balance of the limited warranty...or accompanying Consumable and Accessory Items back to you and charged for any service and/or replacement parts/products at a conveniently located Authorized Service Center. Brother® One-Year Limited Warranty and Replacement Service (USA Only) The repaired or replacement Machine ...

Users Manual - English
Page 8
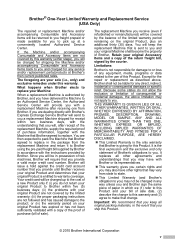
... the limited warranty of 1 year from the date of purchase for labour and parts, Brother International Corporation (Canada) Ltd. ("Brother"), or its Authorized Service Centres, Distributors, Dealers, Agents or employees, shall create another warranty or modify this machine is available at Brother's sole discretion) this MFC/Fax machine shall be liable for any indirect, incidental...
... the limited warranty of 1 year from the date of purchase for labour and parts, Brother International Corporation (Canada) Ltd. ("Brother"), or its Authorized Service Centres, Distributors, Dealers, Agents or employees, shall create another warranty or modify this machine is available at Brother's sole discretion) this MFC/Fax machine shall be liable for any indirect, incidental...

Users Manual - English
Page 15
... Courier New Bold style identifies keys on the LCD of product function. Hot Surface icons warn you for buying a Brother machine! 1 General information 1 Using the documentation 1 Thank you not to touch machine parts that may arise or give tips about how the current operation works with other features. 1 Symbols and conventions used...
... Courier New Bold style identifies keys on the LCD of product function. Hot Surface icons warn you for buying a Brother machine! 1 General information 1 Using the documentation 1 Thank you not to touch machine parts that may arise or give tips about how the current operation works with other features. 1 Symbols and conventions used...
Users Manual - English
Page 34
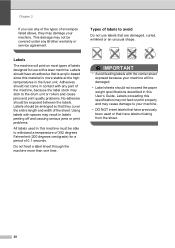
...types of envelopes listed above, they cover the entire length and width of 392 degrees Fahrenheit (200 degrees centigrade) for use with any part of the machine, because the label stock may not be exposed between the labels. Using labels with the carrier sheet exposed because your machine...will print on most types of labels designed for a period of labels to withstand a temperature of the sheet. Chapter 2 If you use any Brother warranty or service agreement. Types of 0.1 seconds. Adhesives should be able to avoid 2 Do not use labels that is acrylic-based since this ...
...types of envelopes listed above, they cover the entire length and width of 392 degrees Fahrenheit (200 degrees centigrade) for use with any part of the machine, because the label stock may not be exposed between the labels. Using labels with the carrier sheet exposed because your machine...will print on most types of labels designed for a period of labels to withstand a temperature of the sheet. Chapter 2 If you use any Brother warranty or service agreement. Types of 0.1 seconds. Adhesives should be able to avoid 2 Do not use labels that is acrylic-based since this ...
Users Manual - English
Page 42
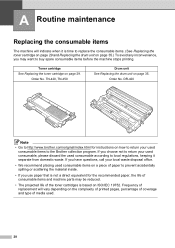
... use paper that is based on ISO/IEC 19752. DR-420 Note • Go to http://www.brother.com/original/index.html for the recommended paper, the life of media used consumable items to the Brother collection program. If you have questions, call your used . 28 Order No. A Routine maintenance A ...TN-450 Drum unit See Replacing the drum unit on the complexity of printed pages, percentage of coverage and type of consumable items and machine parts may want to buy spare consumable items before the machine stops printing. Toner cartridge See Replacing the toner cartridge on page 29.
... use paper that is based on ISO/IEC 19752. DR-420 Note • Go to http://www.brother.com/original/index.html for the recommended paper, the life of media used consumable items to the Brother collection program. If you have questions, call your used . 28 Order No. A Routine maintenance A ...TN-450 Drum unit See Replacing the drum unit on the complexity of printed pages, percentage of coverage and type of consumable items and machine parts may want to buy spare consumable items before the machine stops printing. Toner cartridge See Replacing the toner cartridge on page 29.

Users Manual - English
Page 44
... on . WARNING HOT SURFACE After you may burn yourself. 30 If you do this, you have just used the machine, some internal parts of the machine, DO NOT touch the shaded parts shown in the illustration. Note To force the machine to continue printing after the LCD shows Replace Toner, set the machine...
... on . WARNING HOT SURFACE After you may burn yourself. 30 If you do this, you have just used the machine, some internal parts of the machine, DO NOT touch the shaded parts shown in the illustration. Note To force the machine to continue printing after the LCD shows Replace Toner, set the machine...
Users Manual - English
Page 45
... electrical shock. If toner scatters on a clean, flat, level, stable surface with cold water. • To avoid print quality problems, DO NOT touch the shaded parts shown in injuries. 31
... electrical shock. If toner scatters on a clean, flat, level, stable surface with cold water. • To avoid print quality problems, DO NOT touch the shaded parts shown in injuries. 31
Users Manual - English
Page 46
... spread the toner evenly inside the cartridge. If you choose not to return your used consumable, please discard the used consumable items to the Brother collection program. e Unpack the new toner cartridge. If a toner cartridge is left unpacked for instructions on how to return your local waste ...disposal office. To prevent any degradation to the print quality, DO NOT touch the shaded parts shown in the machine. f Pull off the protective cover. If you have removed the protective cover. IMPORTANT Put the toner cartridge in a...
... spread the toner evenly inside the cartridge. If you choose not to return your used consumable, please discard the used consumable items to the Brother collection program. e Unpack the new toner cartridge. If a toner cartridge is left unpacked for instructions on how to return your local waste ...disposal office. To prevent any degradation to the print quality, DO NOT touch the shaded parts shown in the machine. f Pull off the protective cover. If you have removed the protective cover. IMPORTANT Put the toner cartridge in a...
Users Manual - English
Page 48
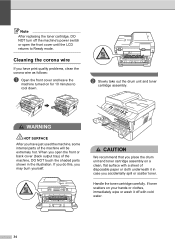
Cleaning the corona wire A If you have just used the machine, some internal parts of the machine, DO NOT touch the shaded parts shown in case you accidentally spill or scatter toner. b Slowly take out the drum unit and toner cartridge assembly. Handle the toner cartridge carefully. WARNING ...
Cleaning the corona wire A If you have just used the machine, some internal parts of the machine, DO NOT touch the shaded parts shown in case you accidentally spill or scatter toner. b Slowly take out the drum unit and toner cartridge assembly. Handle the toner cartridge carefully. WARNING ...
Users Manual - English
Page 50
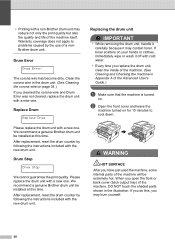
...wire on for 10 minutes to problems caused by following the instructions included with a new one . When you have just used the machine, some internal parts of the machine will be installed at this time. Replacing the drum unit A IMPORTANT • While removing the drum unit, handle it carefully because... it off with a non-Brother drum unit may reduce not only the print quality but also the quality and life of the machine itself. If you may contain toner. We...
...wire on for 10 minutes to problems caused by following the instructions included with a new one . When you have just used the machine, some internal parts of the machine will be installed at this time. Replacing the drum unit A IMPORTANT • While removing the drum unit, handle it carefully because... it off with a non-Brother drum unit may reduce not only the print quality but also the quality and life of the machine itself. If you may contain toner. We...
Users Manual - English
Page 52
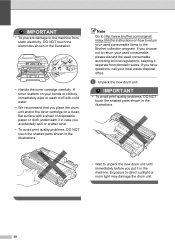
...accidentally spill or scatter toner. • To avoid print quality problems, DO NOT touch the shaded parts shown in the illustration. • Handle the toner cartridge carefully. Note Go to http://www.brother.com/original/ index.html for instructions on a clean, flat surface with cold water. • We... place the drum unit and/or the toner cartridge on how to return your used consumable, please discard the used consumable items to the Brother collection program. Exposure to direct sunlight or room light may damage the drum unit. 38 e Unpack the new drum unit. IMPORTANT •...
...accidentally spill or scatter toner. • To avoid print quality problems, DO NOT touch the shaded parts shown in the illustration. • Handle the toner cartridge carefully. Note Go to http://www.brother.com/original/ index.html for instructions on a clean, flat surface with cold water. • We... place the drum unit and/or the toner cartridge on how to return your used consumable, please discard the used consumable items to the Brother collection program. Exposure to direct sunlight or room light may damage the drum unit. 38 e Unpack the new drum unit. IMPORTANT •...

Users Manual - English
Page 60
b Slowly take out the drum unit and toner cartridge assembly. Leave the machine turned on for 10 minutes to cool down. Paper is jammed at the back of the machine will be extremely hot. If you do this, you open the front or back cover (back output tray) of the machine, DO NOT touch the shaded parts shown in the illustration. Follow these steps: a Open the front cover. When you may burn yourself. 46 WARNING HOT SURFACE After you have just used the machine, some internal parts of the machine B If the LCD shows Jam Rear, a paper jam occurred behind the back cover.
b Slowly take out the drum unit and toner cartridge assembly. Leave the machine turned on for 10 minutes to cool down. Paper is jammed at the back of the machine will be extremely hot. If you do this, you open the front or back cover (back output tray) of the machine, DO NOT touch the shaded parts shown in the illustration. Follow these steps: a Open the front cover. When you may burn yourself. 46 WARNING HOT SURFACE After you have just used the machine, some internal parts of the machine B If the LCD shows Jam Rear, a paper jam occurred behind the back cover.
Users Manual - English
Page 62
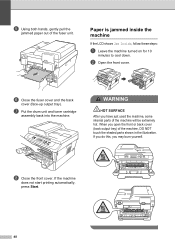
... cover. g Put the drum unit and toner cartridge assembly back into the machine. WARNING HOT SURFACE After you have just used the machine, some internal parts of the fuser unit. When you may burn yourself. If the machine does not start printing automatically, press Start. 48 If you do this, ...you open the front or back cover (back output tray) of the machine, DO NOT touch the shaded parts shown in the illustration. Paper is jammed inside the machine B If the LCD shows Jam Inside, follow these steps: a Leave the machine turned on...
... cover. g Put the drum unit and toner cartridge assembly back into the machine. WARNING HOT SURFACE After you have just used the machine, some internal parts of the fuser unit. When you may burn yourself. If the machine does not start printing automatically, press Start. 48 If you do this, ...you open the front or back cover (back output tray) of the machine, DO NOT touch the shaded parts shown in the illustration. Paper is jammed inside the machine B If the LCD shows Jam Inside, follow these steps: a Leave the machine turned on...


