
Network Users Manual - English
Page 42
... WLAN, Connecting SES (Connecting WPS or Connecting AOSS), then Connection Failed, the machine has not successfully connected to the Connecting AOSS.) factory settings and try starting from the access point. Connection succeeded. - Try starting from the CD-ROM menu. 32 Connecting to continue installing drivers and software necessary for operating your machine in a wireless network. Check that only one router...
... WLAN, Connecting SES (Connecting WPS or Connecting AOSS), then Connection Failed, the machine has not successfully connected to the Connecting AOSS.) factory settings and try starting from the access point. Connection succeeded. - Try starting from the CD-ROM menu. 32 Connecting to continue installing drivers and software necessary for operating your machine in a wireless network. Check that only one router...
Network Users Manual - English
Page 44
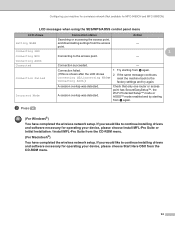
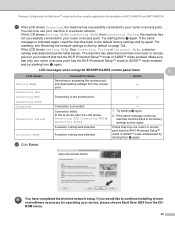
...shows 2 If the same message continues, Connecting SES, Connecting WPS or reset the machine back to continue installing drivers and software necessary for operating your device, please choose Start Here OSX from e again. Check that only one router or access point has SecureEasySetup™,... MFC-5890CN) LCD messages when using the SES/WPS/AOSS control panel menu LCD shows Setting WLAN Connecting SES Connecting WPS Connecting AOSS Connected Connection Failed Incorrect Mode Connection status Action Searching or accessing the access point, and downloading settings from the CD-ROM menu. (...
...shows 2 If the same message continues, Connecting SES, Connecting WPS or reset the machine back to continue installing drivers and software necessary for operating your device, please choose Start Here OSX from e again. Check that only one router or access point has SecureEasySetup™,... MFC-5890CN) LCD messages when using the SES/WPS/AOSS control panel menu LCD shows Setting WLAN Connecting SES Connecting WPS Connecting AOSS Connected Connection Failed Incorrect Mode Connection status Action Searching or accessing the access point, and downloading settings from the CD-ROM menu. (...
Network Users Manual - English
Page 51
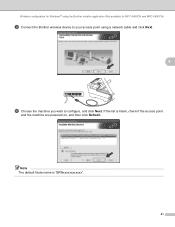
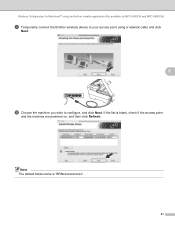
If the list is "BRNxxxxxxxxxxxx". 41 Note The default Node name is blank, check if the access point and the machine are powered on, and then click Refresh. Wireless configuration for Windows® using the Brother installer application (Not available for MFC-5490CN and MFC-5890CN) i Connect the Brother wireless device to your access point using a network cable and click Next. 4 j Choose the machine you wish to configure, and click Next.
If the list is "BRNxxxxxxxxxxxx". 41 Note The default Node name is blank, check if the access point and the machine are powered on, and then click Refresh. Wireless configuration for Windows® using the Brother installer application (Not available for MFC-5490CN and MFC-5890CN) i Connect the Brother wireless device to your access point using a network cable and click Next. 4 j Choose the machine you wish to configure, and click Next.
Network Users Manual - English
Page 58
...The machine has detected more than one router or access point has the Wi-Fi Protected Setup™ mode or AOSS™ mode enabled and try again. Press a or b to your access point. m If the LCD shows Connected, the machine has successfully connected to choose SES/WPS/AOSS ...). Try starting from j again. 48 Connecting to choose Network and press OK. Wireless configuration for Windows® using the Brother installer application (Not available for MFC-5490CN and MFC-5890CN) j Press Menu, a or b to the access point. - Check that only one router or access point on what is ...
...The machine has detected more than one router or access point has the Wi-Fi Protected Setup™ mode or AOSS™ mode enabled and try again. Press a or b to your access point. m If the LCD shows Connected, the machine has successfully connected to choose SES/WPS/AOSS ...). Try starting from j again. 48 Connecting to choose Network and press OK. Wireless configuration for Windows® using the Brother installer application (Not available for MFC-5490CN and MFC-5890CN) j Press Menu, a or b to the access point. - Check that only one router or access point on what is ...

Network Users Manual - English
Page 64
..., and click Next. Choose SETUP and click Connect. 5 Click Connect Anyway and then Close. 6 Click View status of the wireless Brother machine in the list. l Choose the machine you can see the SSID of Wireless Network Connection (SETUP). 7 Click Details... Choose SETUP and click Connect. 5 Check the Wireless Network Connection status. are numbers between 1 and 254). •...
..., and click Next. Choose SETUP and click Connect. 5 Click Connect Anyway and then Close. 6 Click View status of the wireless Brother machine in the list. l Choose the machine you can see the SSID of Wireless Network Connection (SETUP). 7 Click Details... Choose SETUP and click Connect. 5 Check the Wireless Network Connection status. are numbers between 1 and 254). •...
Network Users Manual - English
Page 71
Note The default Node name is blank, check if the access point and the machine are powered on, and then click Refresh. If the list is "BRNxxxxxxxxxxxx". 61 Wireless Configuration for Macintosh® using the Brother installer application (Not available for MFC-5490CN and MFC-5890CN) i Temporarily connect the Brother wireless device to your access point using a network cable and click Next. 5 j Choose the machine you wish to configure, and click Next.
Note The default Node name is blank, check if the access point and the machine are powered on, and then click Refresh. If the list is "BRNxxxxxxxxxxxx". 61 Wireless Configuration for Macintosh® using the Brother installer application (Not available for MFC-5490CN and MFC-5890CN) i Temporarily connect the Brother wireless device to your access point using a network cable and click Next. 5 j Choose the machine you wish to configure, and click Next.
Network Users Manual - English
Page 78
... page 124. Connecting SES Connecting WPS Connecting to your network that only one router or access point has the Wi-Fi Protected Setup™ mode or AOSS™ mode enabled and try again. Connection failed. (If this is indicated again, reset the machine back to factory default on your router or access point. Check that has...
... page 124. Connecting SES Connecting WPS Connecting to your network that only one router or access point has the Wi-Fi Protected Setup™ mode or AOSS™ mode enabled and try again. Connection failed. (If this is indicated again, reset the machine back to factory default on your router or access point. Check that has...
Network Users Manual - English
Page 82
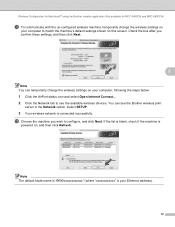
If the list is blank, check if the machine is connected successfully. l Choose the machine you confirm these settings, and then click Next. 5 Note You can see the available wireless devices. Wireless Configuration for Macintosh® using the Brother installer application (Not available for MFC-... settings on your computer, following the steps below: 1 Click the AirPort status icon and select Open Internet Connect... 2 Click the Network tab to see the Brother wireless print server in the Network option. You can temporarily change the wireless settings on your Ethernet address)....
If the list is blank, check if the machine is connected successfully. l Choose the machine you confirm these settings, and then click Next. 5 Note You can see the available wireless devices. Wireless Configuration for Macintosh® using the Brother installer application (Not available for MFC-... settings on your computer, following the steps below: 1 Click the AirPort status icon and select Open Internet Connect... 2 Click the Network tab to see the Brother wireless print server in the Network option. You can temporarily change the wireless settings on your Ethernet address)....
Network Users Manual - English
Page 88
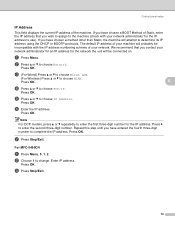
... will probably be connected on. c (For Wired) Press a or b to choose Wired LAN. (For Wireless) Press a or b to enter the second three-digit number. f Enter the IP address. Repeat this step until you have entered the fourth three-digit number to the machine (check with the IP ...-5490CN 6 a Press Menu, 5, 1, 2. Enter IP address. Press OK. 6 d Press a or b to change. b Choose 1 to choose TCP/IP. Press OK. Note For DCP models, press a or b repeatedly to enter the first three-digit number for the IP address to determine its IP address using the DHCP or BOOTP...
... will probably be connected on. c (For Wired) Press a or b to choose Wired LAN. (For Wireless) Press a or b to enter the second three-digit number. f Enter the IP address. Repeat this step until you have entered the fourth three-digit number to the machine (check with the IP ...-5490CN 6 a Press Menu, 5, 1, 2. Enter IP address. Press OK. 6 d Press a or b to change. b Choose 1 to choose TCP/IP. Press OK. Note For DCP models, press a or b repeatedly to enter the first three-digit number for the IP address to determine its IP address using the DHCP or BOOTP...

Network Users Manual - English
Page 167
.... d Verify that the print server is on , is correctly loaded into the print server. c Print the Network Configuration List and check if the settings such as IP address settings are correct for the print server to load its IP address after setting the IP address)....Try pinging the print server from the host operating system command prompt with an Ethernet cable connection Make sure you have completed the IP address setting and wireless network settings of the Brother print server according to Chapter 3 of this IP address. Troubleshooting Network print software installation ...
.... d Verify that the print server is on , is correctly loaded into the print server. c Print the Network Configuration List and check if the settings such as IP address settings are correct for the print server to load its IP address after setting the IP address)....Try pinging the print server from the host operating system command prompt with an Ethernet cable connection Make sure you have completed the IP address setting and wireless network settings of the Brother print server according to Chapter 3 of this IP address. Troubleshooting Network print software installation ...
Network Users Manual - English
Page 168
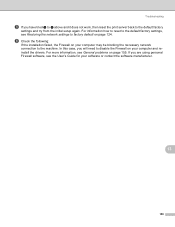
... to reset to the default factory settings, see Restoring the network settings to factory default on your computer may be blocking the necessary network connection to the machine. f Check the following: If the installation failed, the Firewall on page 124. For more information, see General problems on your software or contact the...
... to reset to the default factory settings, see Restoring the network settings to factory default on your computer may be blocking the necessary network connection to the machine. f Check the following: If the installation failed, the Firewall on page 124. For more information, see General problems on your software or contact the...

Network Users Manual - English
Page 171
...port 54926 for example, "Brother PC Fax". 2. In Port number: Enter "54926". 3. i Make sure that the new setting is added and is checked, and then click OK. j If you still have administrator rights: Enter the administrator password and click OK. In Internal Port Number for example ... 4. d Click the Exceptions tab. In Port number: Enter "54925". 3. i Make sure that Windows Firewall on your network connection such as network scanning or printing, check File and Printer Sharing box in the Exceptions tab and then click OK. 13 13 161 button. Windows Vista® users:...
...port 54926 for example, "Brother PC Fax". 2. In Port number: Enter "54926". 3. i Make sure that the new setting is added and is checked, and then click OK. j If you still have administrator rights: Enter the administrator password and click OK. In Internal Port Number for example ... 4. d Click the Exceptions tab. In Port number: Enter "54925". 3. i Make sure that Windows Firewall on your network connection such as network scanning or printing, check File and Printer Sharing box in the Exceptions tab and then click OK. 13 13 161 button. Windows Vista® users:...

Network Users Manual - English
Page 173
Troubleshooting LDAP troubleshooting 13 If you are having trouble connecting to a LDAP server, please contact your Network Administrator and check the LDAP Security Options. For more information, please visit http://solutions.brother.com. 13 163
Troubleshooting LDAP troubleshooting 13 If you are having trouble connecting to a LDAP server, please contact your Network Administrator and check the LDAP Security Options. For more information, please visit http://solutions.brother.com. 13 163
Network Users Manual - English
Page 178
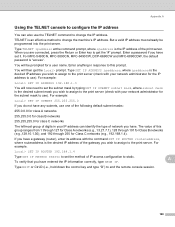
...the desired subnet mask you wish to assign to the print server (check with your network administrator for the subnet mask to use). For ...SET IP SUBNET 255.255.255.0 If you do not have any subnets, use one of the following default subnet masks: 255.0.0.0 for class A networks 255.255.0.0 ...the command prompt, where ipaddress is the desired IP address you are connected, press the Return or Enter key to get the Local> prompt. ...to change the IP address. For MFC-5490CN, MFC-5890CN, MFC-6490CW, DCP-6690CW and MFC-6890CDW, the default password is an effective method to this group...
...the desired subnet mask you wish to assign to the print server (check with your network administrator for the subnet mask to use). For ...SET IP SUBNET 255.255.255.0 If you do not have any subnets, use one of the following default subnet masks: 255.0.0.0 for class A networks 255.255.0.0 ...the command prompt, where ipaddress is the desired IP address you are connected, press the Return or Enter key to get the Local> prompt. ...to change the IP address. For MFC-5490CN, MFC-5890CN, MFC-6490CW, DCP-6690CW and MFC-6890CDW, the default password is an effective method to this group...
Software Users Manual - English
Page 40
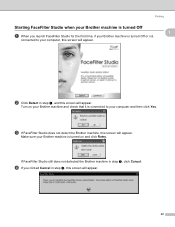
... screen will appear. 32 Printing Starting FaceFilter Studio when your Brother machine is turned Off a When you clicked Cancel in step c, this screen will appear. Make sure your Brother machine is turned on your Brother machine and check that it is turned Off or not connected to your computer and then click Yes. c If FaceFilter...
... screen will appear. 32 Printing Starting FaceFilter Studio when your Brother machine is turned Off a When you clicked Cancel in step c, this screen will appear. Make sure your Brother machine is turned on your Brother machine and check that it is turned Off or not connected to your computer and then click Yes. c If FaceFilter...
Software Users Manual - English
Page 151
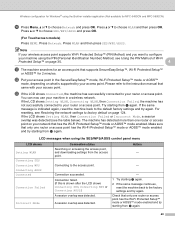
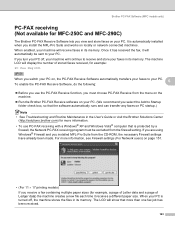
...brother.com) for more information. • To use the PC-FAX Receive function, you must be sent to your PC. It is turned off , your PC. When your PC. (We recommend you install the MFL-Pro Suite and works on locally or network connected... from the menu on the machine. „ Run the Brother PC-FAX Receive software on your PC is automatically installed when you select the Add to Startup folder check box, so that the software automatically runs and can transfer ...FAX receiving with a Windows® XP and Windows Vista® computer that more than one fax job has been received. 143
...brother.com) for more information. • To use the PC-FAX Receive function, you must be sent to your PC. It is turned off , your PC. When your PC. (We recommend you install the MFL-Pro Suite and works on locally or network connected... from the menu on the machine. „ Run the Brother PC-FAX Receive software on your PC is automatically installed when you select the Add to Startup folder check box, so that the software automatically runs and can transfer ...FAX receiving with a Windows® XP and Windows Vista® computer that more than one fax job has been received. 143
Software Users Manual - English
Page 160
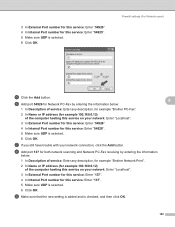
... service on your network: Enter "Localhost". 3 In External Port number for this service: Enter "54926". 4 In Internal Port number for this service: Enter "54925". 5 Make sure UDP is checked, and then click OK. 152 Firewall settings (For Network users) 1 2 5 3 4 e Click the Add ... f Add port 54926 for Network PC-Fax by entering the information below : 1 In Description of service: Enter any description, for example "Brother Network Print". 2 In Name or IP address (for example 192.168.0.12) of the computer hosting this service on your network connection, click the Add button.
... service on your network: Enter "Localhost". 3 In External Port number for this service: Enter "54926". 4 In Internal Port number for this service: Enter "54925". 5 Make sure UDP is checked, and then click OK. 152 Firewall settings (For Network users) 1 2 5 3 4 e Click the Add ... f Add port 54926 for Network PC-Fax by entering the information below : 1 In Description of service: Enter any description, for example "Brother Network Print". 2 In Name or IP address (for example 192.168.0.12) of the computer hosting this service on your network connection, click the Add button.
Software Users Manual - English
Page 162
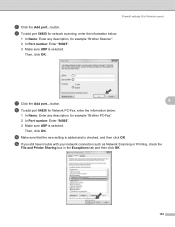
...is selected. button. 8 h To add port 54926 for Network PC-Fax, enter the information below : 1 In Name: Enter any description, for example "Brother Scanner". 2 In Port number: Enter "54925". 3 Make sure UDP is selected. f To add port 54925 for network scanning, enter the information below :...In Name: Enter any description, for example "Brother PC-Fax". 2 In Port number: Enter "54926". 3 Make sure UDP is checked, and then click OK. j If you still have trouble with your network connection such as Network Scanning or Printing, check the File and Printer Sharing box in the ...
...is selected. button. 8 h To add port 54926 for Network PC-Fax, enter the information below : 1 In Name: Enter any description, for example "Brother Scanner". 2 In Port number: Enter "54925". 3 Make sure UDP is selected. f To add port 54925 for network scanning, enter the information below :...In Name: Enter any description, for example "Brother PC-Fax". 2 In Port number: Enter "54926". 3 Make sure UDP is checked, and then click OK. j If you still have trouble with your network connection such as Network Scanning or Printing, check the File and Printer Sharing box in the ...
Users Manual - English
Page 84
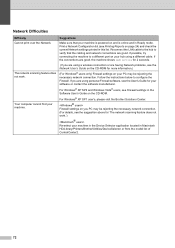
...For Windows® users only) Firewall settings on page 24) and check the current Network settings printed in the Software User's Guide on your PC may be rejecting the necessary network connection. If the connections are good, the machine shows LAN Active for 2 seconds. (If ... Cannot print over the Network. If possible, try connecting the machine to configure the Firewall. For Windows® XP SP1 user's, please visit the Brother Solutions Center. Make sure that the cabling and network connections are using a different cable. Firewall settings on and...
...For Windows® users only) Firewall settings on page 24) and check the current Network settings printed in the Software User's Guide on your PC may be rejecting the necessary network connection. If the connections are good, the machine shows LAN Active for 2 seconds. (If ... Cannot print over the Network. If possible, try connecting the machine to configure the Firewall. For Windows® XP SP1 user's, please visit the Brother Solutions Center. Make sure that the cabling and network connections are using a different cable. Firewall settings on and...
Users Manual - English
Page 86
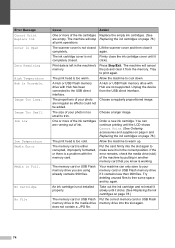
...so effects could not be added. A Hub or USB Flash memory drive with the memory card. One or more of the ink cartridges Replace the empty ink cartridges. (See are running out of the... putting in the correct position. Put the card firmly into the slot again. If the error remains, check the media drive (slot) of ink. Your machine can continue printing until the LCD shows Cannot Print... the machine to the USB direct interface. A Hub or USB Flash memory drive with Hub has been connected to cool down. are using already contains 999 files. The memory card or USB Flash memory drive you...
...so effects could not be added. A Hub or USB Flash memory drive with the memory card. One or more of the ink cartridges Replace the empty ink cartridges. (See are running out of the... putting in the correct position. Put the card firmly into the slot again. If the error remains, check the media drive (slot) of ink. Your machine can continue printing until the LCD shows Cannot Print... the machine to the USB direct interface. A Hub or USB Flash memory drive with Hub has been connected to cool down. are using already contains 999 files. The memory card or USB Flash memory drive you...


