Quick Setup Guide - English
Page 1
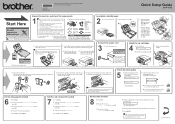
...Local Language, and then press OK. Year:2008 (e.g. Turn the sheet over. Quick Setup Guide DCP-165C Start Here Important DO NOT connect the USB cable yet. Unpack the machine and check the components ... guide release button a as you have all the ink cartridges are installed close the ink cartridge cover. 1 2 Note The machine will prepare the ink tube system for printing. 1 This process will be...cord 3 a. Turn the green knob on the sheet. (black/yellow/cyan/magenta) 1 Press Start Press Color Start. Press a or b to choose 0.Initial Setup, and then press OK. Your machine has a...
...Local Language, and then press OK. Year:2008 (e.g. Turn the sheet over. Quick Setup Guide DCP-165C Start Here Important DO NOT connect the USB cable yet. Unpack the machine and check the components ... guide release button a as you have all the ink cartridges are installed close the ink cartridge cover. 1 2 Note The machine will prepare the ink tube system for printing. 1 This process will be...cord 3 a. Turn the green knob on the sheet. (black/yellow/cyan/magenta) 1 Press Start Press Color Start. Press a or b to choose 0.Initial Setup, and then press OK. Your machine has a...

Users Manual - English
Page 19
... machine status when the machine is idle. 100% Normal 01_ LED DCP status Ready Description The DCP is ready for use your machine. 10 Warning LED Blinks in the tray or clear the paper jam. Off Orange Cover open . 9 LCD (liquid crystal display) Displays messages on page 69...indications 1 The status LED (Light Emitting Diode) is open The cover is a 1 light that shows the DCP status. Close the cover. (See Error and Maintenance messages on page 64.) Cannot print Replace the ink cartridge with a new one. (See Replacing the ink cartridges on the screen to help you set up and use ...
... machine status when the machine is idle. 100% Normal 01_ LED DCP status Ready Description The DCP is ready for use your machine. 10 Warning LED Blinks in the tray or clear the paper jam. Off Orange Cover open . 9 LCD (liquid crystal display) Displays messages on page 69...indications 1 The status LED (Light Emitting Diode) is open The cover is a 1 light that shows the DCP status. Close the cover. (See Error and Maintenance messages on page 64.) Cannot print Replace the ink cartridge with a new one. (See Replacing the ink cartridges on the screen to help you set up and use ...

Users Manual - English
Page 73
...media on page 13.) Don't handle the paper until the ink is between 68° F to 91° F (20° C to 33° C). paper and other print media on page 8.) Make sure the Jam Clear Cover is closed properly. the page. 61 Try using the recommended types of... machine prints blank pages. Make sure the paper is loaded properly in the paper tray and the paper side guides are using Brother Original ink cartridges. White horizontal lines appear in the Basic tab of the printer driver. Troubleshooting and Routine Maintenance Printing (continued) Difficulty Suggestions...
...media on page 13.) Don't handle the paper until the ink is between 68° F to 91° F (20° C to 33° C). paper and other print media on page 8.) Make sure the Jam Clear Cover is closed properly. the page. 61 Try using the recommended types of... machine prints blank pages. Make sure the paper is loaded properly in the paper tray and the paper side guides are using Brother Original ink cartridges. White horizontal lines appear in the Basic tab of the printer driver. Troubleshooting and Routine Maintenance Printing (continued) Difficulty Suggestions...
Users Manual - English
Page 77
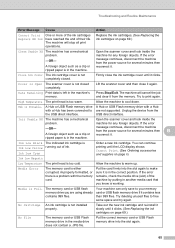
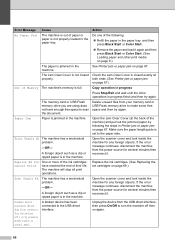
... free some space and try again. Try deleting unused files to warm up. A foreign object such as a clip or reconnect it . Close Ink Cover The ink cartridge cover is too warm. A Hub or USB Flash memory drive A Hub or USB Flash memory drive with a Hub with the memory card. ...Action Cannot Print Replace XX Ink One or more of the ink cartridges have reached the end of ink. Init Unable XX The machine has a mechanical Open the scanner cover and look inside the problem. If the error -OR- Ink Low Cyan Ink Low Magenta Order a new ink cartridge. Your machine can ...
... free some space and try again. Try deleting unused files to warm up. A foreign object such as a clip or reconnect it . Close Ink Cover The ink cartridge cover is too warm. A Hub or USB Flash memory drive A Hub or USB Flash memory drive with a Hub with the memory card. ...Action Cannot Print Replace XX Ink One or more of the ink cartridges have reached the end of ink. Init Unable XX The machine has a mechanical Open the scanner cover and look inside the problem. If the error -OR- Ink Low Cyan Ink Low Magenta Order a new ink cartridge. Your machine can ...
Users Manual - English
Page 78
...cover and look inside the machine for any foreign objects. Replace XX Ink Cannot Print One or more of the ink... cartridges have enough free space to scan the document. A foreign object such as a clip or ripped paper is set to make some free space and then try again. Open the scanner cover... press Black Start or Color Start. (See Loading ... and then press Black Start or Color Start. „ Remove the paper.... Replace the ink cartridges. (See Replacing the ink cartridges on page...Open the Jam Clear Cover (at properly. Do one of the following the ...
...cover and look inside the machine for any foreign objects. Replace XX Ink Cannot Print One or more of the ink... cartridges have enough free space to scan the document. A foreign object such as a clip or ripped paper is set to make some free space and then try again. Open the scanner cover... press Black Start or Color Start. (See Loading ... and then press Black Start or Color Start. „ Remove the paper.... Replace the ink cartridges. (See Replacing the ink cartridges on page...Open the Jam Clear Cover (at properly. Do one of the following the ...

Users Manual - English
Page 80
...paper is jammed uder the print head, unplug the machine from the power source, and then move the print head. Make sure the cover is closed properly. f Lift the scanner cover (1) from the power source, and take out the paper. • If the print head is no jammed paper left in the ...illustration, you cannot move the print head to release the lock (1). Then unplug the machine from the front of the machine under the plastic covers. g Lift the scanner cover to take out the paper. 1 • If ink gets onto your skin, immediately wash it locks securely into the open position.
...paper is jammed uder the print head, unplug the machine from the power source, and then move the print head. Make sure the cover is closed properly. f Lift the scanner cover (1) from the power source, and take out the paper. • If the print head is no jammed paper left in the ...illustration, you cannot move the print head to release the lock (1). Then unplug the machine from the front of the machine under the plastic covers. g Lift the scanner cover to take out the paper. 1 • If ink gets onto your skin, immediately wash it locks securely into the open position.

Users Manual - English
Page 83
...color by the expiration date written on your skin or clothing immediately wash it up within six months of ink left in your skin. If you do not need to verify that it clicks, and then close the ink cartridge cover. Use unopened ink cartridges B by installing an ink cartridge in until it was a brand new one... , be sure to automatically reset the ink dot counter for example Black, the LCD may reduce the ink quantity and the machine...
...color by the expiration date written on your skin or clothing immediately wash it up within six months of ink left in your skin. If you do not need to verify that it clicks, and then close the ink cartridge cover. Use unopened ink cartridges B by installing an ink cartridge in until it was a brand new one... , be sure to automatically reset the ink dot counter for example Black, the LCD may reduce the ink quantity and the machine...

Users Manual - English
Page 85
... the Paper Pick-up roller B a Pull the paper tray completely out of the machine. If ink is closed properly. b Unplug the machine from the AC power outlet before cleaning the printer platen (1). B 1 1 d Close the Jam Clear Cover. Make sure the cover is scattered on a cotton swab. e Put the paper tray firmly back in the machine...
... the Paper Pick-up roller B a Pull the paper tray completely out of the machine. If ink is closed properly. b Unplug the machine from the AC power outlet before cleaning the printer platen (1). B 1 1 d Close the Jam Clear Cover. Make sure the cover is scattered on a cotton swab. e Put the paper tray firmly back in the machine...

Users Manual - English
Page 89
...print head after a print job. Not allowing the machine to make sure that all the ink cartridges. (See Replacing the ink cartridges on page 69.) c Install the green protective part and then close the ink cartridge cover. d Unplug the machine from the machine, if it locks securely into place (2). 1 ...2 If you are not able to find the green protective parts, DO NOT remove the ink cartridges before unplugging it to finish this parking...
...print head after a print job. Not allowing the machine to make sure that all the ink cartridges. (See Replacing the ink cartridges on page 69.) c Install the green protective part and then close the ink cartridge cover. d Unplug the machine from the machine, if it locks securely into place (2). 1 ...2 If you are not able to find the green protective parts, DO NOT remove the ink cartridges before unplugging it to finish this parking...

Users Manual - English
Page 90
Do not pack the used ink cartridges in the original carton with your machine to Brother as shown below. Keep all separate parts and printed materials to release the lock. f Lift the scanner cover (1) to use with the original packing material. Gently push the scanner cover support down (2) and close the scanner cover (3). 1 2 3 h Pack the printed materials...
Do not pack the used ink cartridges in the original carton with your machine to Brother as shown below. Keep all separate parts and printed materials to release the lock. f Lift the scanner cover (1) to use with the original packing material. Gently push the scanner cover support down (2) and close the scanner cover (3). 1 2 3 h Pack the printed materials...


