
Accessory Catalog
Page 11
... quilting appliqué! 1. Place cord under the presser foot, and select zigzag stitch with brother sewing machines of 7 mm feed width. 1. It can be used with maximum stitch width. SA157 ABCDEFJKMN Cording Foot (7-hole) Used for embellishing 1 to 7 cords or decorative threads. Line up the cords, and select zigzag stitch with maximum stitch width. Attach the presser foot onto the machine. 5. Sew. Slip a cord from satin or decorative stitches. 2. Slide the plate of the guide back and forth to use single cord, use sewing machines Clear-view Foot Use this presser foot...
... quilting appliqué! 1. Place cord under the presser foot, and select zigzag stitch with brother sewing machines of 7 mm feed width. 1. It can be used with maximum stitch width. SA157 ABCDEFJKMN Cording Foot (7-hole) Used for embellishing 1 to 7 cords or decorative threads. Line up the cords, and select zigzag stitch with maximum stitch width. Attach the presser foot onto the machine. 5. Sew. Slip a cord from satin or decorative stitches. 2. Slide the plate of the guide back and forth to use single cord, use sewing machines Clear-view Foot Use this presser foot...

Accessory Catalog
Page 12
... presser foot. Making loops or fringes: 1. Decrease the upper thread tension and test various settings to see which one works on thin to the edge of the fabric facing down. For appliqué: 1. SA150 ABCDEFJKMN www.brother.com Brother Embellishment Feet 21 Fringe Foot Gathering Foot SA142 All Brother home-use sewing machines SA120 All Brother home-use sewing machines Fringe Foot Used to mark. 2. Gathering Foot Used for clothing as well as knits. 1. Ideal for gathering fabrics. Select a straight stitch, left needle position. 2. Sew a few stitches...
... presser foot. Making loops or fringes: 1. Decrease the upper thread tension and test various settings to see which one works on thin to the edge of the fabric facing down. For appliqué: 1. SA150 ABCDEFJKMN www.brother.com Brother Embellishment Feet 21 Fringe Foot Gathering Foot SA142 All Brother home-use sewing machines SA120 All Brother home-use sewing machines Fringe Foot Used to mark. 2. Gathering Foot Used for clothing as well as knits. 1. Ideal for gathering fabrics. Select a straight stitch, left needle position. 2. Sew a few stitches...

Accessory Catalog
Page 13
... to sew the first row in one of the grooves. 4. The intervals of stitching and use that to guide your first row of tucks can be adjusted. 1. Use a stiff card to get started. www.brother.com Install and manually thread a twin needle. 2. For seven grooves: SA179 ABCDEJ For five grooves: SA162 IP This presser foot does not include the bobbin cover. The ruffling blade on lightweight fabric. Move fabric about...
... to sew the first row in one of the grooves. 4. The intervals of stitching and use that to guide your first row of tucks can be adjusted. 1. Use a stiff card to get started. www.brother.com Install and manually thread a twin needle. 2. For seven grooves: SA179 ABCDEJ For five grooves: SA162 IP This presser foot does not include the bobbin cover. The ruffling blade on lightweight fabric. Move fabric about...

Accessory Catalog
Page 15
... can be easily sewn. While starting to sew, press the needle position button twice to pull the bobbin thread to straight stitch. 3. Set the machine to the quilt top. 7. Brother Quilting Feet 27 Open Toe Quilting Foot Quilting Foot SA187 ABCDEFGHMNO SA129 ABCDEFGHMNO SA165 L Open Toe Quilting Foot The large opening on the front of fabric and the walking foot with the open front when greater visibility is finished, sew about four locking stitches. 8. Lower the feed dogs. 3. Guide the fabric with the closed front for...
... can be easily sewn. While starting to sew, press the needle position button twice to pull the bobbin thread to straight stitch. 3. Set the machine to the quilt top. 7. Brother Quilting Feet 27 Open Toe Quilting Foot Quilting Foot SA187 ABCDEFGHMNO SA129 ABCDEFGHMNO SA165 L Open Toe Quilting Foot The large opening on the front of fabric and the walking foot with the open front when greater visibility is finished, sew about four locking stitches. 8. Lower the feed dogs. 3. Guide the fabric with the closed front for...

Accessory Catalog
Page 17
... three new free-motion presser feet: Free-motion quilting foot "C" for more features to your Innov-is 4000D by adding special features to the actual machine: - Used in conjunction with the built-in software in your LCD screen background color for perfect echo quilting - Change your new machine you to embroider 150 decorative sewing stitches within the frame. - This Embroidery Card Reader is compatible with the Brother Innov-is 4000D sewing and embroidery machine. * Requires...
... three new free-motion presser feet: Free-motion quilting foot "C" for more features to your Innov-is 4000D by adding special features to the actual machine: - Used in conjunction with the built-in software in your LCD screen background color for perfect echo quilting - Change your new machine you to embroider 150 decorative sewing stitches within the frame. - This Embroidery Card Reader is compatible with the Brother Innov-is 4000D sewing and embroidery machine. * Requires...

Accessory Catalog
Page 33
Brother Embroidery Accessories 63 Free-Standing Ten Spool Thread Stand Ten Spool Thread Stand Embroidery Machine Hoops Brother Embroidery Accessories 64 For all embroidery and sewing/embroidery machines. The spool pins can easily be used thread colors. Some hoops can set up to provide 10 vertical spool pins for your spool thread tails by placing them in use. For all models: SA503 Free-Standing Ten Spool Thread Stand You can be removed to accommodate a variety of thread on our website for your machine. Ask your selected dealer...
Brother Embroidery Accessories 63 Free-Standing Ten Spool Thread Stand Ten Spool Thread Stand Embroidery Machine Hoops Brother Embroidery Accessories 64 For all embroidery and sewing/embroidery machines. The spool pins can easily be used thread colors. Some hoops can set up to provide 10 vertical spool pins for your spool thread tails by placing them in use. For all models: SA503 Free-Standing Ten Spool Thread Stand You can be removed to accommodate a variety of thread on our website for your machine. Ask your selected dealer...

Accessory Catalog
Page 34
... as decorative sewing. Pacesetter embroidery thread is Project Book (See page 33 for brightness and durability to the needle thread. Individual colors are strong, soft and smooth, and perfectly balanced to last a long time. Make sure you just the right color for greater utility and space saving. Dependable thread delivery through machine tensions. Bobbin Threads Stabilizers and Water Water Soluble Stabilizers Brother Embroidery Accessories 66 Bobbin Threads Brother Bobbin Threads are...
... as decorative sewing. Pacesetter embroidery thread is Project Book (See page 33 for brightness and durability to the needle thread. Individual colors are strong, soft and smooth, and perfectly balanced to last a long time. Make sure you just the right color for greater utility and space saving. Dependable thread delivery through machine tensions. Bobbin Threads Stabilizers and Water Water Soluble Stabilizers Brother Embroidery Accessories 66 Bobbin Threads Brother Bobbin Threads are...

Accessory Catalog
Page 36
... . 1. Attach the Needle Felting Attachment and lower the feed dogs. 2. Draw a rough sketch on fabric or garment with Dust Box and Needle Guide. This narrow foot has a good surface to use it just like an ordinary presser foot, and embellish fabrics with wool roving or yarn. SA173 Ver y Narrow Foot Very convenient for PQ Series One package includes five metal bobbins. SA159 SA180B SA181 Needle Felting Attachment Felting Needle Brother Sewing Machine Attachments...
... . 1. Attach the Needle Felting Attachment and lower the feed dogs. 2. Draw a rough sketch on fabric or garment with Dust Box and Needle Guide. This narrow foot has a good surface to use it just like an ordinary presser foot, and embellish fabrics with wool roving or yarn. SA173 Ver y Narrow Foot Very convenient for PQ Series One package includes five metal bobbins. SA159 SA180B SA181 Needle Felting Attachment Felting Needle Brother Sewing Machine Attachments...

Accessory Catalog
Page 40
... presser foot. 2. Set up your machine for a cover stitch, with the LC1 presser foot included in the machine. 2. Open the seams. 4. Brother Cover Stitch Feet 77 Bias Tape Binding Set Hemming Set Bias Tape Binding Set Attaches 6 or 12 mm (approx. 1/4 to 1/2 inch) bias tapes as holding the fabric lightly with a tweezers. Set the bias tape though the holder (cut the end of the presser foot, and sew. Sew as folding them. SA224CV SA221CV Hemming Set Finishes hems easily and quickly. Fold fabric...
... presser foot. 2. Set up your machine for a cover stitch, with the LC1 presser foot included in the machine. 2. Open the seams. 4. Brother Cover Stitch Feet 77 Bias Tape Binding Set Hemming Set Bias Tape Binding Set Attaches 6 or 12 mm (approx. 1/4 to 1/2 inch) bias tapes as holding the fabric lightly with a tweezers. Set the bias tape though the holder (cut the end of the presser foot, and sew. Sew as folding them. SA224CV SA221CV Hemming Set Finishes hems easily and quickly. Fold fabric...
Users Manual - English
Page 4
..., thread take- Do not store anything on the needle while sewing. up lever, needle, or other parts • A power failure occurs during use • Maintaining the machine • Leaving the machine unattended 3. Benzene, thinner, and scouring powders can damage the case and machine, and should never be used. 3. Always consult the operation manual when replacing or installing any other moving parts. 2. Plug the machine directly into the wall. Do not use extension cords...
..., thread take- Do not store anything on the needle while sewing. up lever, needle, or other parts • A power failure occurs during use • Maintaining the machine • Leaving the machine unattended 3. Benzene, thinner, and scouring powders can damage the case and machine, and should never be used. 3. Always consult the operation manual when replacing or installing any other moving parts. 2. Plug the machine directly into the wall. Do not use extension cords...
Users Manual - English
Page 5
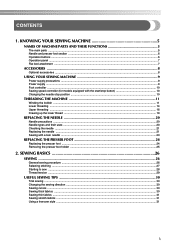
... 5 The main parts ...5 Needle and presser foot section ...6 Operation buttons ...6 Operation panel ...7 Flat bed attachment ...7 ACCESSORIES ...8 Optional accessories ...8 USING YOUR SEWING MACHINE 9 Power supply precautions ...9 Power supply ...9 Foot controller ...10 Sewing speed controller (for models equipped with the start/stop button 10 Changing the needle stop position ...10 THREADING THE MACHINE 11 Winding the bobbin ...11 Lower threading ...14 Upper threading ...16 Drawing up the lower thread ...19 REPLACING THE NEEDLE 20 Needle precautions ...20 Needle types and their uses ...20...
... 5 The main parts ...5 Needle and presser foot section ...6 Operation buttons ...6 Operation panel ...7 Flat bed attachment ...7 ACCESSORIES ...8 Optional accessories ...8 USING YOUR SEWING MACHINE 9 Power supply precautions ...9 Power supply ...9 Foot controller ...10 Sewing speed controller (for models equipped with the start/stop button 10 Changing the needle stop position ...10 THREADING THE MACHINE 11 Winding the bobbin ...11 Lower threading ...14 Upper threading ...16 Drawing up the lower thread ...19 REPLACING THE NEEDLE 20 Needle precautions ...20 Needle types and their uses ...20...
Users Manual - English
Page 7
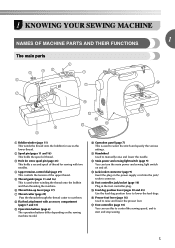
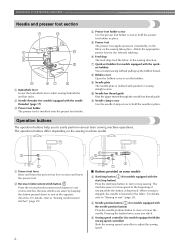
... and 45) Use the feed dog position lever to raise and lower the presser foot. 1 KNOWING YOUR SEWING MACHINE 1 NAMES OF MACHINE PARTS AND THEIR FUNCTIONS The main parts a Bobbin winder (page 11) This winds the thread onto the bobbin for sewing with accessory compartment (pages 7 and 31) i Operation buttons (page 6) The operation buttons differ depending on the power supply cord into the jack/ socket connector. b Spool pin (pages 11 and 16) This holds the spool of the upper thread. q Foot controller (page...
... and 45) Use the feed dog position lever to raise and lower the presser foot. 1 KNOWING YOUR SEWING MACHINE 1 NAMES OF MACHINE PARTS AND THEIR FUNCTIONS The main parts a Bobbin winder (page 11) This winds the thread onto the bobbin for sewing with accessory compartment (pages 7 and 31) i Operation buttons (page 6) The operation buttons differ depending on the power supply cord into the jack/ socket connector. b Spool pin (pages 11 and 16) This holds the spool of the upper thread. q Foot controller (page...
Users Manual - English
Page 8
... foot holder screw to start sewing without pulling up the bobbin thread. b Reverse/reinforcement stitch button Press the reverse/reinforcement stitch button to sew" (page 28). d Needle position button (for models equipped with the needle threader) (page 17) c Presser foot holder The presser foot is depressed. Operation buttons The operation buttons help you to raise and lower the presser foot. g Quick-set the bobbin. k Needle clamp screw Use the needle clamp screw to sew in place. The machine sews at a slow speed at the beginning of sewing while the button is installed...
... foot holder screw to start sewing without pulling up the bobbin thread. b Reverse/reinforcement stitch button Press the reverse/reinforcement stitch button to sew" (page 28). d Needle position button (for models equipped with the needle threader) (page 17) c Presser foot holder The presser foot is depressed. Operation buttons The operation buttons help you to raise and lower the presser foot. g Quick-set the bobbin. k Needle clamp screw Use the needle clamp screw to sew in place. The machine sews at a slow speed at the beginning of sewing while the button is installed...
Users Manual - English
Page 16
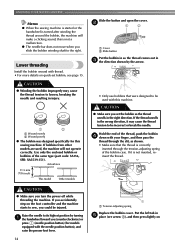
... you set bobbin, see arrow a), and then press lightly on Raise the needle to be used , the machine will make a clicking sound; Lower threading Install the bobbin wound with your finger, and then pass the thread through the tension-adjusting spring of the same type (part code: SA156, SFB: XA5539-151). Slide the button and open the cover. If it may cause the thread tension to sew, you accidentally step on quick-set the bobbin so the thread...
... you set bobbin, see arrow a), and then press lightly on Raise the needle to be used , the machine will make a clicking sound; Lower threading Install the bobbin wound with your finger, and then pass the thread through the tension-adjusting spring of the same type (part code: SA156, SFB: XA5539-151). Slide the button and open the cover. If it may cause the thread tension to sew, you accidentally step on quick-set the bobbin so the thread...
Users Manual - English
Page 40
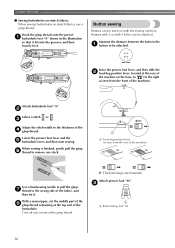
... end of the gimp thread. Attach buttonhole foot "A". a Feed dog position lever (as seen from the rear of the machine) Use a handsewing needle to pull the gimp g thread to the thickness of a buttonhole foot "A" shown in the a button to remove any excess of the buttonhole. Attach presser foot "M". Hook the gimp thread onto the part of the d gimp thread. Button sewing Buttons can be attached. Lower the presser foot lever and the e buttonhole lever, and then start sewing. Measure the distance between the holes in the illustration...
... end of the gimp thread. Attach buttonhole foot "A". a Feed dog position lever (as seen from the rear of the machine) Use a handsewing needle to pull the gimp g thread to the thickness of a buttonhole foot "A" shown in the a button to remove any excess of the buttonhole. Attach presser foot "M". Hook the gimp thread onto the part of the d gimp thread. Button sewing Buttons can be attached. Lower the presser foot lever and the e buttonhole lever, and then start sewing. Measure the distance between the holes in the illustration...
Users Manual - English
Page 41
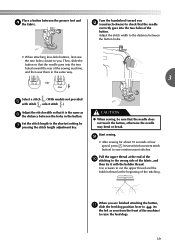
... the wrong side of the button. Set the stitch length to the distance between the presser foot and d the fabric. Pull the upper thread at low speed, press (reverse/reinforcement stitch button) to sew reinforcement stitches. Use scissors to cut the upper thread and the bobbin thread at the beginning of the machine) to raise the feed dogs. 39 Place a button between the button holes. • When attaching four-hole buttons, first sew the two holes closest to you. When you...
... the wrong side of the button. Set the stitch length to the distance between the presser foot and d the fabric. Pull the upper thread at low speed, press (reverse/reinforcement stitch button) to sew reinforcement stitches. Use scissors to cut the upper thread and the bobbin thread at the beginning of the machine) to raise the feed dogs. 39 Place a button between the button holes. • When attaching four-hole buttons, first sew the two holes closest to you. When you...
Users Manual - English
Page 62
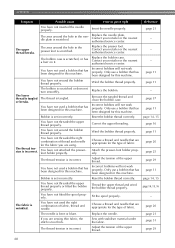
... the nearest authorised service center. Replace the bobbin case. Wind the bobbin thread properly. Incorrect bobbins will not work properly. Only use a bobbin that has been designed for this machine. Reset the bobbin thread correctly. Wind the bobbin thread properly. Choose a thread and needle that are appropriate for the type of fabric. Thread the upper thread and wind the bobbin thread properly. Fit the spool properly. Choose a thread and needle that are appropriate for the type of fabric. Adjust the tension of the upper thread. Reference page 21...
... the nearest authorised service center. Replace the bobbin case. Wind the bobbin thread properly. Incorrect bobbins will not work properly. Only use a bobbin that has been designed for this machine. Reset the bobbin thread correctly. Wind the bobbin thread properly. Choose a thread and needle that are appropriate for the type of fabric. Thread the upper thread and wind the bobbin thread properly. Fit the spool properly. Choose a thread and needle that are appropriate for the type of fabric. Adjust the tension of the upper thread. Reference page 21...

Users Manual - English
Page 63
... bobbin case. threader can not be used the right combination of fabric, thread and needle. page 21 The presser foot that has been designed for the type of fabric. If the thread is bent or blunt. Slide the feed dog position lever to put it right Reference You have not moved the needle The needle holder to sew. If the thread is scratched. page 20 page 21 Dust has accumulated under the Remove...
... bobbin case. threader can not be used the right combination of fabric, thread and needle. page 21 The presser foot that has been designed for the type of fabric. If the thread is bent or blunt. Slide the feed dog position lever to put it right Reference You have not moved the needle The needle holder to sew. If the thread is scratched. page 20 page 21 Dust has accumulated under the Remove...
Users Manual - English
Page 64
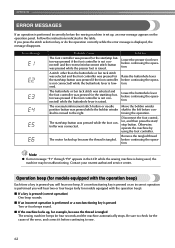
... you will hear one beep. Follow the instructions indicated in the LCD while the sewing machine is pressed you will hear two or four beeps (only for models equipped with the operation beep) Each time a key is being used, the machine may be malfunctioning. The reverse/reinforcement stitch button or needle position button was connected. Solution Lower the presser foot lever before continuing the operation. Lower the buttonhole lever before continuing the...
... you will hear one beep. Follow the instructions indicated in the LCD while the sewing machine is pressed you will hear two or four beeps (only for models equipped with the operation beep) Each time a key is being used, the machine may be malfunctioning. The reverse/reinforcement stitch button or needle position button was connected. Solution Lower the presser foot lever before continuing the operation. Lower the buttonhole lever before continuing the...
Users Manual - English
Page 65
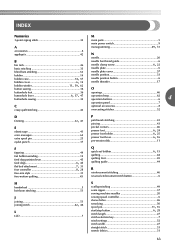
...point zigzag stitch 32 main parts 5 main power switch 9 A , monogramming 49 51 accessories 8 appliqués 42 N needle 20 B bar tack 46 basic stitching 33 blind hem stitching 34 bobbin 14 , bobbin case 14 57 , bobbin cover 6 14 bobbin , winder 11 59, 62 button sewing 38 needle bar thread guide 6 , needle clamp screw 6 22 needle plate 6 needle plate cover 57 needle position 33 needle position button 6 needle threader 17 O buttonhole foot 36 openings 46 buttonhole , lever 6 37, 47 buttonhole sewing 35 operation beep 62 operation buttons 6 4 operation...
...point zigzag stitch 32 main parts 5 main power switch 9 A , monogramming 49 51 accessories 8 appliqués 42 N needle 20 B bar tack 46 basic stitching 33 blind hem stitching 34 bobbin 14 , bobbin case 14 57 , bobbin cover 6 14 bobbin , winder 11 59, 62 button sewing 38 needle bar thread guide 6 , needle clamp screw 6 22 needle plate 6 needle plate cover 57 needle position 33 needle position button 6 needle threader 17 O buttonhole foot 36 openings 46 buttonhole , lever 6 37, 47 buttonhole sewing 35 operation beep 62 operation buttons 6 4 operation...


