
Parts Manual - English
Page 4
... and needle bar mechanism 3 C. Feed mechanism 5 D. Motor mechanism 39 U. Different parts list 45 Ga. If the symbol * is found in October 2004. 2. Lower shaft mechanism 13 G. column, refer to changes in design without prior notice. 3. Thread wiper mechanism 25 M. Control box mechanism 31 P2. Tension release mechanism 27 N. Gauge parts list 47 Wa. Accessories 41 Sp. Bobbin winder mechanism 19 K. Parts are circled by a dotted line 4. Lubrication 15 H. Work clamp...
... and needle bar mechanism 3 C. Feed mechanism 5 D. Motor mechanism 39 U. Different parts list 45 Ga. If the symbol * is found in October 2004. 2. Lower shaft mechanism 13 G. column, refer to changes in design without prior notice. 3. Thread wiper mechanism 25 M. Control box mechanism 31 P2. Tension release mechanism 27 N. Gauge parts list 47 Wa. Accessories 41 Sp. Bobbin winder mechanism 19 K. Parts are circled by a dotted line 4. Lubrication 15 H. Work clamp...

Parts Manual - English
Page 10
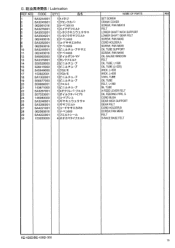
... 6 L1X8 X-FEED LEVER BUSH X-FEED LEVER T-LENGTH REGURATOR BLOCK ASSY SET SCREW, SOCKET (FT) M5X5 X-FEED GEAR BOLT, SOCKET M6X30 BEARING 10 ,LINER SET SCREW, SOCKET (FT) M6X6 Y-FEED RACK SHAFT Y-CONNECTING PIN THRUST WASHER RETAINING RING, E6 SET SCREW, SOCKET (FT) M6X6 FEED GEAR SET SCREW, SOCKET (FT) M6X6 ECCENTRIC SHAFT BALL BEARING, ARDIAL 608ZZ RETAINING RING, EXTERNAL C8 SET SCREW, SOCKET (FT) M6X6 FEED BAR SUPPORT PLATE BOLT, SOCKET M4X10 FEED BAR COVER SCREW,M4X8...
... 6 L1X8 X-FEED LEVER BUSH X-FEED LEVER T-LENGTH REGURATOR BLOCK ASSY SET SCREW, SOCKET (FT) M5X5 X-FEED GEAR BOLT, SOCKET M6X30 BEARING 10 ,LINER SET SCREW, SOCKET (FT) M6X6 Y-FEED RACK SHAFT Y-CONNECTING PIN THRUST WASHER RETAINING RING, E6 SET SCREW, SOCKET (FT) M6X6 FEED GEAR SET SCREW, SOCKET (FT) M6X6 ECCENTRIC SHAFT BALL BEARING, ARDIAL 608ZZ RETAINING RING, EXTERNAL C8 SET SCREW, SOCKET (FT) M6X6 FEED BAR SUPPORT PLATE BOLT, SOCKET M4X10 FEED BAR COVER SCREW,M4X8...

Parts Manual - English
Page 18
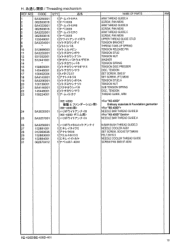
...1 7/ - "'FIJIDU / Lower shaft mechanism REF.NO CODE Q'TY AilA NAME OF PARTS RM 1 SA3226001 1 97:,...ADJUSTING STUD 0 RING, PW3 SHUTTLE RACE BASE ASSY SHUTTLE RACE THREAD GUIDE SCREW, M3X4 S-RACE BASE SETTING CLAW COMPRESSION SPRING WASHER, PLAIN S 3 SCREW, PAN M3X6 S-RACE BASE FELT FELT HOLDER SCREW, M3X5.5 FELT HOLDER SCREW, M3X4 FELT,T FELT, L.360 SPACER,A RETAINING RING SET SCREW, SOCKET (FT) M6X6 COLLAR RETAINING RING, E7 DRIVER,D BOLT, SOCKET M5X12 SHUTTLE RACE BASE BOBBIN CASE ASSY TENSION SPRING SCREW ANTI-SPIN SPRING BOBBIN SET SCREW COLLAR,R SET SCREW, SOCKET (FT) M5X5 SHUTTLE HOOK...
...1 7/ - "'FIJIDU / Lower shaft mechanism REF.NO CODE Q'TY AilA NAME OF PARTS RM 1 SA3226001 1 97:,...ADJUSTING STUD 0 RING, PW3 SHUTTLE RACE BASE ASSY SHUTTLE RACE THREAD GUIDE SCREW, M3X4 S-RACE BASE SETTING CLAW COMPRESSION SPRING WASHER, PLAIN S 3 SCREW, PAN M3X6 S-RACE BASE FELT FELT HOLDER SCREW, M3X5.5 FELT HOLDER SCREW, M3X4 FELT,T FELT, L.360 SPACER,A RETAINING RING SET SCREW, SOCKET (FT) M6X6 COLLAR RETAINING RING, E7 DRIVER,D BOLT, SOCKET M5X12 SHUTTLE RACE BASE BOBBIN CASE ASSY TENSION SPRING SCREW ANTI-SPIN SPRING BOBBIN SET SCREW COLLAR,R SET SCREW, SOCKET (FT) M5X5 SHUTTLE HOOK...
Parts Manual - English
Page 20
SET SCREW CRANK COVER SCREW, PAN M6X10 FELT LOWER SHAFT WICK SUPPORT LOWER SHAFT GEAR FELT SCREW, PAN M4X6 CORD HOLDER,A SCREW, PAN M6X8 OIL TUBE SUPPORT SCREW, PAN M4X6 OIL GAUGE WINDOW FELT OIL TUBE, L=320 OIL TUBE (L=225) WICK, L=300 WICK, L=500 VINYL TUBE OIL TUBE FELT, L=360 OIL TUBE X-FEED LEVER FELT OIL FEEDING PIPE, S CORD BUSH GEAR WICK SUPPORT GEAR FELT CORD HOLDER,B SCREW,PAN M6X8 FELT S-RACE BASE FELT KE-430D/BE-438D-350 ø...
SET SCREW CRANK COVER SCREW, PAN M6X10 FELT LOWER SHAFT WICK SUPPORT LOWER SHAFT GEAR FELT SCREW, PAN M4X6 CORD HOLDER,A SCREW, PAN M6X8 OIL TUBE SUPPORT SCREW, PAN M4X6 OIL GAUGE WINDOW FELT OIL TUBE, L=320 OIL TUBE (L=225) WICK, L=300 WICK, L=500 VINYL TUBE OIL TUBE FELT, L=360 OIL TUBE X-FEED LEVER FELT OIL FEEDING PIPE, S CORD BUSH GEAR WICK SUPPORT GEAR FELT CORD HOLDER,B SCREW,PAN M6X8 FELT S-RACE BASE FELT KE-430D/BE-438D-350 ø...
Parts Manual - English
Page 22
... 1 7-1..-fl-tiT ARM THREAD GUIDE,A SCREW, PAN M5X6 ARM THREAD GUIDE,B SCREW, PAN M5X6 ARM THREAD GUIDE,C SCREW, PAN M5X6 UPPER THREAD GUIDE STUD TENSION BRACKET THREAD TAKE-UP SPRING TENSION RELEASE PIN TENSION STUD TENSION NUT WASHER TENSION SPRING TENSION DISC PRESSER DISC, TENSION SET SCREW, SM3.57 SET SCREW, (FT) M6X6 TENSION STUD,A TENSION NUT SUB TENSION SPRING DISC, TENSION THREAD GUIDE, ARM 24 SA3635001 1 /V)fir)-(1-7>t-fB NEEDLE BAR THREAD GUIDE,B t-(A NEEDLE BAR THREAD GUIDE,A 26 SA3258001 1 /\IJAir),(9)i,D4F-7>1-4 N-BAR BUSH THREAD GUIDE,D 27 152881001 1 i*i.,-04...
... 1 7-1..-fl-tiT ARM THREAD GUIDE,A SCREW, PAN M5X6 ARM THREAD GUIDE,B SCREW, PAN M5X6 ARM THREAD GUIDE,C SCREW, PAN M5X6 UPPER THREAD GUIDE STUD TENSION BRACKET THREAD TAKE-UP SPRING TENSION RELEASE PIN TENSION STUD TENSION NUT WASHER TENSION SPRING TENSION DISC PRESSER DISC, TENSION SET SCREW, SM3.57 SET SCREW, (FT) M6X6 TENSION STUD,A TENSION NUT SUB TENSION SPRING DISC, TENSION THREAD GUIDE, ARM 24 SA3635001 1 /V)fir)-(1-7>t-fB NEEDLE BAR THREAD GUIDE,B t-(A NEEDLE BAR THREAD GUIDE,A 26 SA3258001 1 /\IJAir),(9)i,D4F-7>1-4 N-BAR BUSH THREAD GUIDE,D 27 152881001 1 i*i.,-04...

Instruction Manual - English
Page 4
... problems with correct operation. Sources of the control box. Any fluctuations in severe injury. The ambient temperature should be within ±10% of children. All cords should be secured at least 5 minutes after tilting back the machine head, do not get into your eyes or onto your Brother dealer or a qualified electrician for the sewing machine's power consumption. If using a work...
... problems with correct operation. Sources of the control box. Any fluctuations in severe injury. The ambient temperature should be within ±10% of children. All cords should be secured at least 5 minutes after tilting back the machine head, do not get into your eyes or onto your Brother dealer or a qualified electrician for the sewing machine's power consumption. If using a work...

Instruction Manual - English
Page 5
... a needle breaks, parts of the sewing machine should only be carried out by Brother. CAUTION Sewing This sewing machine should only be used by the warranty. Cleaning Turn off the power switch at the following times, otherwise the machine may operate if the foot switch is depressed by mistake, which could result in machine operation which could result in injury. • When threading the needle • When replacing the needle and bobbin •...
... a needle breaks, parts of the sewing machine should only be carried out by Brother. CAUTION Sewing This sewing machine should only be used by the warranty. Cleaning Turn off the power switch at the following times, otherwise the machine may operate if the foot switch is depressed by mistake, which could result in machine operation which could result in injury. • When threading the needle • When replacing the needle and bobbin •...
Instruction Manual - English
Page 7
... and Y-scale 33 5-4. Using user programs 42 6-7. MAINTENANCE 50 8-1. Applying grease (Work clamp: KE-430D 52 8-8. Installing the bobbin case 26 4-5. Thread nipper device 28 4-7. Setting the sewing speed 33 5-5. Draining the oil 51 8-4. TABLE OF ERROR CODES 55 KE-430D, BE-438D Installing the operation panel 14 3-6. Connecting the ground wire 18 3-12. Upper thread tension 27 4-6. Using the production counter 41 6-6. Cleaning the control box air inlet ports ...........51 8-3. SPECIFICATIONS 2 2-1. USING THE OPERATION PANEL (BASIC OPERATIONS 31...
... and Y-scale 33 5-4. Using user programs 42 6-7. MAINTENANCE 50 8-1. Applying grease (Work clamp: KE-430D 52 8-8. Installing the bobbin case 26 4-5. Thread nipper device 28 4-7. Setting the sewing speed 33 5-5. Draining the oil 51 8-4. TABLE OF ERROR CODES 55 KE-430D, BE-438D Installing the operation panel 14 3-6. Connecting the ground wire 18 3-12. Upper thread tension 27 4-6. Using the production counter 41 6-6. Cleaning the control box air inlet ports ...........51 8-3. SPECIFICATIONS 2 2-1. USING THE OPERATION PANEL (BASIC OPERATIONS 31...
Instruction Manual - English
Page 9
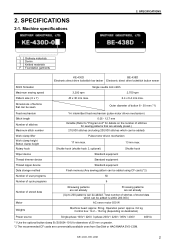
...-438D Electronic direct drive lockstitch bar tacker Electronic direct drive lockstitch button sewer Stitch formation Maximum sewing speed Pattern size (X x Y) Single needle lock stitch 3,200 rpm 2,700 rpm 40 x 30 mm max. 6.4 x 6.4 mm max. Shuttle hook (shuttle hook 2, optional) Shuttle hook Wiper device Standard equipment Thread trimmer device Standard equipment Thread nipper device Standard equipment Data storage method Flash memory (Any sewing pattern can be added using CF card) (*2) Number of user programs 50 Number of cycle programs 9 Number...
...-438D Electronic direct drive lockstitch bar tacker Electronic direct drive lockstitch button sewer Stitch formation Maximum sewing speed Pattern size (X x Y) Single needle lock stitch 3,200 rpm 2,700 rpm 40 x 30 mm max. 6.4 x 6.4 mm max. Shuttle hook (shuttle hook 2, optional) Shuttle hook Wiper device Standard equipment Thread trimmer device Standard equipment Thread nipper device Standard equipment Data storage method Flash memory (Any sewing pattern can be added using CF card) (*2) Number of user programs 50 Number of cycle programs 9 Number...
Instruction Manual - English
Page 10
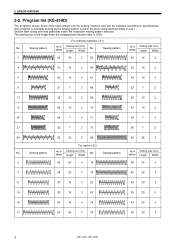
... the work clamp and feed plate in size.) Use the work clamp and feed plate that match the respective sewing pattern selected. of Tacking size (mm) stitches Length Width 2 42 20 3 18 56 24 3 3 35 20 3 19 64 24 3 6 30 16 3 62 42 20 3 14 35 16 3 63 35 20 3 16 43 16 3 78 43 20 3 17 42 24 3 79 36 20 3 3 KE-430D, BE-438D
... the work clamp and feed plate in size.) Use the work clamp and feed plate that match the respective sewing pattern selected. of Tacking size (mm) stitches Length Width 2 42 20 3 18 56 24 3 3 35 20 3 19 64 24 3 6 30 16 3 62 42 20 3 14 35 16 3 63 35 20 3 16 43 16 3 78 43 20 3 17 42 24 3 79 36 20 3 3 KE-430D, BE-438D
Instruction Manual - English
Page 14
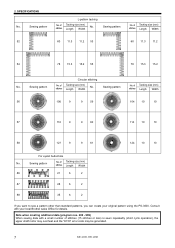
... eyelet buttonhole No. of stitches (15 stitches or less) is sewn repeatedly (short cycle operation), the upper shaft motor may overheat and the "E150" error code may be generated. 7 KE-430D, BE-438D Note when creating additional data (program nos. 200 - 999) When sewing data with your original pattern using the PS-3000. of Tacking size (mm) stitches Length Width No. Sewing pattern No. of Tacking size (mm) stitches Length...
... eyelet buttonhole No. of stitches (15 stitches or less) is sewn repeatedly (short cycle operation), the upper shaft motor may overheat and the "E150" error code may be generated. 7 KE-430D, BE-438D Note when creating additional data (program nos. 200 - 999) When sewing data with your original pattern using the PS-3000. of Tacking size (mm) stitches Length Width No. Sewing pattern No. of Tacking size (mm) stitches Length...
Instruction Manual - English
Page 15
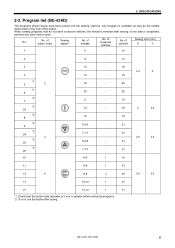
... not have been preset into the sewing machine. No. of one side is completed, and then the other side is sewn. of threads No. Program list (BE-438D) The programs shown below have crossover stitches, the thread is trimmed after sewing of stitches Sewing size (mm) X Y 1 6...button hole diameter is available as long as the needle drops down in the hole of crossover stitches No. No. of button holes Sewing pattern No. Any program is 2 mm or greater before using the programs. *2 Do not use the button lifter spring. of the button. KE-430D, BE-438D 8 SPECIFICATIONS...
... not have been preset into the sewing machine. No. of one side is completed, and then the other side is sewn. of threads No. Program list (BE-438D) The programs shown below have crossover stitches, the thread is trimmed after sewing of stitches Sewing size (mm) X Y 1 6...button hole diameter is available as long as the needle drops down in the hole of crossover stitches No. No. of button holes Sewing pattern No. Any program is 2 mm or greater before using the programs. *2 Do not use the button lifter spring. of the button. KE-430D, BE-438D 8 SPECIFICATIONS...

Instruction Manual - English
Page 30
... power switch before installing the needle, otherwise the machine may operate if the foot switch is depressed by mistake, which could result in a straight line as far as shown in the illustration below. * When using threading mode for threading, the tension discs (1) will go, making sure that the thread can be threaded more easily. (Refer to following page.) [When using the liquid cooling tank] [Two holes...
... power switch before installing the needle, otherwise the machine may operate if the foot switch is depressed by mistake, which could result in a straight line as far as shown in the illustration below. * When using threading mode for threading, the tension discs (1) will go, making sure that the thread can be threaded more easily. (Refer to following page.) [When using the liquid cooling tank] [Two holes...
Instruction Manual - English
Page 32
... TENSION WIND key (3), depress the foot switch to the home position. 5. Check that the needle is completed, the bobbin presser arm (2) will start again.) 7. 4. Release the TENSION WIND key (3) after the machine starts operating, and keep depressing the foot switch until the lower thread stops being wound onto the bobbin. (If you release the foot switch before winding is complete, and then depress it upward. Case B KE-430D, BE-438D Remove the bobbin, hook...
... TENSION WIND key (3), depress the foot switch to the home position. 5. Check that the needle is completed, the bobbin presser arm (2) will start again.) 7. 4. Release the TENSION WIND key (3) after the machine starts operating, and keep depressing the foot switch until the lower thread stops being wound onto the bobbin. (If you release the foot switch before winding is complete, and then depress it upward. Case B KE-430D, BE-438D Remove the bobbin, hook...
Instruction Manual - English
Page 33
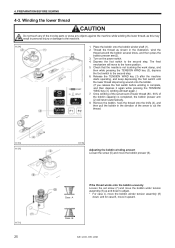
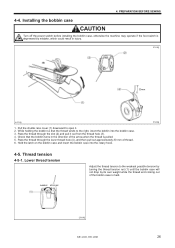
... thread winds to the right, insert the bobbin into the rotary hook. 2535Q 4-5. Thread tension 4-5-1. Pass the thread through the lever thread hole (4), and then pull out approximately 30 mm of the bobbin case is pulled. 5. Pass the thread through the slot (2) and pull it . 2. Lower thread tension weaker stronger Adjust the thread tension to open it out from the thread hole (3). 4. Installing the bobbin case CAUTION Turn off the power switch before installing the bobbin case, otherwise the machine may operate...
... thread winds to the right, insert the bobbin into the rotary hook. 2535Q 4-5. Thread tension 4-5-1. Pass the thread through the lever thread hole (4), and then pull out approximately 30 mm of the bobbin case is pulled. 5. Pass the thread through the slot (2) and pull it . 2. Lower thread tension weaker stronger Adjust the thread tension to open it out from the thread hole (3). 4. Installing the bobbin case CAUTION Turn off the power switch before installing the bobbin case, otherwise the machine may operate...
Instruction Manual - English
Page 35
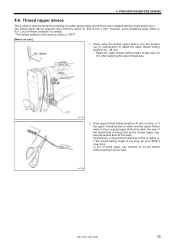
... seam at times when skipped stitches might easily occur. Furthermore, if using the thread nipper device, turn the tension nut (1) (sub-tension) to adjust the upper thread trailing length to 35 - 38 mm. * Adjust the upper thread trailing length to stop the thread from pulling out at the sewing start, and at the first stitch, the end of the thread that is #30 or higher or if the thread trailing length is set...
... seam at times when skipped stitches might easily occur. Furthermore, if using the thread nipper device, turn the tension nut (1) (sub-tension) to adjust the upper thread trailing length to 35 - 38 mm. * Adjust the upper thread trailing length to stop the thread from pulling out at the sewing start, and at the first stitch, the end of the thread that is #30 or higher or if the thread trailing length is set...

Instruction Manual - English
Page 38
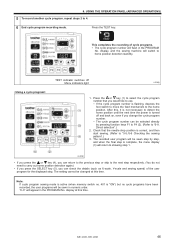
... each operation panel item (1) Power indicator Illuminates when the power is turned on. (2) CAUTION indicator Illuminates when an error occurs. (3) RESET key Used to reset errors. (4) TEST key Used to start test mode. (5) TEST indicator Illuminates when the TEST key (4) has been pressed. (6) THREAD/CLAMP key Used to start threading mode or work clamp height setting mode. (7) THREAD/CLAMP indicator Illuminates when the THREAD/CLAMP key (6) has been pressed. (8) TENSION/WIND key Used to wind the lower thread. (9) TENSION/WIND...
... each operation panel item (1) Power indicator Illuminates when the power is turned on. (2) CAUTION indicator Illuminates when an error occurs. (3) RESET key Used to reset errors. (4) TEST key Used to start test mode. (5) TEST indicator Illuminates when the TEST key (4) has been pressed. (6) THREAD/CLAMP key Used to start threading mode or work clamp height setting mode. (7) THREAD/CLAMP indicator Illuminates when the THREAD/CLAMP key (6) has been pressed. (8) TENSION/WIND key Used to wind the lower thread. (9) TENSION/WIND...
Instruction Manual - English
Page 46
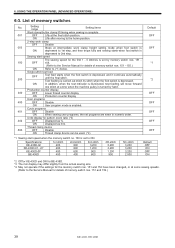
... %. ON Lifts after moving to the Service Manual for pattern zoom ratio (*3) 402 OFF Displayed as mm. Thread clamp device 500 OFF Disable ON Thread clamp device can be used. (*4) Default OFF OFF *1 *2 OFF OFF OFF OFF OFF *1 Sewing start speed The sewing speed for the first 1 - 5 stitches is set programs are sewn in numeric order. USING THE OPERATION PANEL (ADVANCED OPERATIONS) 6-3. Sewing start speed when the memory switch no. 100...
... %. ON Lifts after moving to the Service Manual for pattern zoom ratio (*3) 402 OFF Displayed as mm. Thread clamp device 500 OFF Disable ON Thread clamp device can be used. (*4) Default OFF OFF *1 *2 OFF OFF OFF OFF OFF *1 Sewing start speed The sewing speed for the first 1 - 5 stitches is set programs are sewn in numeric order. USING THE OPERATION PANEL (ADVANCED OPERATIONS) 6-3. Sewing start speed when the memory switch no. 100...
Instruction Manual - English
Page 53
... have been recorded, the user programs will appear in the PROGRAM No. display, and the sewing machine will switch to the home position. Press the or key (1) to select the cycle program number that the needle drop position is complete, the menu display (3) will flash in numeric order. KE-430D, BE-438D 46 USING THE OPERATION PANEL (ADVANCED OPERATIONS) 5 To record another...
... have been recorded, the user programs will appear in the PROGRAM No. display, and the sewing machine will switch to the home position. Press the or key (1) to select the cycle program number that the needle drop position is complete, the menu display (3) will flash in numeric order. KE-430D, BE-438D 46 USING THE OPERATION PANEL (ADVANCED OPERATIONS) 5 To record another...
Instruction Manual - English
Page 64
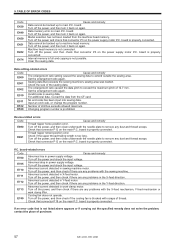
... upper thread trailing length is properly connected. Turn off the power, and then turn it back on again. Turn off the power, and then clean underneath the needle plate to extend outside the sewing area. board is not possible. TABLE OF ERROR CODES Code E430 E440 E450 E451 E452 E474 Cause and remedy Data cannot be backed up to remove any problems with the X-feed mechanism, Y-feed...
... upper thread trailing length is properly connected. Turn off the power, and then turn it back on again. Turn off the power, and then clean underneath the needle plate to extend outside the sewing area. board is not possible. TABLE OF ERROR CODES Code E430 E440 E450 E451 E452 E474 Cause and remedy Data cannot be backed up to remove any problems with the X-feed mechanism, Y-feed...


