
Parts Manual - English
Page 4
... 35 S. Warning labels 50 Index 51 Upper shaft and needle bar mechanism 3 C. Power supply equipment mechanism 37 T. Threading mechanism 17 J. Gauge parts list 47 Wa. Machine body 1 B. If the symbol * is found in design without prior notice. 3. Thread trimmer mechanism 21 L. Foot switch pedal mechanism 39 Z.
... 35 S. Warning labels 50 Index 51 Upper shaft and needle bar mechanism 3 C. Power supply equipment mechanism 37 T. Threading mechanism 17 J. Gauge parts list 47 Wa. Machine body 1 B. If the symbol * is found in design without prior notice. 3. Thread trimmer mechanism 21 L. Foot switch pedal mechanism 39 Z.
Parts Manual - English
Page 5
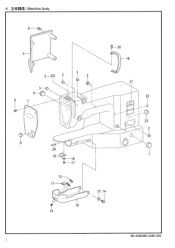
Ii*Pat*/ Machine body 6 ( 0 0 5 0 0 2 -ED 3-® 4 --C 7 3 2 1 5' 20 19 21 22 0 23 frol 3 8 24 16 cm-18 g--17 13 11 10 12 15 14 O KE-430D/BE-438D-050 ø A .
Ii*Pat*/ Machine body 6 ( 0 0 5 0 0 2 -ED 3-® 4 --C 7 3 2 1 5' 20 19 21 22 0 23 frol 3 8 24 16 cm-18 g--17 13 11 10 12 15 14 O KE-430D/BE-438D-050 ø A .

Parts Manual - English
Page 6
...TAKE-UP COVER 20 062401006 1 ti . 21 SA2040001 1 5' 21 SA2041001 1 5/ LABEL, GROUNDING RUBBER CAP, 20.8 DOWEL PIN KE-430D/BE-438D-050 ù NUT PLATE 14 SA3265001 2 Y: .;8-2 SHOULDER SCREW,8-2 15 109239002 2 t:iii.*.-TIS* WASHER, WAVE SPRING 16 SA3266001 1 A-A-t7t/i-7`. ...COVER HOOK U 17 062300416 2 -f -' 3X4 SCREW, PAN M3X4 18 025030236 2 L-5- 1)i/• 3-r,3 WASHER, PLAIN M 3 19 SA3200101 1 5->E>t/i- Ift*I3M / Machine body REF.NO CODE Q'TY NA NAME OF PARTS RM 1 140392009 1 A-4/1,79 OIL CAP 2 117934001 3 j .L.t>13.5 RUBBER CAP, 13.5 3 104821001 5 ...
...TAKE-UP COVER 20 062401006 1 ti . 21 SA2040001 1 5' 21 SA2041001 1 5/ LABEL, GROUNDING RUBBER CAP, 20.8 DOWEL PIN KE-430D/BE-438D-050 ù NUT PLATE 14 SA3265001 2 Y: .;8-2 SHOULDER SCREW,8-2 15 109239002 2 t:iii.*.-TIS* WASHER, WAVE SPRING 16 SA3266001 1 A-A-t7t/i-7`. ...COVER HOOK U 17 062300416 2 -f -' 3X4 SCREW, PAN M3X4 18 025030236 2 L-5- 1)i/• 3-r,3 WASHER, PLAIN M 3 19 SA3200101 1 5->E>t/i- Ift*I3M / Machine body REF.NO CODE Q'TY NA NAME OF PARTS RM 1 140392009 1 A-4/1,79 OIL CAP 2 117934001 3 j .L.t>13.5 RUBBER CAP, 13.5 3 104821001 5 ...

Parts Manual - English
Page 42
.... ar,4 WASHER,PLAIN M4 22 146202000 1 t -fm>91) V/ CORD HOLDER, 6N 23 0A5401006 2 +1-'W71,.-4x1ODB SCREW, PAN (S/P WASHER) M4X10 24 SA3481001 1 F-r2j /SW9Z-1 SWITCH ASSY,MACHINE HEAD 25 0A5301605 2 -i-/- 4i-9:7:13X16DB SCREW,PAN(S/P WASHE) M3X16 26 SA3523101 1 F-1'27.17-> ->V3- 7--syI-9; t- HEAD DETECTOR UNIT,ASSY 27 0A5401006 2 A-J- 1f-9:-.i4X1ODB SCREW, PAN....NO CODE Q'TY NA NAME OF PARTS RM 1 SA3465001 1 ii/I ,9. #12 CORD HOLDER, #12 32 0A5401006 2 +t ,W9Z-4X1ODB SCREW, PAN (S/P WASHER) M4X10 KE-430D/BE-438D-515 úÿ
.... ar,4 WASHER,PLAIN M4 22 146202000 1 t -fm>91) V/ CORD HOLDER, 6N 23 0A5401006 2 +1-'W71,.-4x1ODB SCREW, PAN (S/P WASHER) M4X10 24 SA3481001 1 F-r2j /SW9Z-1 SWITCH ASSY,MACHINE HEAD 25 0A5301605 2 -i-/- 4i-9:7:13X16DB SCREW,PAN(S/P WASHE) M3X16 26 SA3523101 1 F-1'27.17-> ->V3- 7--syI-9; t- HEAD DETECTOR UNIT,ASSY 27 0A5401006 2 A-J- 1f-9:-.i4X1ODB SCREW, PAN....NO CODE Q'TY NA NAME OF PARTS RM 1 SA3465001 1 ii/I ,9. #12 CORD HOLDER, #12 32 0A5401006 2 +t ,W9Z-4X1ODB SCREW, PAN (S/P WASHER) M4X10 KE-430D/BE-438D-515 úÿ
Instruction Manual - English
Page 3
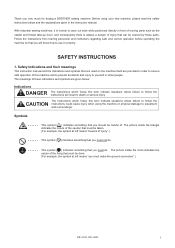
...thing that must be done. (For example, the symbol at left means "you must make the ground connection".) KE-430D, BE-438D i The meanings of injury that can be caused by these indications and symbols are provided in the instruction manual. Indications DANGER The instructions... correctly. Safety indications and their meanings This instruction manual and the indications and symbols that you very much for buying a BROTHER sewing machine. Symbols This symbol ( ) indicates something that you must be taken. (For example, the symbol at left means "beware of injury".) This...
...thing that must be done. (For example, the symbol at left means "you must make the ground connection".) KE-430D, BE-438D i The meanings of injury that can be caused by these indications and symbols are provided in the instruction manual. Indications DANGER The instructions... correctly. Safety indications and their meanings This instruction manual and the indications and symbols that you very much for buying a BROTHER sewing machine. Symbols This symbol ( ) indicates something that you must be taken. (For example, the symbol at left means "beware of injury".) This...

Instruction Manual - English
Page 4
... side or the pulley side from sources of the rated voltage for the sewing machine's power consumption. Be sure to its original position. Furthermore, do not get into your eyes or onto your Brother dealer or a qualified electrician for any devices. 2. Touching areas where high voltages... technician. Do not connect the power cord until installation is depressed by two or more people. Hold the machine head with correct operation. ii KE-430D, BE-438D Furthermore, after turning off the power and disconnect the power cord from the wall outlet before opening the face...
... side or the pulley side from sources of the rated voltage for the sewing machine's power consumption. Be sure to its original position. Furthermore, do not get into your eyes or onto your Brother dealer or a qualified electrician for any devices. 2. Touching areas where high voltages... technician. Do not connect the power cord until installation is depressed by two or more people. Hold the machine head with correct operation. ii KE-430D, BE-438D Furthermore, after turning off the power and disconnect the power cord from the wall outlet before opening the face...

Instruction Manual - English
Page 5
... drink the oil or eat the grease under any of the electrical system. Then contact your nearest Brother dealer or a qualified technician. If the machine develops a problem, contact your nearest Brother dealer or a qualified technician. Cleaning Turn off the power switch and disconnect the power cord from ... switch needs to be left on when carrying out some adjustment, be covered by the warranty. Any problems in machine operation which may result. KE-430D, BE-438D iii If goggles are noticed, immediately turn off the power switch at the following times, otherwise the...
... drink the oil or eat the grease under any of the electrical system. Then contact your nearest Brother dealer or a qualified technician. If the machine develops a problem, contact your nearest Brother dealer or a qualified technician. Cleaning Turn off the power switch and disconnect the power cord from ... switch needs to be left on when carrying out some adjustment, be covered by the warranty. Any problems in machine operation which may result. KE-430D, BE-438D iii If goggles are noticed, immediately turn off the power switch at the following times, otherwise the...
Instruction Manual - English
Page 6
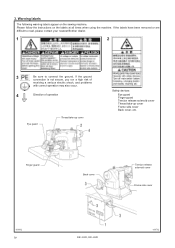
... Thread take-up cover Frame side cover Back cover, etc. If the labels have been removed or are difficult to read, please contact your nearest Brother dealer. 1 2 3 Be sure to connect the ground. Finger guard Back cover Tension release solenoid cover Frame side cover 4399Q iv KE-430D, BE...
... Thread take-up cover Frame side cover Back cover, etc. If the labels have been removed or are difficult to read, please contact your nearest Brother dealer. 1 2 3 Be sure to connect the ground. Finger guard Back cover Tension release solenoid cover Frame side cover 4399Q iv KE-430D, BE...
Instruction Manual - English
Page 7
...needle 23 4-2. Thread tension 26 4-5-1. Adjusting the button clamp (BE-438D 30 4-9. Setting the program number 33 5-3. SEWING 49 8. Checking the needle 51 8-6. SPECIFICATIONS 2 2-1. Installing the machine head 13 3-5. Installing the treadle unit 14 3-7. Connecting the cords... bobbin case 26 4-5. Checking the sewing pattern (KE-430D) ........34 5-6. Program list (BE-438D 8 3. Using the lower thread counter 40 6-5. Direct selection 48 6-9. Machine specifications 2 2-2. Connecting the power cord 21 3-15. Cleaning the rotary hook 50 8-2. Lubrication 51...
...needle 23 4-2. Thread tension 26 4-5-1. Adjusting the button clamp (BE-438D 30 4-9. Setting the program number 33 5-3. SEWING 49 8. Checking the needle 51 8-6. SPECIFICATIONS 2 2-1. Installing the machine head 13 3-5. Installing the treadle unit 14 3-7. Connecting the cords... bobbin case 26 4-5. Checking the sewing pattern (KE-430D) ........34 5-6. Program list (BE-438D 8 3. Using the lower thread counter 40 6-5. Direct selection 48 6-9. Machine specifications 2 2-2. Connecting the power cord 21 3-15. Cleaning the rotary hook 50 8-2. Lubrication 51...
Instruction Manual - English
Page 9
...of cycle programs 9 Number of stored data Motor 89 sewing patterns are set already (Up to 200 patterns can be added. Machine specifications 2. Total number of stitches of 20 mm or greater. *2 The recommended CF cards are set already 53 sewing patterns... Rotary hook Pulse-motor driven mechanism 17 mm max. 13 mm max. KE-430D, BE-438D 2 SPECIFICATIONS 1 Ordinary materials 2 Denim 7 Knitted materials F Foundation garments KE-430D BE-438D Electronic direct drive lockstitch bar tacker Electronic direct drive lockstitch button sewer Stitch formation Maximum sewing speed...
...of cycle programs 9 Number of stored data Motor 89 sewing patterns are set already (Up to 200 patterns can be added. Machine specifications 2. Total number of stitches of 20 mm or greater. *2 The recommended CF cards are set already 53 sewing patterns... Rotary hook Pulse-motor driven mechanism 17 mm max. 13 mm max. KE-430D, BE-438D 2 SPECIFICATIONS 1 Ordinary materials 2 Denim 7 Knitted materials F Foundation garments KE-430D BE-438D Electronic direct drive lockstitch bar tacker Electronic direct drive lockstitch button sewer Stitch formation Maximum sewing speed...
Instruction Manual - English
Page 10
... 16 3 62 42 20 3 14 35 16 3 63 35 20 3 16 43 16 3 78 43 20 3 17 42 24 3 79 36 20 3 3 KE-430D, BE-438D of Tacking size (mm) stitches Length Width 1 42 16 2 65 43 16 2 4 31 16 2 66 32 16 2 5 29 10 2 67 30 10 2 8 21 7 2 68 22... and feed plate that match the respective sewing pattern selected. 2. SPECIFICATIONS 2-2. Program list (KE-430D) The programs shown below have been preset into the sewing machine and can be selected according to specifications. (Any program is available as long as the sewing pattern is 100%.
... 16 3 62 42 20 3 14 35 16 3 63 35 20 3 16 43 16 3 78 43 20 3 17 42 24 3 79 36 20 3 3 KE-430D, BE-438D of Tacking size (mm) stitches Length Width 1 42 16 2 65 43 16 2 4 31 16 2 66 32 16 2 5 29 10 2 67 30 10 2 8 21 7 2 68 22... and feed plate that match the respective sewing pattern selected. 2. SPECIFICATIONS 2-2. Program list (KE-430D) The programs shown below have been preset into the sewing machine and can be selected according to specifications. (Any program is available as long as the sewing pattern is 100%.
Instruction Manual - English
Page 15
... 3 25 3.4 3.4 13 10-10 1 27 27 12-12 1 31 *1 Check that do not have been preset into the sewing machine. of crossover stitches No. of the button. Program list (BE-438D) The programs shown below have crossover stitches, the thread is trimmed after sewing of one side is completed, and then... the other side is sewn. KE-430D, BE-438D 8 2. Any program is 2 mm or greater before using the programs. *2 Do not use the button lifter spring. When sewing programs that the...
... 3 25 3.4 3.4 13 10-10 1 27 27 12-12 1 31 *1 Check that do not have been preset into the sewing machine. of crossover stitches No. of the button. Program list (BE-438D) The programs shown below have crossover stitches, the thread is trimmed after sewing of one side is completed, and then... the other side is sewn. KE-430D, BE-438D 8 2. Any program is 2 mm or greater before using the programs. *2 Do not use the button lifter spring. When sewing programs that the...
Instruction Manual - English
Page 18
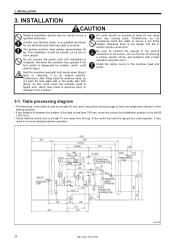
...machine head and motor. 3-1. If the control box and the leg are too close together, it too firmly staples, otherwise there is depressed by mistake, which could occur. INSTALLATION CAUTION Machine... installation should be carried out by two or more people. Furthermore, after tilting back the machine... head, do not excessively bend the cable or secure it may also occur. The sewing machine...machine head with correct operation may result in incorrect sewing machine operation. 3625M 11 KE-430D, BE-438D...it to the machine. If the ground...of the sewing machine. • ...
...machine head and motor. 3-1. If the control box and the leg are too close together, it too firmly staples, otherwise there is depressed by mistake, which could occur. INSTALLATION CAUTION Machine... installation should be carried out by two or more people. Furthermore, after tilting back the machine... head, do not excessively bend the cable or secure it may also occur. The sewing machine...machine head with correct operation may result in incorrect sewing machine operation. 3625M 11 KE-430D, BE-438D...it to the machine. If the ground...of the sewing machine. • ...

Instruction Manual - English
Page 20
...] (5) Bolts [4 pcs] (6) Plain washers [4 pcs] (7) Spring washers [4 pcs] (8) Nuts [4 pcs] (9) Head spring (10)Head rest Note: • Check that the machine head switch is turned on top of the oil pan and the rubber cushions. INSTALLATION 3-4. Figure1 13 4407Q KE-430D, BE...-438D Installing the machine head Pulse motor Approx. 20mm Approx. 20mm (1) Pins [2 pcs] (2) Set screws [2 pcs] (3) Rubber cushion assembly [2 pcs] Place the machine head gently on as shown in Figure 1. • Tap the head rest ...
...] (5) Bolts [4 pcs] (6) Plain washers [4 pcs] (7) Spring washers [4 pcs] (8) Nuts [4 pcs] (9) Head spring (10)Head rest Note: • Check that the machine head switch is turned on top of the oil pan and the rubber cushions. INSTALLATION 3-4. Figure1 13 4407Q KE-430D, BE...-438D Installing the machine head Pulse motor Approx. 20mm Approx. 20mm (1) Pins [2 pcs] (2) Set screws [2 pcs] (3) Rubber cushion assembly [2 pcs] Place the machine head gently on as shown in Figure 1. • Tap the head rest ...
Instruction Manual - English
Page 22
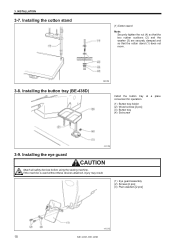
... 3-9. Installing the eye guard CAUTION Attach all safety devices before using the sewing machine. If the machine is used without these devices attached, injury may result. (1) Eye guard assembly (2) Screws [2 pcs] (3) Plain washers [2 pcs] 4411Q 15 KE-430D, BE-438D Installing the cotton stand (1) Cotton stand Note: Securely tighten the nut (4) so that...
... 3-9. Installing the eye guard CAUTION Attach all safety devices before using the sewing machine. If the machine is used without these devices attached, injury may result. (1) Eye guard assembly (2) Screws [2 pcs] (3) Plain washers [2 pcs] 4411Q 15 KE-430D, BE-438D Installing the cotton stand (1) Cotton stand Note: Securely tighten the nut (4) so that...

Instruction Manual - English
Page 23
... P4 (P-ENC) P5 (FOOT) P6 (PANEL) P8 (HEAD-SW) P12 (TPK-SEN) Cord clamps (3) (3) (3) (3) (3) (4) (4), (5) KE-430D, BE-438D 16 Loosen the two screws (1), and then open the cord presser plate (2) in the direction of the white arrow and pass the cord bundle through ... encoder [5-pin] Blue Work clamp encoder [5-pin] Black Foot switch [10-pin] Operation panel [8-pin] Machine head switch [3-pin] Thread clamp sensor [6-pin] Connection location on main P. Gently tilt back the machine head. 2. Securely connect the connectors as indicated in the work table. 3. C. Connecting the cords < ...
... P4 (P-ENC) P5 (FOOT) P6 (PANEL) P8 (HEAD-SW) P12 (TPK-SEN) Cord clamps (3) (3) (3) (3) (3) (4) (4), (5) KE-430D, BE-438D 16 Loosen the two screws (1), and then open the cord presser plate (2) in the direction of the white arrow and pass the cord bundle through ... encoder [5-pin] Blue Work clamp encoder [5-pin] Black Foot switch [10-pin] Operation panel [8-pin] Machine head switch [3-pin] Thread clamp sensor [6-pin] Connection location on main P. Gently tilt back the machine head. 2. Securely connect the connectors as indicated in the work table. 3. C. Connecting the cords < ...

Instruction Manual - English
Page 24
3. C. black to connectors with the same color (e.g. Connectors Machine head memory [7-pin] Upper shaft motor [3-pin] Synchronizer [14-pin] Connectors Work clamp pulse motor [4-pin] Black Thread clamp pulse motor [6-pin] Thread trimmer solenoid [6-... clamp pulse motor harnesses so that no foreign objects, insects or small animals can get pulled, and then gently return the machine head to its original position. 17 KE-430D, BE-438D board. 4113M 4415Q 5. Close the cord presser plate (2) in the illustration depending on the version of the white arrow, and...
3. C. black to connectors with the same color (e.g. Connectors Machine head memory [7-pin] Upper shaft motor [3-pin] Synchronizer [14-pin] Connectors Work clamp pulse motor [4-pin] Black Thread clamp pulse motor [6-pin] Thread trimmer solenoid [6-... clamp pulse motor harnesses so that no foreign objects, insects or small animals can get pulled, and then gently return the machine head to its original position. 17 KE-430D, BE-438D board. 4113M 4415Q 5. Close the cord presser plate (2) in the illustration depending on the version of the white arrow, and...

Instruction Manual - English
Page 25
...eight screws. INSTALLATION 3-11. Check that the ground connections are not clamped by the cover at this time. 4416Q KE-430D, BE-438D 18 Note: Make sure that the cords are secure in order to connect the ground. Connecting the ground wire CAUTION Be sure to ...ensure safety. (5) Tighten the control box cover with correct operation may also occur. (1) Ground wire from upper shaft motor harness (2) Ground wire from the machine head (3) Ground wires from X, Y and work clamp encoder harnesses (3 wires) (4) Ground wire from operation panel harness * The recommended tightening torque for ...
...eight screws. INSTALLATION 3-11. Check that the ground connections are not clamped by the cover at this time. 4416Q KE-430D, BE-438D 18 Note: Make sure that the cords are secure in order to connect the ground. Connecting the ground wire CAUTION Be sure to ...ensure safety. (5) Tighten the control box cover with correct operation may also occur. (1) Ground wire from upper shaft motor harness (2) Ground wire from the machine head (3) Ground wires from X, Y and work clamp encoder harnesses (3 wires) (4) Ground wire from operation panel harness * The recommended tightening torque for ...
Instruction Manual - English
Page 27
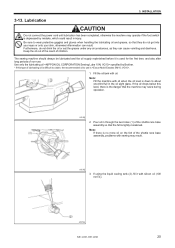
...no more oil on the felt of non-use is the danger that the machine may result. 4419Q 3. INSTALLATION 3-13. Keep the oil out of the reach...race base assembly, problems with silicon oil (100 mm2/s). 4537Q KE-430D, BE-438D 20 Use only the lubricating oil specified by mistake, which could result in injury...below this type of children. Note: Fill the machine with oil. Be sure to use . If using the liquid cooling tank (2), ...fill it is lightly moistened. The sewing machine should always be lubricated and the oil supply replenished before it...
...no more oil on the felt of non-use is the danger that the machine may result. 4419Q 3. INSTALLATION 3-13. Keep the oil out of the reach...race base assembly, problems with silicon oil (100 mm2/s). 4537Q KE-430D, BE-438D 20 Use only the lubricating oil specified by mistake, which could result in injury...below this type of children. Note: Fill the machine with oil. Be sure to use . If using the liquid cooling tank (2), ...fill it is lightly moistened. The sewing machine should always be lubricated and the oil supply replenished before it...

Instruction Manual - English
Page 28
.... 1. Connecting the power cord Insert the power cord plug (1) into a properly-grounded AC power supply. * The inside of the sewing machine. Green/yellow wire (Ground wire) 4114M 21 KE-430D, BE-438D They may occur. ・ Do not use extension cords. boards may cause problems with correct operation of the control box...
.... 1. Connecting the power cord Insert the power cord plug (1) into a properly-grounded AC power supply. * The inside of the sewing machine. Green/yellow wire (Ground wire) 4114M 21 KE-430D, BE-438D They may occur. ・ Do not use extension cords. boards may cause problems with correct operation of the control box...

