

Accessory Catalog
Page 11
... seams or pattern markings are desired. It can be used with maximum stitch width. Attach the presser foot and pull cords under the presser foot. 3. Slip a cord from satin or decorative stitches. 2. SA145 ABCDEFGHJKLMNO SA144 IP Brother Embellishment Feet Cording Foot Cording Foot (5-hole) 20 Cording Foot (7-hole) Cording Foot Used for couching! 1. Slide the plate of the guide back and forth to 3/16 inch (5 mm) wide braids, ribbons, tapes, cords, etc. 1. Perfect for embellishing 1 to 7 cords or decorative threads. Insert cords or threads...
... seams or pattern markings are desired. It can be used with maximum stitch width. Attach the presser foot and pull cords under the presser foot. 3. Slip a cord from satin or decorative stitches. 2. SA145 ABCDEFGHJKLMNO SA144 IP Brother Embellishment Feet Cording Foot Cording Foot (5-hole) 20 Cording Foot (7-hole) Cording Foot Used for couching! 1. Slide the plate of the guide back and forth to 3/16 inch (5 mm) wide braids, ribbons, tapes, cords, etc. 1. Perfect for embellishing 1 to 7 cords or decorative threads. Insert cords or threads...

Accessory Catalog
Page 12
.... 2. Gathering Foot Used for ULT series, PC-6500, PC-8200 and PC-8500 sewing machines. For gathering: 1. Select a straight stitch, left needle position. 2. Place the fabric to make fringes). Select a straight stitch, left needle position. 2. Requires Low Shank Adapter for gathering fabrics. Ideal for edge-stitching heavy fabric such as home decor. Adding decorative stitches over seams or patterns: Line up to the seam or pattern line and sew. For appliqué: 1. Zigzag-sew with transparent thread. Metal type SA186 ABCDEFGHJKLMNO Plastic type...
.... 2. Gathering Foot Used for ULT series, PC-6500, PC-8200 and PC-8500 sewing machines. For gathering: 1. Select a straight stitch, left needle position. 2. Place the fabric to make fringes). Select a straight stitch, left needle position. 2. Requires Low Shank Adapter for gathering fabrics. Ideal for edge-stitching heavy fabric such as home decor. Adding decorative stitches over seams or patterns: Line up to the seam or pattern line and sew. For appliqué: 1. Zigzag-sew with transparent thread. Metal type SA186 ABCDEFGHJKLMNO Plastic type...

Accessory Catalog
Page 13
... adjusted. 1. Install and manually thread a twin needle. 2. For seven grooves: SA179 ABCDEJ For five grooves: SA162 IP This presser foot does not include the bobbin cover. The intervals of stitch length, tuck setting and depth setting. 2. www.brother.com Brother Embellishment Feet 23 Bed Runner & Pillowcase Innov-is moved forward, its teeth catch a fabric and force it forward into the slot, and stitch slowly. 3. Sew slowly for details.) Brother Embellishment Feet Pin Tuck Foot...
... adjusted. 1. Install and manually thread a twin needle. 2. For seven grooves: SA179 ABCDEJ For five grooves: SA162 IP This presser foot does not include the bobbin cover. The intervals of stitch length, tuck setting and depth setting. 2. www.brother.com Brother Embellishment Feet 23 Bed Runner & Pillowcase Innov-is moved forward, its teeth catch a fabric and force it forward into the slot, and stitch slowly. 3. Sew slowly for details.) Brother Embellishment Feet Pin Tuck Foot...

Accessory Catalog
Page 15
... sewing machines. Walking Foot/Open Toe Walking Foot Brother Quilting Feet 28 Walking Foot/Open Toe Walking Foot The feed dogs on the Open Toe Quilting Foot, with the pin over the needle clamp screw. 2. Requires Low Shank Adapter for straight stitch. 3. Select a straight stitch or your preferred stitch such as the machine's lower feed dogs to hold the fabric firmly. 5. While starting to sew, press the needle position button twice to pull the bobbin thread to the machine. 2. Lower the feed dogs. 2. Use both hands while keeping the fabric pulled tight. 9. Sew. Walking...
... sewing machines. Walking Foot/Open Toe Walking Foot Brother Quilting Feet 28 Walking Foot/Open Toe Walking Foot The feed dogs on the Open Toe Quilting Foot, with the pin over the needle clamp screw. 2. Requires Low Shank Adapter for straight stitch. 3. Select a straight stitch or your preferred stitch such as the machine's lower feed dogs to hold the fabric firmly. 5. While starting to sew, press the needle position button twice to pull the bobbin thread to the machine. 2. Lower the feed dogs. 2. Use both hands while keeping the fabric pulled tight. 9. Sew. Walking...

Accessory Catalog
Page 17
.../Innov-is4000D Nightie Innov-is Project Book (See page 18 for embellishing a wide variety of the line machine. Brother Embroidery Accessories 31 QuattroTM 6000D Embroidery Card Reader QuattroTM 6000D Border Frame Innov-is 4000D Premium Package SAECR1 Only compatible with center needle position straight stitch Open toe quilting foot "O" for greater visibility Echo quilting foot "E" for perfect echo quilting - Includes three new free-motion presser feet: Free-motion quilting foot "C" for more features to connect and...
.../Innov-is4000D Nightie Innov-is Project Book (See page 18 for embellishing a wide variety of the line machine. Brother Embroidery Accessories 31 QuattroTM 6000D Embroidery Card Reader QuattroTM 6000D Border Frame Innov-is 4000D Premium Package SAECR1 Only compatible with center needle position straight stitch Open toe quilting foot "O" for greater visibility Echo quilting foot "E" for perfect echo quilting - Includes three new free-motion presser feet: Free-motion quilting foot "C" for more features to connect and...

Accessory Catalog
Page 33
... access to accommodate a variety of your next embroidery, quilting or sewing project. Each thread has it's own thread guide to deliver thread smoothly to the machine as well as a thread locking system which keeps those loose ends tamed when not in the storage slots. For all models: SA503 Free-Standing Ten Spool Thread Stand You can set up to provide 10 vertical spool pins for thread delivery or bobbin storage.
... access to accommodate a variety of your next embroidery, quilting or sewing project. Each thread has it's own thread guide to deliver thread smoothly to the machine as well as a thread locking system which keeps those loose ends tamed when not in the storage slots. For all models: SA503 Free-Standing Ten Spool Thread Stand You can set up to provide 10 vertical spool pins for thread delivery or bobbin storage.

Accessory Catalog
Page 34
..., use these embroidery threads especially designed for Brother sewing and embroidering machines. 61 Color Thread Set with Wooden Rack ETKSP999 PacesetterTM Polyester Threads (61 Color Thread Set with other sewing and embroidery machine brands. Brother Embroidery Accessories PacesetterTM Polyester Threads 65 Brother Country Yarn Embroidery Threads Metallic Threads For the best embroidery results, use the Brother Bobbin Thread designed specifically for your machine. Stabilizers and Water Soluble Stabilizers When doing machine embroidery, the use of needle and stabilizer types.
..., use these embroidery threads especially designed for Brother sewing and embroidering machines. 61 Color Thread Set with Wooden Rack ETKSP999 PacesetterTM Polyester Threads (61 Color Thread Set with other sewing and embroidery machine brands. Brother Embroidery Accessories PacesetterTM Polyester Threads 65 Brother Country Yarn Embroidery Threads Metallic Threads For the best embroidery results, use the Brother Bobbin Thread designed specifically for your machine. Stabilizers and Water Soluble Stabilizers When doing machine embroidery, the use of needle and stabilizer types.

Accessory Catalog
Page 36
..., polar fleece and fake fur. Attach the Needle Felting Attachment and lower the feed dogs. 2. You can slip into very small areas. No thread is required to use it just like an ordinary presser foot, and embellish fabrics with wool roving or yarn. SA159 SA180B SA181 Needle Felting Attachment Felting Needle Brother Sewing Machine Attachments for PQ Series Heavyweight Foot An improved larger foot print assures better contact of wool...
..., polar fleece and fake fur. Attach the Needle Felting Attachment and lower the feed dogs. 2. You can slip into very small areas. No thread is required to use it just like an ordinary presser foot, and embellish fabrics with wool roving or yarn. SA159 SA180B SA181 Needle Felting Attachment Felting Needle Brother Sewing Machine Attachments for PQ Series Heavyweight Foot An improved larger foot print assures better contact of wool...

Accessory Catalog
Page 40
... the presser foot, and sew. Sew. Brother Cover Stitch Feet 78 Top Stitching Foot Set Top Stitching Foot Set Use included presser foot to your Cover Stitch). 1. Align the fabric joint and the groove of fabric pointed so that it is easily set it to top stitch with the LC2 presser foot. SA226CV www.brother.com Open the seams. 4. Insert the tab on the bias tape attachment into the guide. 4. Set up your machine for a cover stitch, with 3 or 6 mm wide cover stitch. 3. Set up your machine for a chain stitch...
... the presser foot, and sew. Sew. Brother Cover Stitch Feet 78 Top Stitching Foot Set Top Stitching Foot Set Use included presser foot to your Cover Stitch). 1. Align the fabric joint and the groove of fabric pointed so that it is easily set it to top stitch with the LC2 presser foot. SA226CV www.brother.com Open the seams. 4. Insert the tab on the bias tape attachment into the guide. 4. Set up your machine for a cover stitch, with 3 or 6 mm wide cover stitch. 3. Set up your machine for a chain stitch...
Users Manual - English
Page 3
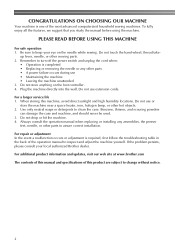
... power switch and unplug the cord when: • Operation is completed • Replacing or removing the needle or any assemblies, the presser feet, needle, or other parts • A power failure occurs during use extension cords. Use only neutral soaps or detergents to inspect and adjust the machine yourself. up lever, needle, or other hot objects. 2. Remember to change without notice. 2 CONGRATULATIONS ON CHOOSING OUR MACHINE Your machine is one of the operation manual to clean the case...
... power switch and unplug the cord when: • Operation is completed • Replacing or removing the needle or any assemblies, the presser feet, needle, or other parts • A power failure occurs during use extension cords. Use only neutral soaps or detergents to inspect and adjust the machine yourself. up lever, needle, or other hot objects. 2. Remember to change without notice. 2 CONGRATULATIONS ON CHOOSING OUR MACHINE Your machine is one of the operation manual to clean the case...

Users Manual - English
Page 4
... Sewing stretch fabrics ...31 Using a free-arm style ...31 3 KNOWING YOUR SEWING MACHINE 5 NAMES OF MACHINE PARTS AND THEIR FUNCTIONS 5 The main parts ...5 Needle and presser foot section ...6 Operation buttons ...6 Operation panel ...7 Flat bed attachment ...7 ACCESSORIES ...8 Optional accessories ...8 USING YOUR SEWING MACHINE 9 Power supply precautions ...9 Power supply ...9 Foot controller ...10 Sewing speed controller (for models equipped with the start/stop button 10 Changing the needle stop position ...10 THREADING THE MACHINE 11 Winding the bobbin ...11 Lower threading ...14 Upper...
... Sewing stretch fabrics ...31 Using a free-arm style ...31 3 KNOWING YOUR SEWING MACHINE 5 NAMES OF MACHINE PARTS AND THEIR FUNCTIONS 5 The main parts ...5 Needle and presser foot section ...6 Operation buttons ...6 Operation panel ...7 Flat bed attachment ...7 ACCESSORIES ...8 Optional accessories ...8 USING YOUR SEWING MACHINE 9 Power supply precautions ...9 Power supply ...9 Foot controller ...10 Sewing speed controller (for models equipped with the start/stop button 10 Changing the needle stop position ...10 THREADING THE MACHINE 11 Winding the bobbin ...11 Lower threading ...14 Upper...

Users Manual - English
Page 6
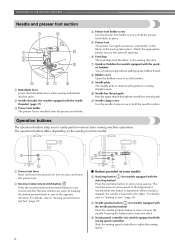
... parts a Bobbin winder (page 11) This winds the thread onto the bobbin for sewing with accessory compartment (pages 7 and 31) i Operation buttons (page 6) The operation buttons differ depending on and off. f Thread take-up lever (page 17) g Thread cutter (page 29) Pass the threads through the thread cutter to lower the feed dogs. o Feed dog position lever (pages 38 and 45) Use the feed dog position lever to cut them. k Handwheel Used to raise and lower the presser foot. p Presser foot lever (page 16) Used to manually raise and lower the needle...
... parts a Bobbin winder (page 11) This winds the thread onto the bobbin for sewing with accessory compartment (pages 7 and 31) i Operation buttons (page 6) The operation buttons differ depending on and off. f Thread take-up lever (page 17) g Thread cutter (page 29) Pass the threads through the thread cutter to lower the feed dogs. o Feed dog position lever (pages 38 and 45) Use the feed dog position lever to cut them. k Handwheel Used to raise and lower the presser foot. p Presser foot lever (page 16) Used to manually raise and lower the needle...
Users Manual - English
Page 7
...c Presser foot holder The presser foot is installed onto the presser foot holder. k Needle clamp screw Use the needle clamp screw to sew" (page 28). The operation buttons differ depending on the fabric as the sewing takes place. The machine sews at a slow speed at the beginning of sewing while the button is lowered in the sewing direction. For details, refer to "Starting to hold the presser foot holder in the opposite direction. Pressing the button twice sews one stitch. f Feed dogs The feed dogs feed the fabric in the fabric. Operation buttons The operation buttons help you...
...c Presser foot holder The presser foot is installed onto the presser foot holder. k Needle clamp screw Use the needle clamp screw to sew" (page 28). The operation buttons differ depending on the fabric as the sewing takes place. The machine sews at a slow speed at the beginning of sewing while the button is lowered in the sewing direction. For details, refer to "Starting to hold the presser foot holder in the opposite direction. Pressing the button twice sews one stitch. f Feed dogs The feed dogs feed the fabric in the fabric. Operation buttons The operation buttons help you...
Users Manual - English
Page 15
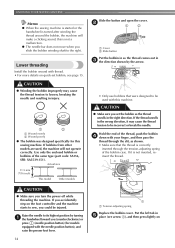
... needle position button), and raise the presser foot lever. 14 1 a Tension-adjusting spring Replace the bobbin cover. CAUTION ● Make sure you set bobbin, see arrow a), and then press lightly on the foot controller and the machine starts to the right. Slide the button and open the cover. If the thread unrolls in the right direction. KNOWING YOUR SEWING MACHINE Memo ● When the sewing machine is started or the handwheel is turned after winding the thread around the bobbin, the machine will not operate...
... needle position button), and raise the presser foot lever. 14 1 a Tension-adjusting spring Replace the bobbin cover. CAUTION ● Make sure you set bobbin, see arrow a), and then press lightly on the foot controller and the machine starts to the right. Slide the button and open the cover. If the thread unrolls in the right direction. KNOWING YOUR SEWING MACHINE Memo ● When the sewing machine is started or the handwheel is turned after winding the thread around the bobbin, the machine will not operate...

Users Manual - English
Page 39
... a stitch or . a Feed dog position lever (as seen from the rear of the machine) Use a handsewing needle to pull the gimp g thread to the thickness of the gimp thread. With a seam ripper, cut the middle part of the h gimp thread remaining at the rear of the machine on stretch fabrics, use a gimp thread. Lower the presser foot lever and the e buttonhole lever, and then start sewing. Hook the gimp thread onto the part of the buttonhole. Button sewing Buttons can be attached. Attach buttonhole foot "A". c 1 a Button fitting foot "M" 38 c Adjust...
... a stitch or . a Feed dog position lever (as seen from the rear of the machine) Use a handsewing needle to pull the gimp g thread to the thickness of the gimp thread. With a seam ripper, cut the middle part of the h gimp thread remaining at the rear of the machine on stretch fabrics, use a gimp thread. Lower the presser foot lever and the e buttonhole lever, and then start sewing. Hook the gimp thread onto the part of the buttonhole. Button sewing Buttons can be attached. Attach buttonhole foot "A". c 1 a Button fitting foot "M" 38 c Adjust...
Users Manual - English
Page 40
... speed, press (reverse/reinforcement stitch button) to the shortest setting by g pressing the stitch length adjustment key. CAUTION ● When sewing, be sure that the needle correctly goes into the two holes toward the rear of the machine) to raise the feed dogs. 39 Adjust the stitch width to check that the needle does not touch the button, otherwise the needle may bend or break. Place a button between the presser foot and d the fabric...
... speed, press (reverse/reinforcement stitch button) to the shortest setting by g pressing the stitch length adjustment key. CAUTION ● When sewing, be sure that the needle correctly goes into the two holes toward the rear of the machine) to raise the feed dogs. 39 Adjust the stitch width to check that the needle does not touch the button, otherwise the needle may bend or break. Place a button between the presser foot and d the fabric...
Users Manual - English
Page 61
... the hole in the needle plate is incorrect. You have not wound the bobbin thread properly. Contact your retailer or the nearest authorised service center. Adjust the tension of the upper thread. Replace the needle. Replace the bobbin case. Reset the bobbin thread correctly. APPENDIX Symptom The upper thread breaks. You have not fitted the spool properly. You have not threaded the upper thread properly. Only use a bobbin that has been designed for this machine. Thread the upper thread and wind the bobbin thread properly...
... the hole in the needle plate is incorrect. You have not wound the bobbin thread properly. Contact your retailer or the nearest authorised service center. Adjust the tension of the upper thread. Replace the needle. Replace the bobbin case. Reset the bobbin thread correctly. APPENDIX Symptom The upper thread breaks. You have not fitted the spool properly. You have not threaded the upper thread properly. Only use a bobbin that has been designed for this machine. Thread the upper thread and wind the bobbin thread properly...

Users Manual - English
Page 62
... the type of the upper thread. page 16 You have not used . Attach the presser foot that is tangled, for this machine. page 52 The stitch is scratched. The thread is tangled in the bobbin case. Adjust the tension of stitch that has been designed for example, in the bobbin case, clean the bobbin case. Remove the tangle thread. If the thread is tangled, for this machine. Slide the feed dog position lever to . The stitch is tangled in the bobbin case. Remove...
... the type of the upper thread. page 16 You have not used . Attach the presser foot that is tangled, for this machine. page 52 The stitch is scratched. The thread is tangled in the bobbin case. Adjust the tension of stitch that has been designed for example, in the bobbin case, clean the bobbin case. Remove the tangle thread. If the thread is tangled, for this machine. Slide the feed dog position lever to . The stitch is tangled in the bobbin case. Remove...
Users Manual - English
Page 63
... foot controller was pressed while the bobbin winder shaft is moved to the left before continuing the operation. The reverse/reinforcement stitch button or needle position button was connected. Solution Lower the presser foot lever before continuing to sew. 62 Be sure to check for the cause of the error, and correct it before continuing the operation. The motor locked up , for example, because the thread is tangled The sewing machine beeps for models...
... foot controller was pressed while the bobbin winder shaft is moved to the left before continuing the operation. The reverse/reinforcement stitch button or needle position button was connected. Solution Lower the presser foot lever before continuing to sew. 62 Be sure to check for the cause of the error, and correct it before continuing the operation. The motor locked up , for example, because the thread is tangled The sewing machine beeps for models...
Users Manual - English
Page 64
...point zigzag stitch 32 main parts 5 main power switch 9 A , monogramming 49 51 accessories 8 appliqués 42 N needle 20 B bar tack 46 basic stitching 33 blind hem stitching 34 bobbin 14 , bobbin case 14 57 , bobbin cover 6 14 bobbin , winder 11 59, 62 button sewing 38 needle bar thread guide 6 , needle clamp screw 6 22 needle plate 6 needle plate cover 57 needle position 33 needle position button 6 needle threader 17 O buttonhole foot 36 openings 46 buttonhole , lever 6 37, 47 buttonhole sewing 35 operation beep 62 operation buttons 6 4 operation...
...point zigzag stitch 32 main parts 5 main power switch 9 A , monogramming 49 51 accessories 8 appliqués 42 N needle 20 B bar tack 46 basic stitching 33 blind hem stitching 34 bobbin 14 , bobbin case 14 57 , bobbin cover 6 14 bobbin , winder 11 59, 62 button sewing 38 needle bar thread guide 6 , needle clamp screw 6 22 needle plate 6 needle plate cover 57 needle position 33 needle position button 6 needle threader 17 O buttonhole foot 36 openings 46 buttonhole , lever 6 37, 47 buttonhole sewing 35 operation beep 62 operation buttons 6 4 operation...


