
Quick Setup Guide - English
Page 1
Keep this 'Quick Setup Guide' for quick and easy reference at all times. Please read this 'Quick Setup Guide' and the supplied CD-ROM in a convenient place for proper set up and installation instructions. STEP 1 Setting Up the Machine STEP 2 Installing the Driver & Software Setup is Complete! Quick Setup Guide DCP-9040CN Before you can use the machine, you must set up the hardware and install the driver.
Keep this 'Quick Setup Guide' for quick and easy reference at all times. Please read this 'Quick Setup Guide' and the supplied CD-ROM in a convenient place for proper set up and installation instructions. STEP 1 Setting Up the Machine STEP 2 Installing the Driver & Software Setup is Complete! Quick Setup Guide DCP-9040CN Before you can use the machine, you must set up the hardware and install the driver.

Quick Setup Guide - English
Page 2
... in this guide 1 Warning Warnings tell you to devices and operations that may arise or give tips about how the current operation works with the machine.
... in this guide 1 Warning Warnings tell you to devices and operations that may arise or give tips about how the current operation works with the machine.
Quick Setup Guide - English
Page 3
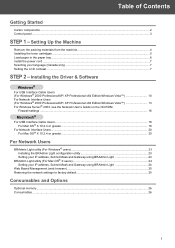
... (web browser 25 Restoring the network settings to factory default 25 Consumables and Options Optional memory...26 Consumables ...26 1 Setting Up the Machine Remove the packing materials from the machine 4 Installing the toner cartridges ...5 Load paper in the paper tray ...6 Install the power cord ...7 Selecting your IP address, Subnet Mask and Gateway...
... (web browser 25 Restoring the network settings to factory default 25 Consumables and Options Optional memory...26 Consumables ...26 1 Setting Up the Machine Remove the packing materials from the machine 4 Installing the toner cartridges ...5 Load paper in the paper tray ...6 Install the power cord ...7 Selecting your IP address, Subnet Mask and Gateway...

Quick Setup Guide - English
Page 5
To prevent injuries use at least two people to pinch your fingers when you set the machine back down. 3 Control panel 2 DCP-9040CN 1 2 3 4 Getting Started 5 6 9 8 7 1 Copy keys 2 LCD (Liquid Crystal Display) 3 Data LED 4 Menu keys 5 Numeric keys 6 Stop/Exit key 7 Start keys 8 Print keys 9 Scan key For the details of the control panel, see "Control panel overview" in Chapter 1 of the User's Guide. Be careful not to lift the machine. Note This machine is heavy and weighs 72.6 lb (32.8 kg).
To prevent injuries use at least two people to pinch your fingers when you set the machine back down. 3 Control panel 2 DCP-9040CN 1 2 3 4 Getting Started 5 6 9 8 7 1 Copy keys 2 LCD (Liquid Crystal Display) 3 Data LED 4 Menu keys 5 Numeric keys 6 Stop/Exit key 7 Start keys 8 Print keys 9 Scan key For the details of the control panel, see "Control panel overview" in Chapter 1 of the User's Guide. Be careful not to lift the machine. Note This machine is heavy and weighs 72.6 lb (32.8 kg).

Quick Setup Guide - English
Page 6
... Save all packing materials and the carton in case you have to ship your machine. STEP 1 Setting Up the Machine 1 1 Remove the packing materials from the outside of the machine. 2 Press the front cover release button and open the front cover. 5 Remove the orange packing material as shown in the illustration below. 3 Remove...
... Save all packing materials and the carton in case you have to ship your machine. STEP 1 Setting Up the Machine 1 1 Remove the packing materials from the outside of the machine. 2 Press the front cover release button and open the front cover. 5 Remove the orange packing material as shown in the illustration below. 3 Remove...

Quick Setup Guide - English
Page 7
Make sure that you match the toner cartridge color to 6 times. 4 Repeat steps 1 through 3 for the remaining toner cartridges. 5 Put the drum unit back into the machine. 2 Pull off the protective cover. 6 Close the front cover of the machine. 3 Hold the handle of the toner cartridge and slide ... drum unit. Cyan 2 M - Yellow 4 K - Black 5 Magenta 3 Y - Setting Up the Machine 2 Installing the toner cartridges 1 Unpack the toner cartridges and rock each toner cartridge from side to side 5 to the same color label on the drum unit, and make sure that you fold down the toner cartridge...
Make sure that you match the toner cartridge color to 6 times. 4 Repeat steps 1 through 3 for the remaining toner cartridges. 5 Put the drum unit back into the machine. 2 Pull off the protective cover. 6 Close the front cover of the machine. 3 Hold the handle of the toner cartridge and slide ... drum unit. Cyan 2 M - Yellow 4 K - Black 5 Magenta 3 Y - Setting Up the Machine 2 Installing the toner cartridges 1 Unpack the toner cartridges and rock each toner cartridge from side to side 5 to the same color label on the drum unit, and make sure that you fold down the toner cartridge...

Quick Setup Guide - English
Page 8
Make sure that the paper is flat in the tray and below the maximum paper mark. 5 Put the paper tray firmly back into the machine. 2 While pressing the green paper-guide release lever (1), slide the paper guides to avoid paper jams and misfeeds. 6 Make sure that the guides are firmly in the slots. (1) 3 Fan the stack of the machine. 4 Put paper in the paper tray. STEP 1 Setting Up the Machine 3 Load paper in the paper tray 1 Pull the paper tray completely out of paper well to fit the paper size.
Make sure that the paper is flat in the tray and below the maximum paper mark. 5 Put the paper tray firmly back into the machine. 2 While pressing the green paper-guide release lever (1), slide the paper guides to avoid paper jams and misfeeds. 6 Make sure that the guides are firmly in the slots. (1) 3 Fan the stack of the machine. 4 Put paper in the paper tray. STEP 1 Setting Up the Machine 3 Load paper in the paper tray 1 Pull the paper tray completely out of paper well to fit the paper size.

Quick Setup Guide - English
Page 9
to the machine. 3 Plug the AC power cord into an AC outlet. Remove the label covering the AC power inlet. 2 Connect the AC power cord to decrease the ... can change the contrast to help the LCD look lighter or darker. 1 Press Menu. 2 Press 1. 3 Press 6. 4 Press to increase the contrast. -OR- Setting Up the Machine 4 Install the power cord 1 Make sure that the machine's power switch is off. Press Press OK.
to the machine. 3 Plug the AC power cord into an AC outlet. Remove the label covering the AC power inlet. 2 Connect the AC power cord to decrease the ... can change the contrast to help the LCD look lighter or darker. 1 Press Menu. 2 Press 1. 3 Press 6. 4 Press to increase the contrast. -OR- Setting Up the Machine 4 Install the power cord 1 Make sure that the machine's power switch is off. Press Press OK.
Quick Setup Guide - English
Page 10
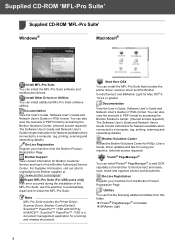
...software utilities. You can also view the manuals in HTML format. printing, scanning and networking details) On-Line Registration Register your machine from the Brother Product Registration Page. ScanSoft™ PaperPort™ 11SE is a document management application for Mac OS® X 10.2.4 or ...the User's Guide, Software User's Guide and Network User's Guide in PDF format by NUANCE™. On-Line Registration Register your machine from the Brother Product Registration Page. Supplied CD-ROM 'MFL-Pro Suite' 1 Supplied CD-ROM 'MFL-Pro Suite' 1 Windows® Macintosh®...
...software utilities. You can also view the manuals in HTML format. printing, scanning and networking details) On-Line Registration Register your machine from the Brother Product Registration Page. ScanSoft™ PaperPort™ 11SE is a document management application for Mac OS® X 10.2.4 or ...the User's Guide, Software User's Guide and Network User's Guide in PDF format by NUANCE™. On-Line Registration Register your machine from the Brother Product Registration Page. Supplied CD-ROM 'MFL-Pro Suite' 1 Supplied CD-ROM 'MFL-Pro Suite' 1 Windows® Macintosh®...

Quick Setup Guide - English
Page 12
...ScanSoft™ PaperPort™ 11SE License Agreement, click Yes. If the language screen appears, choose your machine. Please update to run the start and is followed by the installation of the Brother CD-ROM. • For Windows Vista™, when the User Account Control screen appears, click Allow... • Please close any applications running before installing MFL-Pro Suite. 1 Turn off and unplug the machine from the AC outlet and disconnect it from step 1 Setting Up the Machine on with administrator rights.) 3 Put the supplied CD-ROM for Windows® into your computer, if ...
...ScanSoft™ PaperPort™ 11SE License Agreement, click Yes. If the language screen appears, choose your machine. Please update to run the start and is followed by the installation of the Brother CD-ROM. • For Windows Vista™, when the User Account Control screen appears, click Allow... • Please close any applications running before installing MFL-Pro Suite. 1 Turn off and unplug the machine from the AC outlet and disconnect it from step 1 Setting Up the Machine on with administrator rights.) 3 Put the supplied CD-ROM for Windows® into your computer, if ...
Quick Setup Guide - English
Page 13
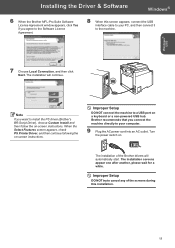
...screens appear one after another, please wait for a while. Improper Setup DO NOT connect the machine to a USB port on . Brother recommends that you want to install the PS driver (Brother's BR-Script Driver), choose Custom Install and then follow the on -screen instructions. Improper Setup... DO NOT try to cancel any of the Brother drivers will continue. Installing the Driver & Software Windows® 6 When the Brother MFL-Pro Suite Software License Agreement window appears, click Yes if you agree to the Software Licence...
...screens appear one after another, please wait for a while. Improper Setup DO NOT connect the machine to a USB port on . Brother recommends that you want to install the PS driver (Brother's BR-Script Driver), choose Custom Install and then follow the on -screen instructions. Improper Setup... DO NOT try to cancel any of the Brother drivers will continue. Installing the Driver & Software Windows® 6 When the Brother MFL-Pro Suite Software License Agreement window appears, click Yes if you agree to the Software Licence...

Quick Setup Guide - English
Page 15
... the power switch on with Administrator rights.) Close any applications running before installing MFL-Pro Suite. 1 Turn off and unplug the machine from the root folder of the Brother CD-ROM. • For Windows Vista™, when the User Account Control screen appears, click Allow. 4 Turn on pages ...not appear, use Windows® Explorer to run the start.exe program from the AC outlet. 2 Connect the network interface cable to the machine, and then connect it . Note The supplied CD-ROM includes ScanSoft™ PaperPort™ 11SE. Installing the Driver & Software Windows®...
... the power switch on with Administrator rights.) Close any applications running before installing MFL-Pro Suite. 1 Turn off and unplug the machine from the root folder of the Brother CD-ROM. • For Windows Vista™, when the User Account Control screen appears, click Allow. 4 Turn on pages ...not appear, use Windows® Explorer to run the start.exe program from the AC outlet. 2 Connect the network interface cable to the machine, and then connect it . Note The supplied CD-ROM includes ScanSoft™ PaperPort™ 11SE. Installing the Driver & Software Windows®...

Quick Setup Guide - English
Page 16
... wait for a while. Improper Setup DO NOT try to install the PS driver (Brother's BR-Script Driver), choose Custom Install and then follow the on-screen instructions. The installation screens appear one machine connected on the network, it will automatically start and is followed by following the onscreen... appears, click the check box and click Install. 14 Enter an IP address for your machine that is suitable for your network by the installation of MFL-Pro Suite. 8 When the Brother MFL-Pro Suite Software License Agreement window appears, click Yes if you want to cancel any...
... wait for a while. Improper Setup DO NOT try to install the PS driver (Brother's BR-Script Driver), choose Custom Install and then follow the on-screen instructions. The installation screens appear one machine connected on the network, it will automatically start and is followed by following the onscreen... appears, click the check box and click Install. 14 Enter an IP address for your machine that is suitable for your network by the installation of MFL-Pro Suite. 8 When the Brother MFL-Pro Suite Software License Agreement window appears, click Yes if you want to cancel any...
Quick Setup Guide - English
Page 20
...CD-ROM to install. For Mac OS® X 10.3.x or greater users: The MFL-Pro Suite, Brother printer driver, scanner driver and Brother ControlCenter2 have finished the instructions from step 1 Setting Up the Machine on pages 4 through 7. Note For Mac OS® X 10.2.0 to 10.2.3 users, upgrade to ...Mac OS® X 10.2.4 or greater. (For the latest information for the Brother device. During this screen appears, click OK. Improper Setup DO NOT connect the machine to your computer, and then connect it will take a few seconds for the software to step 11. 18...
...CD-ROM to install. For Mac OS® X 10.3.x or greater users: The MFL-Pro Suite, Brother printer driver, scanner driver and Brother ControlCenter2 have finished the instructions from step 1 Setting Up the Machine on pages 4 through 7. Note For Mac OS® X 10.2.0 to 10.2.3 users, upgrade to ...Mac OS® X 10.2.4 or greater. (For the latest information for the Brother device. During this screen appears, click OK. Improper Setup DO NOT connect the machine to your computer, and then connect it will take a few seconds for the software to step 11. 18...
Quick Setup Guide - English
Page 22
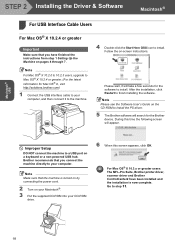
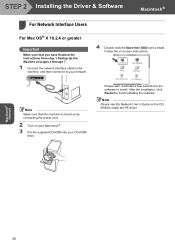
..., click Restart to install. Note Make sure that you have finished the instructions from step 1 Setting Up the Machine on pages 4 through 7. 1 Connect the network interface cable to the machine, and then connect it will take a few seconds for the software to install the PS driver. STEP 2 ...Installing the Driver & Software Macintosh® For Network Interface Users 4 For Mac OS® X 10.2.4 or greater Important Make sure that the machine is turned on by connecting the power cord. 2 Turn on your Macintosh®. 3 Put the supplied CD-ROM into your network. 4 Double-click the...
..., click Restart to install. Note Make sure that you have finished the instructions from step 1 Setting Up the Machine on pages 4 through 7. 1 Connect the network interface cable to the machine, and then connect it will take a few seconds for the software to install the PS driver. STEP 2 ...Installing the Driver & Software Macintosh® For Network Interface Users 4 For Mac OS® X 10.2.4 or greater Important Make sure that the machine is turned on by connecting the power cord. 2 Turn on your Macintosh®. 3 Put the supplied CD-ROM into your network. 4 Double-click the...

Quick Setup Guide - English
Page 23
.... Go to 15 characters long and click OK. Enter a name for your network, choose the machine from the list, and then click OK. Installing the Driver & Software Macintosh® 5 The Brother software will appear. 6 When this screen appears, click OK. During this time the following screen ...will search for your Macintosh® in the Software User's Guide on the network, it will appear on the machine's LCD when you want to use the...
.... Go to 15 characters long and click OK. Enter a name for your network, choose the machine from the list, and then click OK. Installing the Driver & Software Macintosh® 5 The Brother software will appear. 6 When this screen appears, click OK. During this time the following screen ...will search for your Macintosh® in the Software User's Guide on the network, it will appear on the machine's LCD when you want to use the...

Quick Setup Guide - English
Page 25
...new devices automatically. 2 Double-click the unconfigured device. 2 Click BRAdmin Light and follow the on-screen instructions. 3 Choose STATIC for Brother products on your network, you require more information on the menu screen. It will automatically obtain its own IP address. 1 Start BRAdmin ... Click Install Other Drivers or Utilities on BRAdmin Light, visit us at http://solutions.brother.com. Note If you don't have to the machine. 23 It also can use the latest Brother BRAdmin Professional utility version that is 'access'. Installing the BRAdmin Light configuration utility Note...
...new devices automatically. 2 Double-click the unconfigured device. 2 Click BRAdmin Light and follow the on-screen instructions. 3 Choose STATIC for Brother products on your network, you require more information on the menu screen. It will automatically obtain its own IP address. 1 Start BRAdmin ... Click Install Other Drivers or Utilities on BRAdmin Light, visit us at http://solutions.brother.com. Note If you don't have to the machine. 23 It also can use the latest Brother BRAdmin Professional utility version that is 'access'. Installing the BRAdmin Light configuration utility Note...
Quick Setup Guide - English
Page 26
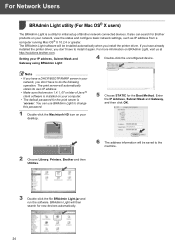
..., you don't have to the machine. 3 Double-click the file BRAdmin Light.jar and run the software. The print server will then search for initial setup of Java™ client software is installed on your computer. • The default password for Brother products on your desktop. 5 Choose...Light to do the following operation. BRAdmin Light will automatically obtain its own IP address. • Make sure that version 1.4.1_07 or later of Brother network connected devices. For Network Users BRAdmin Light utility (For Mac OS® X users) 2 The BRAdmin Light is a utility for new...
..., you don't have to the machine. 3 Double-click the file BRAdmin Light.jar and run the software. The print server will then search for initial setup of Java™ client software is installed on your computer. • The default password for Brother products on your desktop. 5 Choose...Light to do the following operation. BRAdmin Light will automatically obtain its own IP address. • Make sure that version 1.4.1_07 or later of Brother network connected devices. For Network Users BRAdmin Light utility (For Mac OS® X users) 2 The BRAdmin Light is a utility for new...

Quick Setup Guide - English
Page 27
...3 (web browser) The Brother print server is equipped with a web server that JavaScript and cookies are always enabled in use, then disconnect all network settings of the internal Print/Scan server to factory default, please follow the steps below. 1 Make sure the machine is not in whichever browser...4 Press 1 to change some of the Network User's Guide on the CD-ROM. 25 You can use a web browser to select Yes. 5 The machine will need to know the IP address of the print server. 1 Open your browser. 2 Type http://printer_ip_address / into your browser (Where "printer_ip_address" is...
...3 (web browser) The Brother print server is equipped with a web server that JavaScript and cookies are always enabled in use, then disconnect all network settings of the internal Print/Scan server to factory default, please follow the steps below. 1 Make sure the machine is not in whichever browser...4 Press 1 to change some of the Network User's Guide on the CD-ROM. 25 You can use a web browser to select Yes. 5 The machine will need to know the IP address of the print server. 1 Open your browser. 2 Type http://printer_ip_address / into your browser (Where "printer_ip_address" is...

Quick Setup Guide - English
Page 28
... installing a (144-pin SO-DIMM) memory module. (See the User's Guide for your machine, visit us at http://solutions.brother.com or contact your local Brother reseller. Consumables and Options 1 Optional memory 1 The machine has the following optional accessories. Toner Cartridge TN-110C/TN-110M/TN-110Y/TN-110BK TN-115C/TN-115M/TN...
... installing a (144-pin SO-DIMM) memory module. (See the User's Guide for your machine, visit us at http://solutions.brother.com or contact your local Brother reseller. Consumables and Options 1 Optional memory 1 The machine has the following optional accessories. Toner Cartridge TN-110C/TN-110M/TN-110Y/TN-110BK TN-115C/TN-115M/TN...


