
Quick Setup Guide - English
Page 1
... page 25 page 29 Fo r Administrators Setup is Complete! Version 0 Setting Up Your Printer Windows® USB Windows® Parallel Installing the Driver Windows® Network Quick Setup Guide HL-5070N series Read this Quick Setup Guide and supplied CD-ROM in a convenient place for your ...problem or question, access the Brother Solutions Center directly from the CD-ROM/Driver or go to http://solutions.brother.com Keep this Quick Setup Guide before using the printer. Before...
... page 25 page 29 Fo r Administrators Setup is Complete! Version 0 Setting Up Your Printer Windows® USB Windows® Parallel Installing the Driver Windows® Network Quick Setup Guide HL-5070N series Read this Quick Setup Guide and supplied CD-ROM in a convenient place for your ...problem or question, access the Brother Solutions Center directly from the CD-ROM/Driver or go to http://solutions.brother.com Keep this Quick Setup Guide before using the printer. Before...
Quick Setup Guide - English
Page 2
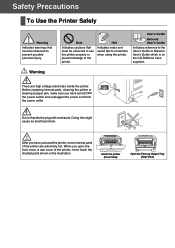
... View) Open the Face-up Output Tray (Rear View) Before replacing internal parts, cleaning the printer or clearing a paper jam, make sure you have just used the printer, some internal parts of the printer, never touch the shaded parts shown in the illustration. Do not handle the plug with wet hands. There are extremely hot...
... View) Open the Face-up Output Tray (Rear View) Before replacing internal parts, cleaning the printer or clearing a paper jam, make sure you have just used the printer, some internal parts of the printer, never touch the shaded parts shown in the illustration. Do not handle the plug with wet hands. There are extremely hot...
Quick Setup Guide - English
Page 3
...Network Interface Cable Users 16 ■ For Brother Peer-to-Peer Network Printer Users (LPR 16 Connecting the Printer to Your Network and Installing the Driver ■ For Brother Peer-to-Peer Network Printer Users (NetBIOS 18 Connecting the Printer to Your Network and Installing the Driver ■...; For Network Shared Printer Users 20 Installing the Driver, Connecting the Cable and Selecting the Appropriate Printer Queue or 'Share name' ...
...Network Interface Cable Users 16 ■ For Brother Peer-to-Peer Network Printer Users (LPR 16 Connecting the Printer to Your Network and Installing the Driver ■ For Brother Peer-to-Peer Network Printer Users (NetBIOS 18 Connecting the Printer to Your Network and Installing the Driver ■...; For Network Shared Printer Users 20 Installing the Driver, Connecting the Cable and Selecting the Appropriate Printer Queue or 'Share name' ...
Quick Setup Guide - English
Page 4
...Brother International Corporation 100 Somerset Corporate Boulevard P.O. As an ENERGY STAR® Partner, Brother Industries, Ltd. This equipment has been tested and found to 120 volt Model Only) This printer is no guarantee that the products Product name: Model number: Model number: Product options: Laser Printer Laser Printer HL-5030, 5040, 5050 and HL-5070N HL...This means that : Products description: Product Name: Model Number: Laser Printer HL-5030, HL-5040, HL-5050, HL-5070N HL-50 are designed to provide reasonable protection against harmful interference in ...
...Brother International Corporation 100 Somerset Corporate Boulevard P.O. As an ENERGY STAR® Partner, Brother Industries, Ltd. This equipment has been tested and found to 120 volt Model Only) This printer is no guarantee that the products Product name: Model number: Model number: Product options: Laser Printer Laser Printer HL-5030, 5040, 5050 and HL-5070N HL...This means that : Products description: Product Name: Model Number: Laser Printer HL-5030, HL-5040, HL-5050, HL-5070N HL-50 are designed to provide reasonable protection against harmful interference in ...
Quick Setup Guide - English
Page 5
Compliance is not suitable for products marketed in fire. Brother Buji Nan Ling Factory Gold Garden Ind., Nan Ling Village, Buji, Rong Gang, Shenzhen, CHINA This product complies with this printer is mandatory for your plug socket, remove the plug from the power outlet to ... install this product to the appropriate length. IEC 60825 specification (220 to 120 volt Model Only) U.S. Internal laser radiation Maximum radiation power: 5 mW Wave length: 760 - 810 nm Laser class: Class IIIb (Accordance with 21 CFR Part 1040.10) Class 3B (Accordance with cut wires is...
Compliance is not suitable for products marketed in fire. Brother Buji Nan Ling Factory Gold Garden Ind., Nan Ling Village, Buji, Rong Gang, Shenzhen, CHINA This product complies with this printer is mandatory for your plug socket, remove the plug from the power outlet to ... install this product to the appropriate length. IEC 60825 specification (220 to 120 volt Model Only) U.S. Internal laser radiation Maximum radiation power: 5 mW Wave length: 760 - 810 nm Laser class: Class IIIb (Accordance with 21 CFR Part 1040.10) Class 3B (Accordance with cut wires is...

Quick Setup Guide - English
Page 6
...the appropriate interface cable for the interface you intend to use (Parallel, USB or Network). ■ It's recommended to another. ■ Getting Started Carton Components Printer 1 2 7 3 4 5 6 1 Face-down Output Tray Support Flap (Support Flap) 2 Control Panel 3 Front Cover Release Button 4 Multi-purpose Tray (...meters). ■ For Parallel interface cable use a shielded interface cable that is not a standard accessory. Save all packing materials and the printer carton. ■ The interface cable is IEEE 1284-compliant. ■ Please make sure that you use a Hi-Speed USB 2.0 ...
...the appropriate interface cable for the interface you intend to use (Parallel, USB or Network). ■ It's recommended to another. ■ Getting Started Carton Components Printer 1 2 7 3 4 5 6 1 Face-down Output Tray Support Flap (Support Flap) 2 Control Panel 3 Front Cover Release Button 4 Multi-purpose Tray (...meters). ■ For Parallel interface cable use a shielded interface cable that is not a standard accessory. Save all packing materials and the printer carton. ■ The interface cable is IEEE 1284-compliant. ■ Please make sure that you use a Hi-Speed USB 2.0 ...

Quick Setup Guide - English
Page 7
... paper jam. 4 Status The LED will flash and change color depending on the printer status. 5 Job Cancel Button Will stop and cancel the print operation in progress. 6 Go Button Pause / Continue printing. 6 Printer LED Indications Printer LED Sleep / OFF Toner Warming Up Drum Paper Status Green : Blinking : ON... : OFF Ready Receiving Data Data Remaining Green Yellow Yellow Printer LED Toner Drum Paper Status Toner Low Yellow *1 Green Toner Empty No Paper/ Drum End Paper Jam Cover Open Yellow Yellow...
... paper jam. 4 Status The LED will flash and change color depending on the printer status. 5 Job Cancel Button Will stop and cancel the print operation in progress. 6 Go Button Pause / Continue printing. 6 Printer LED Indications Printer LED Sleep / OFF Toner Warming Up Drum Paper Status Green : Blinking : ON... : OFF Ready Receiving Data Data Remaining Green Yellow Yellow Printer LED Toner Drum Paper Status Toner Low Yellow *1 Green Toner Empty No Paper/ Drum End Paper Jam Cover Open Yellow Yellow...
Quick Setup Guide - English
Page 8
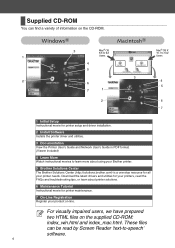
Download the latest drivers and utilities for your printers, read by Screen Reader 'text-to learn about using your Brother printer. 5 Brother Solutions Center The Brother Solutions Center (http://solutions.brother.com) is a one-stop resource for printer maintenance. 7 On-Line Registration Register your printer needs. These files can find a variety of information on the CD-ROM. 1 2 6 3 Mac®...
Download the latest drivers and utilities for your printers, read by Screen Reader 'text-to learn about using your Brother printer. 5 Brother Solutions Center The Brother Solutions Center (http://solutions.brother.com) is a one-stop resource for printer maintenance. 7 On-Line Registration Register your printer needs. These files can find a variety of information on the CD-ROM. 1 2 6 3 Mac®...

Quick Setup Guide - English
Page 9
... pages 8 to 11. 3 You can view the Initial Setup instructions and follow the steps on -screen instructions. Setting Up Your Printer Windows® USB Windows® Parallel Step 1 Setting Up Your Printer 1 Insert the CD-ROM into your CD-ROM drive. Connecting the interface cable is done when installing the driver. Follow...
... pages 8 to 11. 3 You can view the Initial Setup instructions and follow the steps on -screen instructions. Setting Up Your Printer Windows® USB Windows® Parallel Step 1 Setting Up Your Printer 1 Insert the CD-ROM into your CD-ROM drive. Connecting the interface cable is done when installing the driver. Follow...
Quick Setup Guide - English
Page 10
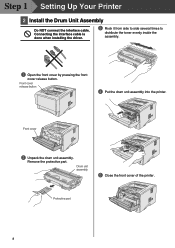
Front cover 2 Unpack the drum unit assembly. Step 1 Setting Up Your Printer 2 Install the Drum Unit Assembly Do NOT connect the interface cable. Protective part 8 Remove the protective part. Drum unit assembly 5 Close the front cover of the printer. Front cover release button 4 Put the drum unit assembly into the printer. Connecting the interface cable is done when installing the driver. 3 Rock it from side to side several times to distribute the toner evenly inside the assembly. 1 Open the front cover by pressing the front cover release button.
Front cover 2 Unpack the drum unit assembly. Step 1 Setting Up Your Printer 2 Install the Drum Unit Assembly Do NOT connect the interface cable. Protective part 8 Remove the protective part. Drum unit assembly 5 Close the front cover of the printer. Front cover release button 4 Put the drum unit assembly into the printer. Connecting the interface cable is done when installing the driver. 3 Rock it from side to side several times to distribute the toner evenly inside the assembly. 1 Open the front cover by pressing the front cover release button.

Quick Setup Guide - English
Page 11
... Go to here. Universal guide release button 5 Put the paper tray firmly back in the Paper Tray 1 Pull the paper tray completely out of the printer. 3 Fan the stack of the paper tray. Check that the paper is flat in the paper tray. Check that the guides are firmly in the...
... Go to here. Universal guide release button 5 Put the paper tray firmly back in the Paper Tray 1 Pull the paper tray completely out of the printer. 3 Fan the stack of the paper tray. Check that the paper is flat in the paper tray. Check that the guides are firmly in the...

Quick Setup Guide - English
Page 12
... power cord to install the driver. 10 Turn the power switch on. 4 Press the Go button. The printer prints a test page. Check that the printer power switch is done when installing the driver. 3 After the printer has finished warming up, the Status LED stops blinking and stays green. Connecting the interface cable is... off. Extend the Support flap. 1 Make sure that the test page has printed correctly. Go to the next page to the printer. 2 Plug the AC power cord into an AC outlet. Step 1 Setting Up Your...
... power cord to install the driver. 10 Turn the power switch on. 4 Press the Go button. The printer prints a test page. Check that the printer power switch is done when installing the driver. 3 After the printer has finished warming up, the Status LED stops blinking and stays green. Connecting the interface cable is... off. Extend the Support flap. 1 Make sure that the test page has printed correctly. Go to the next page to the printer. 2 Plug the AC power cord into an AC outlet. Step 1 Setting Up Your...
Quick Setup Guide - English
Page 13
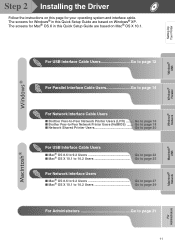
...12 For Parallel Interface Cable Users Go to page 14 For Network Interface Cable Users ■ Brother Peer-to -Peer Network Printer Users (NetBIOS) ....... Go to page 16 ■ Brother Peer-to -Peer Network Printer Users (LPR) ......... The screens for Mac® OS X in this Quick Setup Guide... are based on Mac® OS X 10.1. The screens for your operating system and interface cable. Setting Up Your Printer Windows® USB Windows®...
...12 For Parallel Interface Cable Users Go to page 14 For Network Interface Cable Users ■ Brother Peer-to -Peer Network Printer Users (NetBIOS) ....... Go to page 16 ■ Brother Peer-to -Peer Network Printer Users (LPR) ......... The screens for Mac® OS X in this Quick Setup Guide... are based on Mac® OS X 10.1. The screens for your operating system and interface cable. Setting Up Your Printer Windows® USB Windows®...
Quick Setup Guide - English
Page 14
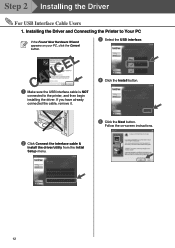
CANCEL 1 Make sure the USB interface cable is NOT connected to Your PC If the Found New Hardware Wizard appears on -screen instructions. 2 Click Connect the interface cable & Install the driver/utility from the Initial Setup menu. 12 Follow the on your PC, click the Cancel button. 3 Select the USB interface. If you have already connected the cable, remove it. 4 Click the Install button. 5 Click the Next button. Installing the Driver and Connecting the Printer to the printer, and then begin installing the driver. Step 2 Installing the Driver For USB Interface Cable Users 1.
CANCEL 1 Make sure the USB interface cable is NOT connected to Your PC If the Found New Hardware Wizard appears on -screen instructions. 2 Click Connect the interface cable & Install the driver/utility from the Initial Setup menu. 12 Follow the on your PC, click the Cancel button. 3 Select the USB interface. If you have already connected the cable, remove it. 4 Click the Install button. 5 Click the Next button. Installing the Driver and Connecting the Printer to the printer, and then begin installing the driver. Step 2 Installing the Driver For USB Interface Cable Users 1.

Quick Setup Guide - English
Page 15
...Next button. 2. For Windows® 2000/XP users: Go to the printer. Setting Your Printer as the Default Printer (For Windows® 2000/XP Users Only) 1 Click Start and then Printers and Faxes. 2 Select the Brother HL-5070N series icon. 7 Click the Finish button. 3 From the File menu,... select Set as the Default Printer". Setting Up Your Printer Windows® USB 6 When this screen appears, make sure the printer power switch is on. Connect...
...Next button. 2. For Windows® 2000/XP users: Go to the printer. Setting Your Printer as the Default Printer (For Windows® 2000/XP Users Only) 1 Click Start and then Printers and Faxes. 2 Select the Brother HL-5070N series icon. 7 Click the Finish button. 3 From the File menu,... select Set as the Default Printer". Setting Up Your Printer Windows® USB 6 When this screen appears, make sure the printer power switch is on. Connect...

Quick Setup Guide - English
Page 16
Step 2 Installing the Driver For Parallel Interface Cable Users Connecting the Printer to Your PC and Installing the Driver 1 Click Connect the interface cable & Install the driver/utility from the Initial Setup menu. 4 Connect the parallel interface cable to your PC, and then connect it to your PC, click the Cancel button. CANCEL 14 If the Found New Hardware Wizard appears on your printer. 2 Select the Parallel interface. 5 Turn on the printer power switch. 3 Turn off the printer power switch.
Step 2 Installing the Driver For Parallel Interface Cable Users Connecting the Printer to Your PC and Installing the Driver 1 Click Connect the interface cable & Install the driver/utility from the Initial Setup menu. 4 Connect the parallel interface cable to your PC, and then connect it to your PC, click the Cancel button. CANCEL 14 If the Found New Hardware Wizard appears on your printer. 2 Select the Parallel interface. 5 Turn on the printer power switch. 3 Turn off the printer power switch.

Quick Setup Guide - English
Page 17
The Setup is now complete. Follow the on-screen instructions. 7 Click the Install button. 9 Click the Finish button. Setting Up Your Printer 6 Click the Next button when the movie finishes. 8 Click the Next button. Windows® Parallel Installing the Driver Fo r Administrators 15
The Setup is now complete. Follow the on-screen instructions. 7 Click the Install button. 9 Click the Finish button. Setting Up Your Printer 6 Click the Next button when the movie finishes. 8 Click the Next button. Windows® Parallel Installing the Driver Fo r Administrators 15

Quick Setup Guide - English
Page 18
...Cable Users For Brother Peer-to-Peer Network Printer Users (LPR) If you are going to connect the printer to your network, we recommended that you contact your hub. 2 Select the Network interface. 5 Turn on your system administrator prior to a free port on the printer power switch.... 3 Turn off the printer power switch. 6 Click the Next button when the movie finishes. 16 Connecting the Printer to Your Network and Installing the Driver 1 Click Connect the interface cable & Install...
...Cable Users For Brother Peer-to-Peer Network Printer Users (LPR) If you are going to connect the printer to your network, we recommended that you contact your hub. 2 Select the Network interface. 5 Turn on your system administrator prior to a free port on the printer power switch.... 3 Turn off the printer power switch. 6 Click the Next button when the movie finishes. 16 Connecting the Printer to Your Network and Installing the Driver 1 Click Connect the interface cable & Install...

Quick Setup Guide - English
Page 19
... NT® 4.0 and Windows® 2000/XP users: The Setup is now complete. For Windows® 95 / 98 / Me users: After your Administrator about the Printer's IP Address. 17 B Click the Finish button. 9 Select Brother Peer-to-Peer Network Printer, and then click the Next button. 0 Select Search from a list of your...
... NT® 4.0 and Windows® 2000/XP users: The Setup is now complete. For Windows® 95 / 98 / Me users: After your Administrator about the Printer's IP Address. 17 B Click the Finish button. 9 Select Brother Peer-to-Peer Network Printer, and then click the Next button. 0 Select Search from a list of your...

Quick Setup Guide - English
Page 20
... then connect it to installation. Step 2 Installing the Driver For Network Interface Cable Users For Brother Peer-to-Peer Network Printer Users (NetBIOS) If you are going to connect the printer to your network, we recommended that you contact your system administrator prior to a free port on your hub. 2 Select the Network interface...
... then connect it to installation. Step 2 Installing the Driver For Network Interface Cable Users For Brother Peer-to-Peer Network Printer Users (NetBIOS) If you are going to connect the printer to your network, we recommended that you contact your system administrator prior to a free port on your hub. 2 Select the Network interface...


