Users Manual - English
Page 77
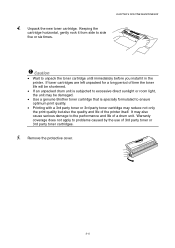
... party toner cartridges. 5. Warranty coverage does not apply to side five or six times. ! Keeping the cartridge horizontal, gently rock it in the printer. Remove the protective cover. 5-5 If toner cartridges are left unpacked for a long period of time the toner life will be shortened. • ...If an unpacked drum unit is subjected to excessive direct sunlight or room light, the unit may be damaged. • Use a genuine Brother toner cartridge that is specially formulated to ensure optimum print quality. • Printing with a 3rd party toner or ...
... party toner cartridges. 5. Warranty coverage does not apply to side five or six times. ! Keeping the cartridge horizontal, gently rock it in the printer. Remove the protective cover. 5-5 If toner cartridges are left unpacked for a long period of time the toner life will be shortened. • ...If an unpacked drum unit is subjected to excessive direct sunlight or room light, the unit may be damaged. • Use a genuine Brother toner cartridge that is specially formulated to ensure optimum print quality. • Printing with a 3rd party toner or ...
Users Manual - English
Page 83
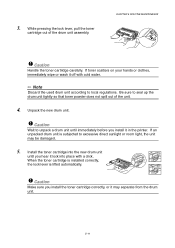
... a drum unit until you hear it lock into the new drum unit until immediately before you install the toner cartridge correctly, or it in the printer. CHAPTER 5 ROUTINE MAINTENANCE ! Caution Make sure you install it may be damaged. 5. Caution Handle the toner cartridge carefully. Be sure to local regulations. 3. Install ... 3 drum unit tightly so that toner powder does not spill out of the drum unit assembly. Caution Wait to excessive direct sunlight or room light, the unit may separate from the drum unit. 5-11 If an unpacked drum unit is lifted automatically. !
... a drum unit until you hear it lock into the new drum unit until immediately before you install the toner cartridge correctly, or it in the printer. CHAPTER 5 ROUTINE MAINTENANCE ! Caution Make sure you install it may be damaged. 5. Caution Handle the toner cartridge carefully. Be sure to local regulations. 3. Install ... 3 drum unit tightly so that toner powder does not spill out of the drum unit assembly. Caution Wait to excessive direct sunlight or room light, the unit may separate from the drum unit. 5-11 If an unpacked drum unit is lifted automatically. !
Users Manual - English
Page 92
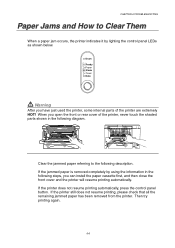
...remaining jammed paper has been removed from the printer. If the jammed paper is removed completely by lighting the control panel LEDs as shown below. Drum Ready Paper Alarm Toner Data Warning After you have just used the printer, some internal parts of the printer, never touch the shaded parts shown in... the following steps, you open the front or rear cover of the printer are ...
...remaining jammed paper has been removed from the printer. If the jammed paper is removed completely by lighting the control panel LEDs as shown below. Drum Ready Paper Alarm Toner Data Warning After you have just used the printer, some internal parts of the printer, never touch the shaded parts shown in... the following steps, you open the front or rear cover of the printer are ...
Users Manual - English
Page 98
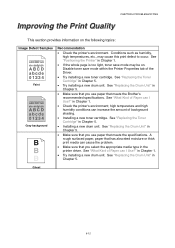
... may cause this print defect to occur. See "Replacing the Drum Unit" in Chapter 1. • If the whole page is too light, toner save mode within the Printer Properties tab of the Driver. • Try installing a new toner cartridge. See "What Kind of background shading. • Installing a... information on . See "What Kind of Paper can increase the amount of Paper can cause the problem. • Make sure that meets the Brother's recommended specifications. See "Replacing the Drum Unit" in Chapter 5. • Make sure that you select the appropriate media type in Chapter 1. &#...
... may cause this print defect to occur. See "Replacing the Drum Unit" in Chapter 1. • If the whole page is too light, toner save mode within the Printer Properties tab of the Driver. • Try installing a new toner cartridge. See "What Kind of background shading. • Installing a... information on . See "What Kind of Paper can increase the amount of Paper can cause the problem. • Make sure that meets the Brother's recommended specifications. See "Replacing the Drum Unit" in Chapter 5. • Make sure that you select the appropriate media type in Chapter 1. &#...
Users Manual - English
Page 102
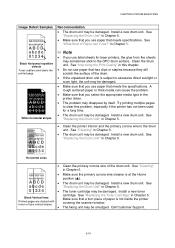
...used for a long time. • The drum unit may be damaged. • Make sure that you use paper that you use label sheets for laser printers, the glue from the sheets may disappear by itself. See "Improving the Print Quality" in Chapter 1. ✏ Note • If you use paper...pages to clear this chapter. • Do not use paper that meets specifications. See "Cleaning" in the printer driver. • The problem may sometimes stick to excessive direct sunlight or room light, the unit may be smudged. Call Customer Support. 6-16 See "What Kind of Paper can cause the ...
...used for a long time. • The drum unit may be damaged. • Make sure that you use paper that you use label sheets for laser printers, the glue from the sheets may disappear by itself. See "Improving the Print Quality" in Chapter 1. ✏ Note • If you use paper...pages to clear this chapter. • Do not use paper that meets specifications. See "Cleaning" in the printer driver. • The problem may sometimes stick to excessive direct sunlight or room light, the unit may be smudged. Call Customer Support. 6-16 See "What Kind of Paper can cause the ...
Quick Setup Guide - English
Page 2
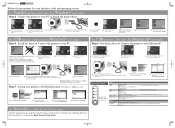
... install the driver / utilities." 2 Select the parallel interface cable. (HL-1230 users will reprint the last job. Printer will not see this screen.) 3 Turn off , press and hold the button until all the LEDs light. Press the button to the "Installing the Driver for your PC, ... Parallel interface cable users (For Windows® users only) Step 4 Connect the printer to your printer as the Default printer (For Windows® 2000 users only) 1 Click Start, Setting and Printers. 2 Select the Brother HL- 1440/1450/1470N series icon. 3 Click the File menu, and then select Set as Default...
... install the driver / utilities." 2 Select the parallel interface cable. (HL-1230 users will reprint the last job. Printer will not see this screen.) 3 Turn off , press and hold the button until all the LEDs light. Press the button to the "Installing the Driver for your PC, ... Parallel interface cable users (For Windows® users only) Step 4 Connect the printer to your printer as the Default printer (For Windows® 2000 users only) 1 Click Start, Setting and Printers. 2 Select the Brother HL- 1440/1450/1470N series icon. 3 Click the File menu, and then select Set as Default...


