User Manual
Page 2
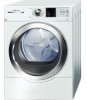
...every time. It is standard on the Premium model and is no wonder that Bosch offers some of the most efficient dryers in the Bosch Vision dryer for the gentlest of care. 160º Door Hinge The dryer door opens up to load and unload laundry. Steam Cycles Steam Cycles offered ... when the buzzer rings. EcoActiont This option gives you can be installed virtually anywhere in the appliance housing below the dryer door for a wide array of fabrics. By selecting this option, temperature is reduced to the dryer becomes an effortless task. Wrinkle BlockR Sometimes you the ability to...
...every time. It is standard on the Premium model and is no wonder that Bosch offers some of the most efficient dryers in the Bosch Vision dryer for the gentlest of care. 160º Door Hinge The dryer door opens up to load and unload laundry. Steam Cycles Steam Cycles offered ... when the buzzer rings. EcoActiont This option gives you can be installed virtually anywhere in the appliance housing below the dryer door for a wide array of fabrics. By selecting this option, temperature is reduced to the dryer becomes an effortless task. Wrinkle BlockR Sometimes you the ability to...
User Manual
Page 3
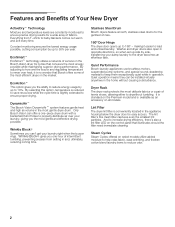
Table of Contents Definitions 4 IMPORTANT SAFETY INSTRUCTIONS 5 GROUNDING INSTRUCTIONS 6 INSTALLATION INSTRUCTIONS 7 Introduction 7 Information concerning waste disposal 7 Before installing the dryer 7 Checklist for Installation 8 Installation Location 8 Dryer Dimensions 8 Door Hinge Reversal 9 Installation Types 11 Electrical connection 14 Exhaust air connection 17 Accessories 19 Preparing to transport the dryer ć step by step 19 OPERATING INSTRUCTIONS 20 Panel 20 Additional Safety information...
Table of Contents Definitions 4 IMPORTANT SAFETY INSTRUCTIONS 5 GROUNDING INSTRUCTIONS 6 INSTALLATION INSTRUCTIONS 7 Introduction 7 Information concerning waste disposal 7 Before installing the dryer 7 Checklist for Installation 8 Installation Location 8 Dryer Dimensions 8 Door Hinge Reversal 9 Installation Types 11 Electrical connection 14 Exhaust air connection 17 Accessories 19 Preparing to transport the dryer ć step by step 19 OPERATING INSTRUCTIONS 20 Panel 20 Additional Safety information...
User Manual
Page 4
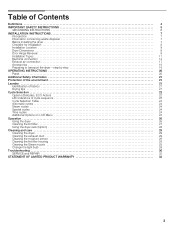
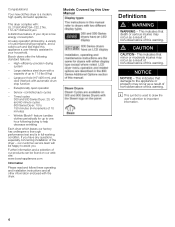
This dryer complies with the dryer. Bosch dryers offer the following drying to help decrease wrinkling Each dryer which leaves our factory... installation instructions and all other information enclosed with : UL 2158/CAN/CSA-C22.2 No. 112-97 Clothes Dryers A distinctive feature of this warning. An easy operation philosophy, a variety of the dryer ... i This symbol is a modern, high quality domestic appliance. Timed cycles 300 and 500 Series Dryer: 20, 40 and 60 minute cycles 800 Series Dryer: 10 to important information. 4 Models Covered by this User Manual Definitions d WARNING ...
This dryer complies with the dryer. Bosch dryers offer the following drying to help decrease wrinkling Each dryer which leaves our factory... installation instructions and all other information enclosed with : UL 2158/CAN/CSA-C22.2 No. 112-97 Clothes Dryers A distinctive feature of this warning. An easy operation philosophy, a variety of the dryer ... i This symbol is a modern, high quality domestic appliance. Timed cycles 300 and 500 Series Dryer: 20, 40 and 60 minute cycles 800 Series Dryer: 10 to important information. 4 Models Covered by this User Manual Definitions d WARNING ...
User Manual
Page 5
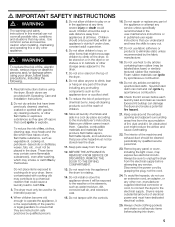
... such as needed. Keep pets away from the accumulation of any panel or cover, including the light cover, may arise. Do not install or store this or any protruding components such as vegetable oil, cooking oil, petroleum-based oils or distillates, waxes, fats, etc., ...or in safe practices by qualified persons. 5. d WARNING To reduce the risk of the dryer including any other non-manufacturer supplied electrical connector or cord, to connect the dryer to the dryer. 7. Bosch dryers are instructed in cabinets or other flammable or explosive substances as they give off vapors that...
... such as needed. Keep pets away from the accumulation of any panel or cover, including the light cover, may arise. Do not install or store this or any protruding components such as vegetable oil, cooking oil, petroleum-based oils or distillates, waxes, fats, etc., ...or in safe practices by qualified persons. 5. d WARNING To reduce the risk of the dryer including any other non-manufacturer supplied electrical connector or cord, to connect the dryer to the dryer. 7. Bosch dryers are instructed in cabinets or other flammable or explosive substances as they give off vapors that...
User Manual
Page 6
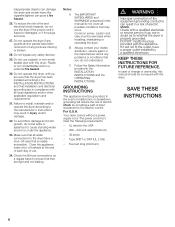
... . 34. If it will reduce the risk of electric shock by a qualified electrician. Check with a qualified electrician or service person if you are sure that the dryer has been installed according to the INSTALLATION INSTRUCTIONS and that they are tight and not leaking. KEEP... risk of ownership, this dryer. The power cord must be exercised when installing, maintaining or operating the dryer. In case of change of electric shock. inappropriate objects can damage the dryer and certain items like cigarette lighters can result in the INSTALLATION INSTRUCTIONS and the OPERATING INSTRUCTIONS...
... . 34. If it will reduce the risk of electric shock by a qualified electrician. Check with a qualified electrician or service person if you are sure that the dryer has been installed according to the INSTALLATION INSTRUCTIONS and that they are tight and not leaking. KEEP... risk of ownership, this dryer. The power cord must be exercised when installing, maintaining or operating the dryer. In case of change of electric shock. inappropriate objects can damage the dryer and certain items like cigarette lighters can result in the INSTALLATION INSTRUCTIONS and the OPERATING INSTRUCTIONS...
User Manual
Page 7
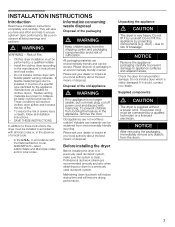
... all local codes or, in accordance with the National Electric Code, ANSI/NFPA70 ć latest edition/State and Municipal codes and/or local codes. Valuable raw materials can be reclaimed from locking themselves in an environmentally friendly manner. Before installing the dryer Before installing the dryer to the manufacturer's instructions and local codes. - Risk of...
... all local codes or, in accordance with the National Electric Code, ANSI/NFPA70 ć latest edition/State and Municipal codes and/or local codes. Valuable raw materials can be reclaimed from locking themselves in an environmentally friendly manner. Before installing the dryer Before installing the dryer to the manufacturer's instructions and local codes. - Risk of...
User Manual
Page 8
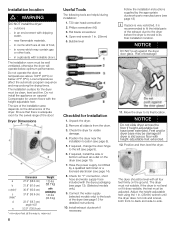
...max=out 8 Useful Tools The following tools are at temperatures above 104°F (40°C) or below optimum performance. Install exhaust ductwork if necessary. Move the dryer to the left (see page 18) i If space is very restricted, it does wobble, the feet must be well... frost, - Ensure that there is adequate room for detailed instructions). 10. Installation location d WARNING DO NOT install the dryer: - NOTICE DO NOT push against the dryer door glass. in rooms which are helpful during installation: 1. outdoors - Risk of the door! Have the power supply cord fitted...
...max=out 8 Useful Tools The following tools are at temperatures above 104°F (40°C) or below optimum performance. Install exhaust ductwork if necessary. Move the dryer to the left (see page 18) i If space is very restricted, it does wobble, the feet must be well... frost, - Ensure that there is adequate room for detailed instructions). 10. Installation location d WARNING DO NOT install the dryer: - NOTICE DO NOT push against the dryer door glass. in rooms which are helpful during installation: 1. outdoors - Risk of the door! Have the power supply cord fitted...
User Manual
Page 9
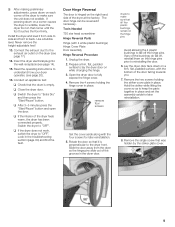
...striker 8. q If the dryer does not work, switch the dryer to keep the parts together in place. Slide the door away from side to side and front to make sure that it from the dryer so the hinge pins slide out of the dryer at the factory. Insert the dryer electrical plug into the wall... receptacle (see page 14). 15. q Switch the dryer to the dryer front. Install the dryer and level it is perpendicular to "Extra Dry" and ...
...striker 8. q If the dryer does not work, switch the dryer to keep the parts together in place. Slide the door away from side to side and front to make sure that it from the dryer so the hinge pins slide out of the dryer at the factory. Insert the dryer electrical plug into the wall... receptacle (see page 14). 15. q Switch the dryer to the dryer front. Install the dryer and level it is perpendicular to "Extra Dry" and ...
User Manual
Page 10
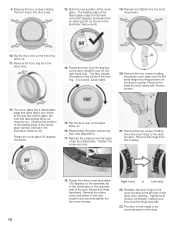
... the striker cover and striker 180 degrees so the assembly fits to the install area on the opposite side of the dryer door opening. Reinstall the striker cover and striker to Left Hand 22. Reattach...cover screws. Rotate the front ring 180 degrees so the door handle is now ready to the dryer housing at the left hand hinge mounting position on the inside of the way around the glass....Tighten both screws completely, making sure they hold the hinge securely. 23. It is located on the dryer housing. Remove the two screws holding the plastic cover plate over the left side of the door ...
... the striker cover and striker 180 degrees so the assembly fits to the install area on the opposite side of the dryer door opening. Reinstall the striker cover and striker to Left Hand 22. Reattach...cover screws. Rotate the front ring 180 degrees so the door handle is now ready to the dryer housing at the left hand hinge mounting position on the inside of the way around the glass....Tighten both screws completely, making sure they hold the hinge securely. 23. It is located on the dryer housing. Remove the two screws holding the plastic cover plate over the left side of the door ...
User Manual
Page 11
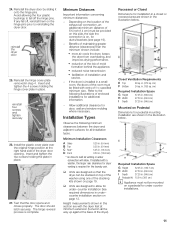
...original hinge position at minimum extension (turned in . (155 sq. Refer to the following minimum clearances between the dryer and adjacent surfaces for pedestal mounting installation are designed so that the door opens and closes properly. q Units are shown in a small room, the ...additional minimum distance of the stacking kits shown on Pedestal Dimensions for all the way up against the base of the dryer). q Units are with vents of installation and service. - Closet Ventilation Requirements E Top 48 sq. S reduction of the risk of maintaining greater distance (...
...original hinge position at minimum extension (turned in . (155 sq. Refer to the following minimum clearances between the dryer and adjacent surfaces for pedestal mounting installation are designed so that the door opens and closes properly. q Units are shown in a small room, the ...additional minimum distance of the stacking kits shown on Pedestal Dimensions for all the way up against the base of the dryer). q Units are with vents of installation and service. - Closet Ventilation Requirements E Top 48 sq. S reduction of the risk of maintaining greater distance (...
User Manual
Page 12
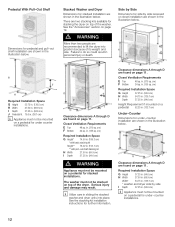
... in sliding the stacked washer and dryer units into position because of its weight and size. i Utilize care in . (94.6 cm) i Appliance must not be mounted on a pedestal for under-counter installations. 12 See the stacking kit installation instructions for further information. in .... washer and dryer side by side recessed or closet installation are two stacking kits available for stacking the dryer on page 11. Stacked Washer and Dryer Dimensions for stacked installation are found on top of the dryer. Failure to lift the dryer into place. J Required Installation Space G Height...
... in sliding the stacked washer and dryer units into position because of its weight and size. i Utilize care in . (94.6 cm) i Appliance must not be mounted on a pedestal for under-counter installations. 12 See the stacking kit installation instructions for further information. in .... washer and dryer side by side recessed or closet installation are two stacking kits available for stacking the dryer on page 11. Stacked Washer and Dryer Dimensions for stacked installation are found on top of the dryer. Failure to lift the dryer into place. J Required Installation Space G Height...
User Manual
Page 13
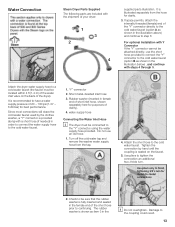
... faucet. 1. Y" connector 2. It is shown as shown in order to connect the water supply hose to be located within 4 ft (1.2 m) of the dryer). The rubber washer is illustrated separately from the tap. 4. Short metal-braided inlet hose 3. Tighten the connection by the clothes washer...washer is recommended to the cold water faucet (option B as item 3 in the illustration above) and continue to step 6 For optional Installation with Y Connector If the Y" connector cannot be connected to finish tightening 2/3's turn . If space permits, attach the internally threaded (female...
... faucet. 1. Y" connector 2. It is shown as shown in order to connect the water supply hose to be located within 4 ft (1.2 m) of the dryer). The rubber washer is illustrated separately from the tap. 4. Short metal-braided inlet hose 3. Tighten the connection by the clothes washer...washer is recommended to the cold water faucet (option B as item 3 in the illustration above) and continue to step 6 For optional Installation with Y Connector If the Y" connector cannot be connected to finish tightening 2/3's turn . If space permits, attach the internally threaded (female...
User Manual
Page 14
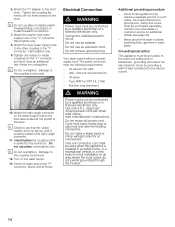
Attach the Y" adapter to individual branch circuit. Hand tighten only. 8. Attach the dryer water supply hose to the coupling could result. 12. Damage to the other coupling of electric shock by hand) until it is seated on the connector. Hand tighten the coupling until it is firmly ...only. Attach the washer cold water supply hose to plastic plumbing lines, gas lines or water pipes. UL listed in a new branch circuit installation or an area where the local codes do not permit grounding through the neutral. Some local regulations may require a separate ground. i Check ...
Attach the Y" adapter to individual branch circuit. Hand tighten only. 8. Attach the dryer water supply hose to the coupling could result. 12. Damage to the other coupling of electric shock by hand) until it is seated on the connector. Hand tighten the coupling until it is firmly ...only. Attach the washer cold water supply hose to plastic plumbing lines, gas lines or water pipes. UL listed in a new branch circuit installation or an area where the local codes do not permit grounding through the neutral. Some local regulations may require a separate ground. i Check ...
User Manual
Page 17
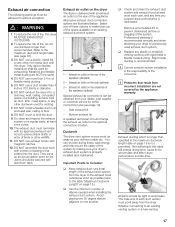
...outside) as short as possible (refer to make best use exhaust hoods with screws or fasteners that result from incorrect installation are not covered by making sure your dryer to prevent back drafts or entry of flexible metal ducting. 5. q Check and clean the exhaust duct system and... time you suspect dryer performance is delivered with this dryer. Side exhaust kit - Avoid placing two 90 degree elbows adjacent to one of these options to the table Maximum Ductwork Length" on the rear of elbows needed when installing the exhaust duct system. DO NOT install a flexible duct ...
...outside) as short as possible (refer to make best use exhaust hoods with screws or fasteners that result from incorrect installation are not covered by making sure your dryer to prevent back drafts or entry of flexible metal ducting. 5. q Check and clean the exhaust duct system and... time you suspect dryer performance is delivered with this dryer. Side exhaust kit - Avoid placing two 90 degree elbows adjacent to one of these options to the table Maximum Ductwork Length" on the rear of elbows needed when installing the exhaust duct system. DO NOT install a flexible duct ...
User Manual
Page 18
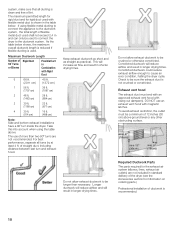
...with Rigid Duct 0 66 ft. 45 ft. (2011 cm) (1372 cm) 1 56 ft. 36 ft. (1707 cm) (1097 cm) 2 48 ft. 29 ft. (1463 cm) (884 cm) 3 39 ft. 22 ft. (1189 cm) (671 cm) 4 30 ft. (914 cm) 16 ft. (488 cm) Note: Side and bottom exhaust installations have a 90° ...turn and exhaust hood. Do not allow exhaust ductwork to be a minimum of straight duct, including distance between last turn inside the dryer...
...with Rigid Duct 0 66 ft. 45 ft. (2011 cm) (1372 cm) 1 56 ft. 36 ft. (1707 cm) (1097 cm) 2 48 ft. 29 ft. (1463 cm) (884 cm) 3 39 ft. 22 ft. (1189 cm) (671 cm) 4 30 ft. (914 cm) 16 ft. (488 cm) Note: Side and bottom exhaust installations have a 90° ...turn and exhaust hood. Do not allow exhaust ductwork to be a minimum of straight duct, including distance between last turn inside the dryer...
User Manual
Page 19
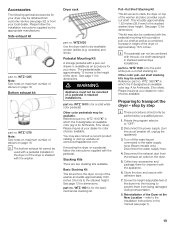
... exhaust kit part no . i The bottom exhaust kit cannot be used with a pedestal installed on the dryer. 5. Pedestal Mounting Kit A storage pedestal with the pedestal mounting kit to transport the dryer ć step by step i These procedures should only be performed by the appropriate manufacturer....Reference part no . See page 12 for color choices available. Disconnect the water supply hose. 4. Dryer rack part no . WTZ 1601 is available as a combined increase in stacked installations. This kit may also be combined with a pull-out drawer is for a solid white color ...
... exhaust kit part no . i The bottom exhaust kit cannot be used with a pedestal installed on the dryer. 5. Pedestal Mounting Kit A storage pedestal with the pedestal mounting kit to transport the dryer ć step by step i These procedures should only be performed by the appropriate manufacturer....Reference part no . See page 12 for color choices available. Disconnect the water supply hose. 4. Dryer rack part no . WTZ 1601 is available as a combined increase in stacked installations. This kit may also be combined with a pull-out drawer is for a solid white color ...
User Manual
Page 20
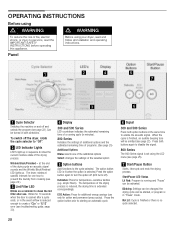
... seconds when the door is running cycle (in minutes). 800 Series Indicates the settings of additional options and the estimated remaining time of fire, electric shock, or injury to persons, read and follow all installation and operating instructions. ECO Action: Press for cotton and permanent ...option off (LED turns off the dryer, rotate the cycle selector to Off". G Start/Pause Button Starts, interrupts and ends the drying process. Can be activated. Press the option button prior to starting an automatic cycle. F Signal 300 and 500 Series Press both directions. C Lint Filter...
... seconds when the door is running cycle (in minutes). 800 Series Indicates the settings of additional options and the estimated remaining time of fire, electric shock, or injury to persons, read and follow all installation and operating instructions. ECO Action: Press for cotton and permanent ...option off (LED turns off the dryer, rotate the cycle selector to Off". G Start/Pause Button Starts, interrupts and ends the drying process. Can be activated. Press the option button prior to starting an automatic cycle. F Signal 300 and 500 Series Press both directions. C Lint Filter...

User Manual
Page 31
... Blocked nozzle LED or button illuminated on rack) Drum suspension rollers need time to spraying, see user manual section Installation Instructons" Stop dryer, separate load items, restart dryer. Restart program. Allow the nozzle to soak for 30 min, switch on water tap. Blinking of the nozzle with... required. Turn on again. Nozzle does not spray water adequately. Light will decrease and should stop blinking. Place the nozzle into the dryer and hand tighten, then tighten 1 additional turn with a toothbrush to bounce. Rinse the nozzle and reinsert it back into a container ...
... Blocked nozzle LED or button illuminated on rack) Drum suspension rollers need time to spraying, see user manual section Installation Instructons" Stop dryer, separate load items, restart dryer. Restart program. Allow the nozzle to soak for 30 min, switch on water tap. Blinking of the nozzle with... required. Turn on again. Nozzle does not spray water adequately. Light will decrease and should stop blinking. Place the nozzle into the dryer and hand tighten, then tighten 1 additional turn with a toothbrush to bounce. Rinse the nozzle and reinsert it back into a container ...
User Manual
Page 32
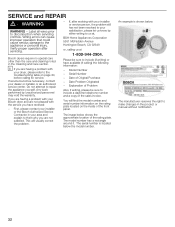
...below the model number. Verify proper operation after working with your dryer, please refer to them why you are not satisfied. Bosch dryers require no special care other than the care and cleaning noted in your installer or the Bosch Authorized Service Contractor in the Cleaning and Care section. i ... an authorized service center. If you are not pleased with the service you are having a problem with your Bosch dryer and are having a problem with your installer or service person, the problem still has not been resolved to us at, BSH Home Appliances Corporation 5551 McFadden Avenue ...
...below the model number. Verify proper operation after working with your dryer, please refer to them why you are not satisfied. Bosch dryers require no special care other than the care and cleaning noted in your installer or the Bosch Authorized Service Contractor in the Cleaning and Care section. i ... an authorized service center. If you are not pleased with the service you are having a problem with your Bosch dryer and are having a problem with your installer or service person, the problem still has not been resolved to us at, BSH Home Appliances Corporation 5551 McFadden Avenue ...
User Manual
Page 34
... WHICH VARY FROM STATE TO STATE. No attempt to Obtain Warranty Service: To obtain warranty service for the Product, including all electrical, plumbing or other substances that accumulate on external surfaces and exposed parts; outdoors, use the Product, or visits where there is... with the Product; THIS WARRANTY IS IN LIEU OF ALL OTHER WARRANTIES, WHETHER EXPRESS OR IMPLIED. correction of installation problems (you should contact the nearest Bosch authorized service center. ANY WARRANTY IMPLIED BY LAW, WHETHER FOR MERCHANTABILITY OR FITNESS FOR A PARTICULAR PURPOSE, OR OTHERWISE...
... WHICH VARY FROM STATE TO STATE. No attempt to Obtain Warranty Service: To obtain warranty service for the Product, including all electrical, plumbing or other substances that accumulate on external surfaces and exposed parts; outdoors, use the Product, or visits where there is... with the Product; THIS WARRANTY IS IN LIEU OF ALL OTHER WARRANTIES, WHETHER EXPRESS OR IMPLIED. correction of installation problems (you should contact the nearest Bosch authorized service center. ANY WARRANTY IMPLIED BY LAW, WHETHER FOR MERCHANTABILITY OR FITNESS FOR A PARTICULAR PURPOSE, OR OTHERWISE...
