User Manual
Page 3
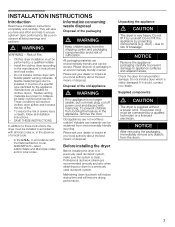
... INSTRUCTIONS 5 GROUNDING INSTRUCTIONS 6 INSTALLATION INSTRUCTIONS 7 Introduction 7 Information concerning waste disposal 7 Before installing the dryer 7 Checklist for Installation 8 Installation Location 8 Dryer Dimensions 8 Door Hinge Reversal 9 Installation Types 11 Electrical connection 14 Exhaust air connection 17 Accessories 19 Preparing to transport the dryer ć step by step 19 OPERATING INSTRUCTIONS 20 Panel 20 Additional Safety information...
... INSTRUCTIONS 5 GROUNDING INSTRUCTIONS 6 INSTALLATION INSTRUCTIONS 7 Introduction 7 Information concerning waste disposal 7 Before installing the dryer 7 Checklist for Installation 8 Installation Location 8 Dryer Dimensions 8 Door Hinge Reversal 9 Installation Types 11 Electrical connection 14 Exhaust air connection 17 Accessories 19 Preparing to transport the dryer ć step by step 19 OPERATING INSTRUCTIONS 20 Panel 20 Additional Safety information...
User Manual
Page 5
...or legal guardians to ensure that could cause a laundry load to a chemical reaction that you understand and have traces of electrical power and must not be permitted within an appliance's vicinity if under close, constant adult supervision. 6. Children should only be placed in the... softeners or products to play on any part of lint, dust and dirt. Excess lint buildup can damage the dryer and create a potential fire hazard. 21. Bosch dryers are instructed in safe practices by qualified service personnel. 23. Do not allow children to eliminate static unless recommended ...
...or legal guardians to ensure that could cause a laundry load to a chemical reaction that you understand and have traces of electrical power and must not be permitted within an appliance's vicinity if under close, constant adult supervision. 6. Children should only be placed in the... softeners or products to play on any part of lint, dust and dirt. Excess lint buildup can damage the dryer and create a potential fire hazard. 21. Bosch dryers are instructed in safe practices by qualified service personnel. 23. Do not allow children to eliminate static unless recommended ...
User Manual
Page 6
...metal flexible duct with the appliance. Close the appliance water shut-off valve that installation and electrical grounding are sure that the dryer has been installed according to whether the dryer is a potential fire hazard. 30. GROUNDING INSTRUCTIONS This appliance must meet the following requirements:... growth, do not use . 34. Check the fill hose connections on a regular basis to the dryer have a proper outlet installed by providing a path of fire and electrical shock hazards, do not let spills or splashout to the manufacturer's instructions may occur. B Always contact...
...metal flexible duct with the appliance. Close the appliance water shut-off valve that installation and electrical grounding are sure that the dryer has been installed according to whether the dryer is a potential fire hazard. 30. GROUNDING INSTRUCTIONS This appliance must meet the following requirements:... growth, do not use . 34. Check the fill hose connections on a regular basis to the dryer have a proper outlet installed by providing a path of fire and electrical shock hazards, do not let spills or splashout to the manufacturer's instructions may occur. B Always contact...
User Manual
Page 7
... all local codes or, in the absence of the old appliance d WARNING If the appliance is supplied without a power cord. Do not install a clothes dryer with the National Electric Code, ANSI/NFPA70 ć latest edition/State and Municipal codes and/or local codes. To reduce the risk of the packaging d WARNING d WARNING...
... all local codes or, in the absence of the old appliance d WARNING If the appliance is supplied without a power cord. Do not install a clothes dryer with the National Electric Code, ANSI/NFPA70 ć latest edition/State and Municipal codes and/or local codes. To reduce the risk of the packaging d WARNING d WARNING...
User Manual
Page 9
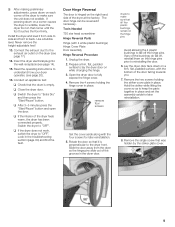
... the heightĆadjustable feet! 13. Connect the exhaust duct to make sure that it from the dryer so the hinge pins slide out of the dryer feels warm, the dryer has been connected properly. Insert the dryer electrical plug into the wall receptacle (see page 20). 16. Read the operating instructions to "Extra Dry...
... the heightĆadjustable feet! 13. Connect the exhaust duct to make sure that it from the dryer so the hinge pins slide out of the dryer feels warm, the dryer has been connected properly. Insert the dryer electrical plug into the wall receptacle (see page 20). 16. Read the operating instructions to "Extra Dry...
User Manual
Page 14
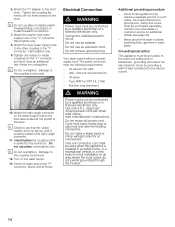
... not reuse old power cord. Some local regulations may require a separate ground. Attach the dryer water supply hose to the coupling could result. 12. Do not use an adapter. Electrical Connection d WARNING Power cord must be grounded. Attach the Y" adapter to the coupling could...-angle connector. 11. Damage to the other coupling of least resistance for the electric current. 14 Tighten the coupling (by a qualified technician or a licensed electrician only. Your dryer comes without a power supply cord. i Do not overtighten. Grounding instruction This appliance...
... not reuse old power cord. Some local regulations may require a separate ground. Attach the dryer water supply hose to the coupling could result. 12. Do not use an adapter. Electrical Connection d WARNING Power cord must be grounded. Attach the Y" adapter to the coupling could...-angle connector. 11. Damage to the other coupling of least resistance for the electric current. 14 Tighten the coupling (by a qualified technician or a licensed electrician only. Your dryer comes without a power supply cord. i Do not overtighten. Grounding instruction This appliance...
User Manual
Page 20
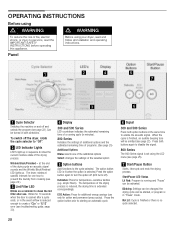
...can be turned in minutes). 800 Series Indicates the settings of additional options and the estimated remaining time of fire, electric shock, or injury to the cycle selected. D Display 300 and 500 Series LED countdown indicates the estimated remaining ...time of the drying process. F Signal 300 and 500 Series Press both directions. Can be activated. ECO Action: Press for additional energy savings (use . OPERATING INSTRUCTIONS Before using your dryer...
...can be turned in minutes). 800 Series Indicates the settings of additional options and the estimated remaining time of fire, electric shock, or injury to the cycle selected. D Display 300 and 500 Series LED countdown indicates the estimated remaining ...time of the drying process. F Signal 300 and 500 Series Press both directions. Can be activated. ECO Action: Press for additional energy savings (use . OPERATING INSTRUCTIONS Before using your dryer...
User Manual
Page 30
...calling for 30 min, switch on again. Check power supply. Lint filter dirty. Clean exhaust air duct. Switch the dryer off /switch on again. Start program. 800 Series, Change settings for 30 min. Degree of the following table. Exhaust air duct is too long. Display may not... rectified or a repair is too long. Close door. Clean moisture sensor as described on again. Troubleshooting d WARNING TO AVOID RISK OF ELECTRICAL SHOCK! Repairs or replacement of parts shall be covered by means of drying has not been reached or the drying time is blocked or ...
...calling for 30 min, switch on again. Check power supply. Lint filter dirty. Clean exhaust air duct. Switch the dryer off /switch on again. Start program. 800 Series, Change settings for 30 min. Degree of the following table. Exhaust air duct is too long. Display may not... rectified or a repair is too long. Close door. Clean moisture sensor as described on again. Troubleshooting d WARNING TO AVOID RISK OF ELECTRICAL SHOCK! Repairs or replacement of parts shall be covered by means of drying has not been reached or the drying time is blocked or ...


