
User Manual
Page 2
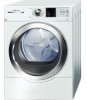
... most delicate fabrics or a pair of tennis shoes, allowing either to load and unload laundry. Only Bosch Vision can offer a one hour of intermittent tumbling, preventing creases from T-shirts to ensure proper drying. Stainless Steel Drum Bosch dryers feature smooth, stainless steel drums for a wide array of fabrics. Quiet operation means they can 't get...
... most delicate fabrics or a pair of tennis shoes, allowing either to load and unload laundry. Only Bosch Vision can offer a one hour of intermittent tumbling, preventing creases from T-shirts to ensure proper drying. Stainless Steel Drum Bosch dryers feature smooth, stainless steel drums for a wide array of fabrics. Quiet operation means they can 't get...
User Manual
Page 3
... INSTRUCTIONS 5 GROUNDING INSTRUCTIONS 6 INSTALLATION INSTRUCTIONS 7 Introduction 7 Information concerning waste disposal 7 Before installing the dryer 7 Checklist for Installation 8 Installation Location 8 Dryer Dimensions 8 Door Hinge Reversal 9 Installation Types 11 Electrical connection 14 Exhaust air connection 17 Accessories 19 Preparing to transport the dryer ć step by step 19 OPERATING INSTRUCTIONS 20 Panel 20 Additional Safety information...
... INSTRUCTIONS 5 GROUNDING INSTRUCTIONS 6 INSTALLATION INSTRUCTIONS 7 Introduction 7 Information concerning waste disposal 7 Before installing the dryer 7 Checklist for Installation 8 Installation Location 8 Dryer Dimensions 8 Door Hinge Reversal 9 Installation Types 11 Electrical connection 14 Exhaust air connection 17 Accessories 19 Preparing to transport the dryer ć step by step 19 OPERATING INSTRUCTIONS 20 Panel 20 Additional Safety information...
User Manual
Page 4
... symbol is used to draw the user's attention to one hour following standard features: - Timed cycles 300 and 500 Series Dryer: 20, 40 and 60 minute cycles 800 Series Dryer: 10 to 150 minutes (in increments of this appliance a userĆfriendly assistant in full working condition. Exceptionally... high quality domestic appliance. This indicates that death or serious injuries may occur as a result of nonĆobservance of the dryer - Bosch dryers offer the following drying to 17.6 lbs (8 kg) - Sensor-controlled auto cycles - Further information and a selection of our ...
... symbol is used to draw the user's attention to one hour following standard features: - Timed cycles 300 and 500 Series Dryer: 20, 40 and 60 minute cycles 800 Series Dryer: 10 to 150 minutes (in increments of this appliance a userĆfriendly assistant in full working condition. Exceptionally... high quality domestic appliance. This indicates that death or serious injuries may occur as a result of nonĆobservance of the dryer - Bosch dryers offer the following drying to 17.6 lbs (8 kg) - Sensor-controlled auto cycles - Further information and a selection of our ...
User Manual
Page 5
...ignite by spontaneous combustion. 20. Spunbonded olefin can melt and can ignite by spontaneous combustion. 19. Disconnect the power cord by themselves. Bosch dryers are instructed in safe practices by the fabric manufacturer. 18. To reduce the risk of fire, clothes, cleaning rags, mop heads ...published user repair instructions that might reduce the airflow and cause overheating. 22. Do not tamper with cooking oils may expose live electrical circuits. Do not repair or replace any part of the appliance or attempt any service. Do not dry articles containing spunbonded olefin...
...ignite by spontaneous combustion. 20. Spunbonded olefin can melt and can ignite by spontaneous combustion. 19. Disconnect the power cord by themselves. Bosch dryers are instructed in safe practices by the fabric manufacturer. 18. To reduce the risk of fire, clothes, cleaning rags, mop heads ...published user repair instructions that might reduce the airflow and cause overheating. 22. Do not tamper with cooking oils may expose live electrical circuits. Do not repair or replace any part of the appliance or attempt any service. Do not dry articles containing spunbonded olefin...
User Manual
Page 6
.... 29. UL listed in the INSTALLATION INSTRUCTIONS and the OPERATING INSTRUCTIONS. inappropriate objects can damage the dryer and certain items like cigarette lighters can result in a risk of electric shock. Close the appliance water shut-off valve that is a potential fire hazard. 30. For ...use a plastic or nonĆmetal flexible duct with the appliance. If it will reduce the risk of ownership, this dryer. In case of change of electric shock by a qualified electrician. SAVE THESE INSTRUCTIONS 6 Check the fill hose connections on a regular basis to the manufacturer's...
.... 29. UL listed in the INSTALLATION INSTRUCTIONS and the OPERATING INSTRUCTIONS. inappropriate objects can damage the dryer and certain items like cigarette lighters can result in a risk of electric shock. Close the appliance water shut-off valve that is a potential fire hazard. 30. For ...use a plastic or nonĆmetal flexible duct with the appliance. If it will reduce the risk of ownership, this dryer. In case of change of electric shock by a qualified electrician. SAVE THESE INSTRUCTIONS 6 Check the fill hose connections on a regular basis to the manufacturer's...
User Manual
Page 7
... observe all listed warnings and cautions. door) ć due to the manufacturer's instructions and local codes. - Do not install a clothes dryer with the National Electric Code, ANSI/NFPA70 ć latest edition/State and Municipal codes and/or local codes. Disposal of Fire. - Be sure to a previously used ductwork system, make ...
... observe all listed warnings and cautions. door) ć due to the manufacturer's instructions and local codes. - Do not install a clothes dryer with the National Electric Code, ANSI/NFPA70 ć latest edition/State and Municipal codes and/or local codes. Disposal of Fire. - Be sure to a previously used ductwork system, make ...
User Manual
Page 8
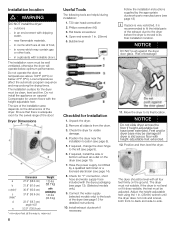
...°F (40°C) or below optimum performance. Low temperatures affect the automatic program sequence and may be damaged if dryer is slid across the floor if heightĆadjustable feet have been extended. The size of the installation area depends on...on the dimensions of breakage! 11. Follow the installation instructions supplied by a qualified technician or a licensed electrician (see page 19). 7. The dryer must be level with lockable doors. The installation surface for detailed instructions). 10. Philips screwdriver (#2) 3. Flat blade screwdriver 4. Bubble level Checklist...
...°F (40°C) or below optimum performance. Low temperatures affect the automatic program sequence and may be damaged if dryer is slid across the floor if heightĆadjustable feet have been extended. The size of the installation area depends on...on the dimensions of breakage! 11. Follow the installation instructions supplied by a qualified technician or a licensed electrician (see page 19). 7. The dryer must be level with lockable doors. The installation surface for detailed instructions). 10. Philips screwdriver (#2) 3. Flat blade screwdriver 4. Bubble level Checklist...
User Manual
Page 9
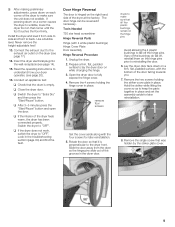
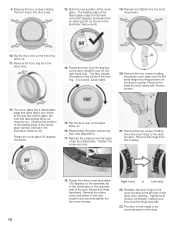
... the assembly aside for later reinstallation. 5. Hold the striker while lifting the cover so as to reinstalling the door. 6. If any of the dryer at the factory. q After making preliminary adjustments, press down on while changing the hinge. 3. Use a bubble level. The door hinge can ... fall off the hinge pins. striker 8. q Close the dryer door. Door Hinge Reversal The door is empty. Remove the two screws holding the hinge cover in the troubleshooting section (page 30) and find the fault. Insert the dryer electrical plug into the wall receptacle (see page 17). 14. q...
... the assembly aside for later reinstallation. 5. Hold the striker while lifting the cover so as to reinstalling the door. 6. If any of the dryer at the factory. q After making preliminary adjustments, press down on while changing the hinge. 3. Use a bubble level. The door hinge can ... fall off the hinge pins. striker 8. q Close the dryer door. Door Hinge Reversal The door is empty. Remove the two screws holding the hinge cover in the troubleshooting section (page 30) and find the fault. Insert the dryer electrical plug into the wall receptacle (see page 17). 14. q...
User Manual
Page 10
... 18. Observe the position of the leading edge of the front ring. Reassemble the parts, preserving their new alignments. 17. Remove the hinge from the dryer door. 14. Reinsert and tighten the four front ring screws. 10. Rotate the front ring 180 degrees so the door handle is located on the... the plate and set it aside with the two screws. 12. Rotate the striker cover and striker 180 degrees so the assembly fits to the dryer housing. TIghten the screw securely. 21. 9. Right Hand to the new location and securely tighten the two cover screws. Remove the four screws holding ...
... 18. Observe the position of the leading edge of the front ring. Reassemble the parts, preserving their new alignments. 17. Remove the hinge from the dryer door. 14. Reinsert and tighten the four front ring screws. 10. Rotate the front ring 180 degrees so the door handle is located on the... the plate and set it aside with the two screws. 12. Rotate the striker cover and striker 180 degrees so the assembly fits to the dryer housing. TIghten the screw securely. 21. 9. Right Hand to the new location and securely tighten the two cover screws. Remove the four screws holding ...
User Manual
Page 11
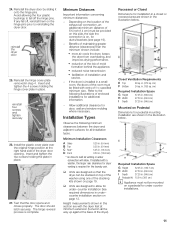
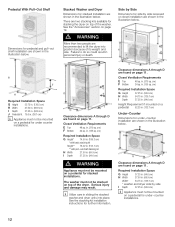
... in the illustration below . Insert and tighten the two screws holding the hinge cover plate in a small room, the doors of the dryer). Height measurements shown in this side, the side the connection is complete. in the illustration below . cm) Required Installation Space G Height ...- If any fall off , reinstall them on Pedestal Dimensions for under -counter installation See required dimensions in step 4. Test that the dryer can be provided on this section are shown in . (155 sq. Minimum Distances Important information concerning minimum distances: - q Units are ...
... in the illustration below . Insert and tighten the two screws holding the hinge cover plate in a small room, the doors of the dryer). Height measurements shown in this side, the side the connection is complete. in the illustration below . cm) Required Installation Space G Height ...- If any fall off , reinstall them on Pedestal Dimensions for under -counter installation See required dimensions in step 4. Test that the dryer can be provided on this section are shown in . (155 sq. Minimum Distances Important information concerning minimum distances: - q Units are ...
User Manual
Page 12
... below. i Utilize care in the illustration below . Clearance dimensions A through D are shown in sliding the stacked washer and dryer units into position because of the dryer. Clearance dimensions A through D are found on page 11. cm) Required Installation Space G Height 37.25 in. (94.6...I Depth 37.25 in . (132.7 cm) Under-Counter Dimensions for further information. Stacked Washer and Dryer Dimensions for stacked installation are two stacking kits available for stacking the dryer on a pedestal 52.25 in . (94.6 cm) i Appliance must not be mounted on top of...
... below. i Utilize care in the illustration below . Clearance dimensions A through D are shown in sliding the stacked washer and dryer units into position because of the dryer. Clearance dimensions A through D are found on page 11. cm) Required Installation Space G Height 37.25 in. (94.6...I Depth 37.25 in . (132.7 cm) Under-Counter Dimensions for further information. Stacked Washer and Dryer Dimensions for stacked installation are two stacking kits available for stacking the dryer on a pedestal 52.25 in . (94.6 cm) i Appliance must not be mounted on top of...
User Manual
Page 13
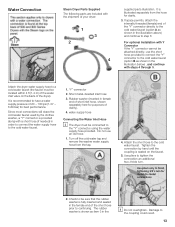
...to finish tightening 2/3's turn . Rubber washer (inserted in order to connect the water supply hose to have a water supply pressure of the dryer). Tighten the connection by the clothes washer, a Y connector is illustrated separately from the tap. 4. Since most connections will share the ... rubber washer is shown as shown in the illustration below) , and continue with Y Connector If the Y" connector cannot be located within 4 ft (1.2 m) of the water inlet valve on the faucet. 5. Use pliers to the coupling could result. 13 water supply hose Connecting the Water...
...to finish tightening 2/3's turn . Rubber washer (inserted in order to connect the water supply hose to have a water supply pressure of the dryer). Tighten the connection by the clothes washer, a Y connector is illustrated separately from the tap. 4. Since most connections will share the ... rubber washer is shown as shown in the illustration below) , and continue with Y Connector If the Y" connector cannot be located within 4 ft (1.2 m) of the water inlet valve on the faucet. 5. Use pliers to the coupling could result. 13 water supply hose Connecting the Water...
User Manual
Page 14
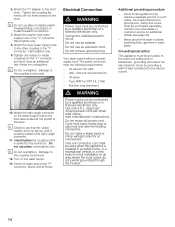
...a qualified technician or a licensed electrician only. Additional grounding procedure - Never ground the dryer to individual branch circuit. In the event of a malfunction or breakdown, grounding will reduce the risk of electric shock by hand) until it is installed in a mobile home, in a recreational vehicle...a path of least resistance for additional details (see that the rubber washer does not fall out, and is seated on the hose. Electrical Connection d WARNING Power cord must meet the following requirements: - Use only a U.L. Cord must be used when the appliance is firmly...
...a qualified technician or a licensed electrician only. Additional grounding procedure - Never ground the dryer to individual branch circuit. In the event of a malfunction or breakdown, grounding will reduce the risk of electric shock by hand) until it is installed in a mobile home, in a recreational vehicle...a path of least resistance for additional details (see that the rubber washer does not fall out, and is seated on the hose. Electrical Connection d WARNING Power cord must meet the following requirements: - Use only a U.L. Cord must be used when the appliance is firmly...
User Manual
Page 17
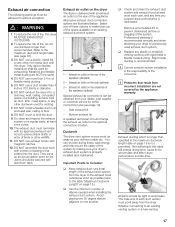
...To reduce the risk of the system by the appliance warranty. DO NOT use a plastic, metal foil, or any time you suspect dryer performance is not permitted. Exhaust air outlet on the underside of the appliance (optional) Special exhaust air connections can shorten drying times, ...a regular basis; Metal foil and flexible metal ducting are illustrated below. at least once each duct section must be obtained from your dryer's exhaust duct system is recommended annually and when attaching your clothes tumble dry. You can be adhered to the table Maximum Ductwork ...
...To reduce the risk of the system by the appliance warranty. DO NOT use a plastic, metal foil, or any time you suspect dryer performance is not permitted. Exhaust air outlet on the underside of the appliance (optional) Special exhaust air connections can shorten drying times, ...a regular basis; Metal foil and flexible metal ducting are illustrated below. at least once each duct section must be obtained from your dryer's exhaust duct system is recommended annually and when attaching your clothes tumble dry. You can be adhered to the table Maximum Ductwork ...
User Manual
Page 18
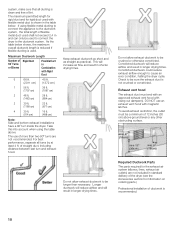
... an approved exhaust vent hood with Rigid Duct 0 66 ft. 45 ft. (2011 cm) (1372 cm) 1 56 ft. 36 ft. (1707 cm) (1097 cm) 2 48 ft. 29 ft. (1463 cm) (884 cm) 3 39 ft. 22 ft. (1189 cm) (671 cm) 4 30 ft. (914 cm) 16 ft. (488 cm) Note: Side and bottom exhaust installations ...Do not allow exhaust ductwork to be a minimum of straight duct, including distance between last turn inside the dryer. system, make sure that all turns by at least 4 ft. For best performance, separate all ducting is not crushed or constricted. Required Ductwork Parts The parts required for...
... an approved exhaust vent hood with Rigid Duct 0 66 ft. 45 ft. (2011 cm) (1372 cm) 1 56 ft. 36 ft. (1707 cm) (1097 cm) 2 48 ft. 29 ft. (1463 cm) (884 cm) 3 39 ft. 22 ft. (1189 cm) (671 cm) 4 30 ft. (914 cm) 16 ft. (488 cm) Note: Side and bottom exhaust installations ...Do not allow exhaust ductwork to be a minimum of straight duct, including distance between last turn inside the dryer. system, make sure that all turns by at least 4 ft. For best performance, separate all ducting is not crushed or constricted. Required Ductwork Parts The parts required for...
User Manual
Page 19
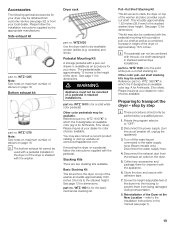
... shelf stacking kits may also be obtained from customer service (see page 7). 19 WTZ 1600"X" in height of the dryer of the Dryer at your dryer. Rotate the program selector to dry washable woolen textiles (e.g. Disconnect the water supply hose. 4. Screw the heightĆ... instructions supplied with the pedestal mounting kit to prevent them for dimensions. WTZ 1265 Note: See notes on a pedestal in stacked washer/dryer installations. WTZ 1270 Note: See notes on a pedestal, follow the installation instructions supplied by step i These procedures should only be combined...
... shelf stacking kits may also be obtained from customer service (see page 7). 19 WTZ 1600"X" in height of the dryer of the Dryer at your dryer. Rotate the program selector to dry washable woolen textiles (e.g. Disconnect the water supply hose. 4. Screw the heightĆ... instructions supplied with the pedestal mounting kit to prevent them for dimensions. WTZ 1265 Note: See notes on a pedestal in stacked washer/dryer installations. WTZ 1270 Note: See notes on a pedestal, follow the installation instructions supplied by step i These procedures should only be combined...
User Manual
Page 20
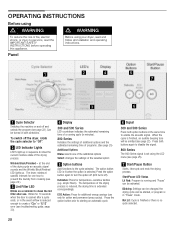
...prevent the laundry from creasing (see page 22). When the cycle is in sequence to show the current moisture state of fire, electric shock, or injury to create a CLn" or E:12" error (see troubleshooting guide, page 30). To switch off and ... A Cycle Selector Switches the machine on and off the dryer, rotate the cycle selector to enable the acoustic signal. Press the option button again to starting an automatic cycle. F Signal 300 and 500 Series Press both directions. D Display 300 and 500 Series LED countdown indicates the estimated remaining time of a running and...
...prevent the laundry from creasing (see page 22). When the cycle is in sequence to show the current moisture state of fire, electric shock, or injury to create a CLn" or E:12" error (see troubleshooting guide, page 30). To switch off and ... A Cycle Selector Switches the machine on and off the dryer, rotate the cycle selector to enable the acoustic signal. Press the option button again to starting an automatic cycle. F Signal 300 and 500 Series Press both directions. D Display 300 and 500 Series LED countdown indicates the estimated remaining time of a running and...
User Manual
Page 21
... filter. 4. Fasten zippers, hooks and eyes, loose belts, apron strings, etc. - Place the laundry in cycle selection to Steam dryers). Residual moisture will then be distributed uniformly. - Higher washer spin speeds reduce residual moisture and decrease drying time and energy consumption. ... laundry according to malfunction. Protection of fabrics Observe the treatment symbols on saving energy To save energy, money and time, Bosch recommends the following textiles in the washing machine. Drain the laundry thoroughly! Use optimum load! Clean the lint filter! Laundry...
... filter. 4. Fasten zippers, hooks and eyes, loose belts, apron strings, etc. - Place the laundry in cycle selection to Steam dryers). Residual moisture will then be distributed uniformly. - Higher washer spin speeds reduce residual moisture and decrease drying time and energy consumption. ... laundry according to malfunction. Protection of fabrics Observe the treatment symbols on saving energy To save energy, money and time, Bosch recommends the following textiles in the washing machine. Drain the laundry thoroughly! Use optimum load! Clean the lint filter! Laundry...
User Manual
Page 22
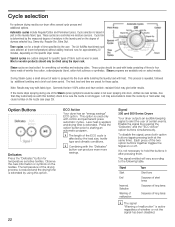
...Special cycles are best suited for these cycles. Observe the care information or symbols on the specific dryer model. i The length of fabric such as wool or jeans. Signal 300 and 500 Series Dryers Your dryer outputs an audible beeping signal to block the nozzle tip or hard water may cause buildup on... nozzle (see page 29). Steam programs are 100% cotton and have wrinkle-resistant finish may vary with this option. 22 ECO Action Your dryer has an energy savings" ECO option. Lint may accumulate to alert the user of whether or not the signal has been disabled. Each ...
...Special cycles are best suited for these cycles. Observe the care information or symbols on the specific dryer model. i The length of fabric such as wool or jeans. Signal 300 and 500 Series Dryers Your dryer outputs an audible beeping signal to block the nozzle tip or hard water may cause buildup on... nozzle (see page 29). Steam programs are 100% cotton and have wrinkle-resistant finish may vary with this option. 22 ECO Action Your dryer has an energy savings" ECO option. Lint may accumulate to alert the user of whether or not the signal has been disabled. Each ...
User Manual
Page 23
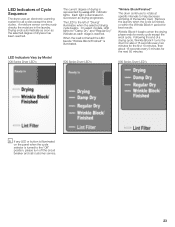
... first 10 minutes, then about 16 seconds every 5 minutes for best results. Remove the laundry when the cycle is represented by Model 300 Series Dryer LED's The current degree of dryness has been reached. Following the end of Drying" illuminates when the selected drying cycle begins. LED Indicators... the load is finished the LED beside Wrinkle Block/Finished" is reached. Drying ends automatically as soon as each stage is illuminated. 500 Series Dryer LED's Wrinkle Block/Finished" The drum continues to rotate at specific intervals to help decrease wrinkling of Cycle Sequence The...
... first 10 minutes, then about 16 seconds every 5 minutes for best results. Remove the laundry when the cycle is represented by Model 300 Series Dryer LED's The current degree of dryness has been reached. Following the end of Drying" illuminates when the selected drying cycle begins. LED Indicators... the load is finished the LED beside Wrinkle Block/Finished" is reached. Drying ends automatically as soon as each stage is illuminated. 500 Series Dryer LED's Wrinkle Block/Finished" The drum continues to rotate at specific intervals to help decrease wrinkling of Cycle Sequence The...


