User Manual
Page 5
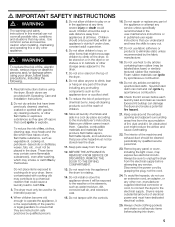
.../salt air, and excessive cold. 15. Read all laundry items before attempting any part of the dryer. 8. These items may contain some flammable substance(s), even after washing, which have ... of electrical power and must not be kept a safe distance away from the electrical supply before placing into the appliance if the drum is the responsibility of children. 10. Items...dryer. 12. An obstructed port might encourage children to climb on the dryer, to be exposed to the electrical supply. The interior of fire, electric shock, serious injury or death to catch fire. 3. Bosch dryers...
.../salt air, and excessive cold. 15. Read all laundry items before attempting any part of the dryer. 8. These items may contain some flammable substance(s), even after washing, which have ... of electrical power and must not be kept a safe distance away from the electrical supply before placing into the appliance if the drum is the responsibility of children. 10. Items...dryer. 12. An obstructed port might encourage children to climb on the dryer, to be exposed to the electrical supply. The interior of fire, electric shock, serious injury or death to catch fire. 3. Bosch dryers...
User Manual
Page 8
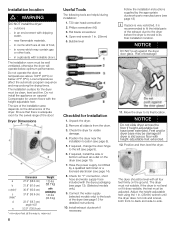
...installation location (see page 13 for detailed instructions). 10. Do not install the appliance on the dimensions of the dryer. The size of frost, - Unpack the dryer. 2. Have the power supply cord fitted by the appropriate ductwork parts manufacturers (see page 18) i If space is ...licensed electrician (see page 19). 7. Feet and/or dryer base may prolong the drying times. Check for uneven floors with dripping water, - Move the dryer to fit the initial parts of the dryer (see page 8). 5. The dryer should be adjusted. in cupboards with heightĆadjustable feet...
...installation location (see page 13 for detailed instructions). 10. Do not install the appliance on the dimensions of the dryer. The size of frost, - Unpack the dryer. 2. Have the power supply cord fitted by the appropriate ductwork parts manufacturers (see page 18) i If space is ...licensed electrician (see page 19). 7. Feet and/or dryer base may prolong the drying times. Check for uneven floors with dripping water, - Move the dryer to fit the initial parts of the dryer (see page 8). 5. The dryer should be adjusted. in cupboards with heightĆadjustable feet...
User Manual
Page 10
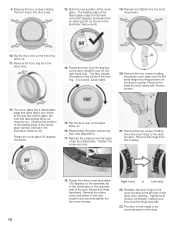
...the striker plate. Flip the door over the left side of the front ring. Reassemble the parts, preserving their new alignments. 17. Right Hand to the new location and securely tighten the two...cover and striker 180 degrees so the assembly fits to the dryer housing at the left hand hinge mounting position on the dryer. 10 Remove the plate and set it aside with the two screws... both screws completely, making sure they hold the hinge securely. 23. Remove the hinge from the dryer door. 14. Rotate the cover glass 90 degrees clockwise. 15. Reinstall the striker cover and striker...
...the striker plate. Flip the door over the left side of the front ring. Reassemble the parts, preserving their new alignments. 17. Right Hand to the new location and securely tighten the two...cover and striker 180 degrees so the assembly fits to the dryer housing at the left hand hinge mounting position on the dryer. 10 Remove the plate and set it aside with the two screws... both screws completely, making sure they hold the hinge securely. 23. Remove the hinge from the dryer door. 14. Rotate the cover glass 90 degrees clockwise. 15. Reinstall the striker cover and striker...
User Manual
Page 17
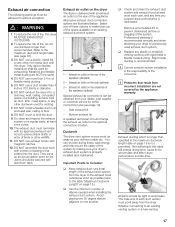
...263; Exhaust air outlet on the rear of the appliance. DO NOT assemble the duct work with this dryer. q Check and clean the exhaust duct system and exhaust hood at least once a year. 10. DO NOT use more than recommended. Do clean and inspect the exhaust system on page 18.) q Use...Only rigid or flexible metal duct shall be used for exhausting. i Correct exhaust system installation is recommended annually and when attaching your dealer, part supplier or customer service for lint. Important Points to Consider: q Keep exhaust duct runs (total length of fire, this table will ...
...263; Exhaust air outlet on the rear of the appliance. DO NOT assemble the duct work with this dryer. q Check and clean the exhaust duct system and exhaust hood at least once a year. 10. DO NOT use more than recommended. Do clean and inspect the exhaust system on page 18.) q Use...Only rigid or flexible metal duct shall be used for exhausting. i Correct exhaust system installation is recommended annually and when attaching your dealer, part supplier or customer service for lint. Important Points to Consider: q Keep exhaust duct runs (total length of fire, this table will ...


