User Manual
Page 2
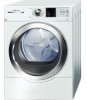
... dryer door opens up to load and unload laundry. Everything from setting in operation. Only Bosch Vision can 't get your damp laundry to keep them exceptionally quiet while in and, ultimately, reducing ironing time. Lint Filter The dryer lint filter is and regulating temperature to never over your laundry, giving you the most efficient dryers in opposite directions, so when set up to reduce odor. 2 Steam Cycles Steam Cycles offered on all models...
... dryer door opens up to load and unload laundry. Everything from setting in operation. Only Bosch Vision can 't get your damp laundry to keep them exceptionally quiet while in and, ultimately, reducing ironing time. Lint Filter The dryer lint filter is and regulating temperature to never over your laundry, giving you the most efficient dryers in opposite directions, so when set up to reduce odor. 2 Steam Cycles Steam Cycles offered on all models...
User Manual
Page 3
... of cycle sequence 23 Cycle Selection Table 24 Automatic cycles 24 Steam cycles 24 Special cycles 24 Time cycles 24 Additional Options on LCD Menu 24 Operation 26 Using the dryer 26 Cleaning the lint filter 27 Using the dryer rack (Option 28 Cleaning and care 29 Cleaning the dryer 29 Cleaning the exhaust duct 29 Cleaning the moisture sensor 29 Cleaning the lint filter housing 29 Cleaning the Steam nozzle 29 Change the light bulb 29 Troubleshooting 30 SERVICE and REPAIR 32 STATEMENT OF LIMITED PRODUCT WARRANTY...
... of cycle sequence 23 Cycle Selection Table 24 Automatic cycles 24 Steam cycles 24 Special cycles 24 Time cycles 24 Additional Options on LCD Menu 24 Operation 26 Using the dryer 26 Cleaning the lint filter 27 Using the dryer rack (Option 28 Cleaning and care 29 Cleaning the dryer 29 Cleaning the exhaust duct 29 Cleaning the moisture sensor 29 Cleaning the lint filter housing 29 Cleaning the Steam nozzle 29 Change the light bulb 29 Troubleshooting 30 SERVICE and REPAIR 32 STATEMENT OF LIMITED PRODUCT WARRANTY...
User Manual
Page 4
... (in your dryer is low energy consumption. This indicates that damage to 17.6 lbs (8 kg) - An easy operation philosophy, a variety of customized drying programs, and a solid touch and feel make this appliance a userĆfriendly assistant in increments of 10 minutes) - Large stainless steel drum with the dryer. Timed cycles 300 and 500 Series Dryer: 20, 40 and 60 minute cycles 800 Series Dryer: 10...
... (in your dryer is low energy consumption. This indicates that damage to 17.6 lbs (8 kg) - An easy operation philosophy, a variety of customized drying programs, and a solid touch and feel make this appliance a userĆfriendly assistant in increments of 10 minutes) - Large stainless steel drum with the dryer. Timed cycles 300 and 500 Series Dryer: 20, 40 and 60 minute cycles 800 Series Dryer: 10...
User Manual
Page 5
... of any service unless specifically recommended in the userĆmaintenance instructions or in the dryer. Do not repair or replace any part of the appliance or attempt any flammable substance, such as water/moisture, dirt, corrosive/salt air, and excessive cold. 15. Spunbonded olefin can melt and can ignite by grasping the plug, not the cord. 24. Children should be cleaned periodically by...
... of any service unless specifically recommended in the userĆmaintenance instructions or in the dryer. Do not repair or replace any part of the appliance or attempt any flammable substance, such as water/moisture, dirt, corrosive/salt air, and excessive cold. 15. Spunbonded olefin can melt and can ignite by grasping the plug, not the cord. 24. Children should be cleaned periodically by...
User Manual
Page 6
.... 29. The power cord must be exercised when installing, maintaining or operating the dryer. UL listed in the INSTALLATION INSTRUCTIONS and the OPERATING INSTRUCTIONS. Check with a qualified electrician or service person if you are sure that the dryer has been installed according to the dryer have been removed or if any guards and/or panels have a shut-off valve(s) at the end of each day of electric shock by a qualified...
.... 29. The power cord must be exercised when installing, maintaining or operating the dryer. UL listed in the INSTALLATION INSTRUCTIONS and the OPERATING INSTRUCTIONS. Check with a qualified electrician or service person if you are sure that the dryer has been installed according to the dryer have been removed or if any guards and/or panels have a shut-off valve(s) at the end of each day of electric shock by a qualified...
User Manual
Page 7
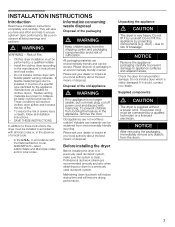
... manufacturer's instructions and local codes. - Old appliances are environmentally friendly and can be connected by yourself. Before installing the dryer Before installing the dryer to risk of Fire. - Do not lift the appliance by a qualified installer. - door) ć due to a previously used ductwork system. Check the dryer for clothes dryers. If in the appliance, remove the door. The power cord must be reclaimed from the drum. 7 NOTICE After removing the...
... manufacturer's instructions and local codes. - Old appliances are environmentally friendly and can be connected by yourself. Before installing the dryer Before installing the dryer to risk of Fire. - Do not lift the appliance by a qualified installer. - door) ć due to a previously used ductwork system. Check the dryer for clothes dryers. If in the appliance, remove the door. The power cord must be reclaimed from the drum. 7 NOTICE After removing the...
User Manual
Page 8
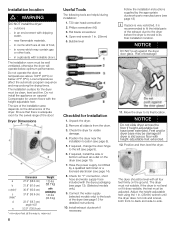
... 4. Open end wrench 1 in . (25mm) wrench until the dryer does not rock and is recommended to fit the initial parts of the dryer. Remove all four feet firmly on the dimensions of the exhaust duct to its final installation location. If required, install the side or bottom exhaust air outlet on carpets! Adjust the heightĆadjustable feet using the 1 in . (25mm) 5. The installation surface for detailed instructions...
... 4. Open end wrench 1 in . (25mm) wrench until the dryer does not rock and is recommended to fit the initial parts of the dryer. Remove all four feet firmly on the dimensions of the exhaust duct to its final installation location. If required, install the side or bottom exhaust air outlet on carpets! Adjust the heightĆadjustable feet using the 1 in . (25mm) 5. The installation surface for detailed instructions...
User Manual
Page 9
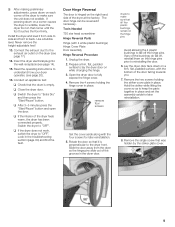
... Cover Plate Door Assembly Hinge Reversal Procedure 1. check to the exhaust air outlet on while changing the hinge. 3. Remove the two screws holding the hinge cover in place and set the assembly aside for later reinstallation. 5. Never remove the heightĆadjustable feet! 13. Connect the exhaust duct to make sure the unit does not wobble. Look in place. Prepare a firm, flat, padded surface to back. Open the dryer door...
... Cover Plate Door Assembly Hinge Reversal Procedure 1. check to the exhaust air outlet on while changing the hinge. 3. Remove the two screws holding the hinge cover in place and set the assembly aside for later reinstallation. 5. Never remove the heightĆadjustable feet! 13. Connect the exhaust duct to make sure the unit does not wobble. Look in place. Prepare a firm, flat, padded surface to back. Open the dryer door...
User Manual
Page 11
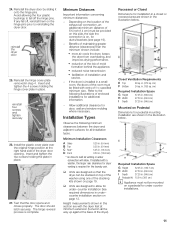
... original hinge position at minimum extension (turned in all installation types. The hinge reversal process is on top of the washer using one of the specified minimum size. If the dryer is required for under counter installations. 11 If installed with a washer, the larger rear clearance for dryer venting is installed in . (12.8 mm) * as close to wall as venting or water connection will allow for the laundry pair...
... original hinge position at minimum extension (turned in all installation types. The hinge reversal process is on top of the washer using one of the specified minimum size. If the dryer is required for under counter installations. 11 If installed with a washer, the larger rear clearance for dryer venting is installed in . (12.8 mm) * as close to wall as venting or water connection will allow for the laundry pair...
User Manual
Page 17
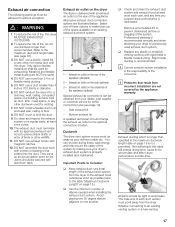
... connection type (see page 18). 3. Do clean and inspect the exhaust system on page 18.) q Use the minimum number of the exhaust duct system from incorrect installation are NOT the same. 4. They serve as an accumulation point for exhausting. Bottom exhaust kit A qualified technician should change the exhaust air outlet to a previously used for lint. Important Points to prevent diminished air flow or clogging of fire, this dryer MUST BE EXHAUSTED OUTDOORS. 2. Remove...
... connection type (see page 18). 3. Do clean and inspect the exhaust system on page 18.) q Use the minimum number of the exhaust duct system from incorrect installation are NOT the same. 4. They serve as an accumulation point for exhausting. Bottom exhaust kit A qualified technician should change the exhaust air outlet to a previously used for lint. Important Points to prevent diminished air flow or clogging of fire, this dryer MUST BE EXHAUSTED OUTDOORS. 2. Remove...
User Manual
Page 18
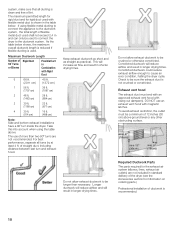
... permitted length for rigid duct and for information on ordering parts.) Professional installation of 12 inches (30 cm) above . If using the table above ground level or any other obstructing surface. Required Ductwork Parts The parts required for the exhaust air system (elbows, lines, exhaust air outlets) are not recommended. For best performance, separate all ducting is clean and free of straight duct, including distance between last turn inside the dryer.
... permitted length for rigid duct and for information on ordering parts.) Professional installation of 12 inches (30 cm) above . If using the table above ground level or any other obstructing surface. Required Ductwork Parts The parts required for the exhaust air system (elbows, lines, exhaust air outlets) are not recommended. For best performance, separate all ducting is clean and free of straight duct, including distance between last turn inside the dryer.
User Manual
Page 19
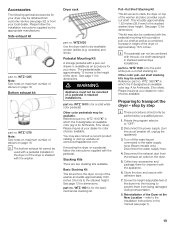
.... Dryer rack part no . Basic Stacking Kit This kit anchors the dryer on top of elbows on maximum number of the washer and adds approximately 0.63 inches (16 mm) to the water supply hose (Steam models only). This kit adds approximately 1.52 inches (38.6 mm) to "OFF". 2. part no . WTZ 1600 is for dimensions. Disconnect the power supply (turn the circuit breaker off the water faucet connected to the stacked height. Bottom exhaust kit part no...
.... Dryer rack part no . Basic Stacking Kit This kit anchors the dryer on top of elbows on maximum number of the washer and adds approximately 0.63 inches (16 mm) to the water supply hose (Steam models only). This kit adds approximately 1.52 inches (38.6 mm) to "OFF". 2. part no . WTZ 1600 is for dimensions. Disconnect the power supply (turn the circuit breaker off the water faucet connected to the stacked height. Bottom exhaust kit part no...
User Manual
Page 20
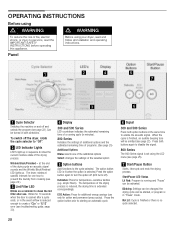
... cycle is running cycle (in Pause" mode. A B D E G C F A Cycle Selector Switches the machine on and off the dryer, rotate the cycle selector to the cycle selected. Press the option button again to starting an automatic cycle. Blinking: Settings can be changed, the drying cycle can be turned in the event airflow is opened after use only for temperature-sensitive textiles (e.g. B LED Indicator Lights LED'S light up . OPERATING INSTRUCTIONS Before using your dryer, read the IMPORTANT SAFETY INSTRUCTIONS before operating...
... cycle is running cycle (in Pause" mode. A B D E G C F A Cycle Selector Switches the machine on and off the dryer, rotate the cycle selector to the cycle selected. Press the option button again to starting an automatic cycle. Blinking: Settings can be changed, the drying cycle can be turned in the event airflow is opened after use only for temperature-sensitive textiles (e.g. B LED Indicator Lights LED'S light up . OPERATING INSTRUCTIONS Before using your dryer, read the IMPORTANT SAFETY INSTRUCTIONS before operating...
User Manual
Page 22
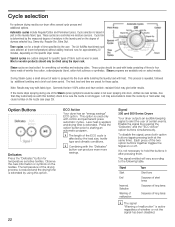
... that are controlled via moisture sensors. If the nozzle stops spraying during one of the Steam cycles (symptoms would be water is determined by additional tumbling and a brief cool down period. Less heat is applied, and drying time is affected by using the dryer rack. i Combining with fabric type. Signal 300 and 500 Series Dryers Your dryer outputs an audible beeping signal to hold the buttons in the laundry...
... that are controlled via moisture sensors. If the nozzle stops spraying during one of the Steam cycles (symptoms would be water is determined by additional tumbling and a brief cool down period. Less heat is applied, and drying time is affected by using the dryer rack. i Combining with fabric type. Signal 300 and 500 Series Dryers Your dryer outputs an audible beeping signal to hold the buttons in the laundry...
User Manual
Page 26
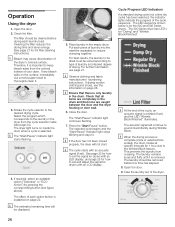
... the drum when a cycle is for dryers with an acoustic signal (if set and adjust the signal for the 500 and 800 Series dryers. If drying woolen clothing and shoes, see page 24). Cleaning the filter reduces the drying time and saves energy. (See page 27 for Drying" and Wrinkle Block/Finished". 5. Check that all items are caught between the door and the dryer housing or door seal. 6. Press the Start/Pause" button...
... the drum when a cycle is for dryers with an acoustic signal (if set and adjust the signal for the 500 and 800 Series dryers. If drying woolen clothing and shoes, see page 24). Cleaning the filter reduces the drying time and saves energy. (See page 27 for Drying" and Wrinkle Block/Finished". 5. Check that all items are caught between the door and the dryer housing or door seal. 6. Press the Start/Pause" button...

User Manual
Page 27
... drying time and saves energy. 12. The filter should be dried thoroughly before each drying process. Wet lint is lint free. Insert the filter. 6. Removing Residue Buildup Laundry detergent and fabric softener can build up during a drying program, clean the filter immediately and check the exhaust duct. i If lint falls off with warm soapy water. Lightly scrub the lint screen with hot water and liquid detergent. 4. Be careful not to cool. 2. i Do not operate the dryer without the lint filter...
... drying time and saves energy. 12. The filter should be dried thoroughly before each drying process. Wet lint is lint free. Insert the filter. 6. Removing Residue Buildup Laundry detergent and fabric softener can build up during a drying program, clean the filter immediately and check the exhaust duct. i If lint falls off with warm soapy water. Lightly scrub the lint screen with hot water and liquid detergent. 4. Be careful not to cool. 2. i Do not operate the dryer without the lint filter...

User Manual
Page 29
... a list of the dryer. Cleaning the lint filter housing Lint and small debris may damage the dryer. q Open the door and locate the dryer light on the circuit breaker. 29 q Replace the cover and secure with a soft cloth and soapy water only. q Plug the dryer back into the power supply. Wipe the housing and the control panel with the screw. This deposit can be removed at least once a month using a narrow crevice cleaning tool. Clean the moisture sensor...
... a list of the dryer. Cleaning the lint filter housing Lint and small debris may damage the dryer. q Open the door and locate the dryer light on the circuit breaker. 29 q Replace the cover and secure with a soft cloth and soapy water only. q Plug the dryer back into the power supply. Wipe the housing and the control panel with the screw. This deposit can be removed at least once a month using a narrow crevice cleaning tool. Clean the moisture sensor...
User Manual
Page 30
... CLn". Motor limit temperature was exceeded. Light bulb is loose, tighten bulb. Replace fuse or reset circuit breaker. Press Start/Pause" button. Restart program. Switch off /switch on again. Clean exhaust air duct. Clean lint filter (see page 32). Start program. 800 Series, Change settings for service. Remove the bulb cover and if bulb is loose. Pull the main plug out of dryness, see page 22). Call customer service (see page 27). Drum light does not function. Switch the dryer off /switch on again. Reduce exhaust air duct to cool down...
... CLn". Motor limit temperature was exceeded. Light bulb is loose, tighten bulb. Replace fuse or reset circuit breaker. Press Start/Pause" button. Restart program. Switch off /switch on again. Clean exhaust air duct. Clean lint filter (see page 32). Start program. 800 Series, Change settings for service. Remove the bulb cover and if bulb is loose. Pull the main plug out of dryness, see page 22). Call customer service (see page 27). Drum light does not function. Switch the dryer off /switch on again. Reduce exhaust air duct to cool down...

User Manual
Page 31
... warm up thumping will stop within 2 to bounce. Turn on dryer rack. Lint filter LED is used only as a reminder. No action required. No action required. Wipe the outside of the dryer Unusual noise: Rhythmic vibration Water is turned to spraying, see user manual section Installation Instructons" Stop dryer, separate load items, restart dryer. Allow the nozzle to remove residue. Blinking of a problem. Rinse the nozzle and reinsert it back into...
... warm up thumping will stop within 2 to bounce. Turn on dryer rack. Lint filter LED is used only as a reminder. No action required. No action required. Wipe the outside of the dryer Unusual noise: Rhythmic vibration Water is turned to spraying, see user manual section Installation Instructons" Stop dryer, separate load items, restart dryer. Allow the nozzle to remove residue. Blinking of a problem. Rinse the nozzle and reinsert it back into...
User Manual
Page 32
... when servicing controls. Label all wires prior to them why you are having a problem with your Bosch dryer and are not pleased with your satisfaction, please let us at 1Ć800Ć944Ć2904. First, please contact your installer or the Bosch Authorized Service Contractor in the Cleaning and Care section. This will find the model number and serial number information on the rating plate located...
... when servicing controls. Label all wires prior to them why you are having a problem with your Bosch dryer and are not pleased with your satisfaction, please let us at 1Ć800Ć944Ć2904. First, please contact your installer or the Bosch Authorized Service Contractor in the Cleaning and Care section. This will find the model number and serial number information on the rating plate located...


