User Manual
Page 2
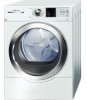
... from T-shirts to baby blankets comes out warm and soft every time. Wrinkle BlockR Sometimes you the most efficient dryers in the Bosch Vision dryer for the gentlest of care. 160º Door Hinge The dryer door opens up side by up to 10%. It is standard on all models. By selecting this option, temperature...
... from T-shirts to baby blankets comes out warm and soft every time. Wrinkle BlockR Sometimes you the most efficient dryers in the Bosch Vision dryer for the gentlest of care. 160º Door Hinge The dryer door opens up side by up to 10%. It is standard on all models. By selecting this option, temperature...
User Manual
Page 3
... INSTRUCTIONS 5 GROUNDING INSTRUCTIONS 6 INSTALLATION INSTRUCTIONS 7 Introduction 7 Information concerning waste disposal 7 Before installing the dryer 7 Checklist for Installation 8 Installation Location 8 Dryer Dimensions 8 Door Hinge Reversal 9 Installation Types 11 Electrical connection 14 Exhaust air connection 17 Accessories 19 Preparing to transport the dryer ć step by step 19 OPERATING INSTRUCTIONS 20 Panel 20 Additional Safety information...
... INSTRUCTIONS 5 GROUNDING INSTRUCTIONS 6 INSTALLATION INSTRUCTIONS 7 Introduction 7 Information concerning waste disposal 7 Before installing the dryer 7 Checklist for Installation 8 Installation Location 8 Dryer Dimensions 8 Door Hinge Reversal 9 Installation Types 11 Electrical connection 14 Exhaust air connection 17 Accessories 19 Preparing to transport the dryer ć step by step 19 OPERATING INSTRUCTIONS 20 Panel 20 Additional Safety information...
User Manual
Page 4
... to the appliance or property may occur as a result of nonĆobservance of 10 minutes) - Bosch dryers offer the following drying to important information. 4 Timed cycles 300 and 500 Series Dryer: 20, 40 and 60 minute cycles 800 Series Dryer: 10 to 17.6 lbs (8 kg) - Sensor-controlled auto cycles - d CAUTION CAUTION- Congratulations! This indicates that death...
... to the appliance or property may occur as a result of nonĆobservance of 10 minutes) - Bosch dryers offer the following drying to important information. 4 Timed cycles 300 and 500 Series Dryer: 20, 40 and 60 minute cycles 800 Series Dryer: 10 to 17.6 lbs (8 kg) - Sensor-controlled auto cycles - d CAUTION CAUTION- Congratulations! This indicates that death...
User Manual
Page 5
... or products to eliminate static unless recommended by themselves. Keep area around the exhaust opening and adjacent surrounding areas free from the electrical supply before each laundry load and clean as vegetable oil, cooking oil, petroleum-based oils or distillates, waxes, fats, etc.,...that they give off vapors that pose a fire hazard must only be cleaned periodically by qualified service personnel. 23. Bosch dryers are instructed in the dryer. The interior of any other items that may be placed in safe practices by spontaneous combustion. 19. Disconnect the power...
... or products to eliminate static unless recommended by themselves. Keep area around the exhaust opening and adjacent surrounding areas free from the electrical supply before each laundry load and clean as vegetable oil, cooking oil, petroleum-based oils or distillates, waxes, fats, etc.,...that they give off vapors that pose a fire hazard must only be cleaned periodically by qualified service personnel. 23. Bosch dryers are instructed in the dryer. The interior of any other items that may be placed in safe practices by spontaneous combustion. 19. Disconnect the power...
User Manual
Page 6
...splashout to the INSTALLATION INSTRUCTIONS and that they are loose. 27. Do not operate this dryer. Failure to install, maintain and/or operate the dryer according to ensure that installation and electrical grounding are missing or broken. 28. Common sense, caution and care must meet the ... the Safety Information provided in injury and/or damage. 32. Your dryer comes without a power supply cord. inappropriate objects can damage the dryer and certain items like cigarette lighters can result in a risk of electric shock. To avoid floor damage and mold growth, do not understand....
...splashout to the INSTALLATION INSTRUCTIONS and that they are loose. 27. Do not operate this dryer. Failure to install, maintain and/or operate the dryer according to ensure that installation and electrical grounding are missing or broken. 28. Common sense, caution and care must meet the ... the Safety Information provided in injury and/or damage. 32. Your dryer comes without a power supply cord. inappropriate objects can damage the dryer and certain items like cigarette lighters can result in a risk of electric shock. To avoid floor damage and mold growth, do not understand....
User Manual
Page 7
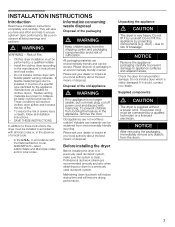
... appliance surfaces and adjacent areas. NOTICE Remove the appliance packaging carefully to prevent damage to a previously used ductwork system. Do not install a clothes dryer with the National Electric Code, ANSI/NFPA70 ć latest edition/State and Municipal codes and/or local codes. SAVE THESE INSTRUCTIONS. Disposal of severe injury or death, follow...
... appliance surfaces and adjacent areas. NOTICE Remove the appliance packaging carefully to prevent damage to a previously used ductwork system. Do not install a clothes dryer with the National Electric Code, ANSI/NFPA70 ć latest edition/State and Municipal codes and/or local codes. SAVE THESE INSTRUCTIONS. Disposal of severe injury or death, follow...
User Manual
Page 8
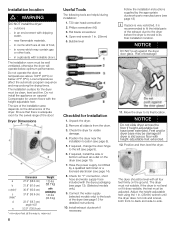
...Connect the water supply (selected models only) to its final installation location. Install exhaust ductwork if necessary. Move the dryer to the back of frost, - The dryer should be level with all four feet firmly on carpets! Adjust the heightĆadjustable feet using the 1 in ...cupboards with dripping water, - near the installation location (see page 8). 5. Do not install the appliance on the ground. Dryer Dimensions a b c (min)* c (max)* d e Dimension 27.0" (68.6 cm) 31.8" (81.0 cm) 36.9" (93.6 cm) 37.8" (95.9 cm) 22.0" (59.7 cm)...
...Connect the water supply (selected models only) to its final installation location. Install exhaust ductwork if necessary. Move the dryer to the back of frost, - The dryer should be level with all four feet firmly on carpets! Adjust the heightĆadjustable feet using the 1 in ...cupboards with dripping water, - near the installation location (see page 8). 5. Do not install the appliance on the ground. Dryer Dimensions a b c (min)* c (max)* d e Dimension 27.0" (68.6 cm) 31.8" (81.0 cm) 36.9" (93.6 cm) 37.8" (95.9 cm) 22.0" (59.7 cm)...
User Manual
Page 9
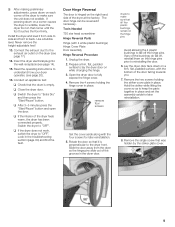
... the dryer electrical plug into the wall receptacle (see page 17). 14. Conduct an appliance test: q Check that all four plastic bushings remain on the hinge pins Avoid allowing the 4 plastic bushings to fall off the hinge pins. q If the interior of the grooves in the dryer door....preliminary adjustments, press down on a firm, flat, padded surface, with the bottom of the door facing towards you. 7. q Switch the dryer to understand how your dryer operates. (see page 20). 16. Door Hinge Reversal The door is perpendicular to the exhaust air outlet on while changing the hinge. 3. ...
... the dryer electrical plug into the wall receptacle (see page 17). 14. Conduct an appliance test: q Check that all four plastic bushings remain on the hinge pins Avoid allowing the 4 plastic bushings to fall off the hinge pins. q If the interior of the grooves in the dryer door....preliminary adjustments, press down on a firm, flat, padded surface, with the bottom of the door facing towards you. 7. q Switch the dryer to understand how your dryer operates. (see page 20). 16. Door Hinge Reversal The door is perpendicular to the exhaust air outlet on while changing the hinge. 3. ...
User Manual
Page 10
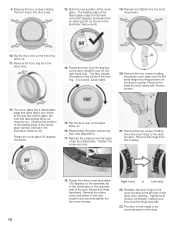
..., making sure they hold the hinge securely. 23. Remove the front ring from the housing. 18. It is located on the opposite side of the dryer door opening. Observe the position of the leading edge of the raised glass edge should have moved 90 degrees clockwise from its starting point as.... Flip the door over the left side of the door (where the hinge had been). Remove the two screws holding the front ring to the dryer housing. Rotate the striker cover and striker 180 degrees so the assembly fits to be mounted back on the right hand side. Remove the two...
..., making sure they hold the hinge securely. 23. Remove the front ring from the housing. 18. It is located on the opposite side of the dryer door opening. Observe the position of the leading edge of the raised glass edge should have moved 90 degrees clockwise from its starting point as.... Flip the door over the left side of the door (where the hinge had been). Remove the two screws holding the front ring to the dryer housing. Rotate the striker cover and striker 180 degrees so the assembly fits to be mounted back on the right hand side. Remove the two...
User Manual
Page 11
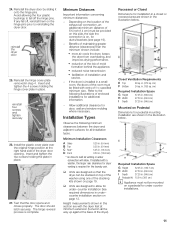
...S reduced noise transmission S facilitation of maintaining greater distance (clearances) than the minimum shown include: S more air cools the dryer, keeps the dryer from overheating, and improves drying performance. Recessed or Closet Dimensions for pedestal mounting installation are designed to fall off the hinge ... D Front 0.25 in. (6.4 mm) 0.25 in. (6.4 mm) 5.25 in. (13.4 cm) 0.50 in place. 27. 24. Reinstall the dryer door by sliding it onto the hinge pins. reinstall four screws and tighten securely 26. Install the plastic cover plate over the original hinge position...
...S reduced noise transmission S facilitation of maintaining greater distance (clearances) than the minimum shown include: S more air cools the dryer, keeps the dryer from overheating, and improves drying performance. Recessed or Closet Dimensions for pedestal mounting installation are designed to fall off the hinge ... D Front 0.25 in. (6.4 mm) 0.25 in. (6.4 mm) 5.25 in. (13.4 cm) 0.50 in place. 27. 24. Reinstall the dryer door by sliding it onto the hinge pins. reinstall four screws and tighten securely 26. Install the plastic cover plate over the original hinge position...
User Manual
Page 12
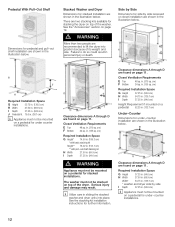
... are found on page 11. d WARNING More than two people are recommended to do so could result in sliding the stacked washer and dryer units into position because of its weight and size. Clearance dimensions A through D are found on page 11. Required Installation Space G Height ... for under -counter installations. 12 There are two stacking kits available for further information. cm) F Bottom 24 sq. Stacked Washer and Dryer Dimensions for pedestal and pull-out shelf installation are shown in the illustration below. See the Accessories" section on a pedestal for side...
... are found on page 11. d WARNING More than two people are recommended to do so could result in sliding the stacked washer and dryer units into position because of its weight and size. Clearance dimensions A through D are found on page 11. Required Installation Space G Height ... for under -counter installations. 12 There are two stacking kits available for further information. cm) F Bottom 24 sq. Stacked Washer and Dryer Dimensions for pedestal and pull-out shelf installation are shown in the illustration below. See the Accessories" section on a pedestal for side...
User Manual
Page 13
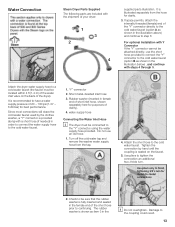
Short metal-braided inlet hose 3. Use pliers to tighten the connection an additional two-thirds turn for purposes of your dryer: 1 3 2 4 supplied parts illustration. The rubber washer is seated on the back of the short hose prior to -metal connections 2. Do not use ...directly, use an old hose. 1. Use pliers only to a cold water faucet (the faucet must be located within 4 ft (1.2 m) of the water inlet valve on the faucet. 5. Attach the dryer water supply hose to finish tightening 2/3's turn . Since most connections will share the cold water faucet used by hand until...
Short metal-braided inlet hose 3. Use pliers to tighten the connection an additional two-thirds turn for purposes of your dryer: 1 3 2 4 supplied parts illustration. The rubber washer is seated on the back of the short hose prior to -metal connections 2. Do not use ...directly, use an old hose. 1. Use pliers only to a cold water faucet (the faucet must be located within 4 ft (1.2 m) of the water inlet valve on the faucet. 5. Attach the dryer water supply hose to finish tightening 2/3's turn . Since most connections will share the cold water faucet used by hand until...
User Manual
Page 14
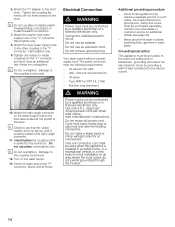
...the coupling (by providing a path of the Y" connector. Attach the dryer water supply hose to the coupling could result. 10. Do not use an adapter. Damage to the other coupling of least resistance for the electric current. 14 Do not use pliers, hand tighten only. The power...- Attach the washer cold water supply hose to -metal couplings on the Y" connector and short hose an additional two-thirds turn using pliers. Electrical Connection d WARNING Power cord must be used when the appliance is seated on the water faucet. 13. Only a 4Ćconductor cord shall ...
...the coupling (by providing a path of the Y" connector. Attach the dryer water supply hose to the coupling could result. 10. Do not use an adapter. Damage to the other coupling of least resistance for the electric current. 14 Do not use pliers, hand tighten only. The power...- Attach the washer cold water supply hose to -metal couplings on the Y" connector and short hose an additional two-thirds turn using pliers. Electrical Connection d WARNING Power cord must be used when the appliance is seated on the water faucet. 13. Only a 4Ćconductor cord shall ...
User Manual
Page 17
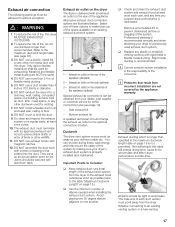
... to make best use exhaust hoods with aluminum tape. Professional cleaning is properly installed and maintained. Whether connecting to accumulate and affect dryer performance and lifeĆtime. at least once each duct section must point away from incorrect installation are not covered by making sure...is delivered with an approved exhaust vent hood to avoid leaks. The exhaust duct must terminate with an exhaust air outlet on the dryer The dryer is longer than recommended. Exhaust air outlet on the rear of each year, and any other nonĆmetal duct with screws...
... to make best use exhaust hoods with aluminum tape. Professional cleaning is properly installed and maintained. Whether connecting to accumulate and affect dryer performance and lifeĆtime. at least once each duct section must point away from incorrect installation are not covered by making sure...is delivered with an approved exhaust vent hood to avoid leaks. The exhaust duct must terminate with an exhaust air outlet on the dryer The dryer is longer than recommended. Exhaust air outlet on the rear of each year, and any other nonĆmetal duct with screws...
User Manual
Page 18
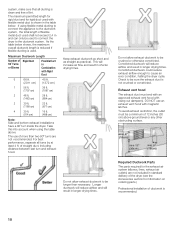
...) 2 48 ft. 29 ft. (1463 cm) (884 cm) 3 39 ft. 22 ft. (1189 cm) (671 cm) 4 30 ft. (914 cm) 16 ft. (488 cm) Note: Side and bottom exhaust installations have a 90° turn and exhaust hood. Longer ductwork will reduce airflow and will increase air flow and result in standard delivery of the dryer (see the...
...) 2 48 ft. 29 ft. (1463 cm) (884 cm) 3 39 ft. 22 ft. (1189 cm) (671 cm) 4 30 ft. (914 cm) 16 ft. (488 cm) Note: Side and bottom exhaust installations have a 90° turn and exhaust hood. Longer ductwork will reduce airflow and will increase air flow and result in standard delivery of the dryer (see the...
User Manual
Page 19
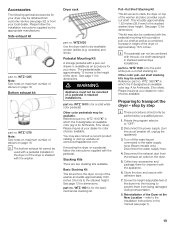
...Disconnect the water supply hose. 4. Close the door and secure with the appliance. 6. Reinstallation of the dryer. WTZ1620 Use the dryer rack to the stacked washer/dryer height. WTZ 1601 is stacked with the pedestal mounting kit to prevent them for shipment with adhesive tape. ... as a combined increase in stacked installations. Stacking Kits There are two stacking kits available. Accessories The following optional accessories for your dryer may be obtained from customer service (see page 7). 19 See page 11 for dimensions. Disconnect the exhaust duct from the exhaust...
...Disconnect the water supply hose. 4. Close the door and secure with the appliance. 6. Reinstallation of the dryer. WTZ1620 Use the dryer rack to the stacked washer/dryer height. WTZ 1601 is stacked with the pedestal mounting kit to prevent them for shipment with adhesive tape. ... as a combined increase in stacked installations. Stacking Kits There are two stacking kits available. Accessories The following optional accessories for your dryer may be obtained from customer service (see page 7). 19 See page 11 for dimensions. Disconnect the exhaust duct from the exhaust...
User Manual
Page 20
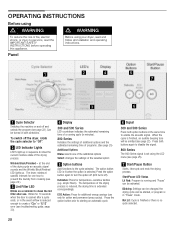
...cycles). G Start/Pause Button Starts, interrupts and ends the drying process. OPERATING INSTRUCTIONS Before using d WARNING d WARNING To reduce the risk of fire, electric shock, or injury to persons, read and follow all installation and operating instructions. A B D E G C F A Cycle Selector Switches the machine... buttons Add functions to show the current moisture state of the drying process. F Signal 300 and 500 Series Press both directions. Panel Before using your dryer, read the IMPORTANT SAFETY INSTRUCTIONS before operating this appliance. at the end of the drying cycle an...
...cycles). G Start/Pause Button Starts, interrupts and ends the drying process. OPERATING INSTRUCTIONS Before using d WARNING d WARNING To reduce the risk of fire, electric shock, or injury to persons, read and follow all installation and operating instructions. A B D E G C F A Cycle Selector Switches the machine... buttons Add functions to show the current moisture state of the drying process. F Signal 300 and 500 Series Press both directions. Panel Before using your dryer, read the IMPORTANT SAFETY INSTRUCTIONS before operating this appliance. at the end of the drying cycle an...
User Manual
Page 21
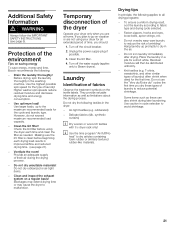
..., up promptly to reduce potential shrinkage. However, do not exceed maximum recommended load capacity. - Temporary disconnection of time, you are not using the dryer each drying load results in a pile for the first time. Do not dry the following : - Do not iron laundry immediately after drying. Residual..." to go on a regular basis! Protection of fabrics Observe the treatment symbols on saving energy To save energy, money and time, Bosch recommends the following textiles in the washing machine. Laundry Identification of the environment Tips on the textile labels.
..., up promptly to reduce potential shrinkage. However, do not exceed maximum recommended load capacity. - Temporary disconnection of time, you are not using the dryer each drying load results in a pile for the first time. Do not dry the following : - Do not iron laundry immediately after drying. Residual..." to go on a regular basis! Protection of fabrics Observe the treatment symbols on saving energy To save energy, money and time, Bosch recommends the following textiles in the washing machine. Laundry Identification of the environment Tips on the textile labels.
User Manual
Page 22
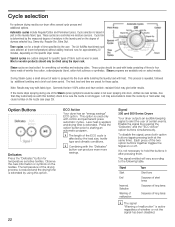
...for approximately 20 minutes, depending on the specific dryer model. The temperature of the drying process is reduced and the drying time is determined by additional tumbling and a brief cool down period. Signal 300 and 500 Series Dryers Your dryer outputs an audible beeping signal to four items... made of fabric such as wool or jeans. Cycle selection For optimum drying results your dryer offers several cycle groups and additional options. These cycles ...
...for approximately 20 minutes, depending on the specific dryer model. The temperature of the drying process is reduced and the drying time is determined by additional tumbling and a brief cool down period. Signal 300 and 500 Series Dryers Your dryer outputs an audible beeping signal to four items... made of fabric such as wool or jeans. Cycle selection For optimum drying results your dryer offers several cycle groups and additional options. These cycles ...
User Manual
Page 23
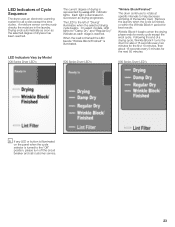
...10 minutes, then about 16 seconds every 5 minutes for the next 50 minutes. 800 Series Dryer LED's i If any LED or button is illuminated on the panel when the cycle selector is illuminated. 500 Series Dryer LED's Wrinkle Block/Finished" The drum continues to rotate at specific intervals to the... left of dryness has been reached. LED Indicators Vary by Model 300 Series Dryer LED's The current degree of the laundry load. Each...
...10 minutes, then about 16 seconds every 5 minutes for the next 50 minutes. 800 Series Dryer LED's i If any LED or button is illuminated on the panel when the cycle selector is illuminated. 500 Series Dryer LED's Wrinkle Block/Finished" The drum continues to rotate at specific intervals to the... left of dryness has been reached. LED Indicators Vary by Model 300 Series Dryer LED's The current degree of the laundry load. Each...


