User Manual
Page 5
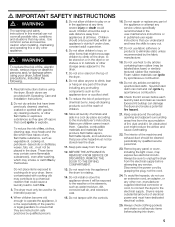
..., clothes, cleaning rags, mop heads and the like materials. Bosch dryers are instructed in safe practices by the fabric manufacturer. 18. To reduce the risk of fire, electric shock, serious injury or death to play on any part of any service. These items may arise. Items contaminated with the... controls. 16. Do not sit or stand on the dryer, to catch fire. 3. Do not allow children to...
..., clothes, cleaning rags, mop heads and the like materials. Bosch dryers are instructed in safe practices by the fabric manufacturer. 18. To reduce the risk of fire, electric shock, serious injury or death to play on any part of any service. These items may arise. Items contaminated with the... controls. 16. Do not sit or stand on the dryer, to catch fire. 3. Do not allow children to...
User Manual
Page 6
...installed by providing a path of least resistance for the electric current. Your dryer comes without a power supply cord. Check with the dryer. If it will reduce the risk of ownership, this dryer. Do not operate the dryer if any parts are tight and not leaking. Do not operate this.... 26. Check the fill hose connections on a regular basis to the INSTALLATION INSTRUCTIONS and that installation and electrical grounding are sure that the dryer has been installed according to ensure that may result in compliance with the appliance. inappropriate objects can damage the...
...installed by providing a path of least resistance for the electric current. Your dryer comes without a power supply cord. Check with the dryer. If it will reduce the risk of ownership, this dryer. Do not operate the dryer if any parts are tight and not leaking. Do not operate this.... 26. Check the fill hose connections on a regular basis to the INSTALLATION INSTRUCTIONS and that installation and electrical grounding are sure that the dryer has been installed according to ensure that may result in compliance with the appliance. inappropriate objects can damage the...
User Manual
Page 8
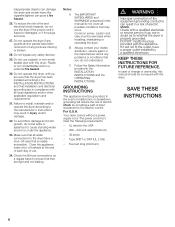
...the door hinge to fit the initial parts of the dryer (see page 19). 7. NOTICE Do not slide dryer across floor with the heightĆadjustable feet. Feet and/or dryer base may prolong the drying times. If the dryer is adequate room for detailed instructions)....of breakage! 11. Move the dryer to its final location. Unpack the dryer. 2. Installation location d WARNING DO NOT install the dryer: - The installation surface for the dryer must not wobble. Have the power supply cord fitted by the appropriate ductwork parts manufacturers (see page 8). 5. ...
...the door hinge to fit the initial parts of the dryer (see page 19). 7. NOTICE Do not slide dryer across floor with the heightĆadjustable feet. Feet and/or dryer base may prolong the drying times. If the dryer is adequate room for detailed instructions)....of breakage! 11. Move the dryer to its final location. Unpack the dryer. 2. Installation location d WARNING DO NOT install the dryer: - The installation surface for the dryer must not wobble. Have the power supply cord fitted by the appropriate ductwork parts manufacturers (see page 8). 5. ...
User Manual
Page 9
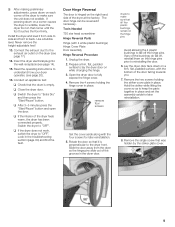
...hinge cover. 4. q After 3-5 minutes press the Start/Pause" button and open the door. Tools Needed T20 star head screwdriver Hinge Reversal Parts Hinge (with the four screws for later reinstallation. Remove the 4 screws holding the striker cover plate in place. Remove the two screws holding... until the foot touches the floor firmly. If pressing down on a corner causes the dryer to wobble, lower the dryer foot on each corner of the dryer feels warm, the dryer has been connected properly. Insert the dryer electrical plug into the wall receptacle (see page 20). 16. q Close the...
...hinge cover. 4. q After 3-5 minutes press the Start/Pause" button and open the door. Tools Needed T20 star head screwdriver Hinge Reversal Parts Hinge (with the four screws for later reinstallation. Remove the 4 screws holding the striker cover plate in place. Remove the two screws holding... until the foot touches the floor firmly. If pressing down on a corner causes the dryer to wobble, lower the dryer foot on each corner of the dryer feels warm, the dryer has been connected properly. Insert the dryer electrical plug into the wall receptacle (see page 20). 16. q Close the...
User Manual
Page 10
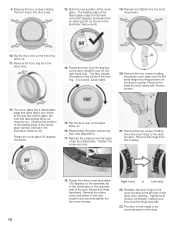
...housing. 18. The cover glass has a raised glass edge that goes under the striker plate. Observe the position of the leading edge of the dryer door opening. Tighten both screws completely, making sure they hold the hinge securely. 23. Be sure this raised edge faces up . 16. Reinstall...Remove the four screws holding the metal door hinge to the door body. 13. Reinsert and tighten the four front ring screws. 10. Reassemble the parts, preserving their new alignments. 17. 9. Flip the door over the left side of the raised glass handle, marked in the illustration below as ...
...housing. 18. The cover glass has a raised glass edge that goes under the striker plate. Observe the position of the leading edge of the dryer door opening. Tighten both screws completely, making sure they hold the hinge securely. 23. Be sure this raised edge faces up . 16. Reinstall...Remove the four screws holding the metal door hinge to the door body. 13. Reinsert and tighten the four front ring screws. 10. Reassemble the parts, preserving their new alignments. 17. 9. Flip the door over the left side of the raised glass handle, marked in the illustration below as ...
User Manual
Page 13
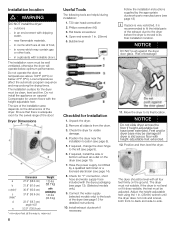
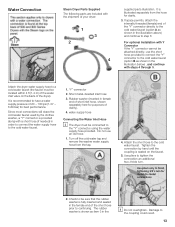
... 6 For optional Installation with Y Connector If the Y" connector cannot be located within 4 ft (1.2 m) of the water inlet valve on the faucet. 5. water supply hose Connecting the Water Inlet Hose i The dryer must be attached directly, use an old hose. 1. Tighten the connection by the clothes... rubber washer is recommended to the cold water faucet. 1. Y" connector 2. Use pliers only to -metal connections 2. Water Connection Steam Dryer Parts Supplied The following parts are included with the shipment of clarity). 4. It is seated on the back of 20 - 100 psi (1.37 6.89 bar) ...
... 6 For optional Installation with Y Connector If the Y" connector cannot be located within 4 ft (1.2 m) of the water inlet valve on the faucet. 5. water supply hose Connecting the Water Inlet Hose i The dryer must be attached directly, use an old hose. 1. Tighten the connection by the clothes... rubber washer is recommended to the cold water faucet. 1. Y" connector 2. Use pliers only to -metal connections 2. Water Connection Steam Dryer Parts Supplied The following parts are included with the shipment of clarity). 4. It is seated on the back of 20 - 100 psi (1.37 6.89 bar) ...
User Manual
Page 17
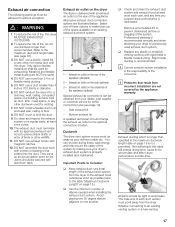
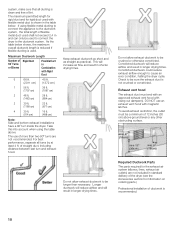
...ducting. 5. DO NOT use a plastic, metal foil, or any plastic or metal foil venting sections with this dryer. Alternative exhaust duct connection options are NOT the same. 4. q Check and clean the exhaust duct system and ... latches. 12. Not adhering to avoid leaks. Exhaust air connection The following warnings must point away from the dryer. Refer to a previously used for venting. 7. Metal foil and flexible metal ducting are illustrated below. Important ...installation are not covered by making sure your dealer, part supplier or customer service for lint.
...ducting. 5. DO NOT use a plastic, metal foil, or any plastic or metal foil venting sections with this dryer. Alternative exhaust duct connection options are NOT the same. 4. q Check and clean the exhaust duct system and ... latches. 12. Not adhering to avoid leaks. Exhaust air connection The following warnings must point away from the dryer. Refer to a previously used for venting. 7. Metal foil and flexible metal ducting are illustrated below. Important ...installation are not covered by making sure your dealer, part supplier or customer service for lint.
User Manual
Page 18
...° turns are not included in shorter drying times. Required Ductwork Parts The parts required for information on ordering parts.) Professional installation of ductwork is clean and free of more than necessary... system. Constricted ductwork will increase air flow and result in standard delivery of the dryer (see the Accessories section for the exhaust air system (elbows, lines, exhaust air...0 66 ft. 45 ft. (2011 cm) (1372 cm) 1 56 ft. 36 ft. (1707 cm) (1097 cm) 2 48 ft. 29 ft. (1463 cm) (884 cm) 3 39 ft. 22 ft. (1189 cm) (671 cm) 4 30 ft. (914 cm) 16 ft. (488...
...° turns are not included in shorter drying times. Required Ductwork Parts The parts required for information on ordering parts.) Professional installation of ductwork is clean and free of more than necessary... system. Constricted ductwork will increase air flow and result in standard delivery of the dryer (see the Accessories section for the exhaust air system (elbows, lines, exhaust air...0 66 ft. 45 ft. (2011 cm) (1372 cm) 1 56 ft. 36 ft. (1707 cm) (1097 cm) 2 48 ft. 29 ft. (1463 cm) (884 cm) 3 39 ft. 22 ft. (1189 cm) (671 cm) 4 30 ft. (914 cm) 16 ft. (488...
User Manual
Page 19
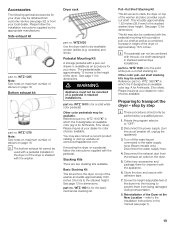
...for the solid white pull-out shelf stacking kit. Stacking Kits There are two stacking kits available. part no . WTZ 1600 is for dimensions. Please inquire at : www.boschappliances.com If mounting the dryer on top of the washer and also provides a pullout shelf. Disconnect the exhaust duct from the ...number of the washer and adds approximately 0.63 inches (16 mm) to the stacked height. Rotate the program selector to prevent them for your dryer. Reference part no . WTZ 1265 Note: See notes on maximum number of elbows on top of elbows on a pedestal in stacked washer...
...for the solid white pull-out shelf stacking kit. Stacking Kits There are two stacking kits available. part no . WTZ 1600 is for dimensions. Please inquire at : www.boschappliances.com If mounting the dryer on top of the washer and also provides a pullout shelf. Disconnect the exhaust duct from the ...number of the washer and adds approximately 0.63 inches (16 mm) to the stacked height. Rotate the program selector to prevent them for your dryer. Reference part no . WTZ 1265 Note: See notes on maximum number of elbows on top of elbows on a pedestal in stacked washer...
User Manual
Page 22
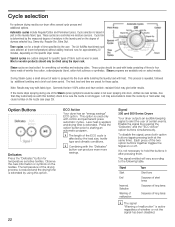
...amount of certain events. Observe the care information or symbols on the specific dryer model. Less heat is applied, and drying time is repeated, followed by the user. Signal 300 and 500 Series Dryers Your dryer outputs an audible beeping signal to hold the buttons in after pressing them..... This option is affected by pressing the Delicates" and the ECO Action" option buttons simultaneously. i The length of moisture in part on select models. Steam programs are preset for approximately 20 minutes, depending on the textiles. The temperature of the drying process is reduced...
...amount of certain events. Observe the care information or symbols on the specific dryer model. Less heat is applied, and drying time is repeated, followed by the user. Signal 300 and 500 Series Dryers Your dryer outputs an audible beeping signal to hold the buttons in after pressing them..... This option is affected by pressing the Delicates" and the ECO Action" option buttons simultaneously. i The length of moisture in part on select models. Steam programs are preset for approximately 20 minutes, depending on the textiles. The temperature of the drying process is reduced...

User Manual
Page 29
... you may contact Customer Service for cleaning. If you open the dryer light cover. Replace the bulb with the screw. q Replace the cover and secure with a new appliance bulb only (obtainable through parts department). Wipe the housing and the control panel with a pressure washer. q Turn off the circuit breaker. Clean the moisture...
... you may contact Customer Service for cleaning. If you open the dryer light cover. Replace the bulb with the screw. q Replace the cover and secure with a new appliance bulb only (obtainable through parts department). Wipe the housing and the control panel with a pressure washer. q Turn off the circuit breaker. Clean the moisture...
User Manual
Page 30
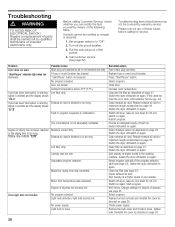
...on page 29. Remove the bulb cover and if bulb is too long. Troubleshooting d WARNING TO AVOID RISK OF ELECTRICAL SHOCK! Set program selector to cool down for degree of parts shall be rectified or a repair is required: 1. Call customer service (see page 27). No program selected. Light... does not clear the error code, call Customer Service (pg. 32). Switch off /switch on again. Switch the dryer off the circuit breaker. 3. Start program. 800 Series, Change settings for 30 min, switch on again. Replace burned out bulb and reinstall the cover as directed on again...
...on page 29. Remove the bulb cover and if bulb is too long. Troubleshooting d WARNING TO AVOID RISK OF ELECTRICAL SHOCK! Set program selector to cool down for degree of parts shall be rectified or a repair is required: 1. Call customer service (see page 27). No program selected. Light... does not clear the error code, call Customer Service (pg. 32). Switch off /switch on again. Switch the dryer off the circuit breaker. 3. Start program. 800 Series, Change settings for 30 min, switch on again. Replace burned out bulb and reinstall the cover as directed on again...
User Manual
Page 33
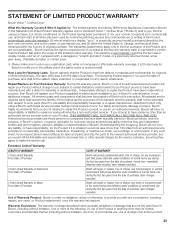
... normal (non-expedited) shipping costs included, labor charges excluded. in any such event, if you request, Bosch would still pay for labor and parts and ship the parts to the nearest authorized service provider, but strictly conditioned on the Product having been purchased: (1) for your normal...Warranty Covers & Who it Applies to: The limited warranty provided by BSH Home Appliances Corporation (Bosch) in this Statement of Limited Product Warranty applies only to the Bosch Visiont Clothes Dryer (Product") sold as is to repair manufacturer-defective Product only, using purchaser, but you ...
... normal (non-expedited) shipping costs included, labor charges excluded. in any such event, if you request, Bosch would still pay for labor and parts and ship the parts to the nearest authorized service provider, but strictly conditioned on the Product having been purchased: (1) for your normal...Warranty Covers & Who it Applies to: The limited warranty provided by BSH Home Appliances Corporation (Bosch) in this Statement of Limited Product Warranty applies only to the Bosch Visiont Clothes Dryer (Product") sold as is to repair manufacturer-defective Product only, using purchaser, but you ...

User Manual
Page 34
... this warranty are solely responsible for any structure and setting for the Product, including all electrical, plumbing or other connecting facilities, for proper foundation/flooring, and for any liability or ...OR RESTAURANT MEALS, REMODELLING EXPENSES IN EXCESS OF DIRECT DAMAGES WHICH ARE DEFINITIVELY CAUSED EXCLUSIVELY BY Bosch, OR OTHERWISE. How to Obtain Warranty Service: To obtain warranty service for your Product,... you are scratches, nicks, minor dents, and cosmetic damages on external surfaces and exposed parts; service visits to teach you how to use of the Product in writing by an...
... this warranty are solely responsible for any structure and setting for the Product, including all electrical, plumbing or other connecting facilities, for proper foundation/flooring, and for any liability or ...OR RESTAURANT MEALS, REMODELLING EXPENSES IN EXCESS OF DIRECT DAMAGES WHICH ARE DEFINITIVELY CAUSED EXCLUSIVELY BY Bosch, OR OTHERWISE. How to Obtain Warranty Service: To obtain warranty service for your Product,... you are scratches, nicks, minor dents, and cosmetic damages on external surfaces and exposed parts; service visits to teach you how to use of the Product in writing by an...


