Update Manual
Page 1
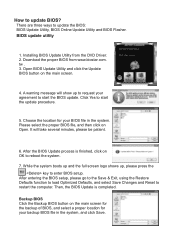
... your BIOS file in the system, and click Save. Download the proper BIOS from the DVD Driver. 2. Click Yes to start the update procedure. 5. How to restart the computer. Installing BIOS Update Utility from www.biostar.com. tw . 3. While the system boots up and the full screen logo shows up to request...
... your BIOS file in the system, and click Save. Download the proper BIOS from the DVD Driver. 2. Click Yes to start the update procedure. 5. How to restart the computer. Installing BIOS Update Utility from www.biostar.com. tw . 3. While the system boots up and the full screen logo shows up to request...
Update Manual
Page 2
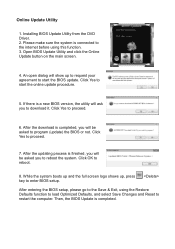
... full screen logo shows up to request your agreement to start the BIOS update. Click OK to proceed. 6. Installing BIOS Update Utility from the DVD Driver. 2. An open dialog will be asked you to proceed. 7. Click Yes to reboot. 8. After the updating process is completed, you will ask you will show...
... full screen logo shows up to request your agreement to start the BIOS update. Click OK to proceed. 6. Installing BIOS Update Utility from the DVD Driver. 2. An open dialog will be asked you to proceed. 7. Click Yes to reboot. 8. After the updating process is completed, you will ask you will show...
Setup Manual
Page 2
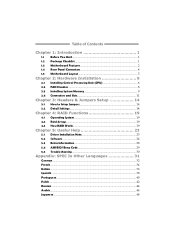
... to Setup Jumpers 14 3.2 Detail Settings 14 Chapter 4: RAID Functions 19 4.1 Operating System 19 4.2 Raid Arrays 19 4.3 How RAID Works 19 Chapter 5: Useful Help 23 5.1 Driver Installation Note 23 5.2 Software ...24 5.3 Extra Information 28 5.4 AMI BIOS Beep Code 29 5.5 Troubleshooting 30 Appendix: SPEC In Other Languages 31 German...32 French ...34...
... to Setup Jumpers 14 3.2 Detail Settings 14 Chapter 4: RAID Functions 19 4.1 Operating System 19 4.2 Raid Arrays 19 4.3 How RAID Works 19 Chapter 5: Useful Help 23 5.1 Driver Installation Note 23 5.2 Software ...24 5.3 Extra Information 28 5.4 AMI BIOS Beep Code 29 5.5 Troubleshooting 30 Appendix: SPEC In Other Languages 31 German...32 French ...34...
Setup Manual
Page 3
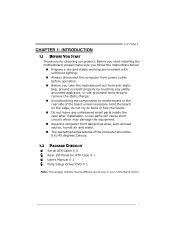
...„ Always disconnect the computer from power outlet before operation. „ Before you for ATX Case X 1 User's Manual X 1 Fully Setup Driver DVD X 1 Note: The package contents may be different due to remove the static charge. „ Avoid touching the components on motherboard or the ... be 0 to 45 degrees Celsius. 1.2 PACKAGE CHECKLIST Serial ATA Cable X 2 Rear I/O Panel for choosing our product. CHAPTER 1: INTRODUCTION H77MU3 1.1 BEFORE YOU START Thank you take the motherboard out from anti-static bag, ground yourself properly by touching any unfastened small parts inside the...
...„ Always disconnect the computer from power outlet before operation. „ Before you for ATX Case X 1 User's Manual X 1 Fully Setup Driver DVD X 1 Note: The package contents may be different due to remove the static charge. „ Avoid touching the components on motherboard or the ... be 0 to 45 degrees Celsius. 1.2 PACKAGE CHECKLIST Serial ATA Cable X 2 Rear I/O Panel for choosing our product. CHAPTER 1: INTRODUCTION H77MU3 1.1 BEFORE YOU START Thank you take the motherboard out from anti-static bag, ground yourself properly by touching any unfastened small parts inside the...
Setup Manual
Page 25
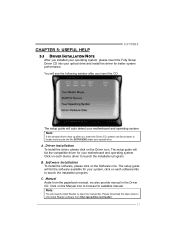
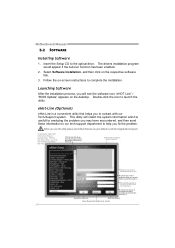
...H77MU3 5.1 DRIVER INSTALLATION NOTE After you insert the CD The setup guide will auto detect your motherboard and operating system. Driver Installation To install the driver, please click on the Manual icon to browse for better system performance. Click on each software title to launch the installation program. Click on the Driver... system, click on the Software icon. A. Software Installation To install the software, please click on each device driver to launch the installation program. The setup guide will need Acrobat Reader to locate and execute the file SETUP.EXE...
...H77MU3 5.1 DRIVER INSTALLATION NOTE After you insert the CD The setup guide will auto detect your motherboard and operating system. Driver Installation To install the driver, please click on the Manual icon to browse for better system performance. Click on each software title to launch the installation program. Click on the Driver... system, click on the Software icon. A. Software Installation To install the software, please click on each device driver to launch the installation program. The setup guide will need Acrobat Reader to locate and execute the file SETUP.EXE...
Setup Manual
Page 26
... you use this information, you fix the problem. This utility will show the i nformation which is a convenient utility that you to complete the installation. The drivers installation program would be able to you. Wi thout this utility,please set Outlook Express as your area or the area cl ose to send...
... you use this information, you fix the problem. This utility will show the i nformation which is a convenient utility that you to complete the installation. The drivers installation program would be able to you. Wi thout this utility,please set Outlook Express as your area or the area cl ose to send...
Bios Manual
Page 17
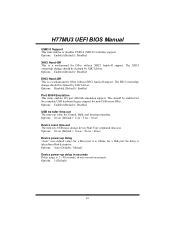
... Device reset time-out The item sets USB mass storage device Start Unit command time-out. The EHCI ownership change should be claimed by EHCI driver. Options: Auto (Default) / Manual Device power-up delay "Auto" uses default value: for a Root port it is 100ms, for a Hub port ...non-USB aware OSes. Options: 5 (Default) 16 Options: Enabled (Default) / Disabled XHCI Hand-Off This is 1 ~ 40 seconds, in one second increments. H77MU3 UEFI BIOS Manual USB3.0 Support This item enables or disables USB3.0 (XHCI) Controller support. The XHCI ownership change should be claimed by XHCI...
... Device reset time-out The item sets USB mass storage device Start Unit command time-out. The EHCI ownership change should be claimed by EHCI driver. Options: Auto (Default) / Manual Device power-up delay "Auto" uses default value: for a Root port it is 100ms, for a Hub port ...non-USB aware OSes. Options: 5 (Default) 16 Options: Enabled (Default) / Disabled XHCI Hand-Off This is 1 ~ 40 seconds, in one second increments. H77MU3 UEFI BIOS Manual USB3.0 Support This item enables or disables USB3.0 (XHCI) Controller support. The XHCI ownership change should be claimed by XHCI...

Bios Manual
Page 24
... (Default) / L0s / L1 / L0sL1 / Auto 23 Options: Enabled (Default) / Disabled / Enabled when no UEFI Driver PCI Express Configuration Onboard PCIE Giga LAN / PEX1_1 Slot / PEX1_2 Slot / PEX16_2 Slot This item controls the PCI Express Root Port. H77MU3 UEFI BIOS Manual on board lan option rom This item enables or disables onboard LAN...
... (Default) / L0s / L1 / L0sL1 / Auto 23 Options: Enabled (Default) / Disabled / Enabled when no UEFI Driver PCI Express Configuration Onboard PCIE Giga LAN / PEX1_1 Slot / PEX1_2 Slot / PEX16_2 Slot This item controls the PCI Express Root Port. H77MU3 UEFI BIOS Manual on board lan option rom This item enables or disables onboard LAN...

Bios Manual
Page 25
... One EHCI controller must always be enabled. Options: Auto (Default) / Gen1 / Gen2 USB Configuration XHCI Pre-Boot Driver This item enables or disables XHCI Pre-Boot Driver support. Options: Enabled (Default) / Disabled xHCI Streams This item enables xHCI maximum primary stream array size. Options: ...Enabled (Default) / Disabled XHCI Mode This item sets the mode of operation of XHCI controller. Options: Enabled (Default) / Disabled 24 H77MU3 UEFI...
... One EHCI controller must always be enabled. Options: Auto (Default) / Gen1 / Gen2 USB Configuration XHCI Pre-Boot Driver This item enables or disables XHCI Pre-Boot Driver support. Options: Enabled (Default) / Disabled xHCI Streams This item enables xHCI maximum primary stream array size. Options: ...Enabled (Default) / Disabled XHCI Mode This item sets the mode of operation of XHCI controller. Options: Enabled (Default) / Disabled 24 H77MU3 UEFI...


