User Guide
Page 3
... of life please dispose of the environment. It may also be done by qualified service personnel. BERNINA is being used or where oxygen is committed to the product. Do not pull or push fabric while stitching. Safety instructions 3 8. Do not throw away this product in the needle area, such as the result...
... of life please dispose of the environment. It may also be done by qualified service personnel. BERNINA is being used or where oxygen is committed to the product. Do not pull or push fabric while stitching. Safety instructions 3 8. Do not throw away this product in the needle area, such as the result...
User Guide
Page 5
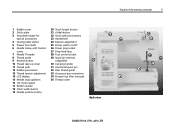
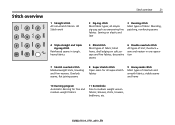
Details of the sewing computer 5 1 Bobbin cover 20 Stitch length button 2 Stitch plate 21 clr/del-button 3 Attachment base for 22 Stitch selection buttons special accessories 23 Handwheel 4 Sewing table socket 24 Balance adjustment 5 Presser foot shaft 25 Power switch on/off 6 Needle clamp with fixation 26 ... box connection 14 LCD display 34 Presser foot lifter (manual) 15 Needle stop up/down 35 Thread cutter 16 1/2 motor speed 17 Bobbin winder 18 Stitch width button 19 Needle position button 31 30 4 Back view 32 33 34 35 7 3 032622.50.04_0701_a210_EN
Details of the sewing computer 5 1 Bobbin cover 20 Stitch length button 2 Stitch plate 21 clr/del-button 3 Attachment base for 22 Stitch selection buttons special accessories 23 Handwheel 4 Sewing table socket 24 Balance adjustment 5 Presser foot shaft 25 Power switch on/off 6 Needle clamp with fixation 26 ... box connection 14 LCD display 34 Presser foot lifter (manual) 15 Needle stop up/down 35 Thread cutter 16 1/2 motor speed 17 Bobbin winder 18 Stitch width button 19 Needle position button 31 30 4 Back view 32 33 34 35 7 3 032622.50.04_0701_a210_EN
User Guide
Page 7
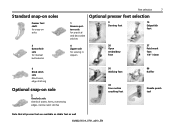
...feet selection 1 Reverse pattern sole for practical and decorative stitches 9 Darning foot 10 Edgestitch foot 4 Zipper sole for sewing in zippers 20 Open embroidery foot 37 Patchwork foot 1/4'' / 6mm 5 Blind stitch sole Blind hems, edge stitching Optional snap-on sole 2 Overlock sole Overlock seams, hems..., oversewing edges, narrow satin stitches 50 Walking foot 43 Free motion couching foot Note that all presser feet ...
...feet selection 1 Reverse pattern sole for practical and decorative stitches 9 Darning foot 10 Edgestitch foot 4 Zipper sole for sewing in zippers 20 Open embroidery foot 37 Patchwork foot 1/4'' / 6mm 5 Blind stitch sole Blind hems, edge stitching Optional snap-on sole 2 Overlock sole Overlock seams, hems..., oversewing edges, narrow satin stitches 50 Walking foot 43 Free motion couching foot Note that all presser feet ...
User Guide
Page 9
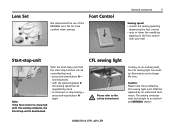
... authorized BERNINA dealer! 032622.50.04_0701_a210_EN With the Start-stop-unit (SSU) the start-stop-function can be controlled by hand. • press start -stop -unit is connected with the speed regulator B the sewing speed can be regulated by hand • to interrupt or stop sewing = press start -stop-button A = stitching starts... be brought to an ordinary bulb, the CFL sewing light has a better illumination and a longer life time. Lens Set We recommend the use of the BERNINA Lens Set for more comfort when sewing.
... authorized BERNINA dealer! 032622.50.04_0701_a210_EN With the Start-stop-unit (SSU) the start-stop-function can be controlled by hand. • press start -stop -unit is connected with the speed regulator B the sewing speed can be regulated by hand • to interrupt or stop sewing = press start -stop-button A = stitching starts... be brought to an ordinary bulb, the CFL sewing light has a better illumination and a longer life time. Lens Set We recommend the use of the BERNINA Lens Set for more comfort when sewing.

User Guide
Page 15
... Thread cutter on head frame • pull both threads from front to back over the cutter • the threads release as soon as the first stitch is sewn 032622.50.04_0701_a210_EN
... Thread cutter on head frame • pull both threads from front to back over the cutter • the threads release as soon as the first stitch is sewn 032622.50.04_0701_a210_EN
User Guide
Page 16
... • for free-hand sewing or dar- The fabric moves under the foot quite slowly, even at full sewing speed. With an extremely short stitch length, the steps are at the back • the measurements show the distance (with needle position cen- 16 Setting up the sewing computer... Stitch plate Note: To change the stitch plate see page 31 Stitch plate markings • the stitch plates are marked with seam guide lines in mm or inches • they are very useful guide lines for...
... • for free-hand sewing or dar- The fabric moves under the foot quite slowly, even at full sewing speed. With an extremely short stitch length, the steps are at the back • the measurements show the distance (with needle position cen- 16 Setting up the sewing computer... Stitch plate Note: To change the stitch plate see page 31 Stitch plate markings • the stitch plates are marked with seam guide lines in mm or inches • they are very useful guide lines for...
User Guide
Page 17
... tension may need adjusting for normal sewing work • for the best results. sion adjustment wheel to increase the upper thread tension turn ten- Perfect stitch formation • the stitch formation is in line with the marking A • the tension does not need adjusting to suit the fabric and chosen... stitch. If other sewing or embroidery threads are used to set for special sewing work, the tension can be adjusted to suit the fabric The tension ...
... tension may need adjusting for normal sewing work • for the best results. sion adjustment wheel to increase the upper thread tension turn ten- Perfect stitch formation • the stitch formation is in line with the marking A • the tension does not need adjusting to suit the fabric and chosen... stitch. If other sewing or embroidery threads are used to set for special sewing work, the tension can be adjusted to suit the fabric The tension ...

User Guide
Page 18
... once sewing is completed. 032622.50.04_0701_a210_EN This can naturally affect the stitch balance so that they are sewn too close together or not close enough. Honeycomb stitch on jersey, buttonholes, etc. Normal position Denser stitch formation (shorter stitch length) Finer stitch formation (longer stitch length) Note: If the balance has been adjusted, return it to...
... once sewing is completed. 032622.50.04_0701_a210_EN This can naturally affect the stitch balance so that they are sewn too close together or not close enough. Honeycomb stitch on jersey, buttonholes, etc. Normal position Denser stitch formation (shorter stitch length) Finer stitch formation (longer stitch length) Note: If the balance has been adjusted, return it to...
User Guide
Page 19
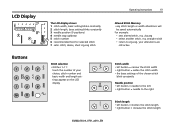
... 3 needle position (9 positions) 4 needle stop up/down 5 stitch number 6 recommended foot for selected stitch 7 satin stitch; dense, short zig-zag stitch Buttons Stitch selection • stitches 1-11: touch the number of your alterations are still active Stitch width • left button = narrow the stitch width • right button = widen the stitch width • the basic settings of the chosen...
... 3 needle position (9 positions) 4 needle stop up/down 5 stitch number 6 recommended foot for selected stitch 7 satin stitch; dense, short zig-zag stitch Buttons Stitch selection • stitches 1-11: touch the number of your alterations are still active Stitch width • left button = narrow the stitch width • right button = widen the stitch width • the basic settings of the chosen...
User Guide
Page 20
...buttonhole is released (max. deactivated when the symbol no longer appears on the LCD display. activated when the symbol appears on the LCD display. stitch length 3 mm) Applications: • programming buttonholes • programming darning program • manual securing (seam begin and end) continous reverse: ...• press button quickly twice • the sewing computer sews the chosen stitch in reverse • press button once to cancel 1/2 motor speed • press the button and the sewing speed will be halved •...
...buttonhole is released (max. deactivated when the symbol no longer appears on the LCD display. activated when the symbol appears on the LCD display. stitch length 3 mm) Applications: • programming buttonholes • programming darning program • manual securing (seam begin and end) continous reverse: ...• press button quickly twice • the sewing computer sews the chosen stitch in reverse • press button once to cancel 1/2 motor speed • press the button and the sewing speed will be halved •...
User Guide
Page 21
...such as oversewing fine fabrics. all super-stretch fabrics 9 Honeycomb stitch Most types of fabric; Stitch overview 1 Straight stitch All non-stretch fabrics. blind hems, shell edging on elastic and lace 3 Running stitch Most types of knit; Mending, patching, reinforcing seams 4 ...Triple straight and triple zig-zag stitch Reinforced seams in one operation 7 Stretch overlock stitch Mediumweight knits, toweling and firm wovens. Overlock = sew and neaten in tough, heavy fabrics 5 Blind stitch Most types of interlock and smooth fabrics; blouses, shirts...
...such as oversewing fine fabrics. all super-stretch fabrics 9 Honeycomb stitch Most types of fabric; Stitch overview 1 Straight stitch All non-stretch fabrics. blind hems, shell edging on elastic and lace 3 Running stitch Most types of knit; Mending, patching, reinforcing seams 4 ...Triple straight and triple zig-zag stitch Reinforced seams in one operation 7 Stretch overlock stitch Mediumweight knits, toweling and firm wovens. Overlock = sew and neaten in tough, heavy fabrics 5 Blind stitch Most types of interlock and smooth fabrics; blouses, shirts...
User Guide
Page 22
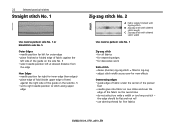
... and over the edge of the guide on the next stroke • do not select too wide a width or too long a stitch - 22 Selected practical stitches Straight stitch No. 1 Use reverse pattern sole No. 1 or blindstitch sole No. 5 Outer Edges • needle position far left for outer.... 5 • set to right needle position to stitch along upper edge Zig-zag stitch No. 2 A Fabric edges finished with zig-zag stitch B Zig-zag stitch with altered stitch length C Zig-zag stitch with altered stitch width Use reverse pattern sole No. 1 Zig-zag stitch • for all fabrics • for neatening edges...
... and over the edge of the guide on the next stroke • do not select too wide a width or too long a stitch - 22 Selected practical stitches Straight stitch No. 1 Use reverse pattern sole No. 1 or blindstitch sole No. 5 Outer Edges • needle position far left for outer.... 5 • set to right needle position to stitch along upper edge Zig-zag stitch No. 2 A Fabric edges finished with zig-zag stitch B Zig-zag stitch with altered stitch length C Zig-zag stitch with altered stitch width Use reverse pattern sole No. 1 Zig-zag stitch • for all fabrics • for neatening edges...
User Guide
Page 23
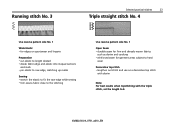
... to raw edge, matching up marks Sewing • stretch the elastic to fit the raw edge while sewing • trim excess fabric close to the stitching Use reverse pattern sole No. 1 Open Seam • durable seam for firm and densely woven fabrics such as denim and corduroy • reinforced seam for... garment areas subject to hard wear Decorative top stitch • lengthen out stitch and use as a decorative top stitch with denim Note: For best results when topstitching with the triple...
... to raw edge, matching up marks Sewing • stretch the elastic to fit the raw edge while sewing • trim excess fabric close to the stitching Use reverse pattern sole No. 1 Open Seam • durable seam for firm and densely woven fabrics such as denim and corduroy • reinforced seam for... garment areas subject to hard wear Decorative top stitch • lengthen out stitch and use as a decorative top stitch with denim Note: For best results when topstitching with the triple...
User Guide
Page 24
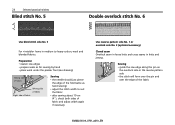
... of fabric Right side of fabric Sewing • the needle should just pierce the edge of the fold (same as hand sewing) • adjust the stitch width to suit the fabric • after sewing about 10 cm (4"), check both sides of the fabric 032622.50.04_0701_a210_EN Sewing 2 • guide the raw... edge along the pin on the overlock sole or the reverse pattern sole • the stitch will form over the pin and over the edge of fabric and adjust width again if necessary Use reverse pattern sole No. 1 or overlock sole...
... of fabric Right side of fabric Sewing • the needle should just pierce the edge of the fold (same as hand sewing) • adjust the stitch width to suit the fabric • after sewing about 10 cm (4"), check both sides of the fabric 032622.50.04_0701_a210_EN Sewing 2 • guide the raw... edge along the pin on the overlock sole or the reverse pattern sole • the stitch will form over the pin and over the edge of fabric and adjust width again if necessary Use reverse pattern sole No. 1 or overlock sole...
User Guide
Page 25
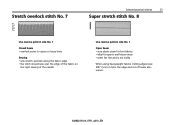
... reverse pattern sole No. 1 Closed Seam • overlock seam in coarse or loose knits Sewing • sew stretch overlock along the fabric edge • the stitch should sew over the edge of the fabric on the right sewing of the needle Use reverse pattern sole No. 1 Open Seam • very elastic...
... reverse pattern sole No. 1 Closed Seam • overlock seam in coarse or loose knits Sewing • sew stretch overlock along the fabric edge • the stitch should sew over the edge of the fabric on the right sewing of the needle Use reverse pattern sole No. 1 Open Seam • very elastic...
User Guide
Page 26
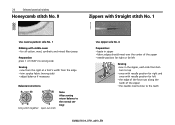
26 Selected practical stitches Honeycomb stitch No. 9 Zippers with Straight stitch No. 1 Use reverse pattern sole No. 1 Ribbing with needle position far left Sewing 4 • sew in zipper • fabric edges should meet over the center ...; baste in the zipper, each side from the edge • trim surplus fabric (wrong side) • adjust balance if necessary Balance/corrections bring stitch together open out stitch Note: After sewing return balance to the teeth 032622.50.04_0701_a210_EN tom to top • once with needle position far right and once with...
26 Selected practical stitches Honeycomb stitch No. 9 Zippers with Straight stitch No. 1 Use reverse pattern sole No. 1 Ribbing with needle position far left Sewing 4 • sew in zipper • fabric edges should meet over the center ...; baste in the zipper, each side from the edge • trim surplus fabric (wrong side) • adjust balance if necessary Balance/corrections bring stitch together open out stitch Note: After sewing return balance to the teeth 032622.50.04_0701_a210_EN tom to top • once with needle position far right and once with...
User Guide
Page 27
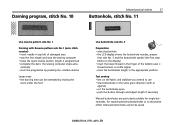
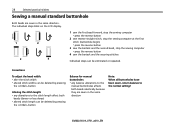
.... 11 Use reverse pattern sole No. 1 Darning with Reverse pattern sole No. 1 (auto stitch counter) • insert needle in the same grain direction (with or against) • cut the buttonhole open • push the button through and adjust length ...
.... 11 Use reverse pattern sole No. 1 Darning with Reverse pattern sole No. 1 (auto stitch counter) • insert needle in the same grain direction (with or against) • cut the buttonhole open • push the button through and adjust length ...
User Guide
Page 28
...bead width: • alter the stitch width • altered stitch widths can be deleted by pressing the «clr/del»-button Altering the stitch length: • any alterations to the stitch length affect both beads (denser or less dense) • altered stitch length can be deleted by pressing... 3 2 4 1 sew the first bead forward, stop the sewing computer • press the reverse button 2 sew reverse straight stitch, stop the sewing computer at the first stitch (buttonhole begin) • press the reverse button 3 sew the bartack and the second bead, stop the sewing computer • ...
...bead width: • alter the stitch width • altered stitch widths can be deleted by pressing the «clr/del»-button Altering the stitch length: • any alterations to the stitch length affect both beads (denser or less dense) • altered stitch length can be deleted by pressing... 3 2 4 1 sew the first bead forward, stop the sewing computer • press the reverse button 2 sew reverse straight stitch, stop the sewing computer at the first stitch (buttonhole begin) • press the reverse button 3 sew the bartack and the second bead, stop the sewing computer • ...
User Guide
Page 29
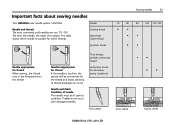
... 29 70 80 90 100 110 -120 • • • • • • Needle appropriate for the thread and faulty stitching or thread breakage can occur with damaged needles. Problems can occur. Needle Needle and thread The most commonly sold needles are nos. 70 -120. ...needle The needle must be too narrow for thread When sewing, the thread runs in perfect condition. Important facts about sewing needles Your BERNINA uses needle system 130/705H. The table shows which threads. Needle inappropriate for thread If the needle is suitable for decorative seams (...
... 29 70 80 90 100 110 -120 • • • • • • Needle appropriate for the thread and faulty stitching or thread breakage can occur with damaged needles. Problems can occur. Needle Needle and thread The most commonly sold needles are nos. 70 -120. ...needle The needle must be too narrow for thread When sewing, the thread runs in perfect condition. Important facts about sewing needles Your BERNINA uses needle system 130/705H. The table shows which threads. Needle inappropriate for thread If the needle is suitable for decorative seams (...
User Guide
Page 31
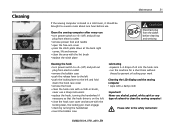
...on the left and fold down at the back right corner, lift and remove • clean the area with the lint brush • replace the stitch plate CAUTION Disconnect plug from the socket before cleaning and servicing Cleaning the hook • turn power switch to «0» (off) and pull ...out plug from electric outlet • remove presser foot and needle • open the free-arm cover • press the stitch plate down the hook race cover • remove the hook • clean the hook race with a cloth or brush, never use . Never use alcohol, petrol...
...on the left and fold down at the back right corner, lift and remove • clean the area with the lint brush • replace the stitch plate CAUTION Disconnect plug from the socket before cleaning and servicing Cleaning the hook • turn power switch to «0» (off) and pull ...out plug from electric outlet • remove presser foot and needle • open the free-arm cover • press the stitch plate down the hook race cover • remove the hook • clean the hook race with a cloth or brush, never use . Never use alcohol, petrol...

