User Guide
Page 2
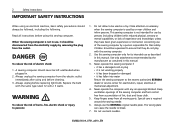
... supervision or instruction concerning use as described in this sewing computer. The wrong plate can cause the needle to persons: 1. Replace the bulb with any air openings blocked. Never operate the computer with the same type rated 12 volts / 5 watts. Always use bent needles. 032622.50.04_0701_a210_EN Always unplug before cleaning. 3. DANGER To reduce the risk of lint, dust and loose cloth. 5. This sewing computer...
... supervision or instruction concerning use as described in this sewing computer. The wrong plate can cause the needle to persons: 1. Replace the bulb with any air openings blocked. Never operate the computer with the same type rated 12 volts / 5 watts. Always use bent needles. 032622.50.04_0701_a210_EN Always unplug before cleaning. 3. DANGER To reduce the risk of lint, dust and loose cloth. 5. This sewing computer...
User Guide
Page 3
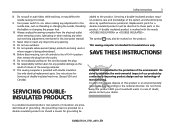
... threading or changing the needle, threading the bobbin or changing the presser foot. 10. Do not unplug by continuously improving product design and our technology of the sewing computer. 17. BERNINA is provided with double insulation. In case of grounding. Always unplug the sewing computer from the outlet. 15. Use only identical replacement parts. The symbol may deflect the needle causing it to the off («0») position then remove...
... threading or changing the needle, threading the bobbin or changing the presser foot. 10. Do not unplug by continuously improving product design and our technology of the sewing computer. 17. BERNINA is provided with double insulation. In case of grounding. Always unplug the sewing computer from the outlet. 15. Use only identical replacement parts. The symbol may deflect the needle causing it to the off («0») position then remove...
User Guide
Page 5
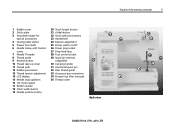
... Presser foot shaft 25 Power switch on/off 6 Needle clamp with fixation 26 Power plug socket screw 27 Drop feed-dog 7 Needle Threader 28 Foot control socket 8 Thread guide 9 Reverse button 29 Spool pin (vertical, collapsible) 29 10 Thread take up cover 30 Carrying handle 11 Thread path 31 Horizontal spool pin 12 Bobbin pre-tension 32 Rear thread guide 13 Thread tension adjustment 33 Accessory box connection 14 LCD display 34 Presser foot lifter (manual) 15 Needle stop up/down 35 Thread cutter 16 1/2 motor speed 17 Bobbin winder 18 Stitch width button 19 Needle position...
... Presser foot shaft 25 Power switch on/off 6 Needle clamp with fixation 26 Power plug socket screw 27 Drop feed-dog 7 Needle Threader 28 Foot control socket 8 Thread guide 9 Reverse button 29 Spool pin (vertical, collapsible) 29 10 Thread take up cover 30 Carrying handle 11 Thread path 31 Horizontal spool pin 12 Bobbin pre-tension 32 Rear thread guide 13 Thread tension adjustment 33 Accessory box connection 14 LCD display 34 Presser foot lifter (manual) 15 Needle stop up/down 35 Thread cutter 16 1/2 motor speed 17 Bobbin winder 18 Stitch width button 19 Needle position...
User Guide
Page 7
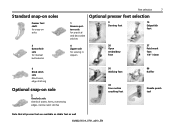
... soles 3 Buttonhole sole for manual buttonholes Feet selection 7 Optional presser feet selection 1 Reverse pattern sole for practical and decorative stitches 9 Darning foot 10 Edgestitch foot 4 Zipper sole for sewing in zippers 20 Open embroidery foot 37 Patchwork foot 1/4'' / 6mm 5 Blind stitch sole Blind hems, edge stitching Optional snap-on sole 2 Overlock sole Overlock seams, hems, oversewing edges, narrow satin stitches 50 Walking foot 43 Free motion couching foot Note that all presser feet are available as stable feet as well 032622.50.04_0701_a210_EN 86 Ruffler Needle punch...
... soles 3 Buttonhole sole for manual buttonholes Feet selection 7 Optional presser feet selection 1 Reverse pattern sole for practical and decorative stitches 9 Darning foot 10 Edgestitch foot 4 Zipper sole for sewing in zippers 20 Open embroidery foot 37 Patchwork foot 1/4'' / 6mm 5 Blind stitch sole Blind hems, edge stitching Optional snap-on sole 2 Overlock sole Overlock seams, hems, oversewing edges, narrow satin stitches 50 Walking foot 43 Free motion couching foot Note that all presser feet are available as stable feet as well 032622.50.04_0701_a210_EN 86 Ruffler Needle punch...
User Guide
Page 10
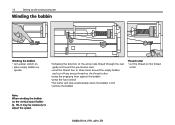
... thread two to three times around the empty bobbin and cut off any excess thread on the thread cutter • press the engaging lever against the bobbin • press the foot control • the motor will stop automatically when the bobbin is full • remove the bobbin Thread cutter • cut the thread on the thread cutter Note: When winding the bobbin on the vertical spool holder (p. 13), it may be necessary to adjust the speed...
... thread two to three times around the empty bobbin and cut off any excess thread on the thread cutter • press the engaging lever against the bobbin • press the foot control • the motor will stop automatically when the bobbin is full • remove the bobbin Thread cutter • cut the thread on the thread cutter Note: When winding the bobbin on the vertical spool holder (p. 13), it may be necessary to adjust the speed...
User Guide
Page 11
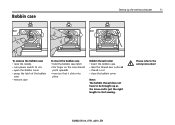
Bobbin case Setting up the sewing computer 11 A To remove the bobbin case • raise the needle • turn power switch to «0» • open the bobbin cover • grasp the latch of the bobbin case • remove case To insert the bobbin case • hold the bobbin case latch • the finger on the case should point upwards • insert so that it clicks into place Bobbin thread cutter • insert the bobbin case • take the thread over...
Bobbin case Setting up the sewing computer 11 A To remove the bobbin case • raise the needle • turn power switch to «0» • open the bobbin cover • grasp the latch of the bobbin case • remove case To insert the bobbin case • hold the bobbin case latch • the finger on the case should point upwards • insert so that it clicks into place Bobbin thread cutter • insert the bobbin case • take the thread over...
User Guide
Page 12
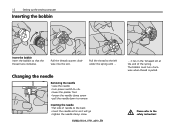
...; lower the presser foot • loosen the needle clamp screw • pull the needle down to remove Inserting the needle • flat side of needle to the back • insert the needle as far as it lies in the T-shaped slit at the end of the spring. Pull the thread to the safety instruction! Changing the needle Removing the needle • raise the needle • turn clockwise when thread is pulled. 12 Setting...
...; lower the presser foot • loosen the needle clamp screw • pull the needle down to remove Inserting the needle • flat side of needle to the back • insert the needle as far as it lies in the T-shaped slit at the end of the spring. Pull the thread to the safety instruction! Changing the needle Removing the needle • raise the needle • turn clockwise when thread is pulled. 12 Setting...

User Guide
Page 13
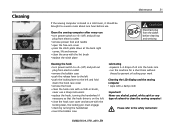
....50.04_0701_a210_EN double A needle work • raise the pin until it clicks into position Please refer to the safety instruction! Changing the presser foot sole Setting up the sewing computer 13 3 Changing the presser foot sole • raise the needle and the presser foot shaft • turn power switch to «0» • press the button on the back of the shaft • lower the presser foot lifter and the foot sole will...
....50.04_0701_a210_EN double A needle work • raise the pin until it clicks into position Please refer to the safety instruction! Changing the presser foot sole Setting up the sewing computer 13 3 Changing the presser foot sole • raise the needle and the presser foot shaft • turn power switch to «0» • press the button on the back of the shaft • lower the presser foot lifter and the foot sole will...
User Guide
Page 14
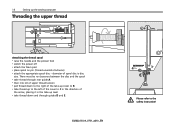
... cover to B • take thread up to the left of the cover to the safety instruction! There must be no clearance between the disc and the spool • take -up the sewing computer Threading the upper thread A Attaching the thread spool • raise the needle and the presser foot • switch the power off • attach the foam pad • place spool on pin (thread unwinds clockwise) • attach the appropriate spool...
... cover to B • take thread up to the left of the cover to the safety instruction! There must be no clearance between the disc and the spool • take -up the sewing computer Threading the upper thread A Attaching the thread spool • raise the needle and the presser foot • switch the power off • attach the foam pad • place spool on pin (thread unwinds clockwise) • attach the appropriate spool...

User Guide
Page 15
Needle Threader Setting up the sewing computer 15 A B Thread in hook • raise the needle • lower the presser foot • lay the thread behind hook B and hold lightly Lever down • press lever A down and simultaneously guide the thread around hook B to the right to the needle Thread in front of needle • put the thread from the front into the guide until it catches in the hook • let go of lever A and thread Thread cutter Thread cutter on...
Needle Threader Setting up the sewing computer 15 A B Thread in hook • raise the needle • lower the presser foot • lay the thread behind hook B and hold lightly Lever down • press lever A down and simultaneously guide the thread around hook B to the right to the needle Thread in front of needle • put the thread from the front into the guide until it catches in the hook • let go of lever A and thread Thread cutter Thread cutter on...
User Guide
Page 16
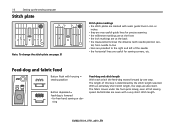
... stitch length selected. The length of the needle • the horizontal lines are also short. 16 Setting up the sewing computer Stitch plate Note: To change the stitch plate see page 31 Stitch plate markings • the stitch plates are marked with seam guide lines in mm or inches • they are very useful guide lines for free-hand sewing or dar- Buttonholes are sewn with needle position cen- Feed-dog and fabric feed Button flush with housing = sewing position Button depressed = feed-dog...
... stitch length selected. The length of the needle • the horizontal lines are also short. 16 Setting up the sewing computer Stitch plate Note: To change the stitch plate see page 31 Stitch plate markings • the stitch plates are marked with seam guide lines in mm or inches • they are very useful guide lines for free-hand sewing or dar- Buttonholes are sewn with needle position cen- Feed-dog and fabric feed Button flush with housing = sewing position Button depressed = feed-dog...
User Guide
Page 17
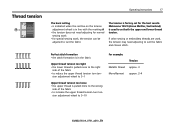
If other sewing or embroidery threads are used to set for special sewing work • for the best results. Perfect stitch formation • the stitch formation is in line with the marking A • the tension does not need adjusting to suit the fabric and chosen stitch. sion adjustment wheel to 3-1 Upper thread tension too loose • the upper thread is factory set both the upper and lower thread tension. Thread tension 3 A 5 Operating instructions 17 The basic setting • is indicated when the...
If other sewing or embroidery threads are used to set for special sewing work • for the best results. Perfect stitch formation • the stitch formation is in line with the marking A • the tension does not need adjusting to suit the fabric and chosen stitch. sion adjustment wheel to 3-1 Upper thread tension too loose • the upper thread is factory set both the upper and lower thread tension. Thread tension 3 A 5 Operating instructions 17 The basic setting • is indicated when the...
User Guide
Page 20
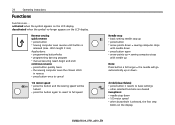
... needle will go automatically up or down • 1/2 motor speed • when buttonhole is released (max. Reverse sewing quick reverse: • press button • Sewing computer sews reverse until button is selected, the first step blinks on the display 032622.50.04_0701_a210_EN stitch length 3 mm) Applications: • programming buttonholes • programming darning program • manual securing (seam begin and end) continous reverse: • press button quickly twice • the sewing computer sews the chosen stitch in reverse...
... needle will go automatically up or down • 1/2 motor speed • when buttonhole is released (max. Reverse sewing quick reverse: • press button • Sewing computer sews reverse until button is selected, the first step blinks on the display 032622.50.04_0701_a210_EN stitch length 3 mm) Applications: • programming buttonholes • programming darning program • manual securing (seam begin and end) continous reverse: • press button quickly twice • the sewing computer sews the chosen stitch in reverse...
User Guide
Page 22
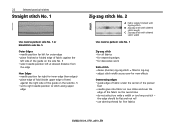
... upper edge of hem) against the right side of the guide on the sole No. 5 • set to right needle position to stitch along upper edge Zig-zag stitch No. 2 A Fabric edges finished with zig-zag stitch B Zig-zag stitch with altered stitch length C Zig-zag stitch with altered stitch width Use reverse pattern sole No. 1 Zig-zag stitch • for all fabrics • for neatening edges • for decorative work Satin stitch • dense (shorter) zig-zag stitch = filled in zig-zag • adjust stitch width as you sew for fine fabrics...
... upper edge of hem) against the right side of the guide on the sole No. 5 • set to right needle position to stitch along upper edge Zig-zag stitch No. 2 A Fabric edges finished with zig-zag stitch B Zig-zag stitch with altered stitch length C Zig-zag stitch with altered stitch width Use reverse pattern sole No. 1 Zig-zag stitch • for all fabrics • for neatening edges • for decorative work Satin stitch • dense (shorter) zig-zag stitch = filled in zig-zag • adjust stitch width as you sew for fine fabrics...
User Guide
Page 26
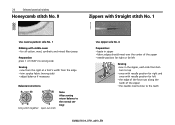
...; the needle inserts close to the teeth 032622.50.04_0701_a210_EN 26 Selected practical stitches Honeycomb stitch No. 9 Zippers with Straight stitch No. 1 Use reverse pattern sole No. 1 Ribbing with needle position far left Sewing 4 • sew in the zipper, each side from the edge • trim surplus fabric (wrong side) • adjust balance if necessary Balance/corrections bring stitch together open out stitch Note: After sewing return balance to the normal setting...
...; the needle inserts close to the teeth 032622.50.04_0701_a210_EN 26 Selected practical stitches Honeycomb stitch No. 9 Zippers with Straight stitch No. 1 Use reverse pattern sole No. 1 Ribbing with needle position far left Sewing 4 • sew in the zipper, each side from the edge • trim surplus fabric (wrong side) • adjust balance if necessary Balance/corrections bring stitch together open out stitch Note: After sewing return balance to the normal setting...
User Guide
Page 27
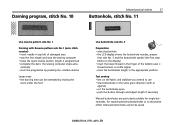
...; complete the darn; Darning program, stitch No. 10 Selected practical stitches 27 Buttonhole, stitch No. 11 Use reverse pattern sole No. 1 Darning with or against) • cut the buttonhole open • push the button through and adjust length if necessary Manual buttonholes are particularly suitable for single buttonholes, for repairing existing buttonholes or to use • sew buttonholes in the same grain direction (with Reverse pattern sole No. 1 (auto stitch counter) • insert needle in the appropriate position Test sewing •...
...; complete the darn; Darning program, stitch No. 10 Selected practical stitches 27 Buttonhole, stitch No. 11 Use reverse pattern sole No. 1 Darning with or against) • cut the buttonhole open • push the button through and adjust length if necessary Manual buttonholes are particularly suitable for single buttonholes, for repairing existing buttonholes or to use • sew buttonholes in the same grain direction (with Reverse pattern sole No. 1 (auto stitch counter) • insert needle in the appropriate position Test sewing •...
User Guide
Page 29
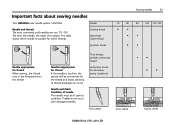
.... Thick threads, synthetic mercerised thread Buttonhole thread for which threads. Darning thread Mercerised cotton thread Synthetic thread Sewing needles 29 70 80 90 100 110 -120 • • • • • • Needle appropriate for thread If the needle is suitable for decorative seams (cordonnet) bent needle blunt needle • • • • hooked needle 032622.50.04_0701_a210_EN Problems can occur. Important facts about sewing needles Your BERNINA uses needle system 130/705H. Needle Needle and thread The...
.... Thick threads, synthetic mercerised thread Buttonhole thread for which threads. Darning thread Mercerised cotton thread Synthetic thread Sewing needles 29 70 80 90 100 110 -120 • • • • • • Needle appropriate for thread If the needle is suitable for decorative seams (cordonnet) bent needle blunt needle • • • • hooked needle 032622.50.04_0701_a210_EN Problems can occur. Important facts about sewing needles Your BERNINA uses needle system 130/705H. Needle Needle and thread The...
User Guide
Page 31
... Clean the sewing computer after every use • turn power switch to «0» (off) and pull out plug from electric outlet • remove presser foot and needle • open the free-arm cover • press the stitch plate down at the back right corner, lift and remove • clean the area with the lint brush • replace the stitch plate CAUTION Disconnect plug from electric outlet • remove the bobbin case...
... Clean the sewing computer after every use • turn power switch to «0» (off) and pull out plug from electric outlet • remove presser foot and needle • open the free-arm cover • press the stitch plate down at the back right corner, lift and remove • clean the area with the lint brush • replace the stitch plate CAUTION Disconnect plug from electric outlet • remove the bobbin case...
User Guide
Page 33
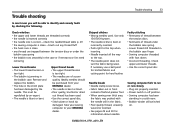
... upper and lower threads. • Use the correct spool disc. Remove and replace the bobbin. • The hole in a cold room. • Bobbin winder still switched on. 032622.50.04_0701_a210_EN Ideally needles should be repolished by checking the following. Skipped stitches • Wrong needles used . • Use the correct spool disc. • Stitch plate or hook tip damaged. Faulty stitching • Remnants of thread between the tension discs or under the bobbin case spring. • Lower thread still threaded...
... upper and lower threads. • Use the correct spool disc. Remove and replace the bobbin. • The hole in a cold room. • Bobbin winder still switched on. 032622.50.04_0701_a210_EN Ideally needles should be repolished by checking the following. Skipped stitches • Wrong needles used . • Use the correct spool disc. • Stitch plate or hook tip damaged. Faulty stitching • Remnants of thread between the tension discs or under the bobbin case spring. • Lower thread still threaded...
User Guide
Page 34
...21, 24 F Fabric feed Feed-dog Foot control H Honeycomb stitch I Inserting the bobbin L LCD display Lens Set M Maintenance 1/2 Motor speed N Needle position Needle stop Needle Threader Needle up/down Needles 16 16 6, 9 21, 26 12 O Optional accessories P Power cable Presser feet R Reverse sewing Running stitch 7, 8, 9 6 7 T Thread cutter Thread tension Threading Threads Triple straight stitch Trouble shooting 10, 11, 15 17 14 29 21, 23 33 20 U 21, 23 Upper thread 14 19 9 31-32 20 19 20 15 20 29, 30 S Seam guide 8 Sewing light 9, 32 Sewing table 8 Snap-on soles 7 Spool pin 13...
...21, 24 F Fabric feed Feed-dog Foot control H Honeycomb stitch I Inserting the bobbin L LCD display Lens Set M Maintenance 1/2 Motor speed N Needle position Needle stop Needle Threader Needle up/down Needles 16 16 6, 9 21, 26 12 O Optional accessories P Power cable Presser feet R Reverse sewing Running stitch 7, 8, 9 6 7 T Thread cutter Thread tension Threading Threads Triple straight stitch Trouble shooting 10, 11, 15 17 14 29 21, 23 33 20 U 21, 23 Upper thread 14 19 9 31-32 20 19 20 15 20 29, 30 S Seam guide 8 Sewing light 9, 32 Sewing table 8 Snap-on soles 7 Spool pin 13...


