User Guide
Page 2
...removing the plug from all instructions before replacing light bulb. Children should never be supervised to break. 7. Use only attachments recommended by a person responsible for examination, repair, electrical or mechanical adjustment. 4. Do not use the BERNINA original needle plate. DANGER .... Always use bent needles. 032622.50.04_0701_a210_EN Keep ventilation openings of lint, dust and loose cloth. 5. 2 Safety instructions IMPORTANT SAFETY INSTRUCTIONS When using and before cleaning. 3. Read all moving parts. WARNING To reduce the risk of electric shock: 1. Never...
...removing the plug from all instructions before replacing light bulb. Children should never be supervised to break. 7. Use only attachments recommended by a person responsible for examination, repair, electrical or mechanical adjustment. 4. Do not use the BERNINA original needle plate. DANGER .... Always use bent needles. 032622.50.04_0701_a210_EN Keep ventilation openings of lint, dust and loose cloth. 5. 2 Safety instructions IMPORTANT SAFETY INSTRUCTIONS When using and before cleaning. 3. Read all moving parts. WARNING To reduce the risk of electric shock: 1. Never...
User Guide
Page 3
... («0») position then remove the plug from the electrical outlet when removing covers, lubricating or when making any opening. 12. BERNINA is provided on a double-insulated product nor should only be marked on the cord but grasp the plug. 16. Always unplug the... where aerosol (spray) products are provided instead of the environment. Never drop or insert any object into any adjustments in the product. Safety instructions 3 8. This sewing computer is marked with the words «DOUBLE INSULATION» or «DOUBLE INSULATED». Servicing a double-insulated ...
... («0») position then remove the plug from the electrical outlet when removing covers, lubricating or when making any opening. 12. BERNINA is provided on a double-insulated product nor should only be marked on the cord but grasp the plug. 16. Always unplug the... where aerosol (spray) products are provided instead of the environment. Never drop or insert any object into any adjustments in the product. Safety instructions 3 8. This sewing computer is marked with the words «DOUBLE INSULATION» or «DOUBLE INSULATED». Servicing a double-insulated ...
User Guide
Page 6
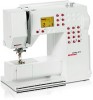
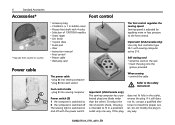
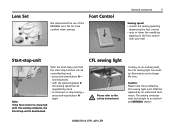
... with sewing computer activa 210. If the plug When sewing • unwind the cable Refer to fit in a polarized outlet only one blade wider than the other). To reduce the risk of 130/705H needles • Seam ripper • Lint brush • 3 spool discs • Foam pad • Oiler • Instruction manual •... Foot control cable • plug C into sewing computer Power switch (D) 1 the computer is switched on and off The sewing light is intended to the safety instruction! Important! (USA/Canada only) Use only foot controller type SR-1 with the power switch.
... with sewing computer activa 210. If the plug When sewing • unwind the cable Refer to fit in a polarized outlet only one blade wider than the other). To reduce the risk of 130/705H needles • Seam ripper • Lint brush • 3 spool discs • Foam pad • Oiler • Instruction manual •... Foot control cable • plug C into sewing computer Power switch (D) 1 the computer is switched on and off The sewing light is intended to the safety instruction! Important! (USA/Canada only) Use only foot controller type SR-1 with the power switch.
User Guide
Page 9
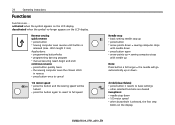
... that a defective CFL sewing light must be brought to interrupt or stop sewing = press start-stop -unit is deactivated. Contrary to the safety instructions! With the Start-stop-unit (SSU) the start-stop-function can be controlled by hand. • press start-stop-button A = stitching starts &#...speed • control the sewing speed by depressing the foot control • raise or lower the needle by hand • to an authorized BERNINA dealer! 032622.50.04_0701_a210_EN The sewing computer must ONLY be regulated by tapping on the foot control with your heel Start-stop-unit B A ...
... that a defective CFL sewing light must be brought to interrupt or stop sewing = press start-stop -unit is deactivated. Contrary to the safety instructions! With the Start-stop-unit (SSU) the start-stop-function can be controlled by hand. • press start-stop-button A = stitching starts &#...speed • control the sewing speed by depressing the foot control • raise or lower the needle by hand • to an authorized BERNINA dealer! 032622.50.04_0701_a210_EN The sewing computer must ONLY be regulated by tapping on the foot control with your heel Start-stop-unit B A ...
User Guide
Page 11
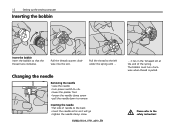
... bobbin cover Note: The bobbin thread does not have to be brought up as the loose end is just the right length to the safety instruction! 032622.50.04_0701_a210_EN Please refer to start sewing.
... bobbin cover Note: The bobbin thread does not have to be brought up as the loose end is just the right length to the safety instruction! 032622.50.04_0701_a210_EN Please refer to start sewing.
User Guide
Page 12
... refer to the back • insert the needle as far as it lies in the T-shaped slit at the end of needle to the safety instruction! it will go • tighten the needle clamp screw 032622.50.04_0701_a210_EN ... Changing the needle Removing the needle • raise the needle • turn clockwise...
... refer to the back • insert the needle as far as it lies in the T-shaped slit at the end of needle to the safety instruction! it will go • tighten the needle clamp screw 032622.50.04_0701_a210_EN ... Changing the needle Removing the needle • raise the needle • turn clockwise...

User Guide
Page 13
double A needle work • raise the pin until it clicks into position Please refer to the safety instruction! Changing the presser foot sole Setting up the sewing computer 13 3 Changing the presser foot sole • raise the needle and the presser foot shaft &#...
double A needle work • raise the pin until it clicks into position Please refer to the safety instruction! Changing the presser foot sole Setting up the sewing computer 13 3 Changing the presser foot sole • raise the needle and the presser foot shaft &#...
User Guide
Page 14
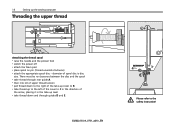
... C D B E Please refer to C in the direction of the arrow, placing it in the take thread up to the left of the cover to the safety instruction! diameter of spool disc is disc size. 14 Setting up level • take thread down to the right of the take-up cover to B •...
... C D B E Please refer to C in the direction of the arrow, placing it in the take thread up to the left of the cover to the safety instruction! diameter of spool disc is disc size. 14 Setting up level • take thread down to the right of the take-up cover to B •...
User Guide
Page 17
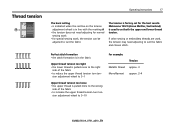
... tension turn ten- sion adjustment wheel to suit the fabric The tension is factory set both the upper and lower thread tension. Thread tension 3 A 5 Operating instructions 17 The basic setting • is indicated when the red line on the tension adjustment wheel is in the fabric Upper thread tension too tight...
... tension turn ten- sion adjustment wheel to suit the fabric The tension is factory set both the upper and lower thread tension. Thread tension 3 A 5 Operating instructions 17 The basic setting • is indicated when the red line on the tension adjustment wheel is in the fabric Upper thread tension too tight...

User Guide
Page 18
... remedied with Balance to the normal setting once sewing is completed. 032622.50.04_0701_a210_EN Applications: Practical stitches, e.g. Honeycomb stitch on jersey, buttonholes, etc. 18 Operating instructions Balance Your sewing computer has been tested and factory set using a double layer of cretonne fabric and Metrosene 100/2 threads (Arova Mettler, Switzerland).
... remedied with Balance to the normal setting once sewing is completed. 032622.50.04_0701_a210_EN Applications: Practical stitches, e.g. Honeycomb stitch on jersey, buttonholes, etc. 18 Operating instructions Balance Your sewing computer has been tested and factory set using a double layer of cretonne fabric and Metrosene 100/2 threads (Arova Mettler, Switzerland).
User Guide
Page 19
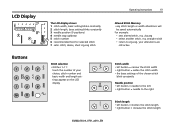
... width • the basic settings of your choice; stitch number and basic width and length settings appear on the LCD display 032622.50.04_0701_a210_EN Operating instructions 19 Altered Stitch Memory • any stitch length or width alterations will be saved automatically For example: • sew altered stitch, e.g. dense, short zig-zag...
... width • the basic settings of your choice; stitch number and basic width and length settings appear on the LCD display 032622.50.04_0701_a210_EN Operating instructions 19 Altered Stitch Memory • any stitch length or width alterations will be saved automatically For example: • sew altered stitch, e.g. dense, short zig-zag...
User Guide
Page 20
... • press the button and the sewing speed will go automatically up or down • 1/2 motor speed • when buttonhole is released (max. 20 Operating instructions Functions Functions are cleared Exceptions: • needle stop up • press button • arrow points down = sewing computer stops with needle down • press button...
... • press the button and the sewing speed will go automatically up or down • 1/2 motor speed • when buttonhole is released (max. 20 Operating instructions Functions Functions are cleared Exceptions: • needle stop up • press button • arrow points down = sewing computer stops with needle down • press button...
User Guide
Page 31
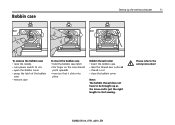
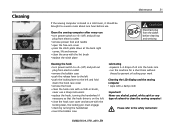
..., the locking pin must engage • check by turning the handwheel • insert the bobbin case Lubricating • squeeze 2-3 drops of solvent to the safety instruction! 032622.50.04_0701_a210_EN
..., the locking pin must engage • check by turning the handwheel • insert the bobbin case Lubricating • squeeze 2-3 drops of solvent to the safety instruction! 032622.50.04_0701_a210_EN
User Guide
Page 32
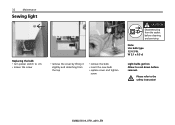
W 2.1 x 9.5 d. 32 Maintenance Sewing light Replacing the bulb • turn power switch to the safety instruction! 032622.50.04_0701_a210_EN Please refer to «0» • loosen the screw • remove the cover by lifting it slightliy and detaching from the top • remove the bulb • insert the new bulb • replace cover and tighten screw CAUTION Disconnect plug from the socket before removal. Allow to cool down before cleaning and servicing Note: Use bulb type 12 V 5 W. Light bulbs get hot.
W 2.1 x 9.5 d. 32 Maintenance Sewing light Replacing the bulb • turn power switch to the safety instruction! 032622.50.04_0701_a210_EN Please refer to «0» • loosen the screw • remove the cover by lifting it slightliy and detaching from the top • remove the bulb • insert the new bulb • replace cover and tighten screw CAUTION Disconnect plug from the socket before removal. Allow to cool down before cleaning and servicing Note: Use bulb type 12 V 5 W. Light bulbs get hot.
User Guide
Page 35
Important safety Instructions Details of the sewing computer Standard Accessories Feet selection Optional Accessories Setting up the sewing computer Operating instructions Stitch overview Selected practical stitches Sewing Needles Maintenance Troubleshooting Index Contents 35 2 4 6 7 8 10 17 21 22 29 31 33 34 07/01 EN 032 622 50 04 Impressum Typesetting, Layout, DTP: Silvia Bartholdi Graphics: Müller-Melzer ID, Kreuzlingen © copyright 2007 BERNINA International AG, Steckborn 032622.50.04_0701_a210_EN
Important safety Instructions Details of the sewing computer Standard Accessories Feet selection Optional Accessories Setting up the sewing computer Operating instructions Stitch overview Selected practical stitches Sewing Needles Maintenance Troubleshooting Index Contents 35 2 4 6 7 8 10 17 21 22 29 31 33 34 07/01 EN 032 622 50 04 Impressum Typesetting, Layout, DTP: Silvia Bartholdi Graphics: Müller-Melzer ID, Kreuzlingen © copyright 2007 BERNINA International AG, Steckborn 032622.50.04_0701_a210_EN

