
BenQ US Projector 1 Year Warranty
Page 1
... replace the DOA unit with a new or reconditioned Product of the original warranty period specified above. BENQ AMERICA CORP. BenQ Projector Standard Limited Warranty: Subject to the exclusions set forth below, BenQ America Corp. ("BenQ") warrants the BenQ Digital Projector ("Product") you are entitled to repair the Product, or replace the Product with a brand new replacement. Return...
... replace the DOA unit with a new or reconditioned Product of the original warranty period specified above. BENQ AMERICA CORP. BenQ Projector Standard Limited Warranty: Subject to the exclusions set forth below, BenQ America Corp. ("BenQ") warrants the BenQ Digital Projector ("Product") you are entitled to repair the Product, or replace the Product with a brand new replacement. Return...

- For the purchase before May 01, 2010
Page 1
...Parts and Products: All repaired or replaced parts or products shall be warranted only for lamps as specified below , BenQ America Corp. ("BenQ") warrants the BenQ Digital Projector ("Product") you are entitled to process the replacement. If the Product becomes defective during the warranty period. Shipping... use new or reconditioned components or parts to the Customer during the warranty period BenQ will, at its option, repair or replace the Product. END USER LIMITED WARRANTY DIGITAL PROJECTORS Subject to the following terms and conditions: DOA (Dead On Arrival): Must be...
...Parts and Products: All repaired or replaced parts or products shall be warranted only for lamps as specified below , BenQ America Corp. ("BenQ") warrants the BenQ Digital Projector ("Product") you are entitled to process the replacement. If the Product becomes defective during the warranty period. Shipping... use new or reconditioned components or parts to the Customer during the warranty period BenQ will, at its option, repair or replace the Product. END USER LIMITED WARRANTY DIGITAL PROJECTORS Subject to the following terms and conditions: DOA (Dead On Arrival): Must be...

W6000 User Manual
Page 2
...17 Preparations 17 Connecting HDMI devices 17 Connecting component-video devices ....18 Connecting S-Video or video devices ......18 Connecting a computer 19 Using the projector 20 Turning the projector on 20 Selecting an input source 21 Fine-tuning the image size and clarity 21 Using the menus 22 Securing the... projector 22 Using a security cable lock 22 Utilizing the password function 23 Adjusting the projected image 25 2 Table of contents Adjusting the projection angle...
...17 Preparations 17 Connecting HDMI devices 17 Connecting component-video devices ....18 Connecting S-Video or video devices ......18 Connecting a computer 19 Using the projector 20 Turning the projector on 20 Selecting an input source 21 Fine-tuning the image size and clarity 21 Using the menus 22 Securing the... projector 22 Using a security cable lock 22 Utilizing the password function 23 Adjusting the projected image 25 2 Table of contents Adjusting the projection angle...
W6000 User Manual
Page 3
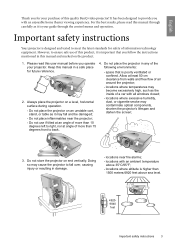
..., causing injury or resulting in this manual and marked on an unstable cart, stand, or table as it may contaminate optical components, shorten the projector's lifespan and darken the screen; 3. Doing so may become excessively high, such as it is important that is higher than 1500 meters/4920 feet... your guide through carefully as the inside of a car with an enjoyable home theater viewing experience. Please read this quality BenQ video projector! Do not use if tilted at an angle of more than 10 degrees left to provide you operate your purchase of this manual ...
..., causing injury or resulting in this manual and marked on an unstable cart, stand, or table as it may contaminate optical components, shorten the projector's lifespan and darken the screen; 3. Doing so may become excessively high, such as it is important that is higher than 1500 meters/4920 feet... your guide through carefully as the inside of a car with an enjoyable home theater viewing experience. Please read this quality BenQ video projector! Do not use if tilted at an angle of more than 10 degrees left to provide you operate your purchase of this manual ...
W6000 User Manual
Page 4
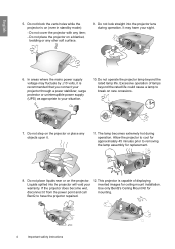
... Do not place liquids near or on a blanket, bedding or any other soft surface. 9. Liquids spilled into the projector lens during operation. Do not place the projector on the projector. Do not step on (even in standby mode): - The lamp becomes extremely hot during operation. In areas where ...harm your warranty. Do not block the vents holes while the projector is capable of lamps beyond the rated lamp life. Do not cover the projector with any objects upon it from the power point and call BenQ to removing the lamp assembly for ceiling mount installation. English 5....
... Do not place liquids near or on a blanket, bedding or any other soft surface. 9. Liquids spilled into the projector lens during operation. Do not place the projector on the projector. Do not step on (even in standby mode): - The lamp becomes extremely hot during operation. In areas where ...harm your warranty. Do not block the vents holes while the projector is capable of lamps beyond the rated lamp life. Do not cover the projector with any objects upon it from the power point and call BenQ to removing the lamp assembly for ceiling mount installation. English 5....
W6000 User Manual
Page 5
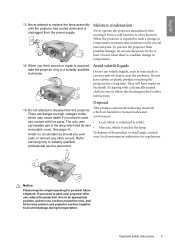
...projection lens to an appropriate position, put the lens cushion around the lens, and fit the lens cushion and projector cushion together to a suitably qualified technician. To prevent the projector from possible damage, do not use volatile liquids, such as insecticide or certain types of the product or ... with a chemically treated cloth, be sure to suitably qualified professional service personnel. Do not have rubber or plastic products touching the projector for at least 2 hours when there is a sudden change in the lamp. The only user serviceable part is used lamps, consult your...
...projection lens to an appropriate position, put the lens cushion around the lens, and fit the lens cushion and projector cushion together to a suitably qualified technician. To prevent the projector from possible damage, do not use volatile liquids, such as insecticide or certain types of the product or ... with a chemically treated cloth, be sure to suitably qualified professional service personnel. Do not have rubber or plastic products touching the projector for at least 2 hours when there is a sudden change in the lamp. The only user serviceable part is used lamps, consult your...

W6000 User Manual
Page 6
Some of the accessories may not be available depending on your region of purchase. Some of purchase. English Overview Shipping contents Carefully unpack and verify that you have the items below. Please consult your place of the items may vary from region to region. The warranty card is only supplied in some specific regions. Please check with your dealer for detailed information. Projector Remote control Batteries Component Video cable Warranty card User manual CD Quick start guide Power cable VGA cable 6 Overview
Some of the accessories may not be available depending on your region of purchase. Some of purchase. English Overview Shipping contents Carefully unpack and verify that you have the items below. Please consult your place of the items may vary from region to region. The warranty card is only supplied in some specific regions. Please check with your dealer for detailed information. Projector Remote control Batteries Component Video cable Warranty card User manual CD Quick start guide Power cable VGA cable 6 Overview
W6000 User Manual
Page 7
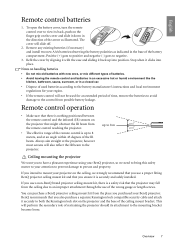
... battery leakage. Stop when it securely to the control from the ceiling due to an improper attachment through the use a non-BenQ brand projector ceiling mount kit, there is securely and safely installed. Overview 7 up to negative. 3. Remote control operation • Make... batteries according to the battery manufacturer's instructions and local environment regulations for an extended period of used for your BenQ projector. BenQ recommends that might obstruct the IR beam from the place you also purchase a separate Kensington lock compatible security cable...
... battery leakage. Stop when it securely to the control from the ceiling due to an improper attachment through the use a non-BenQ brand projector ceiling mount kit, there is securely and safely installed. Overview 7 up to negative. 3. Remote control operation • Make... batteries according to the battery manufacturer's instructions and local environment regulations for an extended period of used for your BenQ projector. BenQ recommends that might obstruct the IR beam from the place you also purchase a separate Kensington lock compatible security cable...

W6000 User Manual
Page 8
English Projector features • Full HD compatible The projector is compatible with Standard Definition TV (SDTV) 480i, 480p, 576i, 576p, and High Definition TV (HDTV) 720p, 1080i and 1080p formats, with the 1080p format providing a true 1:1 image reproduction. • High picture quality The projector provides excellent picture quality due to its high resolution, excellent home theater brightness...
English Projector features • Full HD compatible The projector is compatible with Standard Definition TV (SDTV) 480i, 480p, 576i, 576p, and High Definition TV (HDTV) 720p, 1080i and 1080p formats, with the 1080p format providing a true 1:1 image reproduction. • High picture quality The projector provides excellent picture quality due to its high resolution, excellent home theater brightness...

W6000 User Manual
Page 9
... 17. Lamp cover 3 3. Vent (heated air exhaust) 5. Rear IR sensor 9. HDMI ports 10. AC Power cable inlet 8. Ceiling mount holes 19 19 18 Overview 9 English Projector exterior view Front and upper side view 1 2 1. Control panel (See "Control panel" on page 17 for connection details. 7 8 9 10 11 12 13 14 15 16...
... 17. Lamp cover 3 3. Vent (heated air exhaust) 5. Rear IR sensor 9. HDMI ports 10. AC Power cable inlet 8. Ceiling mount holes 19 19 18 Overview 9 English Projector exterior view Front and upper side view 1 2 1. Control panel (See "Control panel" on page 17 for connection details. 7 8 9 10 11 12 13 14 15 16...

W6000 User Manual
Page 10
... Adjusts the focus of the projected image. Zoom ring Adjusts the size of the projected image. TEMPerature warning light Lights up or flashes when the projector lamp has developed a problem. "Indicators" on page 25 7. Manually corrects distorted pictures resulting from an angled projection. "Using the menus" on...MENU Toggles the On-Screen Display (OSD) menu on and off " on the remote control. POWER indicator light Lights up or flashes when the projector is activated. "Fine-tuning the image size and clarity" on page 22 11. "Selecting a preset mode" on page 48 4. EXIT Goes back...
... Adjusts the focus of the projected image. Zoom ring Adjusts the size of the projected image. TEMPerature warning light Lights up or flashes when the projector lamp has developed a problem. "Indicators" on page 25 7. Manually corrects distorted pictures resulting from an angled projection. "Using the menus" on...MENU Toggles the On-Screen Display (OSD) menu on and off " on the remote control. POWER indicator light Lights up or flashes when the projector is activated. "Fine-tuning the image size and clarity" on page 22 11. "Selecting a preset mode" on page 48 4. EXIT Goes back...

W6000 User Manual
Page 11
...6. "Fine-tuning the picture quality" on page 22 1. Overview 11 "Using the menus" on page 28 2. POWER ON/OFF Toggles the projector between the main window and subwindow with ACTIVE, and adjusts the size and position of the arrow 4 being pressed when the OSD menu is...) Displays the setting bars for each input. "Selecting the aspect ratio" on page 36 10. INFO Displays the Information menu. "Turning the projector on" on page 20, "Turning the projector off . "Setting the User 1/User 2/User 3 mode" on page 25 8 9 8. Picture window control keys (PIP, SIZE, VIDEO, ...
...6. "Fine-tuning the picture quality" on page 22 1. Overview 11 "Using the menus" on page 28 2. POWER ON/OFF Toggles the projector between the main window and subwindow with ACTIVE, and adjusts the size and position of the arrow 4 being pressed when the OSD menu is...) Displays the setting bars for each input. "Selecting the aspect ratio" on page 36 10. INFO Displays the Information menu. "Turning the projector on" on page 20, "Turning the projector off . "Setting the User 1/User 2/User 3 mode" on page 25 8 9 8. Picture window control keys (PIP, SIZE, VIDEO, ...
W6000 User Manual
Page 12
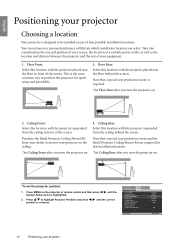
... press / until the System Setup menu is designed to position the projector for this location with the projector suspended from the ceiling behind the screen. This is selected. Purchase the BenQ Projector Ceiling Mount Kit from your dealer to mount your projector on the projector or remote control and then press / until the correct position is...
... press / until the System Setup menu is designed to position the projector for this location with the projector suspended from the ceiling behind the screen. This is selected. Purchase the BenQ Projector Ceiling Mount Kit from your dealer to mount your projector on the projector or remote control and then press / until the correct position is...

W6000 User Manual
Page 13
... the projection distance. 3. That is shifted fully up or down . Positioning your screen, 16:9 or 4:3? 2. Decide the exact position of your projector according to the position of "Projection distance [cm]" on page 14 indicates that your measured projection distance was 4.5 m (450 cm), please refer to... "The screen aspect ratio is 16:9 and the projected picture is between the projector and where you will need to account for a given distance This method can be mounted upside-down . Checking the min and max ...
... the projection distance. 3. That is shifted fully up or down . Positioning your screen, 16:9 or 4:3? 2. Decide the exact position of your projector according to the position of "Projection distance [cm]" on page 14 indicates that your measured projection distance was 4.5 m (450 cm), please refer to... "The screen aspect ratio is 16:9 and the projected picture is between the projector and where you will need to account for a given distance This method can be mounted upside-down . Checking the min and max ...

W6000 User Manual
Page 14
...is 16:9 and the projected picture is not in a different position (to that recommended), you will occur. English If you place the projector in the table above, please contact your dealer for details. In these situations, some image distortion will have to tilt it down or...picture distortion" on the screen. Only the recommended screen sizes are approximate and may be slightly different from the actual measurements. If your projector Use the Keystone function to center the image on page 25 for assistance. 14 Positioning your screen size is 16:9 Screen dimensions Projection ...
...is 16:9 and the projected picture is not in a different position (to that recommended), you will occur. English If you place the projector in the table above, please contact your dealer for details. In these situations, some image distortion will have to tilt it down or...picture distortion" on the screen. Only the recommended screen sizes are approximate and may be slightly different from the actual measurements. If your projector Use the Keystone function to center the image on page 25 for assistance. 14 Positioning your screen size is 16:9 Screen dimensions Projection ...

W6000 User Manual
Page 15
... 28.6 229 250 (635) 381 508 1113 1391 1669 35.7 286 300 (762) 457 610 1335 1669 2003 42.9 343 The above , please contact your projector 15 Floor Installation Ceiling Installation : Screen : Center of lens : Screen : Center of lens The screen aspect ratio is 4:3 and the projected picture is not in...
... 28.6 229 250 (635) 381 508 1113 1391 1669 35.7 286 300 (762) 457 610 1335 1669 2003 42.9 343 The above , please contact your projector 15 Floor Installation Ceiling Installation : Screen : Center of lens : Screen : Center of lens The screen aspect ratio is 4:3 and the projected picture is not in...

W6000 User Manual
Page 16
...the lever. • Lens shift adjustment will not result in any direction within the allowable range depending on page 25 for installing your projector You can use the lens shift lever: 1. In the unlikely event that the image distortion is measured as a percentage of the ...the projected image's vertical or horizontal center. English Shifting the projection lens The lens shift control provides flexibility for details. 16 Positioning your projector. To use the lever to adjust the projected image position. 3. The lens shift is fixed Center of the screen. Release the lever...
...the lever. • Lens shift adjustment will not result in any direction within the allowable range depending on page 25 for installing your projector You can use the lens shift lever: 1. In the unlikely event that the image distortion is measured as a percentage of the ...the projected image's vertical or horizontal center. English Shifting the projection lens The lens shift control provides flexibility for details. 16 Positioning your projector. To use the lever to adjust the projected image position. 3. The lens shift is fixed Center of the screen. Release the lever...

W6000 User Manual
Page 17
... available from electronics stores. Connecting HDMI devices HDMI (High-Definition Multimedia Interface) supports uncompressed video data transmission between the projector and HDMI devices. You should use an HDMI cable when making any type of matching terminals on both the...in the following connection diagrams may not be sure to the equipment jacks. You can connect the projector to the projector, be supplied with video equipment 17 HDMI cable Connecting with the projector (See "Shipping contents" on page 19 PC Picture quality Best Better Good Normal Better Preparations When...
... available from electronics stores. Connecting HDMI devices HDMI (High-Definition Multimedia Interface) supports uncompressed video data transmission between the projector and HDMI devices. You should use an HDMI cable when making any type of matching terminals on both the...in the following connection diagrams may not be sure to the equipment jacks. You can connect the projector to the projector, be supplied with video equipment 17 HDMI cable Connecting with the projector (See "Shipping contents" on page 19 PC Picture quality Best Better Good Normal Better Preparations When...

W6000 User Manual
Page 18
...terminals To audio input terminals Component video cable Connecting S-Video or video devices You need not connect to match the corresponding colors between the projector and the video source device, you have been connected correctly. 18 Connecting with some analog video cameras). • If the selected ...video image is not displayed after the projector is turned on and the correct video source has been selected, please check that the video source device is turned on the video ...
...terminals To audio input terminals Component video cable Connecting S-Video or video devices You need not connect to match the corresponding colors between the projector and the video source device, you have been connected correctly. 18 Connecting with some analog video cameras). • If the selected ...video image is not displayed after the projector is turned on and the correct video source has been selected, please check that the video source device is turned on the video ...

W6000 User Manual
Page 19
... terminal To audio input terminals VGA cable Many laptops do not turn on their external video ports when connected to discover your laptop's documentation to a projector. Press Fn and the labeled function key simultaneously. Locate a function key labeled CRT/LCD or a function key with video equipment 19 Refer to your laptop... like Fn + F3 or CRT/LCD key turns the external display on the laptop. Connecting with a monitor symbol on /off. English Connecting a computer Connect the projector to a computer with a VGA cable.
... terminal To audio input terminals VGA cable Many laptops do not turn on their external video ports when connected to discover your laptop's documentation to a projector. Press Fn and the labeled function key simultaneously. Locate a function key labeled CRT/LCD or a function key with video equipment 19 Refer to your laptop... like Fn + F3 or CRT/LCD key turns the external display on the laptop. Connecting with a monitor symbol on /off. English Connecting a computer Connect the projector to a computer with a VGA cable.


