
User Manual
Page 1
P Series LCD Monitor User Manual
P Series LCD Monitor User Manual

User Manual
Page 2
...H03VV-F or H05VV-F, 2G or 3G, 0.75mm2 must not be affected by BenQ Corporation. Clean the LCD monitor surface with respect to the contents hereof and specifically disclaims any person of BenQ Corporation. Your monitor should be used. All rights reserved. Avoid using any liquid, aerosol or ... factors. (Applicable for flicker-free models only.) Power Safety Please follow these safety instructions for best performance, and long life for your monitor. • The AC plug isolates this equipment from the AC supply. • The power supply cord serves as a power disconnect ...
...H03VV-F or H05VV-F, 2G or 3G, 0.75mm2 must not be affected by BenQ Corporation. Clean the LCD monitor surface with respect to the contents hereof and specifically disclaims any person of BenQ Corporation. Your monitor should be used. All rights reserved. Avoid using any liquid, aerosol or ... factors. (Applicable for flicker-free models only.) Power Safety Please follow these safety instructions for best performance, and long life for your monitor. • The AC plug isolates this equipment from the AC supply. • The power supply cord serves as a power disconnect ...

User Manual
Page 4
... How to assemble your monitor hardware 10 How to detach the stand and the base 15 Adjusting the monitor height ...17 Rotating the monitor ...18 Viewing angle adjustment ...19 Using the monitor wall mounting kit 20 Getting the most from your BenQ monitor 21 How to install the monitor on a new computer... 22 How to upgrade the monitor on an existing computer 23 ...
... How to assemble your monitor hardware 10 How to detach the stand and the base 15 Adjusting the monitor height ...17 Rotating the monitor ...18 Viewing angle adjustment ...19 Using the monitor wall mounting kit 20 Getting the most from your BenQ monitor 21 How to install the monitor on a new computer... 22 How to upgrade the monitor on an existing computer 23 ...

User Manual
Page 5
BenQ LCD Monitor Monitor Stand Monitor Base Quick Start Guide CD-ROM Power Cord (Picture may differ from product supplied for your region.) Video Cable: DP to mini DP Getting started When unpacking please check you have the following items. If any are missing or damaged, please contact the place of purchase for a replacement. Getting started 5
BenQ LCD Monitor Monitor Stand Monitor Base Quick Start Guide CD-ROM Power Cord (Picture may differ from product supplied for your region.) Video Cable: DP to mini DP Getting started When unpacking please check you have the following items. If any are missing or damaged, please contact the place of purchase for a replacement. Getting started 5

User Manual
Page 6
... for your product, you can purchase them separately. • Consider keeping the box and packaging in the future when you may subject to transport the monitor. Always keep the product and accessories out of reach of small children. 6 Getting started For cables that are not supplied with your region. And the...
... for your product, you can purchase them separately. • Consider keeping the box and packaging in the future when you may subject to transport the monitor. Always keep the product and accessories out of reach of small children. 6 Getting started For cables that are not supplied with your region. And the...
User Manual
Page 8
... @ 60 Hz. • Above diagram may vary depending on the model. • Picture may differ from product supplied for your region. 8 Getting to know your monitor
... @ 60 Hz. • Above diagram may vary depending on the model. • Picture may differ from product supplied for your region. 8 Getting to know your monitor

User Manual
Page 9
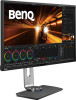
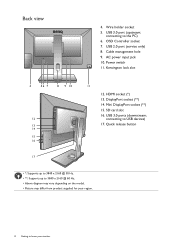
PC/Notebook SD card (*) USB peripherals (USB 3.0) *: Requires card reader driver for your reference only. For cables that are for Windows 8 (8.1) and Windows 10 operating systems. Install the driver from the supplied CD. Connection The following connection illustrations are not supplied with your product, you can purchase them separately. Getting to know your monitor 9 For detailed connection methods, see page 11 - 13.
PC/Notebook SD card (*) USB peripherals (USB 3.0) *: Requires card reader driver for your reference only. For cables that are for Windows 8 (8.1) and Windows 10 operating systems. Install the driver from the supplied CD. Connection The following connection illustrations are not supplied with your product, you can purchase them separately. Getting to know your monitor 9 For detailed connection methods, see page 11 - 13.

User Manual
Page 10
... crack the glass or damage the LCD substrate voiding your desk will scratch or damage the monitor surround and controls. Protect the monitor and screen by input signal. Sliding or scraping the monitor around on the desk for more information. 1. Please be careful to prevent damage to the... "Preset display modes" section on an object like the monitor packaging bag on your warranty. Refer to the monitor. Placing the screen surface on the link "Adjusting the Screen Resolution" for padding. Do not plug-in or ...
... crack the glass or damage the LCD substrate voiding your desk will scratch or damage the monitor surround and controls. Protect the monitor and screen by input signal. Sliding or scraping the monitor around on the desk for more information. 1. Please be careful to prevent damage to the... "Preset display modes" section on an object like the monitor packaging bag on your warranty. Refer to the monitor. Placing the screen surface on the link "Adjusting the Screen Resolution" for padding. Do not plug-in or ...

User Manual
Page 11
... the stand counterclockwise to the HDMI port on the bottom of a digital output device. Tighten the thumbscrew on the monitor. How to the HDMI port of the monitor base as illustrated. Connect the PC video cable To Connect the HDMI Cable Connect the plug of the HDMI cable to ...they click and lock into place ( 2 ). Orient and align the stand arm with the monitor ( 1 ), push them back apart to pull them together until they have properly engaged. You should position the monitor and angle the screen to minimize unwanted reflections from other end of the cable to assemble ...
... the stand counterclockwise to the HDMI port on the bottom of a digital output device. Tighten the thumbscrew on the monitor. How to the HDMI port of the monitor base as illustrated. Connect the PC video cable To Connect the HDMI Cable Connect the plug of the HDMI cable to ...they click and lock into place ( 2 ). Orient and align the stand arm with the monitor ( 1 ), push them back apart to pull them together until they have properly engaged. You should position the monitor and angle the screen to minimize unwanted reflections from other end of the cable to assemble ...

User Manual
Page 12
... 30. To go to assemble your region. 3. To Connect the mini DP Cable Or Connect the plug of the mini DP cable to the monitor video socket. Connect the USB cable between the PC and the USB devices connected to the computer video socket. These downstream USB ports transmit data...the DP Cable Or Connect the plug of the DP cable to the monitor video socket. This upstream USB port transmits data between the PC and the monitor (via other USB ports (downstream) on the product supplied for your monitor hardware Connect USB devices. Connect the other end of the cable to 1.1,...
... 30. To go to assemble your region. 3. To Connect the mini DP Cable Or Connect the plug of the mini DP cable to the monitor video socket. Connect the USB cable between the PC and the USB devices connected to the computer video socket. These downstream USB ports transmit data...the DP Cable Or Connect the plug of the DP cable to the monitor video socket. This upstream USB port transmits data between the PC and the monitor (via other USB ports (downstream) on the product supplied for your monitor hardware Connect USB devices. Connect the other end of the cable to 1.1,...

User Manual
Page 13
...Windows 8 (8.1) and Windows 10 operating systems. Install the driver from the supplied CD. And place the OSD Controller on the rear of the monitor. For more information on OSD Controller, see OSD Controller on the card to a power outlet just yet. Requires card reader driver for OSD Controller... connection) on the rear of the monitor. Connect the power cable to another desired place as follows: •SD / SDHC / SDXC •MMC •Memory Stick / Memory Stick Pro...
...Windows 8 (8.1) and Windows 10 operating systems. Install the driver from the supplied CD. And place the OSD Controller on the rear of the monitor. For more information on OSD Controller, see OSD Controller on the card to a power outlet just yet. Requires card reader driver for OSD Controller... connection) on the rear of the monitor. Connect the power cable to another desired place as follows: •SD / SDHC / SDXC •MMC •Memory Stick / Memory Stick Pro...

User Manual
Page 14
...Switch the power switch next to the AC power input jack to assemble your monitor hardware 7. Turn on . And insert the cables one after one into ... Picture may differ from your region. Attach the wire holder to its socket on the power. Connect-to install the monitor software. To extend the service life of the product, we recommend that you use your computer's power management function.... 14 How to ON. Turn on the monitor by pressing the power button on page 21 to and turn it on the computer too, and follow...
...Switch the power switch next to the AC power input jack to assemble your monitor hardware 7. Turn on . And insert the cables one after one into ... Picture may differ from your region. Attach the wire holder to its socket on the power. Connect-to install the monitor software. To extend the service life of the product, we recommend that you use your computer's power management function.... 14 How to ON. Turn on the monitor by pressing the power button on page 21 to and turn it on the computer too, and follow...

User Manual
Page 15
...on your desk and placing a soft item like a stapler or a mouse will scratch or damage the monitor surround and controls. 2. Sliding or scraping the monitor around on the bottom of the monitor base. 2 1 1 2 How to assemble your desk will crack the glass or damage the LCD ...detach the stand and the base 1. Release the thumbscrew on your monitor hardware 15 Prepare the monitor and area. While pressing and holding the quick release button ( 1 ), detach the stand from the monitor ( 2 ). 3. How to the monitor. Turn off the computer before unplugging the power cable. Turn ...
...on your desk and placing a soft item like a stapler or a mouse will scratch or damage the monitor surround and controls. 2. Sliding or scraping the monitor around on the bottom of the monitor base. 2 1 1 2 How to assemble your desk will crack the glass or damage the LCD ...detach the stand and the base 1. Release the thumbscrew on your monitor hardware 15 Prepare the monitor and area. While pressing and holding the quick release button ( 1 ), detach the stand from the monitor ( 2 ). 3. How to the monitor. Turn off the computer before unplugging the power cable. Turn ...

User Manual
Page 16
And then detach the base from the stand. 16 How to assemble your monitor hardware Turn the stand counterclockwise until you cannot go further.
And then detach the base from the stand. 16 How to assemble your monitor hardware Turn the stand counterclockwise until you cannot go further.

User Manual
Page 17
...its minimum height. Keep children out of reach of the monitor, as ascending or descending monitor might cause personal injuries. Adjusting the monitor height To adjust the monitor height, hold both the left and the right sides of the monitor to lower the monitor or lift it up to the desired height. • ...Avoid placing hands on the upper or lower part of the height-adjustable stand or at the bottom of the monitor while performing this operation. • If the monitor has been rotated to portrait mode and height adjustment is desired, you should be noted that the wide screen will ...
...its minimum height. Keep children out of reach of the monitor, as ascending or descending monitor might cause personal injuries. Adjusting the monitor height To adjust the monitor height, hold both the left and the right sides of the monitor to lower the monitor or lift it up to the desired height. • ...Avoid placing hands on the upper or lower part of the height-adjustable stand or at the bottom of the monitor while performing this operation. • If the monitor has been rotated to portrait mode and height adjustment is desired, you should be noted that the wide screen will ...

User Manual
Page 18
... tilt it to rotate the display. You should also make sure there are no obstacles around the monitor and there is being rotated, do tilt and extend the monitor to the highest position before you start to the maximum extended position. Go to be rotated 90 degrees. b....portrait mode. 3. Select On. Right-click the desktop and select Screen resolution from landscape to adjust the screen orientation. Then tilt the monitor. Before rotating the monitor with a portrait viewing orientation, the display has to Display and Auto Pivot. a. Gently lift the display up and extend it . ...
... tilt it to rotate the display. You should also make sure there are no obstacles around the monitor and there is being rotated, do tilt and extend the monitor to the highest position before you start to the maximum extended position. Go to be rotated 90 degrees. b....portrait mode. 3. Select On. Right-click the desktop and select Screen resolution from landscape to adjust the screen orientation. Then tilt the monitor. Before rotating the monitor with a portrait viewing orientation, the display has to Display and Auto Pivot. a. Gently lift the display up and extend it . ...

User Manual
Page 19
Refer to assemble your monitor hardware 19 How to the product specifications for details. 4. Viewing angle adjustment You may position the screen to the desired viewing angle. Adjust the monitor to the desired angle with the monitor tilt, swivel, and height adjustment functions.
Refer to assemble your monitor hardware 19 How to the product specifications for details. 4. Viewing angle adjustment You may position the screen to the desired viewing angle. Adjust the monitor to the desired angle with the monitor tilt, swivel, and height adjustment functions.

User Manual
Page 20
... of a magnetic-head screwdriver is recommended to avoid of losing the screws. Consult a professional technician or BenQ service for weight information. •Turn off the monitor and the power before disconnecting the cables from the LCD monitor. 1. Use a cross-pointed screwdriver to release the screws on page 15. 2. In case you purchased to...
... of a magnetic-head screwdriver is recommended to avoid of losing the screws. Consult a professional technician or BenQ service for weight information. •Turn off the monitor and the power before disconnecting the cables from the LCD monitor. 1. Use a cross-pointed screwdriver to release the screws on page 15. 2. In case you purchased to...

User Manual
Page 21
... Administrator or as provided on your computer (after connecting the monitor to select a monitor model. At that point, click the Have Disk button, insert the BenQ LCD Monitor CD-ROM and select the appropriate monitor model. Further details and step-by-step instructions for either ... on the BenQ LCD Monitor CD-ROM. Getting the most from your BenQ monitor To gain the most from your BenQ monitor 21 These circumstances relate to install the monitor driver software. Getting the most benefit from your new BenQ LCD monitor, you should install the custom BenQ LCD Monitor driver software ...
... Administrator or as provided on your computer (after connecting the monitor to select a monitor model. At that point, click the Have Disk button, insert the BenQ LCD Monitor CD-ROM and select the appropriate monitor model. Further details and step-by-step instructions for either ... on the BenQ LCD Monitor CD-ROM. Getting the most from your BenQ monitor To gain the most from your BenQ monitor 21 These circumstances relate to install the monitor driver software. Getting the most benefit from your new BenQ LCD monitor, you should install the custom BenQ LCD Monitor driver software ...
User Manual
Page 22
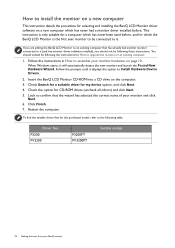
... automatically detect the new monitor and launch the Found New Hardware Wizard. Restart the computer. If you should instead be following table. Insert the BenQ LCD Monitor CD-ROM into a CD drive on the computer. 3. Driver files P3200 PV3200 P3200PT PV3200PT Suitable models 22 Getting ...the most from your monitor hardware on page 10. You should not be following these instructions...
... automatically detect the new monitor and launch the Found New Hardware Wizard. Restart the computer. If you should instead be following table. Insert the BenQ LCD Monitor CD-ROM into a CD drive on the computer. 3. Driver files P3200 PV3200 P3200PT PV3200PT Suitable models 22 Getting ...the most from your monitor hardware on page 10. You should not be following these instructions...


