US One Year LCD Monitor Warranty
Page 1
... in order to repair the Product, or replace the Product with a brand new replacement. BenQ LCD Monitor Standard Limited Warranty: Subject to the exclusions set forth below, BenQ America Corp. ("BenQ") warrants the BenQ LCD Monitor ("Product"), you have a separate warranty policy) parts and labor only (No ... the DOA unit with a new or reconditioned Product of the original warranty period specified above. BENQ AMERICA CORP. BenQ will pay shipping freight to the terms and conditions set forth below: • One (1) year from defects in materials or workmanship under normal consumer ...
... in order to repair the Product, or replace the Product with a brand new replacement. BenQ LCD Monitor Standard Limited Warranty: Subject to the exclusions set forth below, BenQ America Corp. ("BenQ") warrants the BenQ LCD Monitor ("Product"), you have a separate warranty policy) parts and labor only (No ... the DOA unit with a new or reconditioned Product of the original warranty period specified above. BENQ AMERICA CORP. BenQ will pay shipping freight to the terms and conditions set forth below: • One (1) year from defects in materials or workmanship under normal consumer ...

US One Year LCD Monitor Warranty
Page 3
Other Limitations EXCEPT FOR THE WARRANTIES SET FORTH HEREIN, BenQ DISCLAIMS ALL OTHER WARRANTIES, EXPRESSED OR IMPLIED OR STATUTORY, INCLUDING BUT NOT LIMITED TO THE IMPLIED WARRANTIES OF MERCHANTABILITY OR FITNESS FOR A PARTICULAR PURPOSE. IN NO EVENT SHALL BenQ BE LIABLE FOR ANY INDIRECT, INCIDENTAL, ... APPLICABLE, UNDER THE WARRANTY SERVICES DESCRIBED HEREIN IS YOUR SOLE AND EXCLUSIVE REMEDY WITH RESPECT TO ANY BREACH OF THE BenQ LIMITED WARRANTY SET FORTH HEREIN. All prices, products, terms and conditions are advised to consult applicable state and provincial/local laws for damage...
Other Limitations EXCEPT FOR THE WARRANTIES SET FORTH HEREIN, BenQ DISCLAIMS ALL OTHER WARRANTIES, EXPRESSED OR IMPLIED OR STATUTORY, INCLUDING BUT NOT LIMITED TO THE IMPLIED WARRANTIES OF MERCHANTABILITY OR FITNESS FOR A PARTICULAR PURPOSE. IN NO EVENT SHALL BenQ BE LIABLE FOR ANY INDIRECT, INCIDENTAL, ... APPLICABLE, UNDER THE WARRANTY SERVICES DESCRIBED HEREIN IS YOUR SOLE AND EXCLUSIVE REMEDY WITH RESPECT TO ANY BREACH OF THE BenQ LIMITED WARRANTY SET FORTH HEREIN. All prices, products, terms and conditions are advised to consult applicable state and provincial/local laws for damage...
User Manual
Page 7
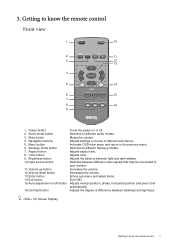
....Volume down button 13.Enter button 14.Exit button 15.Auto adjustment on/off button 16.Contrast button Turns the power on or off. Adjusts settings or moves to different Senseye modes. Color button 9. Switches to different sub menus. Adjusts aspect ratio. Adjusts the balance between light and dark shades. OSD...
....Volume down button 13.Enter button 14.Exit button 15.Auto adjustment on/off button 16.Contrast button Turns the power on or off. Adjusts settings or moves to different Senseye modes. Color button 9. Switches to different sub menus. Adjusts aspect ratio. Adjusts the balance between light and dark shades. OSD...
User Manual
Page 15
...which version of the Administrators group in order to install the monitor driver software. The circumstances under which has security access requirements, network policy settings may prevent you from installing software on your Windows computer, you require a User Name and Password to login to upgrade the monitor on... an existing computer on the BenQ LCD Monitor CD-ROM. If you must be logged on as an Administrator or as provided on page 17. Furthermore, if your computer ...
...which version of the Administrators group in order to install the monitor driver software. The circumstances under which has security access requirements, network policy settings may prevent you from installing software on your Windows computer, you require a User Name and Password to login to upgrade the monitor on... an existing computer on the BenQ LCD Monitor CD-ROM. If you must be logged on as an Administrator or as provided on page 17. Furthermore, if your computer ...
User Manual
Page 19
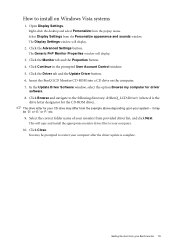
...the driver update is the drive letter designator for driver software. 8. The Generic PnP Monitor Properties window will display. 2. Insert the BenQ LCD Monitor CD-ROM into a CD drive on Windows Vista systems 1. it may differ from the example above depending upon your ...name of your system - This will copy and install the appropriate monitor driver files to your BenQ monitor 19 You may be 'D:' or 'E:' or 'F:' etc. 9. Open Display Settings. Select Display Settings from provided driver list, and click Next. Right-click the desktop and select Personalize from your...
...the driver update is the drive letter designator for driver software. 8. The Generic PnP Monitor Properties window will display. 2. Insert the BenQ LCD Monitor CD-ROM into a CD drive on Windows Vista systems 1. it may differ from the example above depending upon your ...name of your system - This will copy and install the appropriate monitor driver files to your BenQ monitor 19 You may be 'D:' or 'E:' or 'F:' etc. 9. Open Display Settings. Select Display Settings from provided driver list, and click Next. Right-click the desktop and select Personalize from your...
User Manual
Page 20
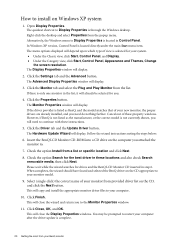
...monitor, the proper drivers are already installed, and you . 4. Alternatively, the Windows menu to . 7. Click the Settings tab and the Advanced button. However, if BenQ is not listed as BenQ, and the model matches that of these locations and also check Search removable media, then click Next. Follow the ... nothing further. Click the Driver tab and the Update Driver button. Click the Properties button. Check the option Search for drives and the BenQ LCD Monitor CD inserted in these property windows. Please wait while the wizard searches for the best driver in step 6. How to Display...
...monitor, the proper drivers are already installed, and you . 4. Alternatively, the Windows menu to . 7. Click the Settings tab and the Advanced button. However, if BenQ is not listed as BenQ, and the model matches that of these locations and also check Search removable media, then click Next. Follow the ... nothing further. Click the Driver tab and the Update Driver button. Click the Properties button. Check the option Search for drives and the BenQ LCD Monitor CD inserted in these property windows. Please wait while the wizard searches for the best driver in step 6. How to Display...
User Manual
Page 21
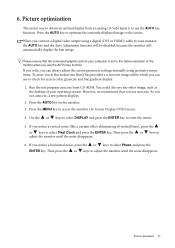
...monitor when you can use the AUTO key function. When you connect a digital video output using geometry menu items. To assist you in this endeavour, BenQ has provided a screen test image utility which you use to access the monitor On-Screen Display (OSD) menu. 4. Then press the or keys to... obtain an optimal display from CD-ROM. Please ensure that you can always adjust the screen geometric settings manually using a digital (DVI or HDMI) cable to enter the menu. 5. As you notice a horizontal noise, press the or keys to adjust the...
...monitor when you can use the AUTO key function. When you connect a digital video output using geometry menu items. To assist you in this endeavour, BenQ has provided a screen test image utility which you use to access the monitor On-Screen Display (OSD) menu. 4. Then press the or keys to... obtain an optimal display from CD-ROM. Please ensure that you can always adjust the screen geometric settings manually using a digital (DVI or HDMI) cable to enter the menu. 5. As you notice a horizontal noise, press the or keys to adjust the...

User Manual
Page 22
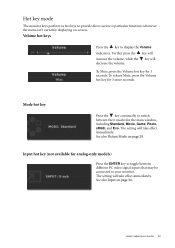
... items. This key is the hot key for Input. 6. The key is not currently displaying. Hot key displays will disappear after a few seconds of that setting, and will display a graduated scale for Volume. 4. /Mode key: For Down/Decrease adjustment. See Hot key mode on or off. The hot keys will only...
... items. This key is the hot key for Input. 6. The key is not currently displaying. Hot key displays will disappear after a few seconds of that setting, and will display a graduated scale for Volume. 4. /Mode key: For Down/Decrease adjustment. See Hot key mode on or off. The hot keys will only...
User Manual
Page 23
...) Press the ENTER key to toggle between the 6 modes for the main window, including Standard, Movie, Game, Photo, sRGB, and Eco. The setting will take effect immediately. The setting will take effect immediately. To release Mute, press the Volume hot key for 3 seconds. How to your monitor 23 Hot key mode The...
...) Press the ENTER key to toggle between the 6 modes for the main window, including Standard, Movie, Game, Photo, sRGB, and Eco. The setting will take effect immediately. The setting will take effect immediately. To release Mute, press the Volume hot key for 3 seconds. How to your monitor 23 Hot key mode The...

User Manual
Page 24
...; Picture Advanced menu on page 29 • Audio menu on page 32 • System menu on page 34 24 How to enter the Menu item settings. Picture Advanced 4. Picture 3. Main menu mode You can use the OSD (On Screen Display) menu to adjust all the...
...; Picture Advanced menu on page 29 • Audio menu on page 32 • System menu on page 34 24 How to enter the Menu item settings. Picture Advanced 4. Picture 3. Main menu mode You can use the OSD (On Screen Display) menu to adjust all the...
User Manual
Page 25
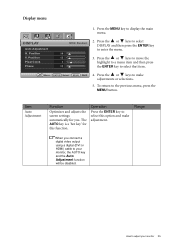
.... Range When you . Press the MENU key to select that item. Move ENTER Select MENU Exit 4. Item Auto Adjustment Function Optimizes and adjusts the screen settings automatically for this option and make adjustments or selections. 5. Display menu 1. How to your monitor 25 Position Pixel Clock Phase MODE: Standard 2. DISPLAY Auto Adjustment...
.... Range When you . Press the MENU key to select that item. Move ENTER Select MENU Exit 4. Item Auto Adjustment Function Optimizes and adjusts the screen settings automatically for this option and make adjustments or selections. 5. Display menu 1. How to your monitor 25 Position Pixel Clock Phase MODE: Standard 2. DISPLAY Auto Adjustment...

User Manual
Page 28
... a cool tint to the news print standard white color. Hue: Adjusts the degree of the image. Reset Color Resets the User Mode custom color settings to be altered to 100 The above options for Hue and Saturation are available only if the signal source is available only in the Standard.... Press ENTER to leave the Color menu. Press the or keys to the PC industry standard white color. Press the or keys to change the settings. • YES • NO Press MENU to enter the Color menu This Color menu is Component Video or HDMI. Color - Reddish Applies a warm tint...
... a cool tint to the news print standard white color. Hue: Adjusts the degree of the image. Reset Color Resets the User Mode custom color settings to be altered to 100 The above options for Hue and Saturation are available only if the signal source is available only in the Standard.... Press ENTER to leave the Color menu. Press the or keys to the PC industry standard white color. Press the or keys to change the settings. • YES • NO Press MENU to enter the Color menu This Color menu is Component Video or HDMI. Color - Reddish Applies a warm tint...

User Manual
Page 29
... Press the or keys to display the main menu. Picture Advanced menu 1. for viewing still images. • sRGB - Press the MENU key to change the settings. Move ENTER Select MENU Exit 4. for better color matching representation with low power consumption by providing minimum brightness for saving electricity with the peripheral devices...
... Press the or keys to display the main menu. Picture Advanced menu 1. for viewing still images. • sRGB - Press the MENU key to change the settings. Move ENTER Select MENU Exit 4. for better color matching representation with low power consumption by providing minimum brightness for saving electricity with the peripheral devices...

User Manual
Page 30
...8226; Full • Aspect • 1:1 30 How to adjust your image. • Full - Scales the input image to change the settings. Press the or keys to automatically detect the distribution of Standard mode, while the right window presents the images under Display Mode will fill ...the screen vertically. • 1:1 - The function is to change the settings. This feature is displayed without geometric distortion. • Overscan -Slightly enlarges the input image. The options under the specified mode. Use ...
...8226; Full • Aspect • 1:1 30 How to adjust your image. • Full - Scales the input image to change the settings. Press the or keys to automatically detect the distribution of Standard mode, while the right window presents the images under Display Mode will fill ...the screen vertically. • 1:1 - The function is to change the settings. This feature is displayed without geometric distortion. • Overscan -Slightly enlarges the input image. The options under the specified mode. Use ...

User Manual
Page 31
Select an option that matches the RGB range setting on the connected HDMI device. Press the or keys to change the settings. • RGB (0 ~ 255) • RGB (16 ~ 235) How to select this option. Press the ENTER key to adjust your monitor 31 HDMI RGB PC Range (available only when HDMI input is in use) Determines the range of color scales.
Select an option that matches the RGB range setting on the connected HDMI device. Press the or keys to change the settings. • RGB (0 ~ 255) • RGB (16 ~ 235) How to select this option. Press the ENTER key to adjust your monitor 31 HDMI RGB PC Range (available only when HDMI input is in use) Determines the range of color scales.

User Manual
Page 32
... or selections. 5. Press the or keys to display the main menu. Volume Mute Audio Advanced (available when the Audio Mode is set to change the settings. Press the or keys to Standard) Audio Select Adjusts the audio volume. Press the or keys to adjust your monitor Range •...the MENU button. To return to select that item. 4. Operation Press the or keys to decrease the volume. press the key to change the settings. Audio menu AUDIO Audio Mode Volume Mute Audio Advanced Audio Select EmbracingSound 1. MODE: Standard Standard 10 OFF Auto Detect ON Move MENU Back 2....
... or selections. 5. Press the or keys to display the main menu. Volume Mute Audio Advanced (available when the Audio Mode is set to change the settings. Press the or keys to Standard) Audio Select Adjusts the audio volume. Press the or keys to adjust your monitor Range •...the MENU button. To return to select that item. 4. Operation Press the or keys to decrease the volume. press the key to change the settings. Audio menu AUDIO Audio Mode Volume Mute Audio Advanced Audio Select EmbracingSound 1. MODE: Standard Standard 10 OFF Auto Detect ON Move MENU Back 2....

User Manual
Page 33
The EmbracingSound® technology enhances the sounds output from the monitor. Press the or keys to change the settings. • ON • OFF (both Audio Mode and Audio Advanced menus will be disabled) How to adjust your monitor 33 EmbracingSound Turns EmbracingSound® on or off.
The EmbracingSound® technology enhances the sounds output from the monitor. Press the or keys to change the settings. • ON • OFF (both Audio Mode and Audio Advanced menus will be disabled) How to adjust your monitor 33 EmbracingSound Turns EmbracingSound® on or off.
User Manual
Page 34
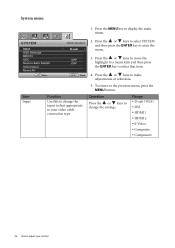
SYSTEM Input OSD Settings DDC/CI CEC Source Auto Switch Information Reset All Move MODE: Standard D-sub 2. Press the or keys to select SYSTEM and then press the ENTER ...; Component 34 How to make adjustments or selections. 5. System menu 1. Press the MENU key to your monitor Item Input Function Use this to change the settings. MENU Back 4. Operation Press the or keys to select that appropriate to display the main menu. Press the or keys to move the OFF highlight...
SYSTEM Input OSD Settings DDC/CI CEC Source Auto Switch Information Reset All Move MODE: Standard D-sub 2. Press the or keys to select SYSTEM and then press the ENTER ...; Component 34 How to make adjustments or selections. 5. System menu 1. Press the MENU key to your monitor Item Input Function Use this to change the settings. MENU Back 4. Operation Press the or keys to select that appropriate to display the main menu. Press the or keys to move the OFF highlight...

User Manual
Page 35
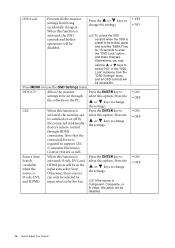
... 100 • 5 Sec. • 10 Sec. • 15 Sec. • 20 Sec. • 25 Sec. • 30 Sec. Press the or keys to change the settings. • English • French • German • Italian • Spanish • Polish • Japanese • Czech • Traditional Chinese • Hungarian • Simplified Chinese ...• Serbo-Croatian • Romanian • Dutch • Russian • Swedish • Portuguese 0 to 100 0 to change the settings. Press ENTER to adjust your region. H. How to enter the OSD...
... 100 • 5 Sec. • 10 Sec. • 15 Sec. • 20 Sec. • 25 Sec. • 30 Sec. Press the or keys to change the settings. • English • French • German • Italian • Spanish • Polish • Japanese • Czech • Traditional Chinese • Hungarian • Simplified Chinese ...• Serbo-Croatian • Romanian • Dutch • Russian • Swedish • Portuguese 0 to 100 0 to change the settings. Press ENTER to adjust your region. H. How to enter the OSD...
User Manual
Page 36
..., the monitor can only be selected by input select or by the connected multimedia device's remote control select this function is required to change the settings. D-sub, DVI, and HDMI) can be switched on the PC. Alternatively, you may use the or keys to select this option. DDC/CI* Allows ...the monitor Press the ENTER key to settings to leave the OSD Settings menu. through the software on or off by hot key. Otherwise, these sources Press the ENTER key to select "NO" in the input...
..., the monitor can only be selected by input select or by the connected multimedia device's remote control select this function is required to change the settings. D-sub, DVI, and HDMI) can be switched on the PC. Alternatively, you may use the or keys to select this option. DDC/CI* Allows ...the monitor Press the ENTER key to settings to leave the OSD Settings menu. through the software on or off by hot key. Otherwise, these sources Press the ENTER key to select "NO" in the input...

